


Dwight
-
Posts
5,258 -
Joined
-
Last visited
Content Type
Profiles
Forums
Events
Blogs
Gallery
Store
Everything posted by Dwight
-
One of the advertisers on here . . . Toledo sewing machine co . . . handles used machines. He may not give you a deal . . . but his machines are good . . . and a used price will save you some money. Buy the used one . . . learn how to use it . . . let it make you the cash for the new one . . . then sell the used one. May God bless, Dwight
-
Good looking leatherwork May God bless, Dwight
-
I had the same EXACT problem with saddle tan . . . darn near quit using it. Now I take a bristle brush . . . and coat the hair side with NFO . . . and make sure you ARE NOT using the compound . . . buy the good stuff. I dip the brush and start brushing . . . watching that every square inch gets a light wetting . . . it has to change color or I add oil to it until it does. I leave it for 24 hours . . . belts laying on their side . . . holsters laying on their back most of the time. After 24 hours . . . I get out the 9 by 16 baking dish (my dyeing pan) . . . and I put it in the dye just long enough to know for absolute certain that every piece of it has contacted the liquid dye. Pull it out . . . and set it up to dry. I quit having "serious" blotchy problems using the above process. There are still slight variations . . . but nothing like your holster. And I can't comment on your process because I've never tried it. I've also never dampened my leather . . . as that is water . . . my dye is oil based . . . and I never believed that oil and water will mix in a good way. YMMV May God bless, Dwight
-
 I've been messing with leather for 25+ years so far . . . NEVER have had any thing I made give me problems with Resolene . . . it goes on . . . stays on . . . and works. I was really . . . REALLY . . . mad at a belt I made one time using USMC black . . . I think I could have wire brushed that thing and black would still have rubbed off. Grabbed the Resolene . . . 2 light coats . . . END of problem. Try it . . . you have nothing to lose at this point . . . if you've never used it . . . make sure to dilute it . . . 50 / 50 Resolene and tap water. Stir well and put on with a bristle paint brush (I use the little cheap 1 inch wide throw away ones . . . rinse the resolene out of it . . . use it for months) . . . You kind of slop it on to start with . . . then give it the up/down . . . left / right . . . right angle . . . left angle . . . put enough on that serious brushing will cause a bit of foam to come up . . . then brush it until all the bubbles are busted . . . that is one coat. Give it 20 minutes to rest and add a second coat . . . and you should be fixed all and good. May God bless, Dwight
 -
Try Weaver Leather . . . they're a sponsor on here . . . May God bless, Dwight
-
You just might check with local veteran groups . . . there are people who help veterans with "problems" . . . they find leatherworking as a resource to help them work thru their "problems". If you are not a veteran . . . they may welcome you anyway as someone who brings another group of ideas that may spark a better interest than key fobs, wallets, and belts. Plus . . . you may find someone there with your same interests . . . the help could go both ways. Columbus Ohio Tandy has a really great one . . . and I know the instructor . . . he's a cool dude . . . and apparently it is really helping some of the guys. May God bless, Dwight
-
If I were making it for you . . . I would do "PARAMEDIC" in larger letters . . . Your job is outstanding . . . so your "title" should be too . . . unless of course the unit has certain limitations. Plus . . . just before you quit on the shield . . . go over the back with 2 or 3 or 4 more coats of 50 / 50 resolene and water . . . that valley between the shield and helmet will allow lots of water to hit the back of it . . . and you don't want water to go in the back and ruin the rest of it. Resolene in several coats on a product that does not flex . . . is the next thing to waterproofing . . . good stuff. May God bless, Dwight
-
Here in Ohio . . . our best bet for selling stuff is Facebook marketplace . . . I bought a truck . . . milling machine . . . I've seen whole shops on there . . . and I've sold a brass bed headboard . . . portable air tank . . . it's just good. I'd try there first . . . doesn't cost anything unless you want to pay for some special treatment of your ad . . . just make sure you put a good list of what you want to sell . . . if the information doesn't spark an interest . . . no sale. Do you have any machinery? You can list it here . . . or if you want . . . you might break it up into machinery . . . hand tools . . . leather (size & sq footage) . . . you might sell it all on here. May God bless, Dwight
-
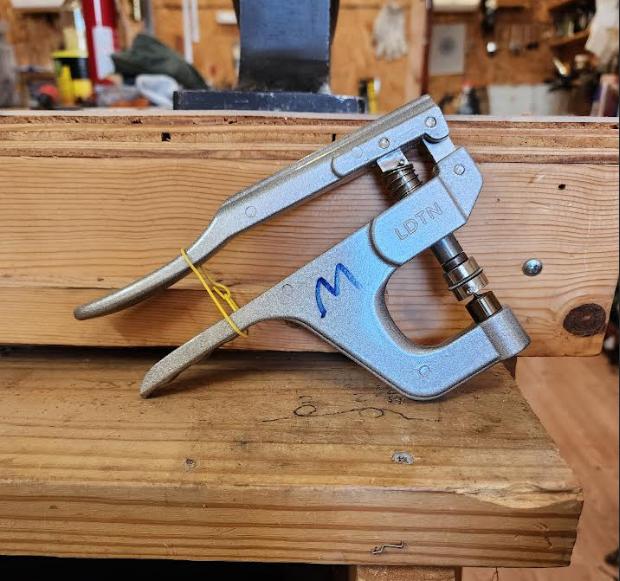
A couple of years ago . . . I was in an Amish store that sells material for sewing . . . kinda like an Amish Joann Fabric shop. They had this tool in there . . . and I knew exactly what it was as soon as I saw it . . . the tool itself was 35 bucks . . . and the set of dies was 18. Both sets fo male and female came in that kit. I went back later and bought another one just like it . . . so I didn't have to swap dies every time I wanted to do a snap. I have been just plain pleased with this tool . . . it is great . . . you have to be careful and follow directions . . . and if you do . . . great snaps every time. I believe I also saw them in Hobby Lobby . . . not certain. There is a cheaper version like this . . . sells for about 18 bucks . . . comes in a kit . . . Amish buy them for the snaps for the women's clothing . . . it is a smaller tool . . . and I don't know if it will do line 24 snaps . . . mine does every time. Nothing against Dot . . . but that's a bunch of money for a snap setter. May God bless, Dwight
-
Ohio Travel Bag is a name you may look at . . . I believe they are owned by Weaver Leather now May God bless, Dwight
-
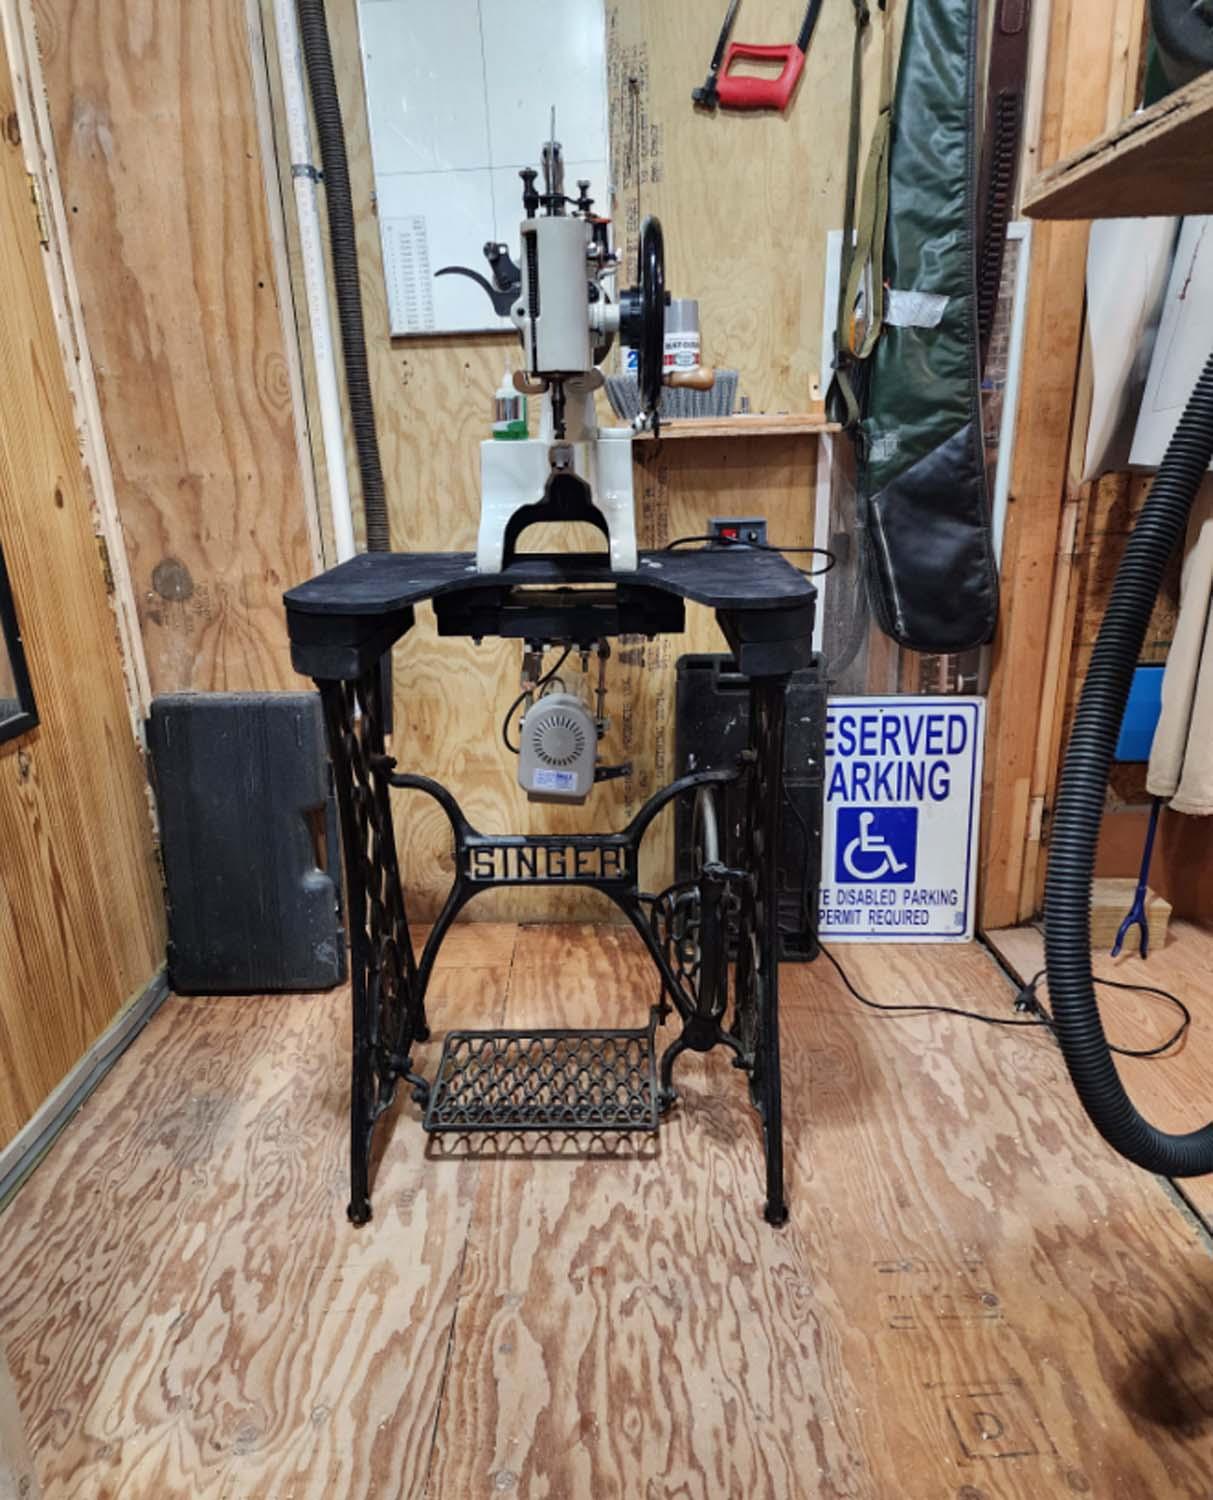
I bought 2 of em . . . asked the lady if it was a Singer . . . she said yes . . . loaded it up . . . got it home . . . then saw that it didn't have the "Singer" across the middle like the one in the picture. Had to go buy another one . . . checked it this time. Yep . . . they are one solid platform for sure. May God bless, Dwight
-
I use a smaller oval shaped punch . . . Never quite got the hang of it . . . minor miscues really look bad with it. Finally put it in a vise . . . made sure the punch was oriented straight away . . . Took a file and engraved a line down the middle of the top of the punch. No more problems . . . works great. May God bless, Dwight
-
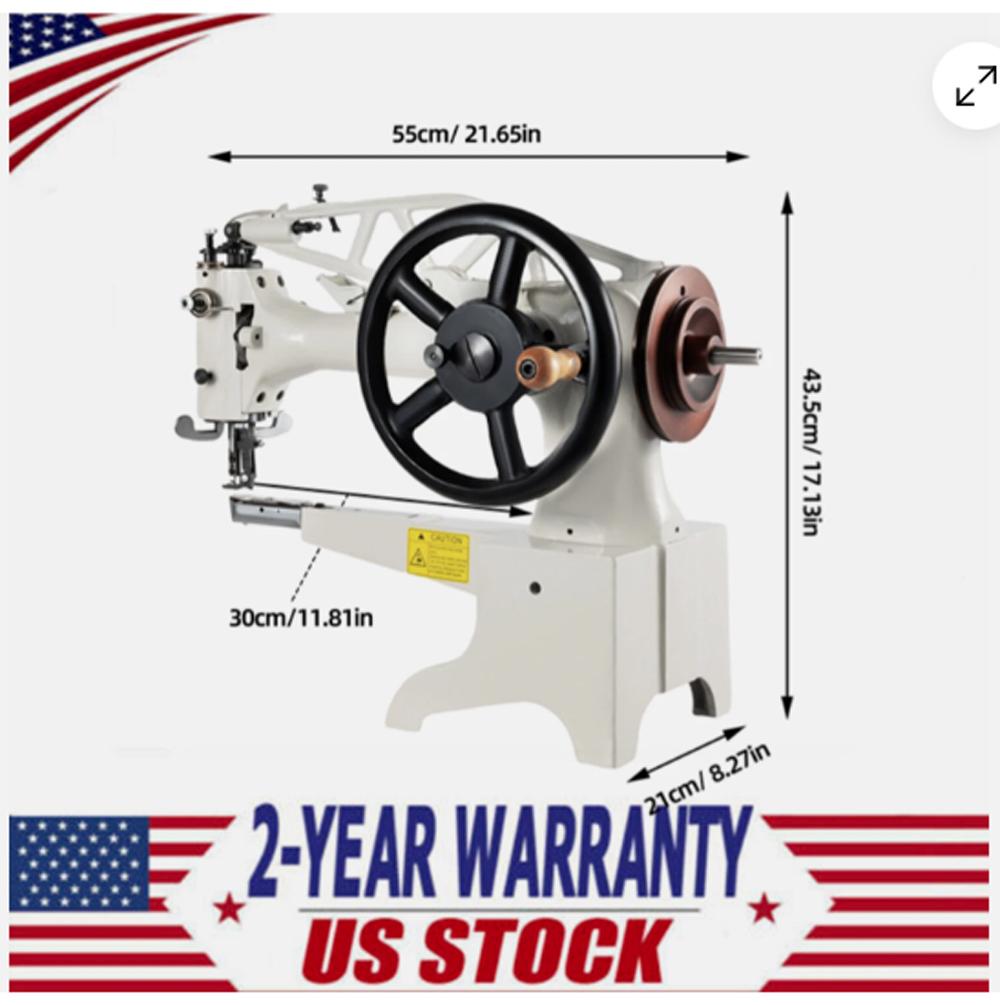
Excuse me for laughing TomE . . . but just for the heck of it . . . I went to the page on threading . . . the Chinese actually coppied the same images and everything in my book that came with it. I could not afford even a used Singer here . . . and this one was only 335 bucks. May God bless, Dwight
-
I have severe peripheral neuropathy in my feet and legs . . . (starting in my hands as well . . . ugh) . . . so I have to sit while using it. Coincidentally . . . saw a Singer frame for sale . . . had to laugh when I thought of it . . . Wound up buying two frames . . . will make a table for our church out of the other one. I sit on a folding stool when using it . . . and it is really comfortable. It is a Chinese copy of a Singer 29 something . . . it is one of the two with the smaller spool . . . about the size of a quarter. I was somewhat concerned about the thread . . . turns out that good old carpet thread works great in it . . . I'm also going to remodel it some day down the road . . . in the arms (solid 2 x 4's right now) . . . I'm going to make some long drawers . . . keep all the thread, bobbins, needles, etc. in them. May God bless, Dwight
-
I got my patcher . . . set up . . . and working . . . am very happy with it. May God bless, Dwight

-
-
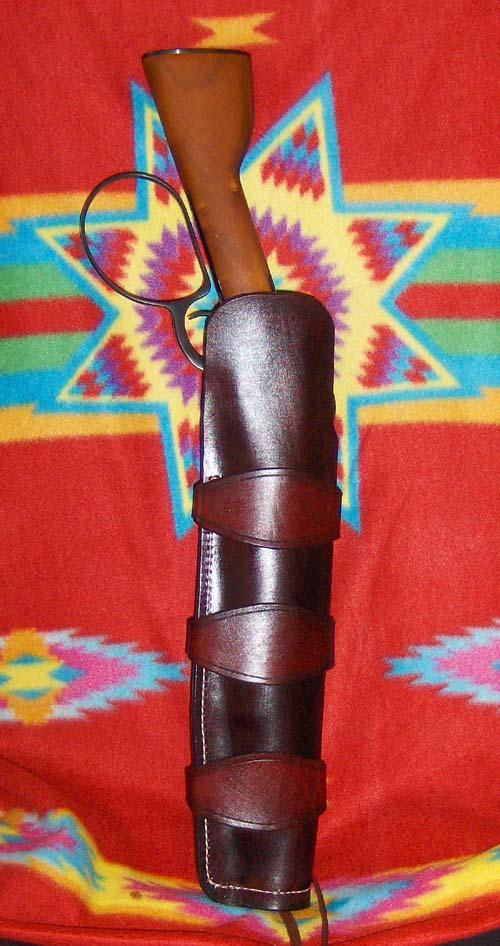
I made one a couple years back . . . he wanted the hammer and trigger fairly well covered He also wanted to wear it around his waist May God bless, Dwight

-
A single point sling has several advantages . . . the biggest of which allows you to pass the caretaking of the firearm to either arm effortlessly and quickly. Makes for entering or leaving a doorway very easy . . . as well as meandering thru bushes . . . or trails where overgrowth can get in the way. Allows one to reach down and pick up something on the ground or a table . . . without the possibility of stubbing the muzzle in the mud. I put a ring on the left side of my M1A just below the rear sight . . . and I love my single point sling when I'm carrying the rifle . . . the weight around the neck does not bother me as much as trying to carry it on a shoulder. it is also MUCH MUCH quicker to put into action than any other sling I've ever tried to use. May God bless, Dwight
-
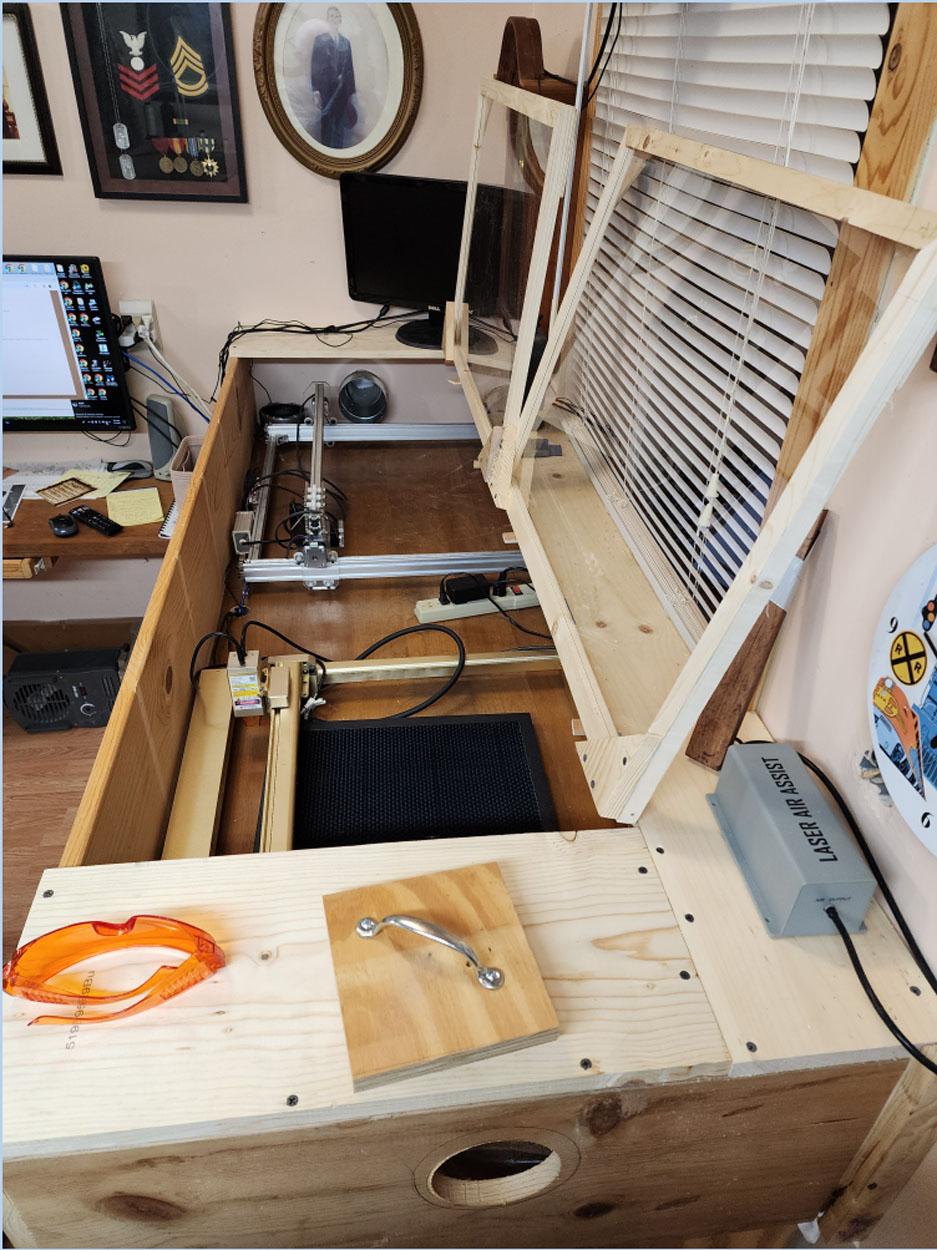
My first laser engraver (of 3) came from a wonderful friend on here whom I'll leave nameless so people don't bug him for one or other stuff. He offered me a 3000 Mw machine for 50 bucks plus shipping. I love that little rascal. I also have a 10 watt . . . and another one is somewhere in the "in transit" stage. I have no problems with the 10 watt . . . cutting anything leather I want . . . and I even cut 1/4 or 3/16 plywood with it . . . engrave the plywood and do all sorts of funky stuff. I use an air assist which makes the edges look like they were cut with a super duper sharp but hot knife. One of my favorite things to do with it is cut out left over leather scraps for key fobs. It cuts the fob . . . pops the holes for the rivet . . . in two passes. I could do it in one . . . but backing off on the power conserves the life of my laser head and makes for a slightly better looking product. If I'm adding a name or logo or something . . . I do it first . . . then do the cut out. Logo and cut out are in the 3 minute category from blank hunk of leather in my hand . . . to the finished product in my hand. My 2 present machines sit on a 10 dollar second hand door about 24 inches wide and 6 ft long . . . 1 by 12's form the sides . . . and some of the top . . . plexiglass windows cover each machine . . . a fan is on one end pulling out the fumes . . . to a dryer vent hole in the side of my shop that leads outside . . . at the other end of the box is a hole slightly larger than the fan hole. There is no stink in my shop. I don't have my phone or I'd pop the pictures up here. I only have this one of the setp showing it from the end where the hole is. It is covered by the square of plywood with the drawer handle . . . and you can see the two machines inside. Basic corrugated cardboard it a good medium for practice to check your settings. I'll then do a cut out of one of the important areas of the burn . . . run it thru the machine on a piece of scrap . . . adjust as needed . . . an run it. All in all . . . laser engraving is not as easy as falling off a cliff . . . but each person has to learn on their own. One machine . . . using one piece of leather . . . and one program . . . will produce different results than whatever part of that equation changes. May God bless, Dwight
-
Airbrushing produces a pretty appearance . . . and can be feathered to the extent that it is very very uniform in color. It can also be used to make a two or 3 or even more . . . toned layers of color . . . making some really unique and lovely color(s) or color patterns. BUT . . . airbrushing is only a light surface dying technique. Almost any scrape or beating will remove the dye . . . there is a thread on here about re-dying shoes . . . the scrape on his right shoe proves my point . . . as shoes (especially Oriental made) are very lightly air brushed with the appropriate cheap thin dye. I much prefer and seriously advocate dip dying if one wants one color . . . and wants the item to be able to stand up to at least some serious abuse. May God bless, Dwight
-
That would be very easy duplicated on a laser engraver . . . And using some oddball scrap leather . . . shouldn't take over 3 or 4 tries to get the first pattern done for it. I don't need any such cartridge holder . . . but if I did . . . I think I would like that pattern . . . especially if I were using something bottle necked like a .308 / 30-30 / 30-06 or so. Would be a good deal for a deer hunter . . . maybe even incorporated in a butt stock cheek weld riser. Shouldn't be too hard to do . . . even sew the thing on a big rig machine like a Cowboy 4500 May God bless, Dwight
-
I'm assuming this is a loop between the shoulders to hang the jacket on a hook With that in mind . . . the "loop" leather would be popped thru that sort of oval piece . . . and then thru probably 8 oz little circles. It would then be splayed into 4 pieces . . . each would be glued and then cemented to the little circle Then you super wet the whole thing and form that semi oval using regular tools and let it dry . . . when it was originally cut . . . I would have cut it probably 1/2 inch wide all around it . . . and once dry . . . trim to the exact size you would want. Glue and stitch . . . re-dampen the oval . . . touch up the molding . . . done It is actually a novel piece of work . . . would add a bit of bling to the garment . . . I would never use it . . . but it is a cool touch May God bless, Dwight
-
Finishing Coat
Dwight replied to Cactusman's topic in Dyes, Antiques, Stains, Glues, Waxes, Finishes and Conditioners.
If you were in the military . . . Resolene and dress shoes would be a gift from heaven. Super polish them guys . . . about 6 or 8 coats or resolene . . . you have a pair of inspection shoes that need only to be put back in their protective white socks . . . to await the next inspection. Didn't have it when I was in the Navy . . . had to do it the hard way. And I would probably bring the holster back to you within about a week. Neutral or any other shoe polish has no ability at all to protect the leather item. Rubbing up against a wall . . . gate . . . laying on the ground . . . the leather will look like it was found on the beach at Normandy. May God bless, Dwight -
Neatsfoot oil is meant to replace the oil that was latent in the original hide. It is very easy to get too much in there . . . kids usually do that with their baseball gloves . . . thinking sloppy and floppy will catch a ball better It don't. My oiling is done with a cheap 1 inch pig hair paint brush from Harbor freight. I put it on quickly . . . just enough to see it is wet . . . and quit. The "wet" stage disappears very quickly . . . My item will be just barely noticeably darker the next day. Usually only determined by putting a piece of the original leather up to the oiled one . . . squinting a bit . . . to find a difference . May God bless, Dwight
-
Do it however you want . . . but if my project requires a gusset . . . I lay down the item . . . trace the outside for the length of the gusset I want . . . then cut the outside of the gusset piece out of a hunk of leather. I then decide how wide a gusset I want . . . use a pair of dividers and mark that all around the inside of the piece I cut out I then cut out the gussett . . . glue it in place . . . sew / lace / stitch / as necessary. May God bless, Dwight