Dwight
-
Posts
5,240 -
Joined
-
Last visited
Content Type
Profiles
Forums
Events
Blogs
Gallery
Everything posted by Dwight
-
There are two holes thru the belt there by the buckle . . . and you could easily do like Rocky Aussie suggested . . . jut adding a piece there to move the buckle out farther in the front. By cutting it right behind the buckle tongue slot . . . you could round the corners a tad bit . . . sew the outside again to the liner . . . and you would not have to do any skiving or gluing if you just punched 2 holes in the inside and the outside pieces that would fold over and make the NEW buckle keeper. I'd not bat an eye at wearing it . . . that's for sure. It is one beautiful belt . . . don't let this length thing get the best of you. Finish up that piece holding the buckle with some little doo-dad stamping . . . make it look like you planned it . . . only you and the owner will know you didn't. May God bless, Dwight
-
I would cut off the section of the belt where the buckle attaches. I would then take a piece of probably 7 oz . . . make it long enough to attach on the belt where the end was cut . . . overlap it front and back (skive the belt to facilitate this) . . . stamp the new piece to augment the stamping of the belt . . . dye & finish the "new" piece . . . And I would not charge him for the extra. I do things like this for my customers . . . knowing we all make mistakes. It would become a custom belt such as no one around would have . . . May God bless, Dwight
-
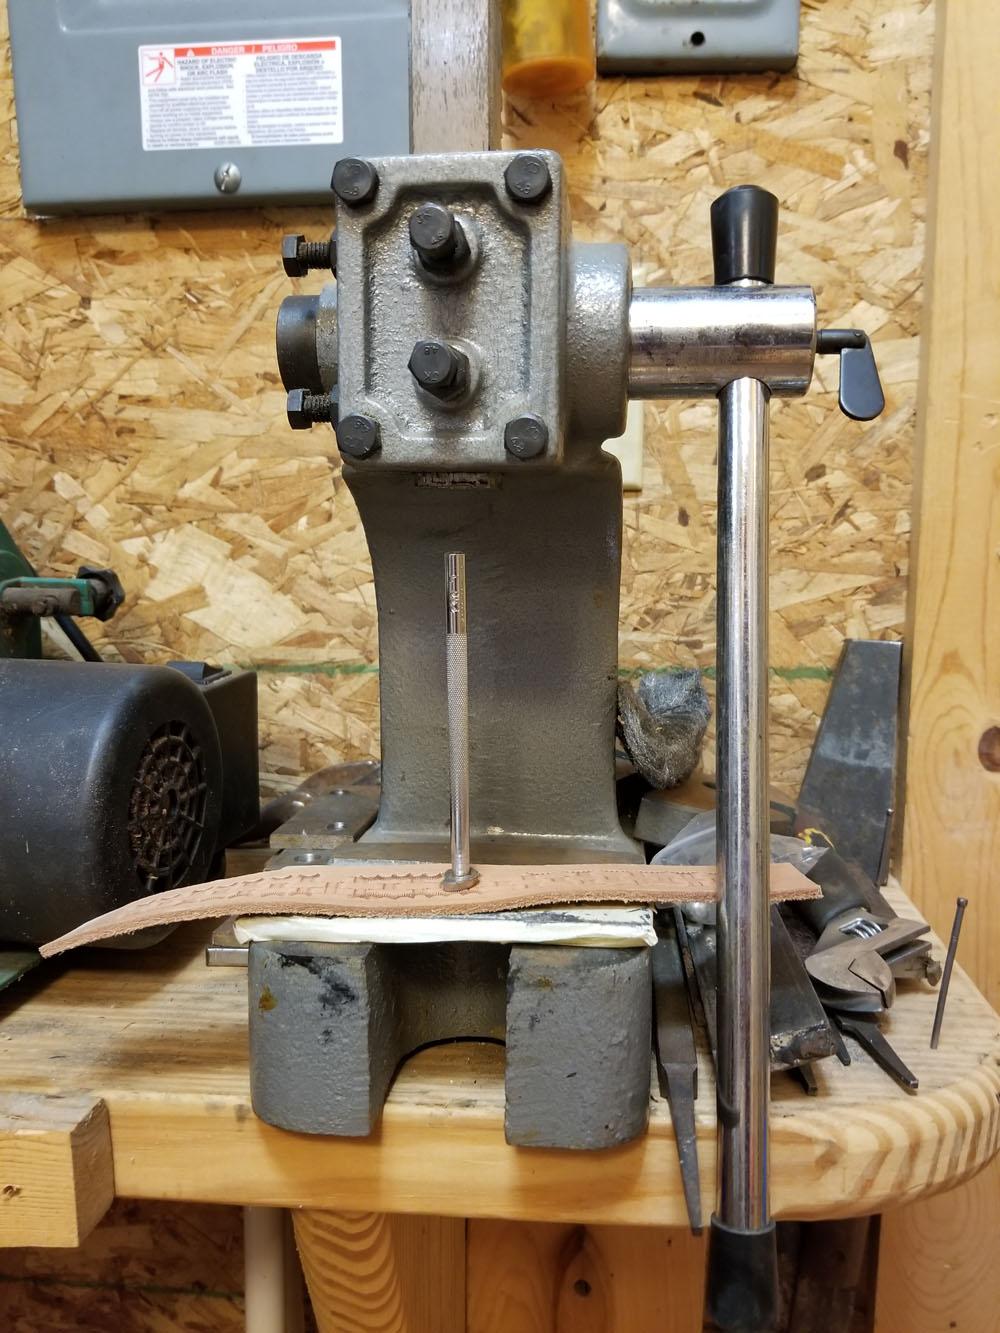
In the demo video . . . he was using a punch to make holes in a piece of aluminum that looked to be maybe an eighth of an inch thick. That takes a whole bunch more muscle than to just do some stamping in damp leather. I went out to my shop . . . couldn't recall if my press was 1 ton or half ton . . . it's a 1 ton from Harbor freight . . . There is a piece of 1/8 inch flat stock steel under the leather and a full size stamping tool standing. You can put the magnetic chuck on the end of the ram . . . and would probably want to cut an inch off each stamping tool . . . but it should work like a champ. The other thing you could do . . . remove the arm . . . take it to a machine shop . . . have them drill the arm for you . . . and put a set screw in the side of it that would be tightened with an allen wrench. Slip the stamping tool up in there . . . tighten with the allen wrench . . . stamp to your little heart's content. I might even put masking tape on the outside of my stamps . . . just push them up in there . . . friction would hold them. But then again . . . why don't you show us exactly what kind of stamping you want to do . . . it might make a difference on how you accomplish it. I use my ram to set any letters for initials or names and I use up to 1 inch letters . . . never have a problem. And if I wanted a magnetic tool holder . . . I'd put a flat magnet on the bottom of the ram . . . and slip a standard drill chuck up to it with the stamping tool . . . May God bless, Dwight

-
It depends on what kind of pressure you are looking for there . . . but if it is just stamping pressure for stamping leather . . . you should be able to use something like a 4 inch air cylinder . . . mount the magnetic chuck to it . . . build an angle iron box to sit it in . . . you could make it any height you want. Push the down air button . . . the stamp comes down . . . up button sends it back up . . . regulate the pressure to get the stamping depth you want. I use one I built to cut out leather key fobs . . . it's a bit hokey in one respect . . . but the end product is well worth my expense and effort I went to. May God bless, Dwight
-
If you want to press something . . . get the one ton arbor press from harbor freight for 65 bucks. It'll do your pressing . . . And if you want to get fancy with it . . . a decent mechanic can hook a hydraulic cylinder to the shaft . . . and then you can go to serious town with stamping and cutting. May God bless, Dwight
-
Hang in there Az . . . I'll guarantee you that virtually everyone has done that same type stuff . . . whether it was leather . . . an Excel spreadsheet . . . baking cookies . . . going to the store . . . Been there . . . done that . . . is the mantra for it . . . And yes . . . in case you were wondering . . . I also have a couple left handed holsters . . . May God bless, Dwight
-
I prefer the groover . . . have never had one complaint about the stitching . . . the leather pulling apart . . . or anything else . . . and I have products out there that have been used for 20 years. Wing dividers are "OK" if you have several parallel stitch lines . . . or for a decorative piece . . . But to say it is wrong . . . is no more true than saying Dodge trucks are wrong . . . because they are a Dodge. May God bless, Dwight
-
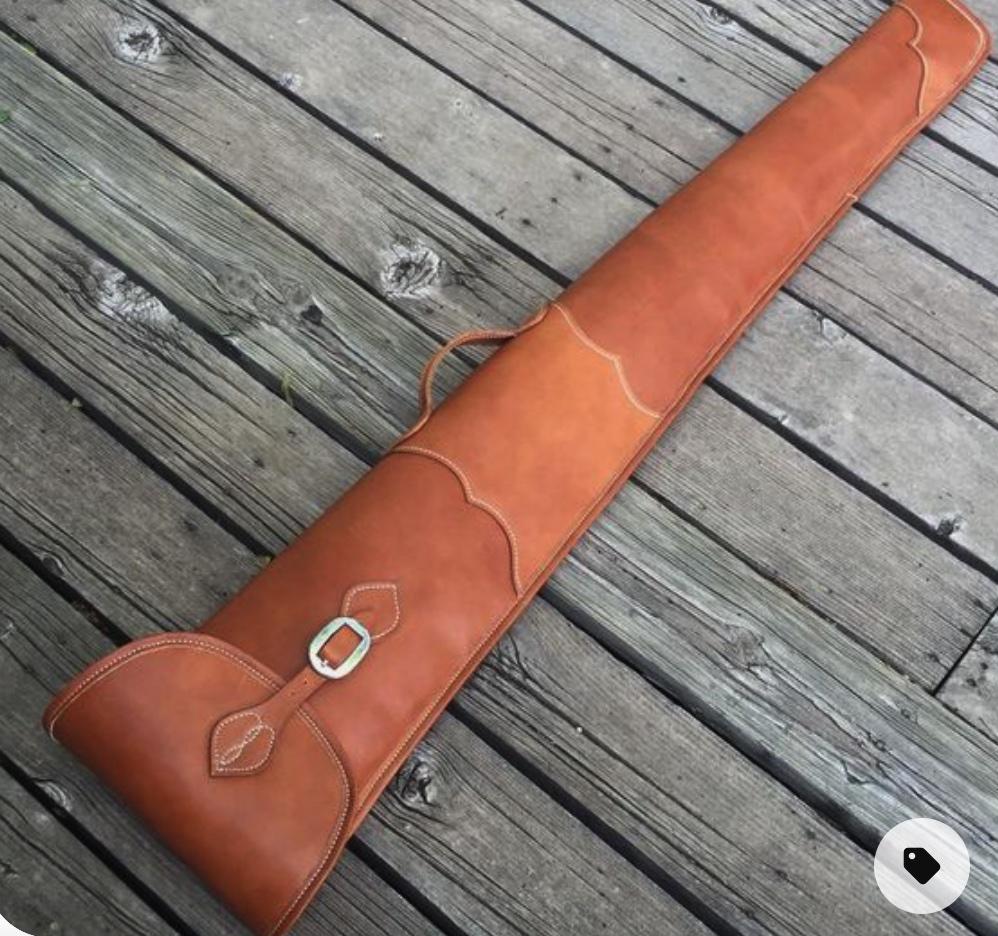
That's a good looking belt . . . way above my skill level. May God bless, Dwight
-
We were all beginners at one time . . . When I have a similar problem . . . (all of us do at one time or another) . . . I get out my hand sewing needles . . . pick the right one . . . pull out the bad thread . . . and go to town with my needle and thread. The way I do it is not saddle stitching . . . but will have a similar effect. Put a good figure eight knot in the thread . . . leaving a 2 or 3 inch tail on it. Sneak up between the pieces . . . somewhere in the middle of the bad sewing . . . start up or down . . . doesn't matter. Loop stitch it one direction until you get to the good sttches . . . double up on a couple of those stitches . . . then start back the other way . . . sewing down where you came up . . . and sewing up where you sewed down earlier . . . AND . . . as you loop stitch . . . DO NOT PULL IT TIGHT. Leave an inch or so in each loop . . . hanging out of the leather on each side of the piece. You'll fix this later . . . trust me. Continue the loop stitching all the way past where you started . . . so that you go into the good stitches . . . again 2 or 3 stitches . . . just to double them up and anchor them . . . and again . . . sewing back to your start place . . . going up where you sewed down coming out . . . and going down where you sewed up . . . When you get back to your start place . . . you then grab that 2 or 3 inch tail of the beginning stitch . . . and with the other hand . . . begin pulling the stitches tight . . . going the direction you first started sewing . . . continue pulling them tight . . . one at a time . . . until you finally have it all sewn . . . stitches tightened . . . and you have the tail in one hand and the thread in the other hand. Tie them into a good tight . . . square knot . . . look it up if you don't know how to do it. Then comes a kinda tricky part. Find two needles . . . longest ones you have . . . and cut those two threads hanging out so that they are about 2/3 as long as the needles. Thread the needles with those hanging out threads . . . and with a pair of pliers . . . push the back end of the needles up between the layers until they are pulled free of the thread. Pull out your needles . . . your job is done. Have fun . . . take it slow . . . get a pair of cheater reading glasses to help make sure you are hitting the holes right as you do not make new holes . . . use the old ones . . . get a couple of doughnuts . . . and a cup of coffee . . . reward yourself at each end of the stitching . . . and when you are done . . . have a piece of apple pie. May God bless, Dwight PS: Apple pie rewards always help make the work good . . . whether it was or not . . . lol
-
I have no doubt I could build one for far less than 200 bucks . . . but when you add the labor time to the materials . . . it gets pricey right quick. I could easily build one for myself . . . have done far more complicated machinery that that . . . but again . . . once the time is put in it . . . what did I save?? May God bless, Dwight
-
You need first to have the new wearer take off the belt they are currently wearing. Lay it down on the table . . . measure from the outside of the buckle to the hole they use the most. That is THEIR true waist size. Add 4 inches to that . . . and you now have the size you need to make the gunbelt into. One way is to simply cut out the extra from the center of the back . . . and then punch and lace it back together with lacing. Use leather lacing . . . not plastic. The other way is to take off the extra from the off side from the holster. Outline and re-do that end in the manner it was first created . . . you should not have much more than 8 inches of hand stitching . . . should be a couple hour's work at most. Either way . . . when it is done . . .the buckle when centered on the wearer will cause the holster to ride slightly behind the "normal" ride . . . or the buckle can be pulled around a bit to the side to line up the holster. Have fun . . . may God bless, Dwight
-

My first gunbelt
Dwight replied to Thescandall's topic in Gun Holsters, Rifle Slings and Knife Sheathes
Do you have a table like surface for yours?? My old machine was a Tippmann Boss . . . a great machine . . . but I had to make a flat table surface for it . . . otherwise my back stitches were not perfectly parallel to the front. AND . . . I did bust a few needles until I really caught on to using it . . . and the flat table attachment I made took that away for almost 100% Had to do the same thing with my Cowboy . . . but it came with an attachment I put on it that gives me basically a table for it. I'll add some to it . . . as I'll be doing some things that will be long and or wide . . . gunbelts just being one of them. May God bless, Dwight -
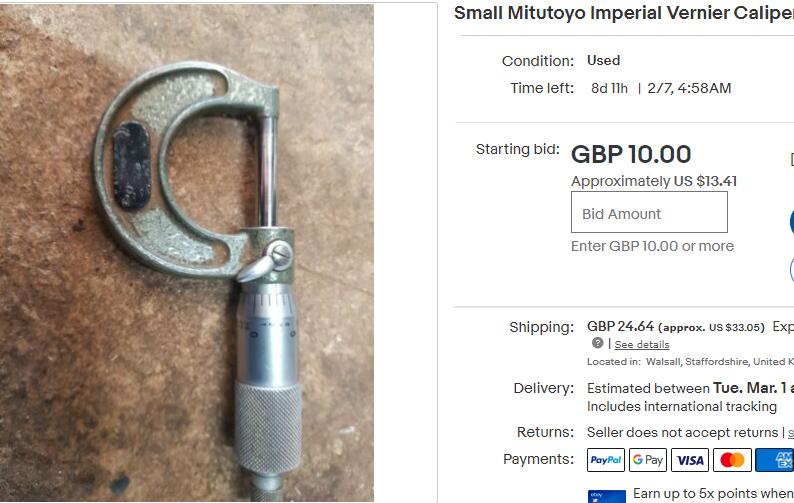
Well . . . if you really want one . . . you could just make a new face for the thing on a computer . . . very gently get the cover off. . . pry off the hand . . . put on a new face. It would be an evening's work . . . but the other choice would be to paste a printout on the back . . . 4 oz = 1.58 mm / 8 oz = 3.17 mm etc. Actually . . . I'd love to have that little MM dude . . . preferably in inches . . . but that would be OK that way. Too much leather is sold as "this" thickness . . . and it is often times just on the verge of a lower one or higher one . . . or meanders around in thickness all over the hide. I take my mechanical 6 inch caliper with me when I go to buy leather. May God bless, Dwight
-
My first gunbelt
Dwight replied to Thescandall's topic in Gun Holsters, Rifle Slings and Knife Sheathes
Looks like both of us got new machines . . . been wanting a Cowboy for wayyyyy too long . . . finally was actually given a gift . . . was able to use it . . . got a 4500. What brand is your machine? Looks like it does a great job . . . I took the liberty of turning your pic and enlarging it for the rest of the folks . . . great job . . . May God bless, Dwight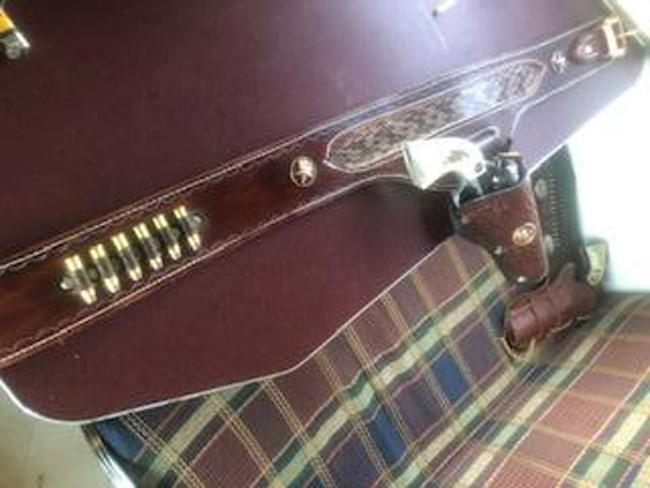
-
One like this will . . . May God bless, Dwight
-
Chest rig for "The Judge".
Dwight replied to Hags's topic in Gun Holsters, Rifle Slings and Knife Sheathes
Looks good my friend . . . I've made a couple of holsters for "Judges" . . . almost think I'd rather rassle an alligator or something. But it looks like you mastered it well. May God bless, Dwight -
If you are SOME KIND OF serious about sharp knives in the kitchen. Sharpen em with a stone . . . several really . . . getting finer as you go. When you get all you can there . . . go to a cotton polishing wheel . . . put some polishing compound on it . . . and polish them there knives. THAT's sharp . . . just watch your fingers. I use one on my pocket knife . . . and it works super. May God bless, Dwight
-
You may have gotten a dull blade . . . Tandy sells the blades for the ones they sell . . . they are cheap . . . might try that. The other thing to finish sharpening most any shop cutting tool . . . a cotton polishing wheel with polishing compound . . . just have to work to figure what angle to hold the blade. I can polish up my pocket knife and it'll do some serious cutting. Just need the wheel and some polishing compound. It'll also put a serious finish on most anything you cut with. May God bless, Dwight
-
Allright in my book . . . May God bless, Dwight
-
I like it . . . been using it for close to 20 years . . . I pretty much exclusively use their 346 May God bless, Dwight
-
Where I used to work . . . we used a lot of tints in our paint making process . . . as long as the drum was in the warehouse . . . it was in inventory . . . once it came out of the warehouse into the factory . . . the whole thing was wrote off at one time as expended. You could do the same thing . . . blue tag means this hide / piece / etc is still in inventory . . . once it is cut . . . gets a red tag . . . has been considered used up. I don't know the name of that inventory system off the top of my head . . . heard it bandied around years ago . . . don't recall. Your accountant should know the name . . . and should be helpful to set it up that way. May God bless, Dwight
-
TomE has the tool that would get my vote . . . May God bless, Dwight
-
About 60 years ago . . . I made a purse for a lady for her birthday . . . stamped and all. IIRC . . . the pattern was leaves, flowers, stems . . . etc. . . . that "Old Fashioned Stuff" I'm going to start (maybe) back into the custom . . . hand stamped . . . purse market . . . I'm looking for those older patterns . . . not at all thrilled with the skull and crossbones junk being done today . . . Any help would be greatly appreciated . . . including something I saw a number of years back . . . it was a "sort of" pattern pack . . . where you picked which piece you wanted and bent and twisted it to make your own total pattern . . . it was just a bunch of different pieces . . . you picked and chose which ones fit your needs for that job. Thanks . . . may God bless, Dwight


-
Leather steering wheel dye rubbing off on clothes
Dwight replied to CarOwnerDave's topic in Leatherwork Conversation
So strip it the heck off . . . make a new one . . . put it on . . . send pictures of the old one to the MFG corp headquarters . . . with a specific complaint naming the place you bought it . . . the salesman . . . the the geek who is giving you the problem about it. At least you will not have dye all over you . . . and you may just get it fixed right. Don't do that and all you will do is give yourself an ulcer and become a crybaby. May God bless, Dwight -
When using a vacuum bag to form a holster how many HP do you use?
Dwight replied to AzShooter's topic in How Do I Do That?
Yep . . . good old Weldwood contact cement is good for lots of stuff. I didn't know how it would work for that type of application . . . so I made the border about 2 inches wide . . . have never had a leak. Bag is 12 or 15 yrs old . . . or thereabouts. It also works pretty good if your shoe sole comes loose . . . if a piece breaks off your wife's counter top . . . it'll hold fabric together while you're trying to sew it if you are having trouble with it . . . probably used it for some other stuff I can't recall. I keep a can of it handy all the time. May God bless, Dwight