


RockyAussie
-
Posts
3,265 -
Joined
-
Last visited
Content Type
Profiles
Forums
Events
Blogs
Gallery
Store
Everything posted by RockyAussie
-

Cobra 4 presser foot leaving marks
RockyAussie replied to aaron8771's topic in Leather Sewing Machines
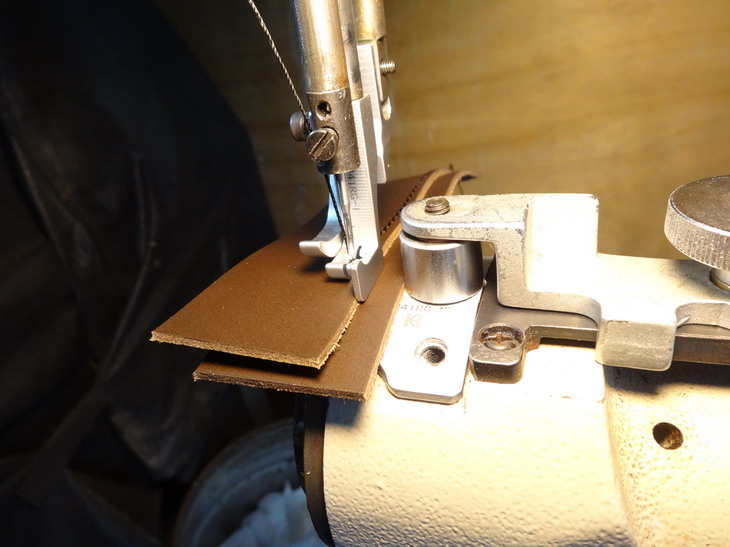
Is it possible to use the blanket foot set with the teeth ground down smooth on that job? I would hesitate before reducing the foot pressure spring too far as in my experience the small foot footprint is likely more the problem. On that sort of thickness you could run into the job lifting up with the needle if you reduce the pressure too much. Another alternative is to get a wider foot from kwokhing like in this pic of mine and grind the side bit off if you don't want that guide part of it. http://www.kwokhing.com/ It is right on the last page in their catalogue from memory. First pic shows small contact area of the standard feet 2nd pic shows the kwoking feet with about twice the amont of contact area The picture below shows most of the range but you can get a wider front foot for a bigger gap and that may be a better one to cut down. You may find some thing more about these feet in this post I did awhile ago. Brian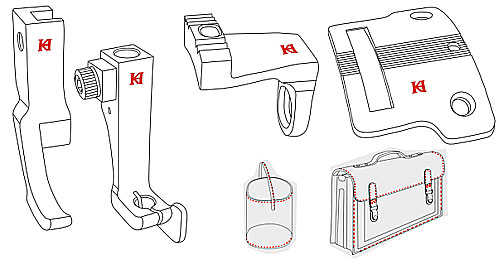

-
My take on the Dopp Kit
RockyAussie replied to YinTx's topic in Purses, Wallets, Belts and Miscellaneous Pocket Items
Very nice work there. I think you have done it well and in great time considering you hand stitched it. $150 would be a bargain for that sort of work and construction as a 1 off for sure. -
Used a band knife splitter for the first time today
RockyAussie replied to howlback's topic in Leather Machinery
I've been using a couple of band knife splitters for many years and I doubt I could do my business without at least one. Keep in mind that they can pay for themselves fairly quickly if you offer the splitting service to others as well. My main belt competitor in Australia I have been splitting their belt backing and cutting the strips as well for many years now and I think I get more profit from that than making my own belts. They get around 1000 strips every 2 or 3 months and that normally takes me a couple of week ends to get done. Something to think about. -
Is it a good choice? Seiko CH8B cylinder bed
RockyAussie replied to Ehgreen's topic in Leather Sewing Machines
I think those may be the Adler 69 type of which I have one here. They are pretty similar to the Pfaff 335 type. I prefer the smoothness of the Pfaff. I'll give you a call shortly. -
Is it a good choice? Seiko CH8B cylinder bed
RockyAussie replied to Ehgreen's topic in Leather Sewing Machines
That is correct I am not selling any machines but it could be worth coming to see the various machines like splitters and skivers and all sorts of sewing machines. I do see many people buy a less than useful machine for their needs when starting out and a good understanding of the type of machines that would be best for the product you want to produce can save a lot of money and frustration. Some pictures of products can help but to actually feel and discuss how they are made is a real worthwhile advantage. If you check out wildharryaustralia on instagram you can see some of the wide range of products we produce. I cant seem to put a link to it on here I'm sorry. Brian -
Is it a good choice? Seiko CH8B cylinder bed
RockyAussie replied to Ehgreen's topic in Leather Sewing Machines
Not sure where in QLD you are but I have a 441 type machine here as well as a stack of other probably more suitable size machines you are welcome to come and try out and see what they do if you want. I am near to Rockhampton. I suspect the size machine that would be more suitable for your needs would be in the 335 style but would not be sure without seeing some pictures of the type of stuff you want to make. 0.3-1.2cm leather is an extreme variation and I doubt you would often need to go that thick on the type of products you mention. -
19th century Hugo Werteim shoe patcher
RockyAussie replied to RichardPorley's topic in Leather Sewing Machines
Hugely Wertheim .......all those hours of beautiful restoration. Congratulations -
Patterning the old way when the CAD is just too hard
RockyAussie replied to RockyAussie's topic in How Do I Do That?
Good idea. I think we should start making a pair in a new post though. I will need to finish these bags I'm working on here first so give me a week to line up some stuff and we will get into it. Please advise me what tools and machinery you have available...lasting pliers etc. Nice looking lasts BTW.The scalloped out section on the wooden ones is strange to do that to a last but would have been done to give a metatarsal lift for one of them common foot problems. -
Do your thick and greasy stuff in multiple passes. I often just run the same setting but hold the article back so it is only doing half the depth on the first run. If it still slips you may need to sharpen the blade. On really bad stuff you can let it sharpen a bit as as you feed it through as long as your not doing large amounts for any length of time.
-
Patterning the old way when the CAD is just too hard
RockyAussie replied to RockyAussie's topic in How Do I Do That?
I;d love to do some croc holsters but I don't ever seem to attract them customers. I might have to find some time to get down to the rifle range and ....who knows!!! Hi Gigi, great to hear from you...especially as your saying all that nice stuff and all as well. I hope to see some of your fantastic work here soon... -
Patterning the old way when the CAD is just too hard
RockyAussie replied to RockyAussie's topic in How Do I Do That?
Hi Alex, I have in the past made many custom made shoes or more precisely shoes for problem feet. That is about 10% of the population unfortunately. Although I was pretty well equipped I was spending more time measuring feet and taking orders than the time it took to make them. I could not get any staff with any sort of experience be that I even advertised throughout Australia for nearly 3 months. Still got most of that machinery packed away but I found the leather work angle was far easier and affordable to train people and a lot of the same machinery is used. Anyway that,s all history ...What sort of shoes would you like to make? Post a picture here of the style of shoe and the lasts as well and I'll try and lead you through a pair. Fear of starting is always the biggest problem. -
I think that you will find that you have made a wise investment. Just ask here if you need any help.
-
I have a couple of skiving machines and the Fortuna one that looks the same as this one is my favorite. If the machine is working alright I would say that a price from $1000 to $1500 would be great but I would pay $2000 easily if it is in good condition. Note I do put a high value on the dust extraction part. You mention small leather goods and that often involves soft leathers that the dust extractor helps the leather to pull through without getting could on the feed roller. Check my you tube videos to see a little bit on this.
-
Patterning the old way when the CAD is just too hard
RockyAussie replied to RockyAussie's topic in How Do I Do That?
Thanks for the kind words Gene and don't you just get a bit cranky when like yesterday ya spend 2 hours searching for a little pattern piece to only find that it was where it should be all along? I'm still working on the 3 remaining croc bags taking generally 3 pics to get 1 that looks ok. Should be some new stuff to load soon now I hope. -
Where to find pins with custom logo with a rivet back closure?
RockyAussie replied to Frankzweekhorst's topic in Suppliers
I have had my own or customer logo ones made up before of a similar type of thing. As I am in Australia I doubt my contacts here would be much use to you but ....what I did is contact a badge making company and had them attach to the back a 5 or 7mm post as is used in a speedy rivet. This was soldered onto the back of the brass badge.It is important that they do not allow the solder to fill the speedy rivet post as this stops it from collapsing as it should when pressed into its receiving part. I have also had very high quality badges I designed made in Japan but are quite expensive there. http://www.metalhouse.co.jp/english/ Somewhere in their blog they show how that made a fitting I designed for Atelier Mason M . Hope that is of some help. Brian PS check their blog page first as it shows quite a few of the soldered on speedy rivet post now. -
Patterning the old way when the CAD is just too hard
RockyAussie replied to RockyAussie's topic in How Do I Do That?
Thank you all for the kind words and @billybopp I don't think selling leather work to leather workers is ever going to pay off but the thanks is always worth more to me. -
Patterning the old way when the CAD is just too hard
RockyAussie replied to RockyAussie's topic in How Do I Do That?
Sorry my friend but they often get hacked up so I can remember what thickness of skive and splitting I did cause I just am not be smart enough to write them down as I go.Probably because I'd never remember where I wrote it I even where that book would be. If you want a croc one I'll do it for you for about $2600 au. That's about $2000 US I guess. -
Patterning the old way when the CAD is just too hard
RockyAussie replied to RockyAussie's topic in How Do I Do That?
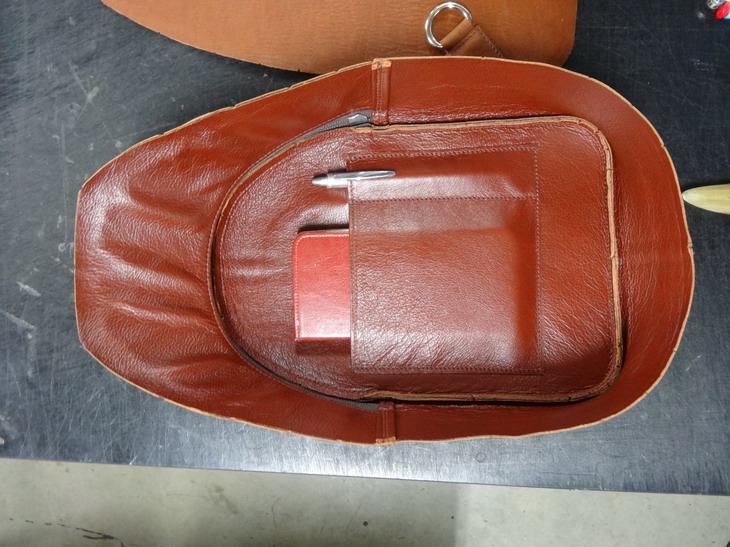
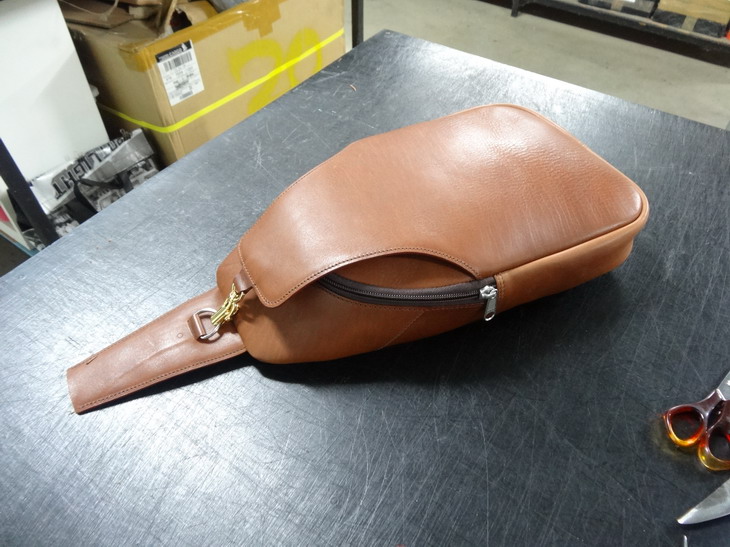
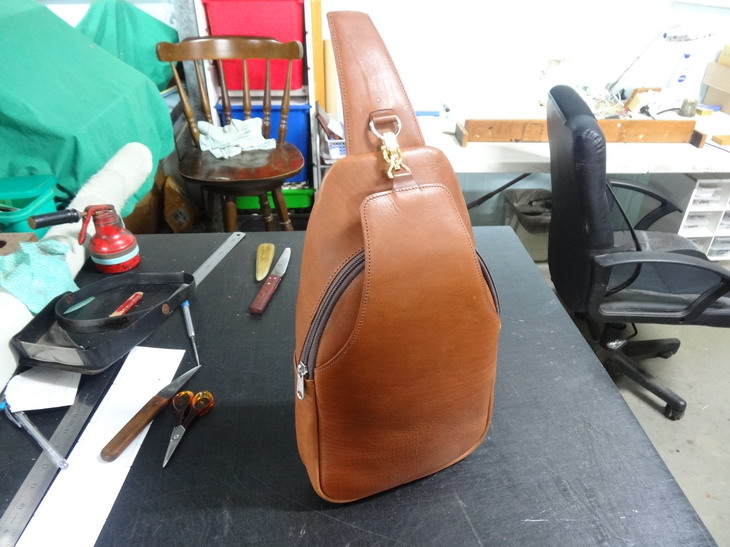
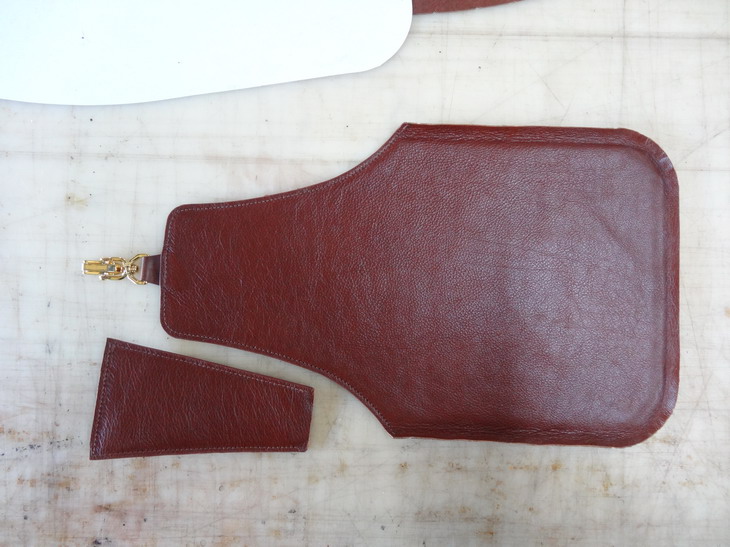
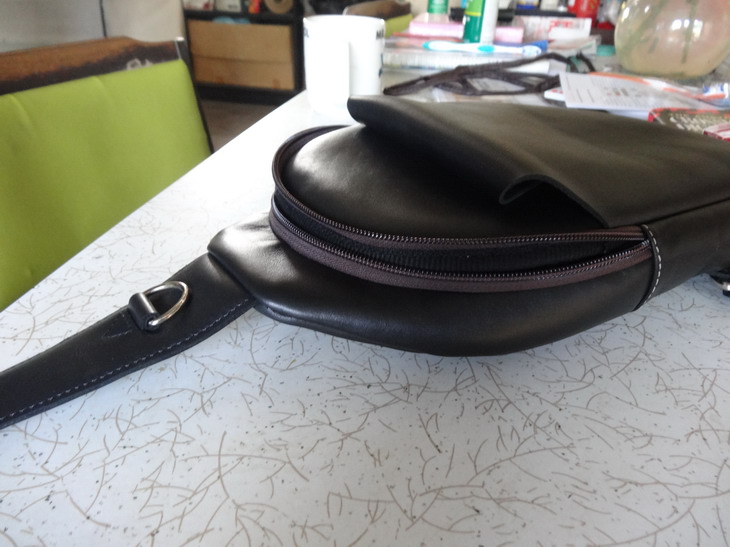
Just to finish off this pattern tester this pic shows the front and middle pockets attached to the gusset. Here I did a test with my phone and a pen for fitting. Note that the binder over the edge is a must as the zip will snag a bit if the binder is not attached These next pics show the bag all stitched and the test is a good pass this time. The croc making ones are next to come. .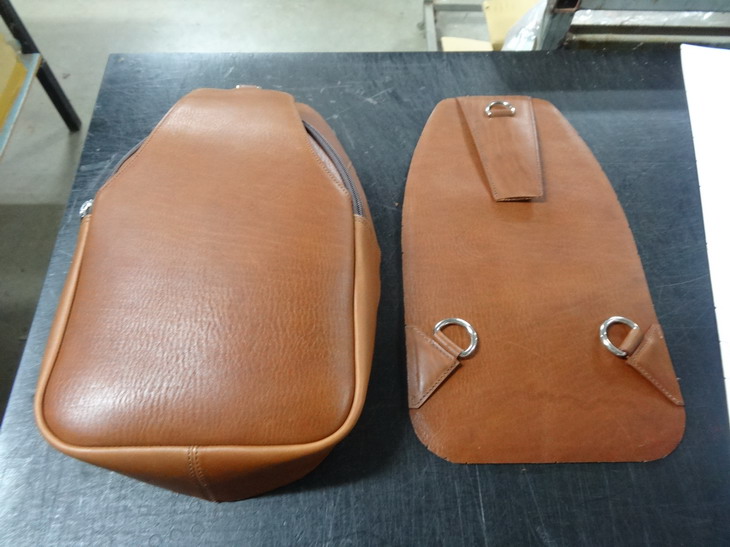
-
Patterning the old way when the CAD is just too hard
RockyAussie replied to RockyAussie's topic in How Do I Do That?
Thanks but honestly I have a terrible memory so I just book mark my post and when I have to make another I come back and see how I did it. -
Patterning the old way when the CAD is just too hard
RockyAussie replied to RockyAussie's topic in How Do I Do That?
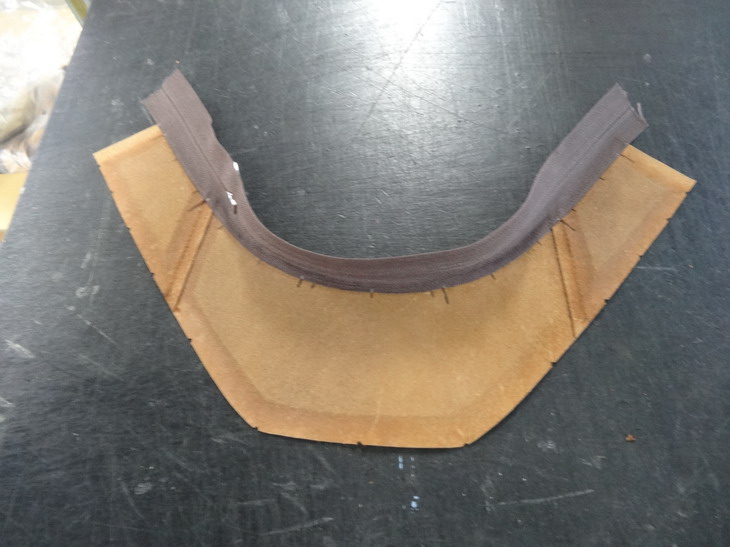
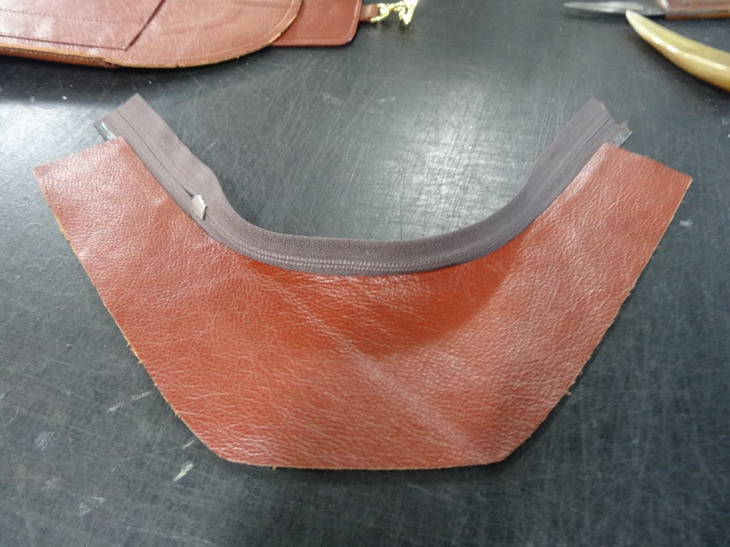
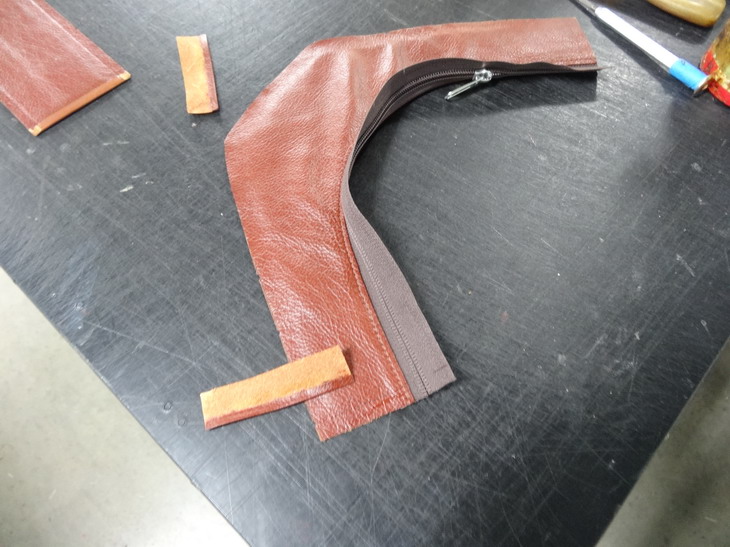
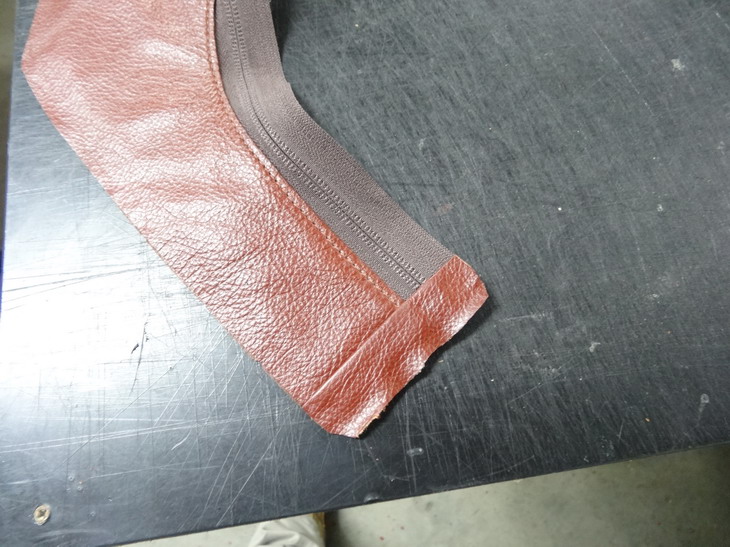
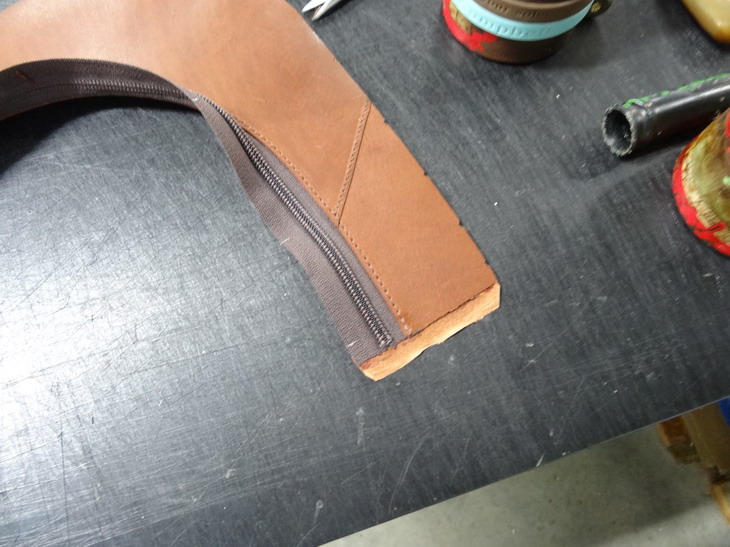
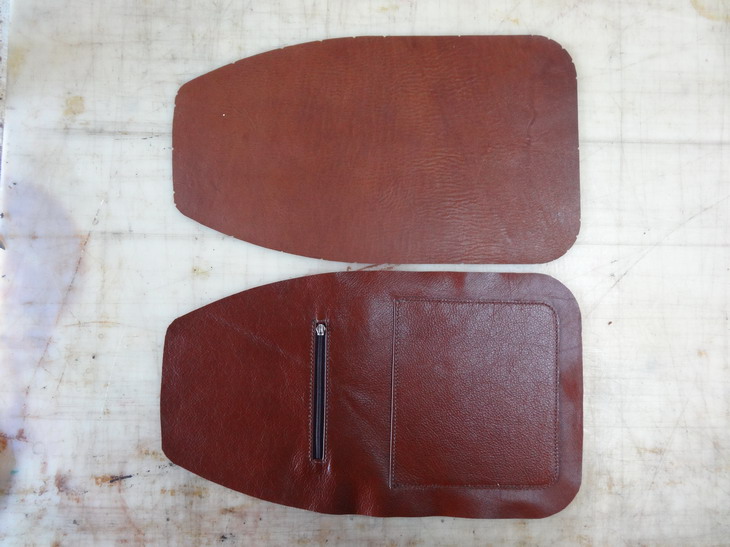
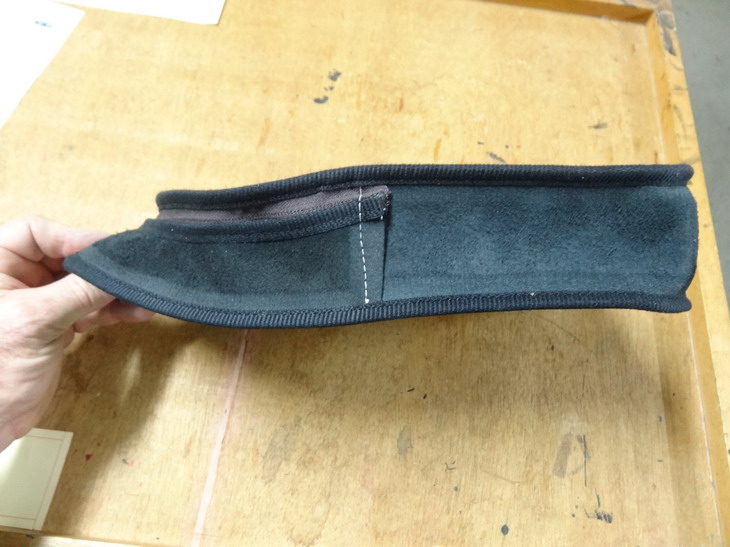
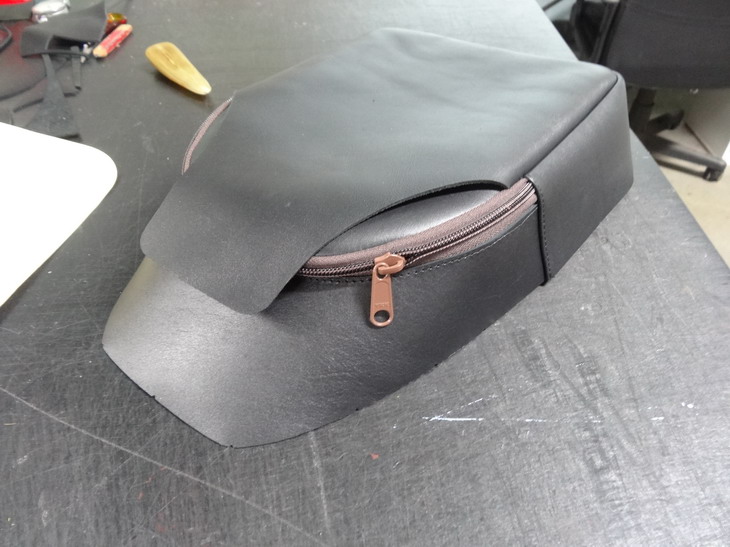
Now the dreaded Zipper ...... After cutting the leather to shape and giving the inner edge an edge coat I use a template to mark a line in 7mm from that same edge. Note that the zip and the leather has had line up marks to get the positioning as accurate as possible. This is contact glued up on the zip and leather. This shows the zip now attached into place Next the leather lining of the same size is attached into place. It has the inner edge edge coated as well. This piece has the zip sewn into place now and to cover the ends I decided to make up some little cover pieces. This will add strength to a part that will have to endure a lot of pressure later. This tab is now glued back over the zip and leather edge and readied up to attach to the bottom gusset section. Here shown are the back and its D and strap attachments as well as the front and middle pockets combined and ready to have the gusset attached to them both. Here the gusset has been connected and ready to have a double lot of stitching on each side More to come soon.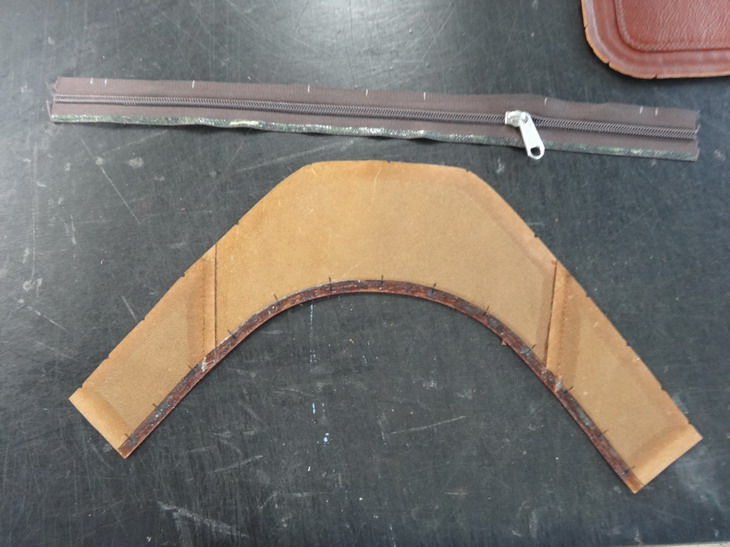


-
Patterning the old way when the CAD is just too hard
RockyAussie replied to RockyAussie's topic in How Do I Do That?
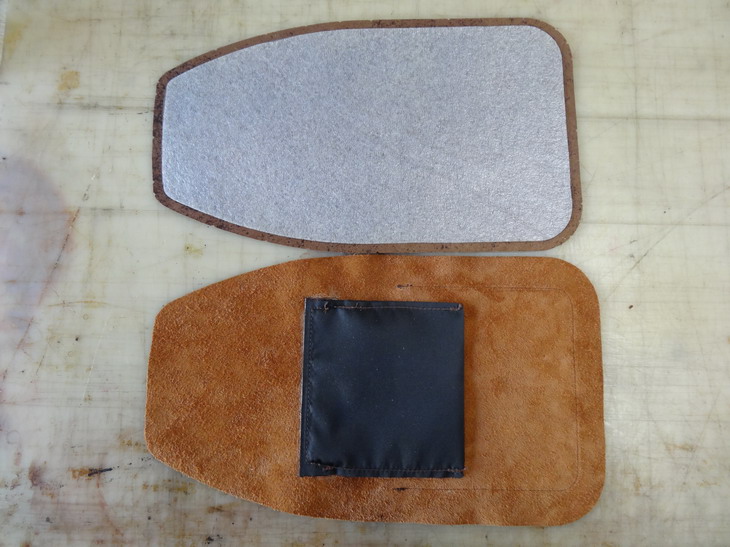
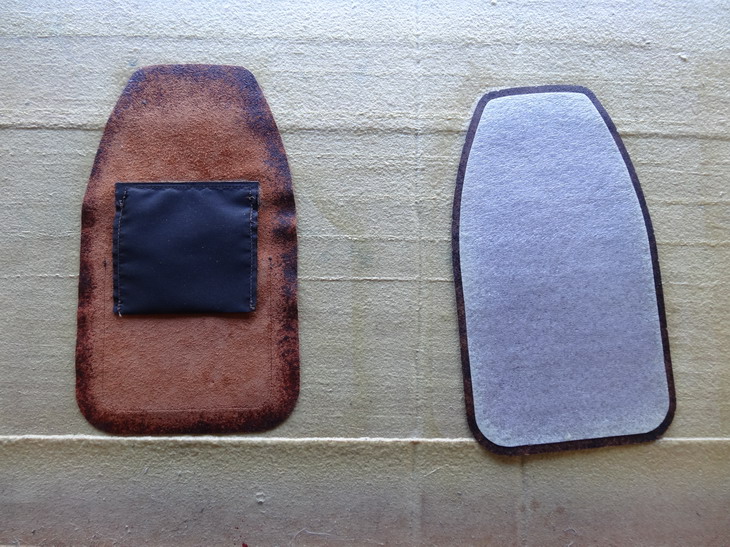
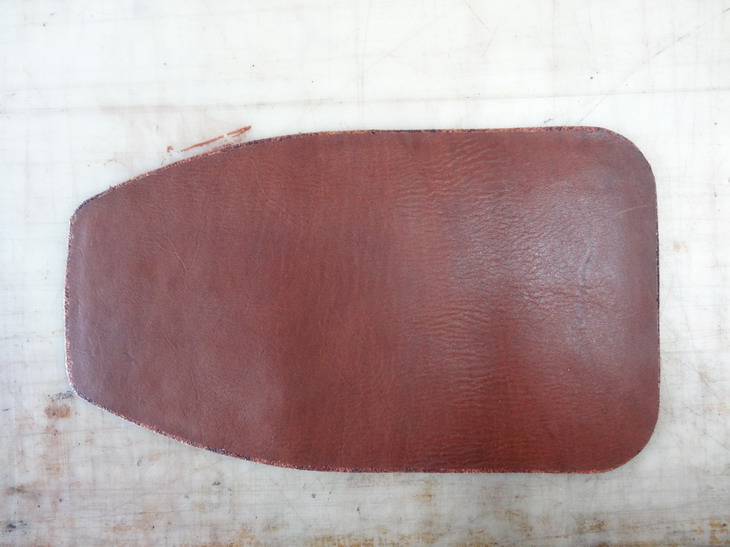
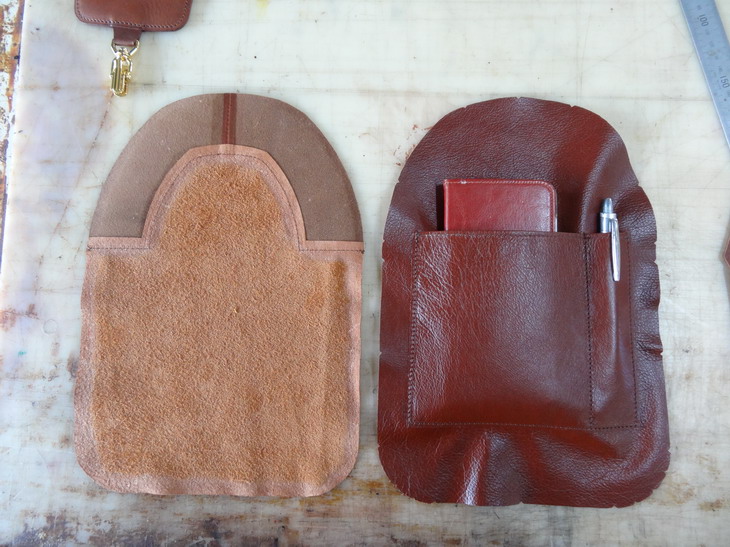
Thanks for confidence vote Gary but to be honest I'd be a lot happier if I could get the pattern right the FIRST time. Camera's playing up a lot but I will keep posting as best I can. The first mock up is a thick a quite firm chrome tan that is not all that cheap but I use a lot of it on a wide range of products like belt backing and alarm pouches etc. The second mock up pattern tester is an oil tan veg or retan I get here called "Jungle" from a southern supplier or "Whisky Chopper" if from East Coast Leather near Brisbane. I picked these leathers due to them being around 2mm+ thick (5+oz) as the croc is very thick to start and getting it sanded down to below this thickness can lead to holes. I will load a few tips on the zip in a bit more detail later but I will put a little bit on it here tonight as well for you and @alpha2 To more fully check the patterns and my leather linings and their layout I decided I best make a more complete bag. Some of the croc skins are smaller than others and require some more segments than the larger skins so I also broke up the leather bag into the smaller segments patterns as well. This picture shows the front shaped pocket made up along with the piece for the strap that attaches later. At this stage they have the lining attached as shown in the following picture and have a 1mm foam between them. They have also been edge coated and stitched as well. Lining side below This one shows the 2 parts that make up the back. The lining piece shows the zipper pocket and the outer back leather shows the 1mm foam attached. I will show some more on the technique for this little zipper installation when I do the next croc bag. This is the other side view of the above picture which shows the second pocket on the lining as well. Next I have spray glued the edges to combine these 2 parts. This shows the parts now conecte4d and ready to have the lining edges trimmed down and the line up V cuts put in. This pic shows the top section of the second pocket that will have to be made up in 2 pieces on the bags made using the smaller croc skins. A stitch is done around 6mm or 1/4" in from the edge as shown. This is then glued and tapped down and recut to size. The inner curve part will be edge coated at this stage. Here is that piece connected to its lower lining piece as well as the opposite side of that section that has a phone and pen pocket attached. This section gets ful;ly attached together and trimmed to size again with the V cuts put in as well. This is the gusset bottom section with its liner spray glued and ready to be attached. Note that the outer part has been made from 2 pieces as well. More to come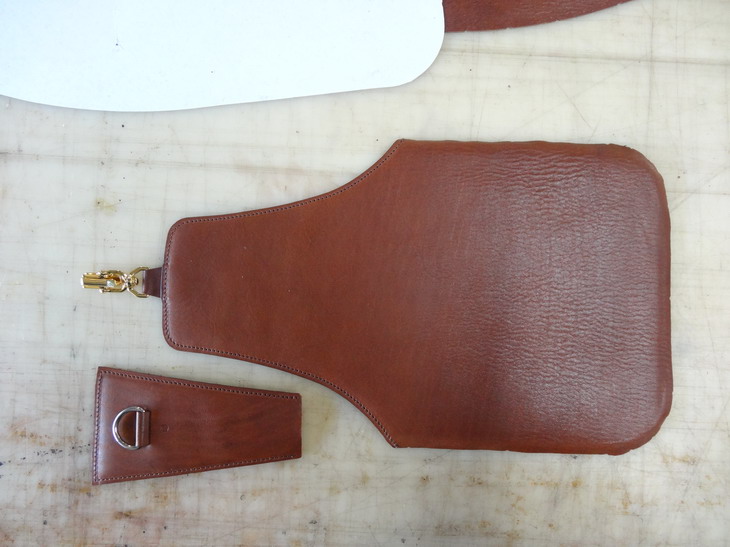


-
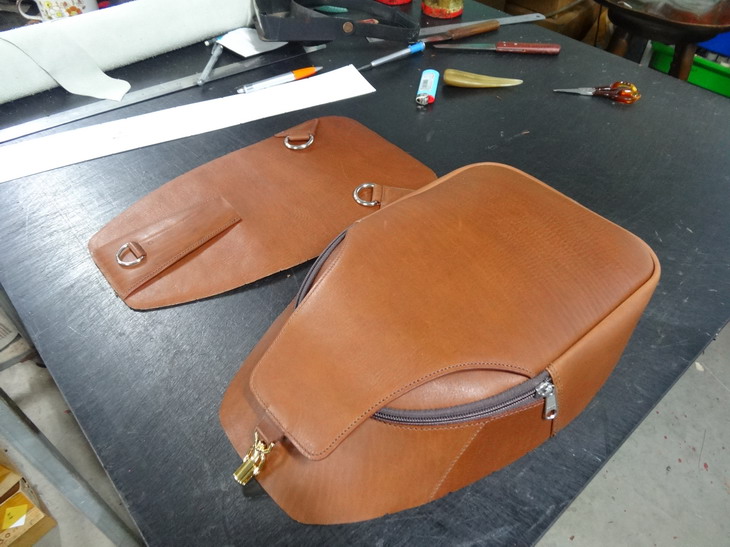
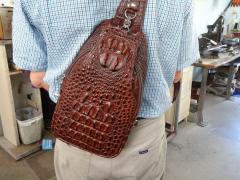
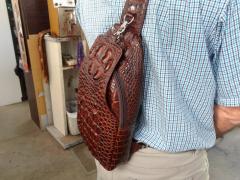
Crocodile sling bag
RockyAussie commented on RockyAussie's gallery image in Gallery- Our Leatherwork
 Thanks for the compliment. The size is 370mm high x 220mm wide by around 70mm deep. I agree that video is just a bit toooo real.
 -
Patterning the old way when the CAD is just too hard
RockyAussie posted a topic in How Do I Do That?
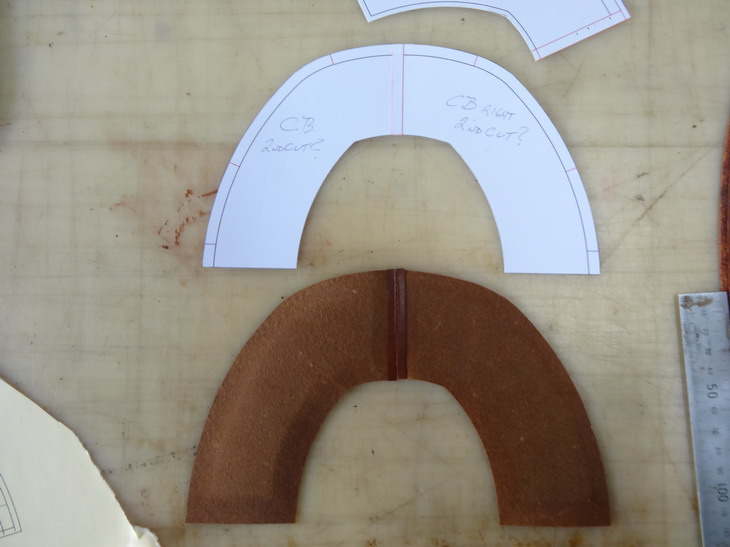
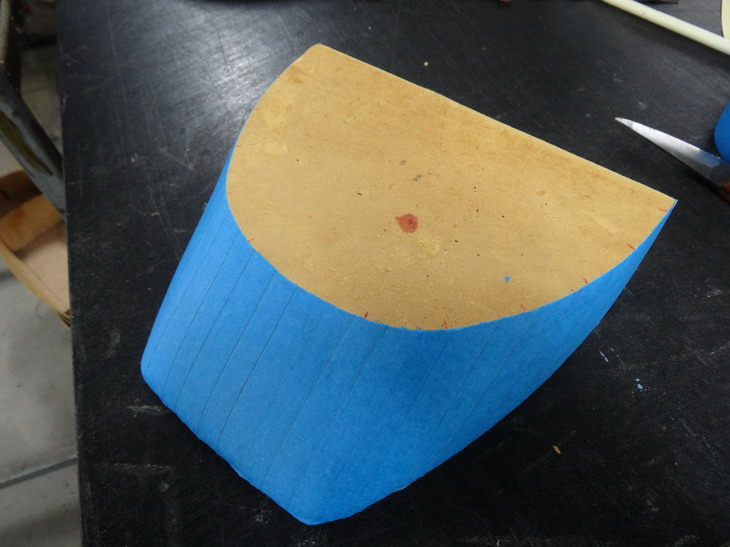
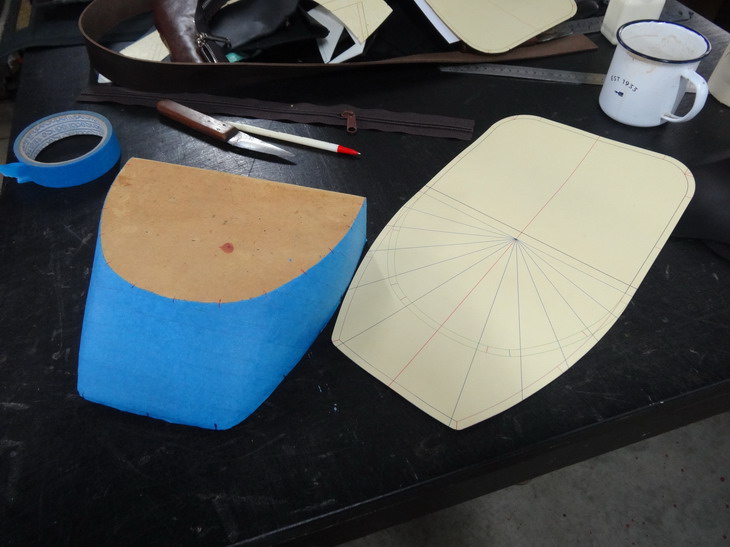
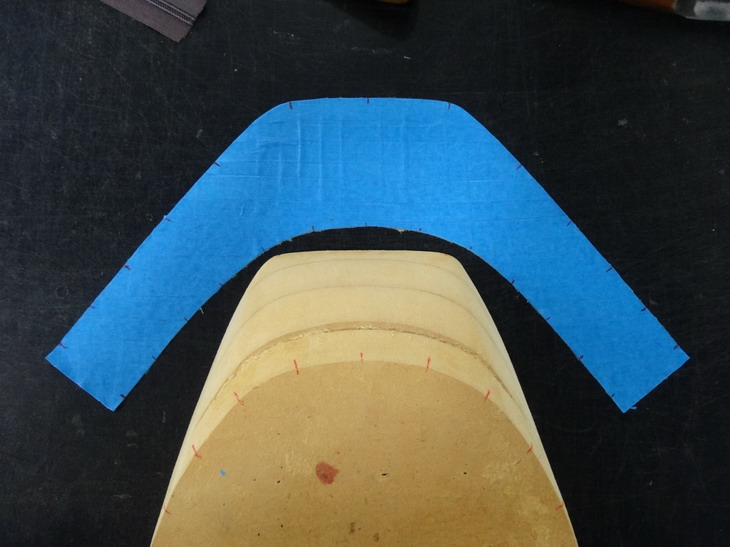
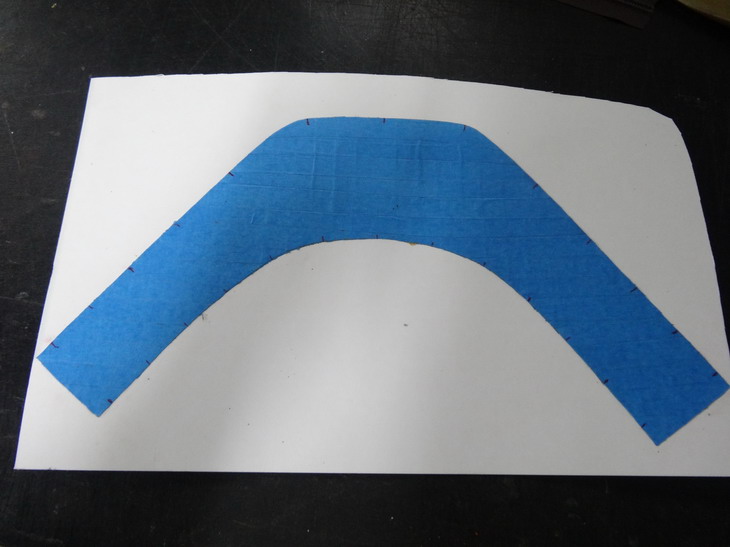
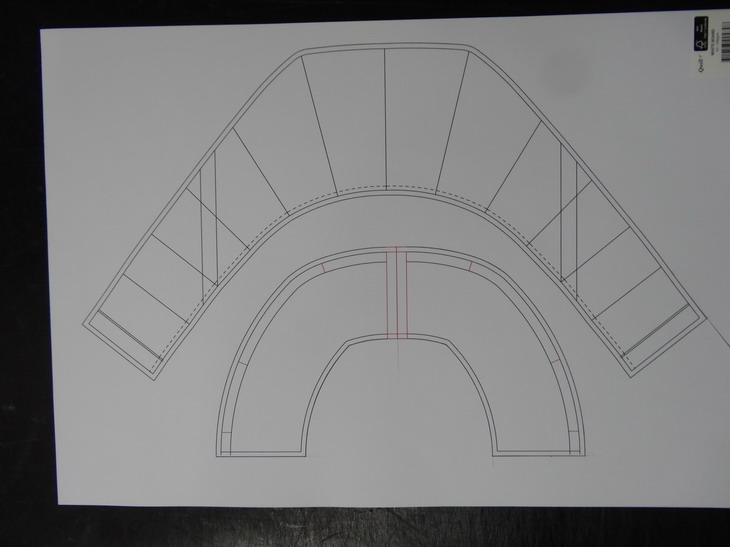
This shows a few of the steps I took along the way as I made this bag. There are 4 bags to be made out of Australian saltwater crocodile skin and to be ready over the next week coming. The background to this is that these four Chinese customers I have done works for previously want to revist Australia and get me to make them each a bag to take back home with them. As this has been done in such a rush some of the bag hardware I wanted to get from Ohio Travel and flashy zips did not get used. AS hard as I tried I could not get my pattern measurements to work satisfactorily as shown below so I decided o resort to some old steps from my shoe making days.The first couple of pictures show the first bag as complete. This following picture shows my first disastrous patterning effort using cad software. Here following I resorted to making up the shape I wanted by gluing and sanding up some craft-wood and then like the old shoe lasts I used masking tape to do multiple overlapping layers around the shape. With the patterns broken down into 15 degree increments I transferred these spacings onto my mould and the masking paper.These marks are for aligning the pieces as they come together. Next the masking tape I removed and l flattened onto my cutting table. This was then attached to an A3 sheet of printing board. I then took a picture directly overhead and placed it into my cad program to trace around and bring to match the correct size. It could be done without this step but I like to have all of my patterns stored together. This next pic shows that the bag now sits flat and I am on the right track. I will post some more pictures later. Brian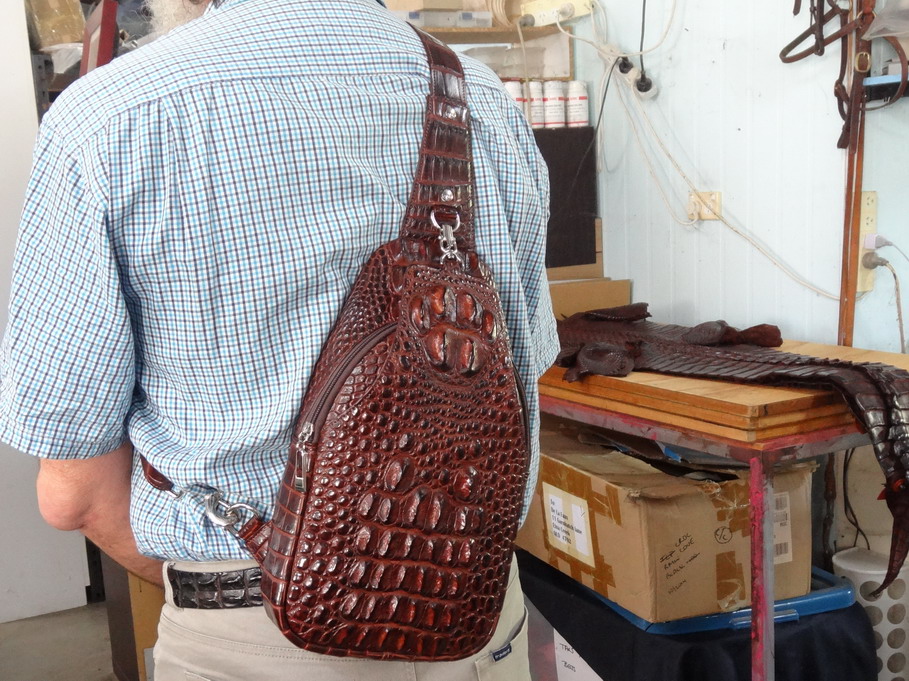

-
From the album: Crocodile cross body sling bag
-
From the album: Crocodile cross body sling bag