RockyAussie
-
Posts
3,265 -
Joined
-
Last visited
Content Type
Profiles
Forums
Events
Blogs
Gallery
Everything posted by RockyAussie
-

From the album: Crocodile cross body sling bag
-

Question about lining a leather bag
RockyAussie replied to panchoskywalker's topic in How Do I Do That?
Lefa board and Texon are very similar but I thought the Lefa was only quite thin. The Texon comes in 2 or 3mm and I would have picked the 3mm. Looks very nice at any rate. -
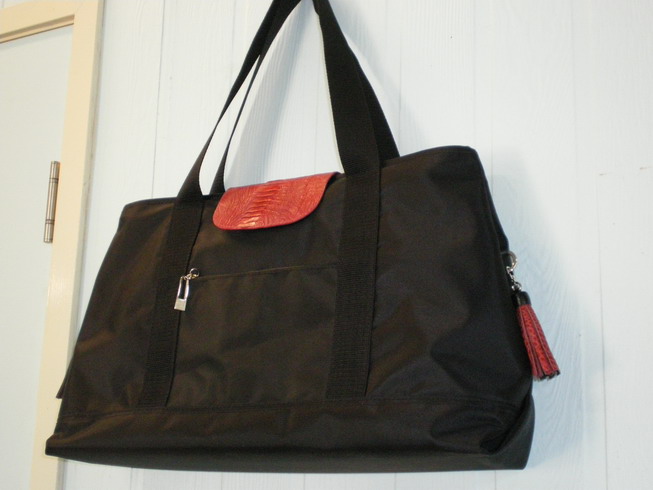
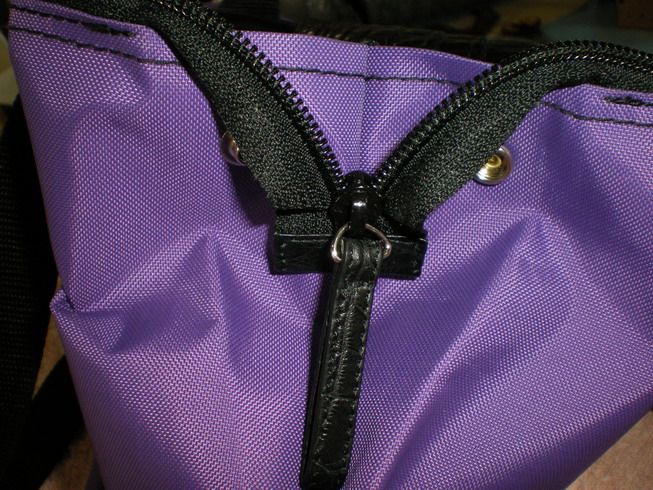
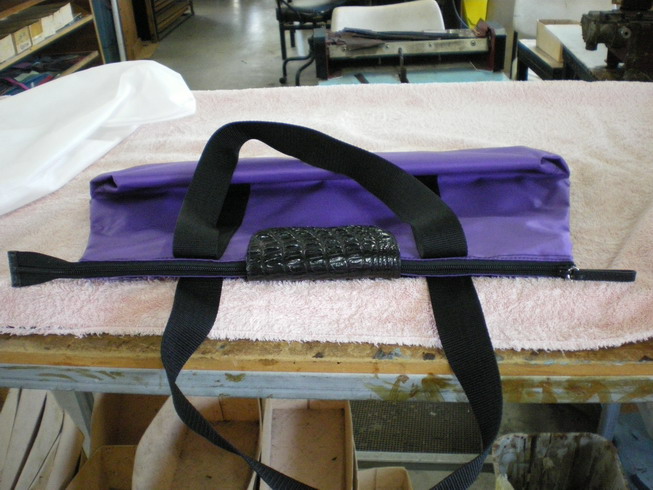
Ripstop fabric comes in many thicknesses but is hard wearing and has the advantage of not fraying on the edges. I have in the past made some totes that fold up completely from ripstop with croc or ostrich trimming. First pic is ripstop and the next is leather but shows how it can be folded up. The others are also ripstop and show how the clips at the ends allow more capacity if required.

-
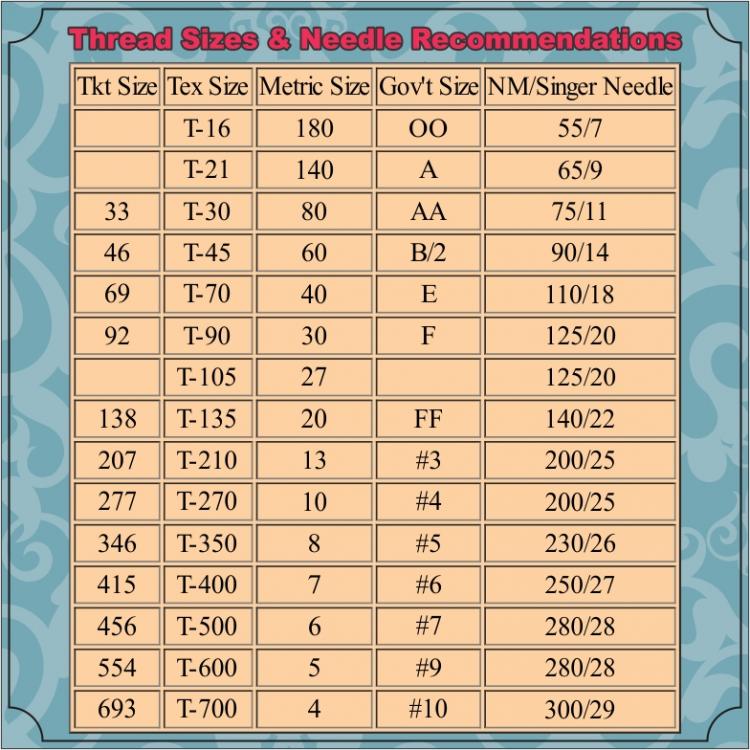
Very big difference.... see chart below.
-
Hey David, Congratulations on your excellent purchase decision with a Fortuna. As I am way over the other side of the pond where I get parts for them would not be much use to you. I would recommend you to have a look on this Campbell Randall page. https://campbell-randall.com/shop/fav-fratelli-alberti?page=2 I have a FAV AV2 machine that the presser feet and many other parts can interchange with on the Fortuna. I tend to make up my own presser feet rollers etc but the 30mm roller FAV -1498C at the top of the page on this link would be a good start I think. I would get a new belt that runs the sharpening stone while I as it, as they wear out occasionally and it pays to have a spare ready when you need it. Lastly just a tip if you are wanting to do any very thin soft leather ...after sharpening get a strip of mellow veg and very very slowly run it through a skive. This cleans up any fine roughness and is a bit like stropping the blade. Have fun. Brian
-
I have got them both as well and word for word I agree. I do use the Adler 69 for more of the heaver work only because that work is less frequent and I can have 1 set up for the heaver settings. I do prefer the smoother Pfaff 335 and copy parts (feet and binder change overs etc) are easy and cheap to find on line.
-
Question about lining a leather bag
RockyAussie replied to panchoskywalker's topic in How Do I Do That?
Texon board ( there are other brands as well) as used in shoe making for the insoles is used quite commonly. It can be stitched but holds is shape fairly well. If you want it extra stiff use some 3 ply instead or as well glued on after stitching. -
Maybe this is not relevant but I just had to save this picture I found awhile back and sometimes I just gotta go back and look at it. Thought I might just share it with you .

-
Thanks for the update and great to hear you are getting it sorted. - Brian
-
19th century Hugo Werteim shoe patcher
RockyAussie replied to RichardPorley's topic in Leather Sewing Machines
Very pretty Richard. Thanks for posting the pics they are Hugo Wertheim. Sorry couldn't resist -
I believe what is meant by adjusting the blade tension is adjusting the blades how far down into the nylon roller. How are you able to change the blades if you don't back off the pressure first. The blades on a new nylon should not need to go in much more than 1 to 2mm or about a 1/16".
-
Probably the blades are bad but just in case. If you haven't thought to change the location where the blades are touching into the nylon roller there could be some broken blade embedded into the nylon from previous or some grit/stone off of the back of some leather that has become embedded. Sorry I just read you said the nylon roller was new.
-
By pictures of the products I meant the products @5150handbags makes or wants to be able to make. I think that any of these machines would likely be suitable for the light description offered so far but my advise is more from a maker of the said products rather than personal experience with those machines. As you are likely to be looking for assistance learning how to use the machine it would be worth considering buying from a sponsor/supplier of this site. Other than that please ignore my earlier advise as sometimes I throw in my 2c and though well intended may be worth less than 1c. I hope that you can get someone with more direct experience than me to comment further on your choices. I wish you good luck.
-
Agreed . Some pictures of the products would help to confirm.
-
@dikman You're probably right and I will get to it, but for now I have 3 Chinese customers flying in next month that I have to make 4 male cross body bags for and I have not even patterned them out yet. They have been good customers previously and have paid for the croc already so its just gotta happen. Along with a few other bags I have to get done this week and way tooooo many bloody belts to even think about as well. You shore you don't need a workin holiday? BTW I think I might have to disappear off LW for a bit. Best wishes to you and all. Brian
-
Ahaa , you mean the angle of the dangle and a bit of the Newton stuff. Most perplexing. Interest looks low so to the backburner for now she will go.
-
WAY down south here in Oz. I'll let ya know when I get them fancy scales in and try and do a more professional lookin post of sorts. Damn now I'm a red face as well
-
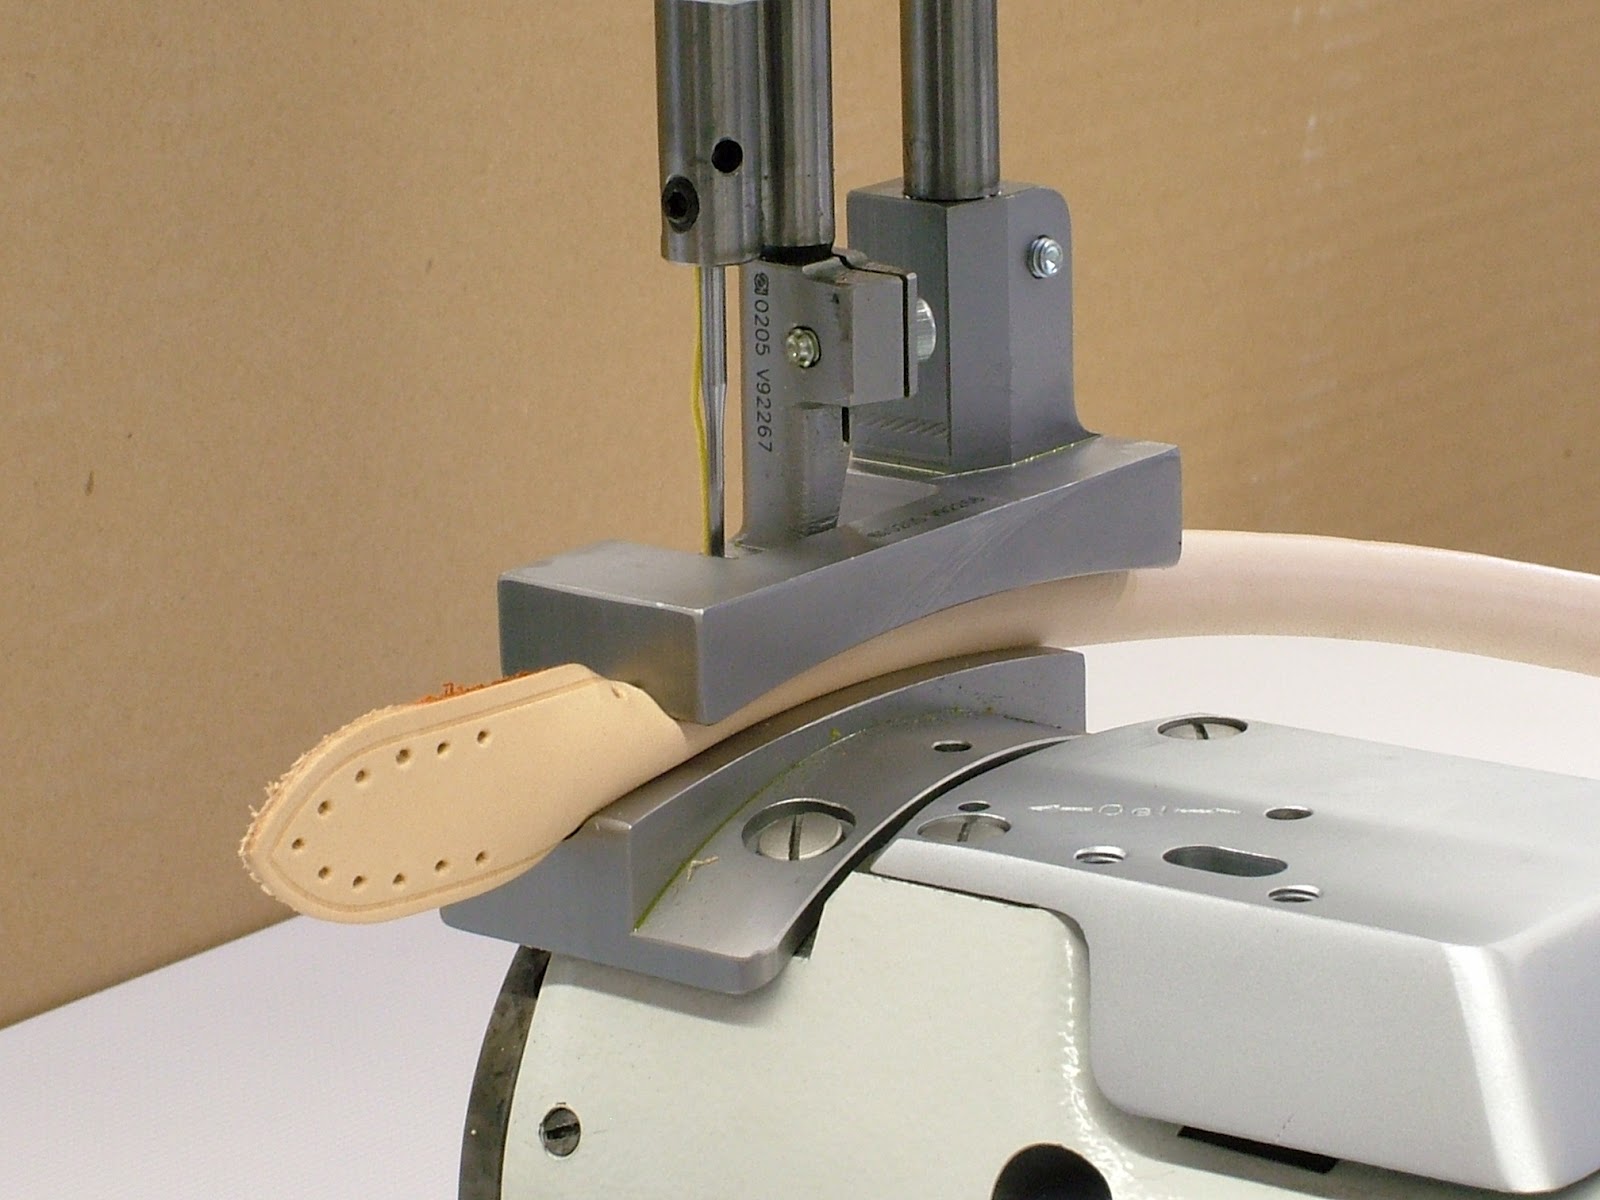
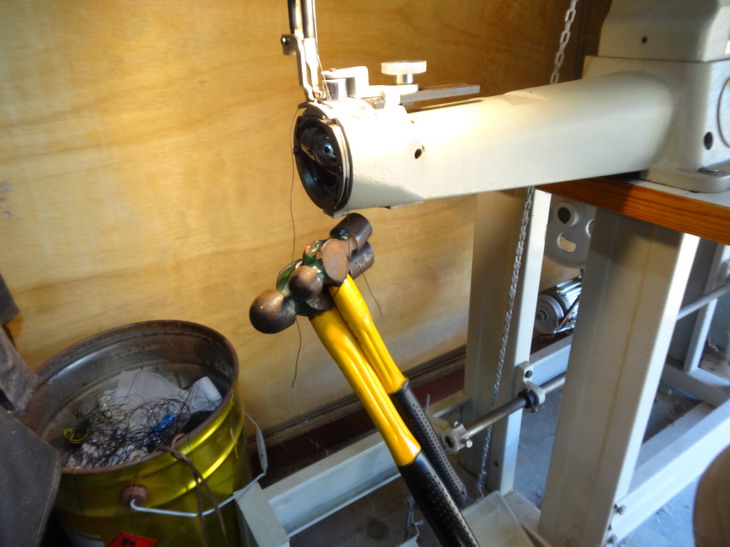
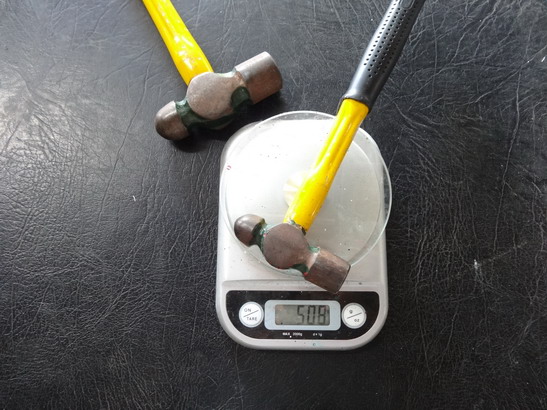
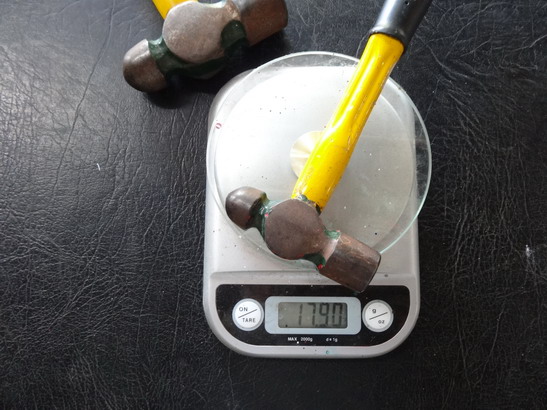
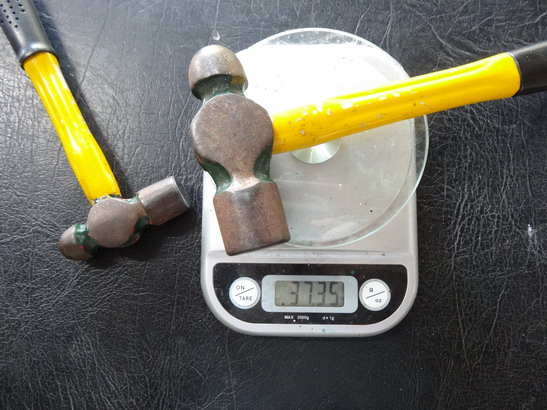
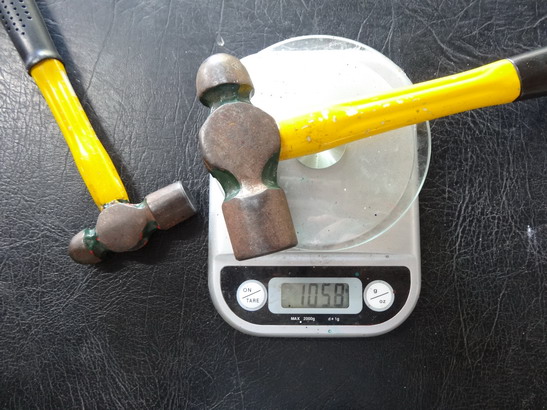
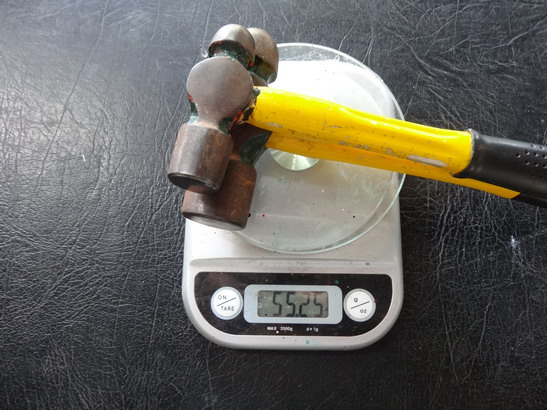
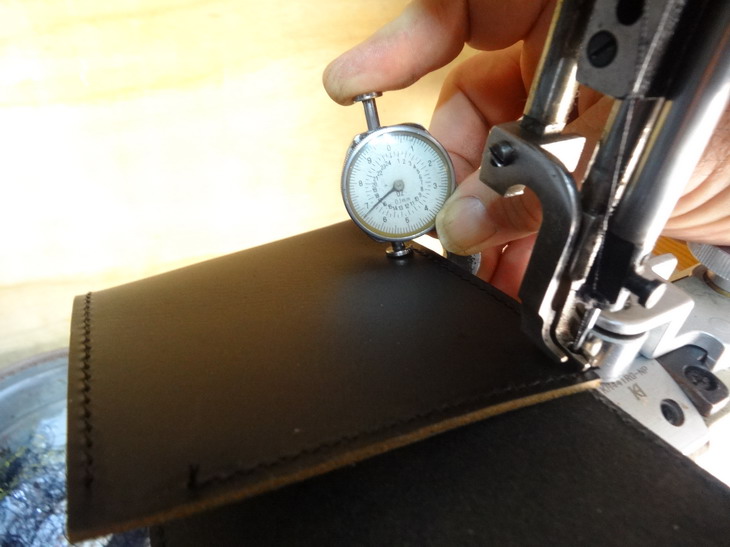
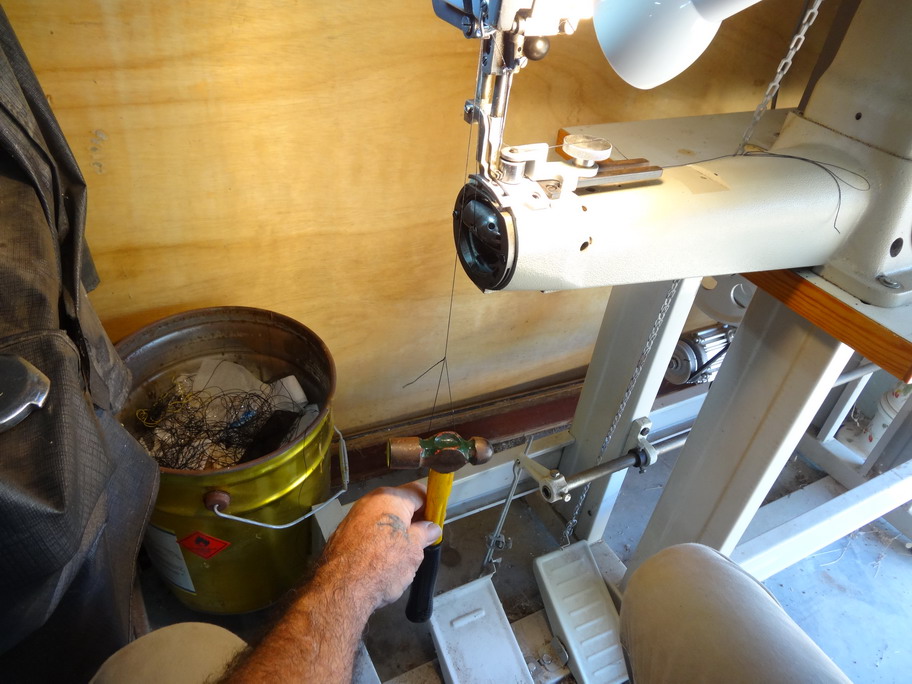
Next I got the top tension which comes out just over 3 pounds (1pound and 2 pound hammers) .I hung them down over the smooth area being careful to not let the thread get caught in the crack. For those that would like to see metric grams as against ounces I am showing pictures of both. The 2 hammers together. I intend to get another set of digital scales to try out like in this ebay listing https://www.ebay.com.au/itm/WH-A05L-LCD-Portable-Digital-Electronic-Scale-10-45kg-10g-for-Fishing-Luggage-TJ/172412860830?ssPageName=STRK%3AMEBIDX%3AIT&_trksid=p2055119.m1438.l2649 to hopefully provide some more references on other thicknesses and machines types. If this is likely to be of interest please let me know here and I will start this off in a separate dedicated post. You can follow me also if you would like to be advised of any updates to this. Brian
-
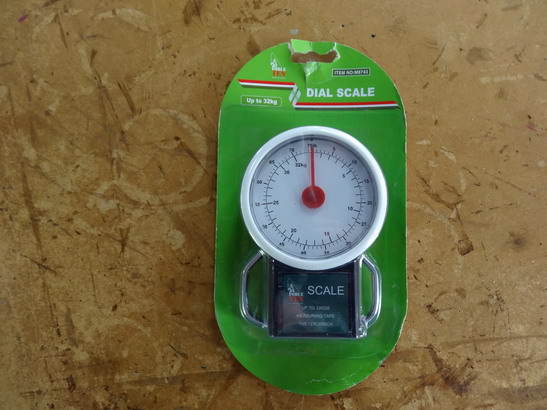
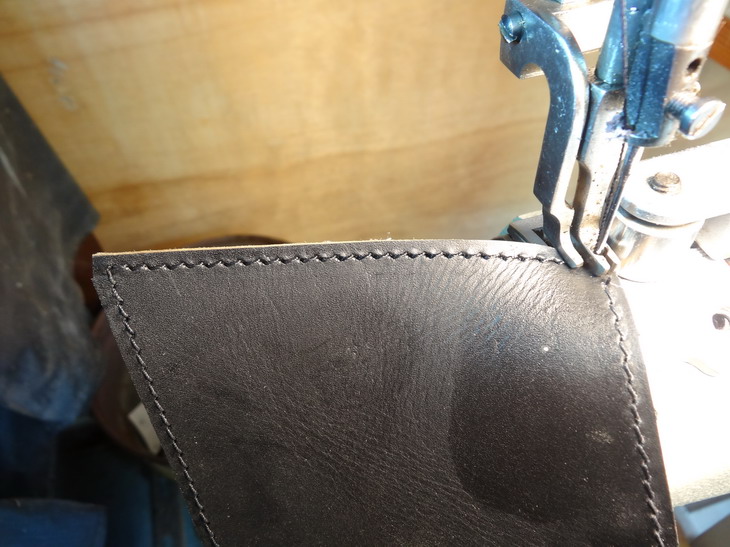
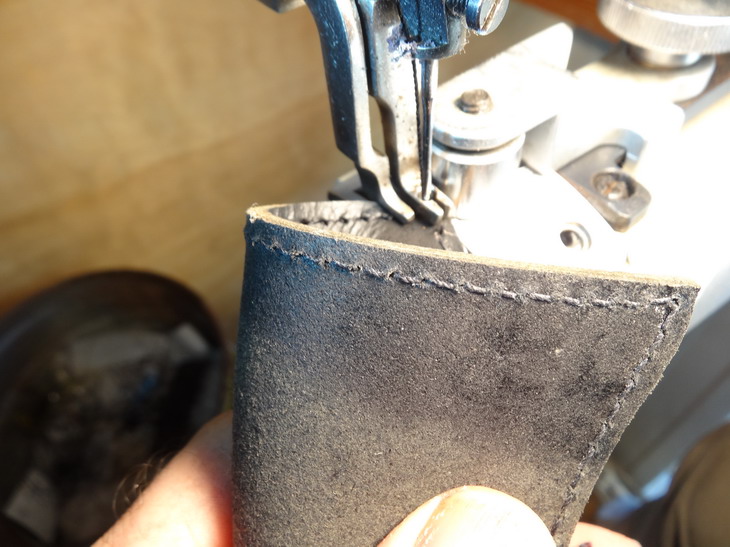
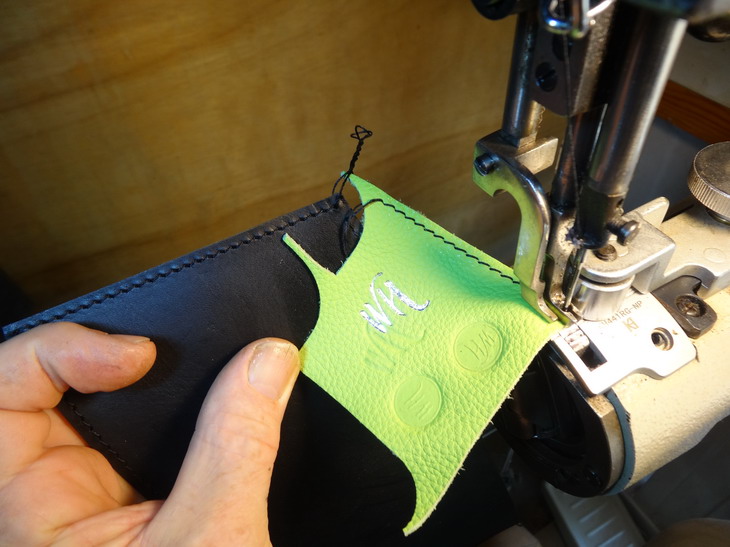
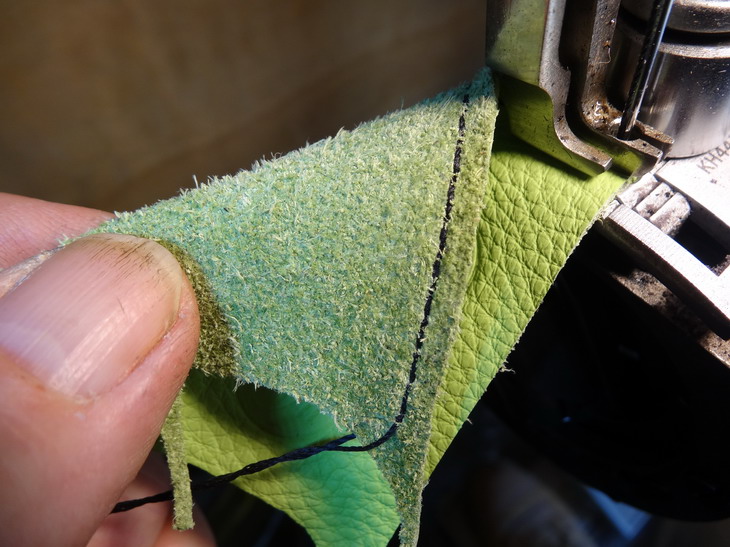
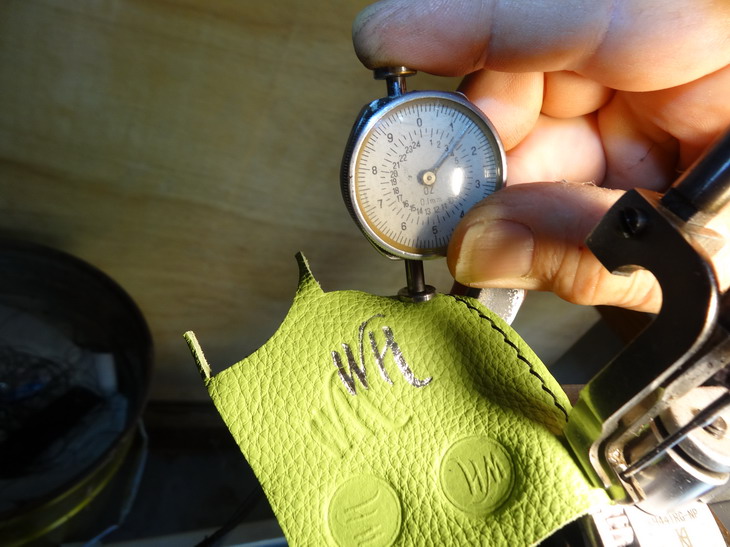
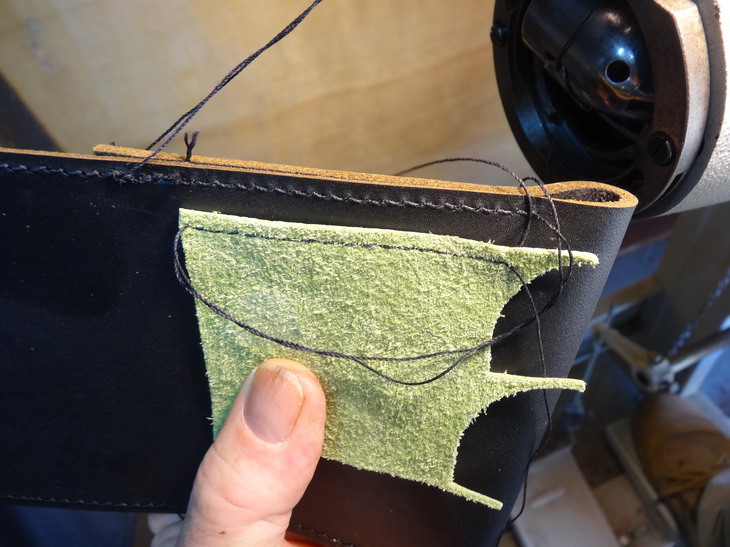
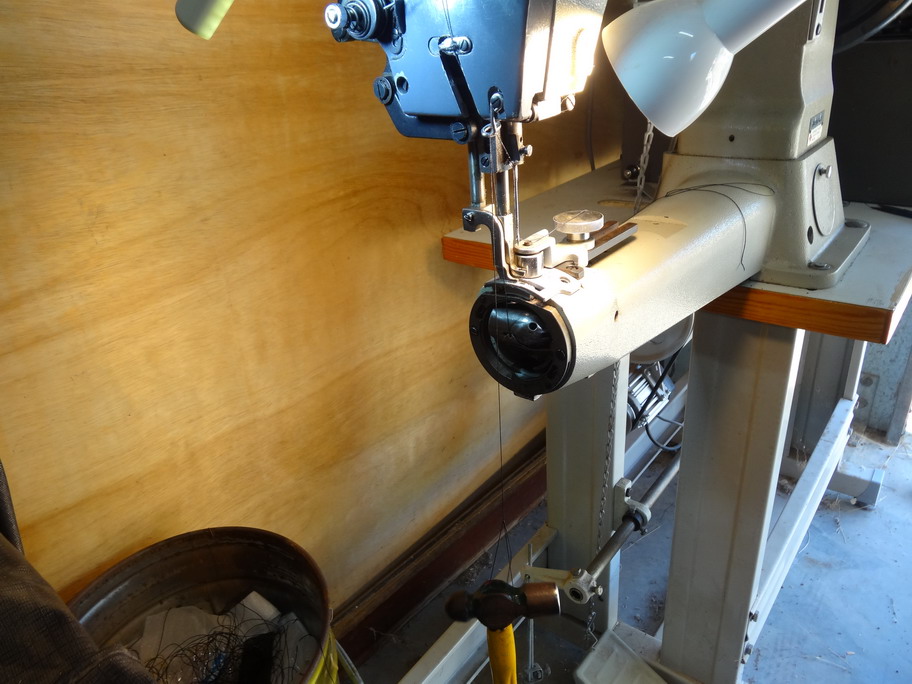
Hide's not that thin and I didn't think any thing said was but humour anyway. If I ever say anything that seems not right I would WAY prefer they say so cause I could learn something new myself. I went and got a new set of fish scales and that was a waste of $10.00 bucks, they would not show any thing under a pound of pull.Got me thinker workin and how I could hammer this problem out - See the pictures 1st pic - dont bother with these scales I set about getting the tensions on my machine finely balanced first. I started with some quite firm veg at 3+mm (8oz) and set up with 20m (138) thread top and bottom and a Schmetz NM:160 Size 23 794 LR needle. Note not knots to the top No knots under I then went straight over to a 1.4mm(3 1/2oz) garment leather. No knots on top No knots on bottom I then went straight over to the first piece and doubled it up. Still no adjustments made. Top looks good Bottom looks good Now I set about getting some way of measuring these tensions. The results in a bit of a nutshell is the bobbin was just over 1pound if hung as shown and the top 3 pound hung as shown. Note: these setting are more ideal if doing wallets or purses, handbags etc. For the bobbin tension I ran the thread up to the thread guide above and GENTLY allowed the weight down. The hammer will hold just. I will post more soon.
-
Waist Belt Bag
RockyAussie replied to SonderingSusan's topic in Purses, Wallets, Belts and Miscellaneous Pocket Items
Looks good. Well done -
This would depend on the clearance between the solenoid and where it presses and I guess what machine type. I have a Pfaff that has a solenoid that I could easily put in a knee lift between but that would mean the solenoid would then need to be disconnected as to not be activated. If you want both to operate independently that would require a bit of fancy connecting but is likely possible. Not sure if there would be any reason to have both able to operate. May I ask why you would want the knee lift instead?
-
19th century Hugo Werteim shoe patcher
RockyAussie replied to RichardPorley's topic in Leather Sewing Machines
WOW Jeeps mate don't do that to it ifn you want to use it I mean. That looks like its worth more as a non going item I reckon. Imagine having that in a antique shop or a sewing machine sales business or.....Are you opening a shop maybe?. -
19th century Hugo Werteim shoe patcher
RockyAussie replied to RichardPorley's topic in Leather Sewing Machines
That is a shame but I think it is still beautiful. If anyone can bring it back into play I have every confidence. Sandblast and weld first I guess. Are you able to do that welding yourself?Cant wait to see the finish Regards Brian -
If all you want to do is stitch thick double layer stuff then that tight as a banjo string setting may work for you. From what I have understood previously the problem has been more that the thread tension kept showing the knots intermittently. I suspect that if you back of this high tension you will get the same problem raise its head. There are a huge list of reasons as to why a machine will give you intermittent thread tensions problems and for future reference I will go through a few. 1st - always check that the thread is coming off at the spool without any catching. Sometimes thread can almost be welded together and all you can do there is keep pulling it off until and if it stops catching. 2nd make sure that the bobbin is wound on with a good even pressure and it should not catch at all intermittently when pulled through the spring in the bobbin case. 3. if the bobbin looks well loaded and it catches check the bobbin for smoothness. I often polish the ends and edges of mine on a rag wheel with Tripoli polish compound. I also use a drop of oil down in the bobbin case base to be sure of smooth friction. 4. occasionally I take the secondary (top tension) discs off and polish the faces to remove any formed ridges or imperfections. 5. on the primary tension(the lower tension assembly) I remove the discs and washers etc and the parts that rub against the felt pads I brush over a very fine wet and dry sandpaper then polish. I also put a little oil on the felts while I have them apart. (this area is often overlooked but if you check carefully you will see that the thread is turning that disc in the middle a little with every stitch or at least you should see it. If it gets hung up a times you have ...up and down tension problem. 6 Foot pressure. If your foot pressure is too light then when the knot comes up it can lift the job and then the knot can stay on the bottom. Some leather being hard and soft with insufficient foot pressure will give intermittent knots normally on the bottom side. 7 Bad timing. In this case I will also point out that the shuttle race screws need to be loose enough to just see the springs behind the screw heads as seen about 9 minutes in on this Video. Some people mistakenly do them up tight including some sellers of these machines. Lastly - In case you have not seen it I recommend to watch this Video . The only part I differ with here is that when I am loading a bobbin I prefer to hold the thread on the outside of the winder (I leave a tail about 6" long to hold) when it starts until it breaks off. This stops that loose bit of thread from tangling around and upsetting the even winding. I am sorry I could not find my small fish scales to get some base settings as yet. I think they would also be great for showing up visually how much variation is happening from the top tension when being pulled through as well a the bobbin tension. I am sure I would have had sometimes a pound in tension variation and being able to say its the bobbin or the top or both quickly would be a nice jump start. Brian
-
Looks like a brass rivet. When I have done them I normally put the long rivet stem up in the hole of the setter and hammer the washer down flat onto the job. Once it is set down I cut the length down with some sharp nail pullers about 1/8" left hanging out. I then file the top to get rid of the point and round it a little then I normally hammer/peen around the head with the hammer until it is reasonably rounded mushroomed of. Then the cupped out part in the tool gets tapped around until the head looks nicely rounded. Link shows the tool and in the top right corner some of the rivets-https://www.etsy.com/au/listing/178221387/copper-rivet-burr-setter-9-and-12?gpla=1&gao=1&&utm_source=google&utm_medium=cpc&utm_campaign=shopping_au_en_au_b-craft_supplies_and_tools-other-other&utm_custom1=9e43c565-f8f5-410d-aa40-2a02f101d32e&gclid=CjwKCAjwsJ3ZBRBJEiwAtuvtlDI3THiIo0tJBGcAgN9R9XeAMPW0aG9S-DiL716F67AiTGUtV_7hwxoCWY0QAvD_BwE