koreric75
-
Posts
557 -
Joined
-
Last visited
Content Type
Profiles
Forums
Events
Blogs
Gallery
Store
Everything posted by koreric75
-

Adler 67-372-thoughts on quality and capability
koreric75 replied to koreric75's topic in Leather Sewing Machines
So I know this is an older thread, but just wanted to revisit and say I really do love this little ugly green machine... Lol. I just recently put a speed reducer in it and that made a huge difference. The downside is there really aren't any parts that direct fit save for a few welting feet and zipper feet options. I have managed to get a fixed mount binder to work decent, still fine tuning but wow it really makes a beautiful stitch when dialed in. -
 That is a beauty!
 -
I currently own Satan's Adler...that thing is possessed....lol
-
 Agreed, this really stands out and given a choice between bw and this, I'd go with this as it's unique and super sharp!
 -
WHERE on the table do I want my machine?
koreric75 replied to kevinkay's topic in Leather Sewing Machines
If you're not planning on a speed reducer/motor setup you can skip the belt cutout and do a motor mounted topside behind. I agree on the suggested thickness, i made this table from melamine and at one layer it would sag with my little singer 66k so an industrial machine definitely needs the reinforcement. I used the same material and did two layers of melamine, The hole on the top was cut to fit the shape of the bed, the hole on the 2d layer was cut to allow openings for mechanisms and keep a lip and corners which have a spacer for the machine to sit on and flush with table. For the motor control, i unmounted from the bracket and mounted to the bottom of the table to line up with the pedal assy. -
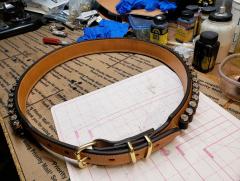
That looks great! Love the color contrast on the stitching too!
-
Basic Saddle Stitch Tutorial By Nigel Armitage
koreric75 replied to immiketoo's topic in Sewing Leather
https://youtu.be/TGuiha5S2oE here you go, saddlestitch in detail, just search nigel armitage on youtube and it'll get you there -
I would say depends on what you want it for and how often do you plan on doing it...I use my tandy bench splitter for just this purpose on some items...mainly wallet card pockets...just split it before cutting to exact width as it probably will stretch some and when you stretch one way it gets narrower the other. If this is something you plan on a reg basis, i would say contact your leather supplier and ask them to split it first. A super sharp bench blade will make quick work of a couple inch straps, 4" may be a little tough.
-
Motoko II backpack build
koreric75 replied to koreric75's topic in Purses, Wallets, Belts and Miscellaneous Pocket Items
Thanks, I think the main thing here is the round hole stitching would take to long and I'm not in for buying a cheap inline set... The chisels are cheap, but they're straight and sharp and fit the smaller thread better...I haven't tried getting 1mm through it, but the 150d flat stuff I use works... To keep the color match I used 277 in natural to match the pocket stitching with the Adler... -
Speed Reducer mounted directly onto Servo Motor
koreric75 replied to Constabulary's topic in Leather Sewing Machines
I like it, i prefer this one tho that mounts in the same holes as the servo and the servo mounts to the bottom of it...I just installed this on my adler 67-372 and it made a world of difference, i can actually turn a corner and go slow enough while still punching through heavier leather. -
Motoko II backpack build
koreric75 replied to koreric75's topic in Purses, Wallets, Belts and Miscellaneous Pocket Items
Thanks!, I can't take any credit for the design, even the emblem piece was on the pattern...i just used my stamp...lol. The only deviations i made were to machine stitch the side reinforcement panels and the inside pocket and the front flap to the back before saddle stitching the gussets in. And Tony uses a 1.5mm round punch for the holes, i opt for stitching chisels with 6mm spacing...works out to almost right on the money. -
I finally finished up another of Tony See's pattern builds...they are really fun to do if you are not on a tight schedule. This was some heavy oil tan from Acadia and the last bit of the chestnut W&C bridle.
-
Help a guy out with his new skiving machine!
koreric75 replied to YinTx's topic in Leather Machinery
I went through almost an entire bobbin a couple days ago testing the adler out for some belt stitching...seemed to be irregular some stitches great then others knots on top? Finally after messing with tension etc i felt i had it dialed in so of course change the bobbin so i don't get halfway through the belt...then found that i had forgot to pull the thread in between the spring tension on the bobbin case......sooo started over with a new bobbin, fresh scrap and a humble attitude....lol -
I'm not saying it won't, for whole belt/straps i use my tandy deluxe splitter, waited and waited until it finally went on sale for Christmas one year, but it's not for doing edges, that is why i bought the green thing...but like i said for those edge skives i use my japanese skiving knife style...
-
I have the same one, it will skive leather, but if it's stretchy it will stretch it out trying to pull it through or bunch up and dig in. Also the blade holder doesn't cover the rear corners of the razor blade so there's that to watch out for...ask me how I know...lol. I think with some time, alot of time and patience you could get it to work for some things, but for me it isn't worth the time, i'd rather just use my manual skiver as it takes less time than fiddling with the green machine.
-
linked it...
-
I haven't seen one of those type reducers on a sewing machine, but ultimately mounting will depend on your table and preference. I went with a box type reducer that utilizes the same mounting holes as the servo and the servo mounts to the bottom of the box...made it very simple, but on my old adler i had to remove the knee lift as the bracket interfered with the box mounting position. If it was a huge deal, and my table would allow it, I could rotate the entire assembly 180* and set the motor to spin the other way, but that would require drilling new holes and my table wouldn't fit it that way so I'm ok for now with using the rear foot lift, and will probably get a treadle pedal and connect a wire to the lift roller down the road a bit. Hope this helps, would love to see pics of how it turns out.
-
try solar-leather or toledo sewing, i've only seen fire engine red in 277, but never know...
-
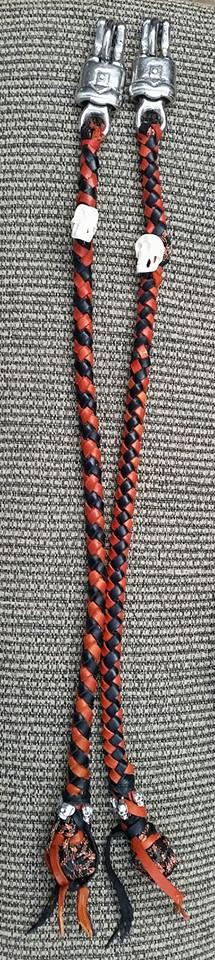
here's the only thing i have that shows it very well, this was 4/5oz vegtan dip dyed black and orange then braided....hope this helps...ps. it was fiebings "orange" and ordered off amazon as no one had it in stock.

-
Review of Hermann Oak Leather by SLC (Economy grade)
koreric75 replied to YinTx's topic in Leatherwork Conversation
Thanks for the review @YinTx, I was curious when i saw the video...I take trips right up through Springfield to see family further north, but just can't make myself stop in there and check out the store. I would imagine, if you were able to hand select the sides yourself and knock off shipping that would be a huge benefit. I have been taking advantage of W&C overstock/special grades lately for smaller items, and so far have been pleasantly surprised with what I've been able to do with the lower graded sides. As always, beautiful wristlet, your tooling and stamping and stitching are top notch...how did you go about the color on this one? it's very even and nicely finished as well. -
That is not always a bad thing...I do have a "target weight", but if i'm not at that exact weight, but I fit into a certain pair of jeans that haven't been worn for a couple years then i don't really care. If you feel better and your overall health is improved, weight is just a number.
-
I think this i a great thread! I've personally watched @bikermutt07 lose over 100lbs, back then I was the "skinny one"...lol. But as we know life happens and we lose focus on one thing and zero in on another. I'm in the process of retiring after 23+ yrs in the USAF, so focus has been getting a real job...lol. I'm on terminal leave now, and enjoying time off with the kiddos over the summer months, but also notice I've picked up 20-30 lbs since my last pt test. What's worse is I pay a membership for the YMCA that is obviously being squandered, that money could've been spent on leather if i'm not using it...so back to it. I was 270lbs at the start of July, I'm down to 258lbs this morning, and want to get back to where I was in December at 225lbs. Official retirement date is 1 Sep 2019, my goal is to be back to ~235lbs by then...I think it's definitely possible. I have destressed as I have a job lined up starting in Aug, and have been getting to some projects that I've been putting off. How is everyone else doing so far?
-
I have the 3 volumes of How to make leather cases, I love them all and they have been very helpful. Now how many of those "exact" items have I made? none, but i have used pieces and parts from all 3 books for many many projects... ha handle from here for this bag, a pocket from this page for that bag, etc...also when i was struggling on how to make a turned bag look a little better at the seams, i turned to the volumes and found the info on welting, and figured that would work for piping as well and it turned out ok. My most recent bag was a patter from Tony See (dieselpunk), and I used a strap design right out of the volumes, the one with a conway buckle for the adjustment...turned out great. Best advice i can give is to do something...I could sit an envision ideas all day long, but i have to get something down on posterboard and start folding and getting 3d going for my brain to kick in. Once that spark happens the leather comes out and things happen, sometimes good, sometimes not, but good or bad i'm learning what to do or what not to do. For patterns, keep in mind always...what seam allowance am I leaving, and how will the temper, and thickness of the material affect the dimensions i've built out on paper or posterboard, and DOCUMENT everything you do if your desire is to be able to recreate the bag!!! I am very bad about this and i'll end up with a finished bag that i really like, and then a few weeks, months, days...i'll realize, if i had to reddo it i'd be starting from scratch because what i had drawn out and what actually happened were 2 totally different things. Hope this helps, and can't wait to see what comes to mind.
-
I'll 2d that, I've been using this guide, actually laminated it and hung it up with some other quick ref stuff...only had 2 belts that didn't come out fitting, found out later even though explicitly telling folks to measure the old "fitting" belt, or use a tape measure and get me the actual waist size. Both figured that the jeans size would be just as good and that's what they gave me so that's what they got...lol. I have seen as much difference from one pair of jeans marked 36 to a fella with a 40" waist that was still getting into them...but that 36" to the middle hole was far from close and couldn't even get the belt around him to fit the last hole. Had I used the actual waist 40" (if measured bare skin I'd add an inch for material bulk) then I could've used that number 40"or 41" for the buckle bend to the middle hole measurement then add my 8" for the blank to do my buckle fold end and have the last couple holes...i probably would've started with a 50" blank in this case as sometimes i need a couple tries with my belt tipper punch...i have the hardest time getting that thing even... I hope this helps, although I've really only regurgitated what is already in the pdf, and without knowing how measurements were taken we can't help troubleshoot much more than that. I'm from the ShowMe state as well, so show me what ya did...lol.
-
Short by how much?