


kgg
-
Posts
3,357 -
Joined
-
Last visited
Content Type
Profiles
Forums
Events
Blogs
Gallery
Store
Everything posted by kgg
-
What a shame, that video was from back in 2015. I did wonder after watching both of the video's if he (now I know it was you) ever got it working correctly. kgg
-
Good repurposing of an old drill. kgg
-
I would checkout this video as it adjusts a set screw behind the small horizontal plate that adds or releases tension on the up and down movement of the rear pressor foot shaft. May help in reducing the jerky movement. The video is called "Techsew 4100 Trouble shoot" Link: youtube.com/watch?v=NHswdukpWog&t=600s kgg
-
I do find it odd that a lot of the heavy duty machines say their machines can take a #18 to XX needle or V69 to XXX thread but you can't readily get them. kgg
-
I can't be of any help other then check with a cobbler that does replacement soles cut from either used car tires or the sheets of retreads rubber used to retread tires. kgg
-
I would still check with Aaron Martin in western Ontario as they do cater to the horse and tack people and mybe able to source them. kgg
-
I would try: i) Cowboy Dealer ii) Aaron Martin in western Ontario as they maybe able to order ------ aaronmartin.com/product.php?cat_id=996&catview=20&submit=View ---- they list Schmetz in a 160 (#23) iii) Cutex Sewing ------ cutexsewingsupplies.com/products/100-organ-7x3-dyx3-794-sewing-machine-needles-singer-consew-highlead?variant=32221430415413 --- they list Organ in a 120 (#19) iv) Amazon ---------- amazon.com/7X3-Sewing-Machine-Needles-Highlead/dp/B01FGZ22X6?th=1--- they list Organ in a 120 (#19) kgg
-
Thank you. Give it a go, you got nothing to loss. The only problem maybe the length of usable shaft which could be extended with inside threaded shaft extenders or similar shaft extenders. kgg
-
Thank you. The thread on the both sides of the the machine shaft are your standard SAE 5/8" - 11 just that the right side has your standard right hand thread twist and the other side is a left hand thread twist (commonly known as bastard thread). There is a silver color nut for the side with the regular thread and a dull sort of yellowish nut for the other. Also the machine did come with two 8" cotton polishing pads. kgg
-
Not sure yet and the heat maybe the down fall but over the next day or so I am going to give it a go on a half round sheath that I have be playing with so we'll see. kgg
-
I agree, just got to figure out what sizes of grooves that will get used the most. I think I am going to use some good old fashion Canadian ironwood (eastern hophornbeam ) which is the hardest wood in Canada and I have a lot of it. kgg
-
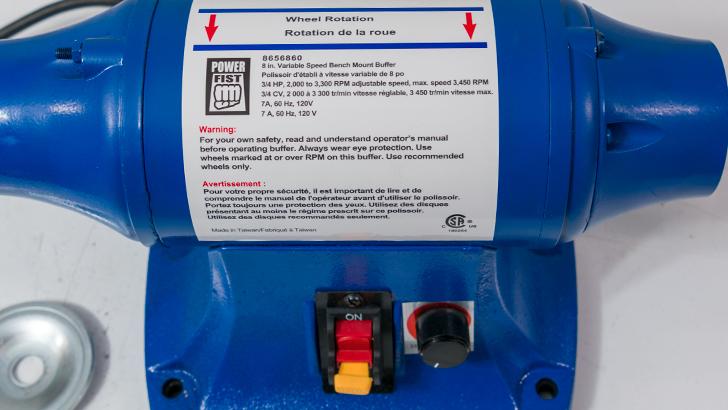
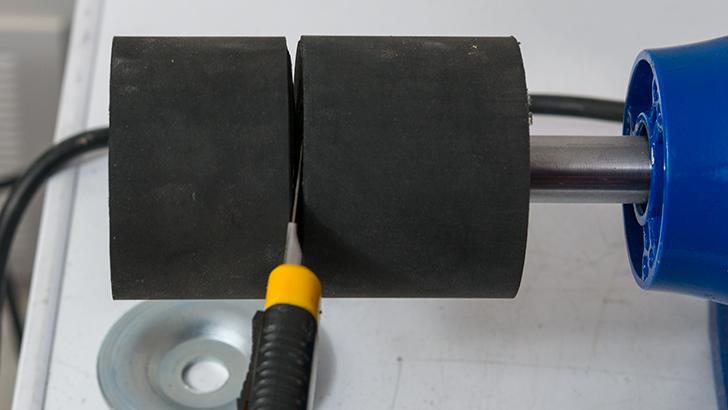
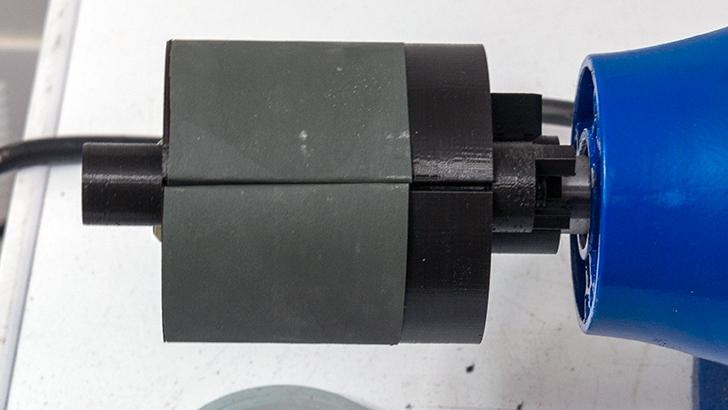
I was looking to step-up from the inexpensive rotary tool attachment to a more professional setup. Sticker / spec shock would be an under statement as anything I would consider decent was about $750 plus shipping with adjustable speed control but only with 1/2" or less diameter shafts and amp ratings of 5 or less. After much looking and pondering I settled on a 8" buffing / polishing bench machine made in Taiwan from Princess Auto (Photo 1) as it pretty well covered off what I was looking for: i) 3/4" main shaft cut down to 5/8" (Photo 2) ii) CSA approved iii) 7 amp rating iv) adjustable speed control from 2000 - 3450 rpm. The price was $130, tax in, and all I had to do was purchase a burnisher ($75 tax in and delivered) and re-drill the 1/2" hole with a 11/16" bit. The next thing was to figure out the sanding wheel side. I chose to go with a 3" x 4 1/2" sanding sleeve which I could have in hindsight gone with a 2" diameter sleeve. This required me to get a 4 1/2" rubber sanding drum ($30 tax in and delivered) and 3" x 4 1/2" sanding discs ($28.50 tax in and delivered). Then I had to re-drill the 1/2" hole with a 5/8" bit and cut it roughly to the usable 5/8" section of the shaft. To cut the rubber sanding drum I stuck it on the shaft and with the machine running I used a utility knife to cut it to the proper length (Photo 3). This did work but the drawback was there was a lot of the sanding disc unsupported about 77mm (Photo 4). The piece I am holding is just too tighten or loosen the spacer in place / removal (Photo 5). To this point the cost is $263.50 for something that can do the job but... The sanding disc side of the machine was begging to get modified so I 3D some stuff: 1. A spacer which fills the unsupported and allows the use of the full sleeve (4 1/2 long x 3 inch diameter) rather then just 37 mm of the supported surface. 2. A 3.15 inch long x 3 inch diameter sander wheel for using standard sheets of sandpaper (Photo 6). This was a scrap piece of 1000 grit sandpaper I had handy just to show how it wraps around the drum. This way I can have a better range of available sanding grits and get three pieces of sandpaper out of a sheet. It's also cheaper as a sanding sleeve costs about $8 each whereas a 3 pack of the expensive 3M sandpaper sheets are about $8 and I get 9 pieces so it costs about a dollar per. I did like the principal that the Just Wood burnisher in the UK uses to attach the sandpaper to the drum but I figured I could build a better mouse trap. My thought on the Just Wood as I see it is once you cut the sandpaper sheets too the proper width along the length of the sandpaper sheet you have to trim the length by about 10mm and the sandpaper is being held in place by a hollow flatten pin that is dependent on a friction fit in a oblong hole. 3. A 4.25 inch long x 3 inch diameter burnisher with 1- 15mm, 1-10mm, 1-8mm, 2- 6mm and 1-4mm concave slots. This does work but if I like it I probably will use it as a guide and turn it in wood (Photo 7). The cost of PLA filament about $30. Total Cost including about $30 in PLA filament is $293.50. So far no problems like flying bits and pieces, fractures or catastrophic failures when run at full bore. Any and all comments are welcomed.


-
I don't think of it as so much as pushback but on this side of the pond, at least where I am, the cost of those items would be much greater then the £30 ($50 CAD) you paid. The taper bearing alone would be probably be £30 ($50 CAD) or more depending on the size and to get a decent pulley the cost would be £60 ($100) or more. Not everyone feels comfortable in modifying their machine so for a little more money it is easier just to order a speed reducer setup and belt that is mounted under the table mount. If the machine is used and or the motor is older I would recommend replacing the motor with a newer servo motor. Then if the speed still needs to be further reduced add a under-the-table speed reducer setup. kgg
-
It still is, with Imperial easier to access for a lot of items like nuts, bolts, drill bits, pulley's etc. kgg
-
Will my sewing machine work well with leather?
kgg replied to Warhauk's topic in Leatherwork Conversation
Right up front I know nothing about your particular machine. According to the spec of your machine you have a single needle domestic embroidery machine which maybe able to do some normal tailoring sewing tasks but it is geared more for doing embroidery tasks using generally thinner fabrics. Most domestic sewing machines not domestic embroidery machine can do about 1mm or so of soft leather, chrome tan. The older domestic sewing machines like the Singers could probably handle much thicker soft leather occasionally as they were case iron bodied machines with real metal gears and shafts. For leather you need a metal bodied machine with metal gears and the thicker the leather the heavier the machine you need. I wouldn't attempt to use your machine for leather or thick tough fabric like 21 oz canvas. Since there is no one machine that will do everything the key in finding a new or used sewing machine for leather is knowing what you would like to sew whether that is wallets or saddles. kgg -
You never said the size of thread you want to use. I did a quick check of the Global WF 975 manual and the max needle is a #22 (140 metric) which is the bottom end for V138 ( Tkt 20 ) in softer thinner material. I couldn't find a manual for the WF 69 so I would check with the seller and see what is the max needle size these machines can handle.
-
As MtlBiker said call Chris at Japan Sewing. Good prices and save on shipping cost or you can pick it up. I have purchased all my new machines from him, good service. kgg
-
What Country / City are you located in as someone maybe able to direct you to vendor close to your location. kgg
-
I personally use the brush type motors similar to the one Wiz mention on my machines with no problems. I would say definitely put a new servo motor on your machine and give it a try. You could always add a speed reducer at a later date if you find that it still doesn't give you the control you need. kgg
-
A couple of things that maybe a play. Run speed. I run the Prusa's at 100 mm per second. Type of PLA. I use a Hybrid engineering grade PLA which requires it have a head temperature of 245 C which causes the filament to fuse yielding less individual lines in the print. Glue stick. With the type of PLA I use and at the speed I run if I don't use the glue stick I have found that I get a 5% failure rate. So to get the consistency I want I just add the glue as cheap insurance. I can see having the printer enclosed may keep the area at a more constant temp which could also affect printing. I'm going to have to think about that. kgg
-
This may help others that are using 3D filament dryers and is just my experience which may vary. Those that want or need filament to have a constant water content on all prints regardless of humidly are probably considering a filament dryer. I have three such dryers but I will discuss the two that are directly connected to 3D printers. One is a PrintDry "Dryer Pro", the other is a EIBOS3D CYCLOPES and both are made in China. The EIBOS3D CYCLOPES is probably sort of worth the money and the wait which is about two months as it must take a slow boat journey from China to your door. The EIBOS3D CYCLOPES out preforms the PrintDry "Dryer Pro" on the following points: i) Less expensive. ii) Gets down to sub ten percent ambient moisture in under 30min vs 70min. iii) Has a smaller footprint. iv) Can handle dual roles at once like the PrintDry but can handle one big role without the need of adapter's. v) The housing is clear so you can see how much filament is left on the roll. vi) The housing has holes in the top of the container so that it can live on your desk next to or behind your printer. vii) The PrintDry also needs to be unplugged as it never really goes 'off' and with the touch sensor on the front it is always active and easily pressed. Of all the issues with the PrintDry "Dryer Pro" the worst is the very poor filament roll off caused by poor bearings. Had a 30 hr prototype print for my burnisher jam up at hour 25 because of increased resistance from the 'roller bearings'. Needless to say I had some colorful words. kgg
-
This may help others that are using Prusa 3D printers and is just my experience which may vary depending on user printing needs. Prusa makes 3 different bed plate styles, original 'Smooth', 2nd gen 'Rough', 3rd gen 'Satin'. What I found was "Smooth" works well with PLA and PETG, the "Rough" works best with PLA while "Satin" works best with nothing. None give 100 percent consistency all the time of sticking PLA even after using degreaser then 99 rubbing alcohol and running at 50 to 75 bed temps. All 3 still need a thin layer of glue for optimal first layer squish with PLA. The "Rough" gives a slightly rough texture but is the most forgiving. You can squish the first layer so much that it melds into a solid base. The "Smooth" is the least forgiving but gives a glass smooth surface and if you look close you can actually see the outline of the lines of the plate in the first layer. The "Satin" is a compromise between the "Smooth" and the "Rough" plates. Not glass smooth but hard to see your lines (right at edge of almost being solid). If I was to buy again I would stick with "Rough" with maybe a "Smooth" plate as backup for oddball prints. I will avoid the "Satin" when purchasing in the future just not worth it. kgg
-
Taurus cylinder arm machine
kgg replied to TheDavidLeathermanShow's topic in Leather Sewing Machines
This video if it is similar to the Atlas AT2628 will help with you do the conversion with a couple of nice closeups. www.youtube.com/watch?v=-MZjEKvDuQY I think a lot of us have made a mistake or two over the years. kgg -
Taurus cylinder arm machine
kgg replied to TheDavidLeathermanShow's topic in Leather Sewing Machines
You have not mentioned what you are sewing. The machine does look in good overall shape and maybe missing some parts. I would ask from what dealer they bought the machine from as getting those parts may prove to be difficult. The main question I would ask is it suitable to properly sew your items in the thread size and thickness that you need/want. kgg -
Unless he is up front with why he needs a dozen wallets without logo's tell him that with the logo it's "X" dollars per wallet and "3X or +" dollars per wallet without the logo as well as suggesting he approach say Gucci. kgg