Goldshot Ron
-
Posts
405 -
Joined
-
Last visited
Content Type
Profiles
Forums
Events
Blogs
Gallery
Store
Everything posted by Goldshot Ron
-
Like Tom, I have made wooden blocks to mold my leather around. After making a case, it can be stretched by wetting the case and adding an 8/9oz. piece to the mold and remolding to fit the phone. One problem you'll find when making a case for someone, they neglect to tell you that they have a protection trim around their phone. Always look and measure the phone yourself, don't count on the customer's figure being correct. Ron
-
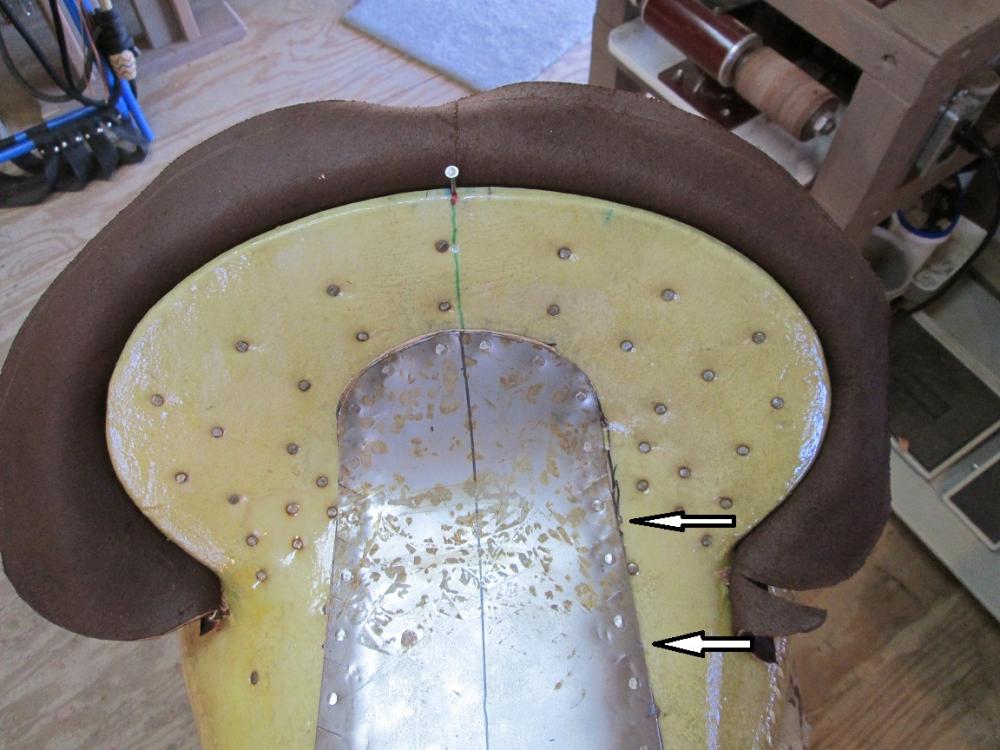
Here's one tip if you haven't tried it yet; make angled cuts between the nail holes along the bars. The cuts should be uniform in length and distance between each other. The cut would be from the edge of the strainer, and no further than the edge of the bar (approximately 3/4 to 1 inch). Cuts don't have to be made along the cantle section. This allows the strainer edge to conform to the bars without hammering the hell out of the center seat part of the strainer. You shouldn't be hammering the plate so hard that you break a mallet. Also, use an anvil to help shape the plate, not your tree. I have a piece of train rail for my anvil. Also, make sure that the bottom of the strainer is not so flat that it lies on the horse's spine, or pushes the pad down causing a pressure point along the back. Everyone lays the ground seat pieces differently over the strainer, so remember that the leather primarily forms the seat, not the metal strainer. Hope this helps, Ron
-
Years ago I purchased a CS Osborn oval punch. It was the smallest they made. Because of the bevel of the punch, the hole is larger than ideal. Who makes oval punches that would make a nice hole? Ron
-
Do whatever you have to do to make it work.
-
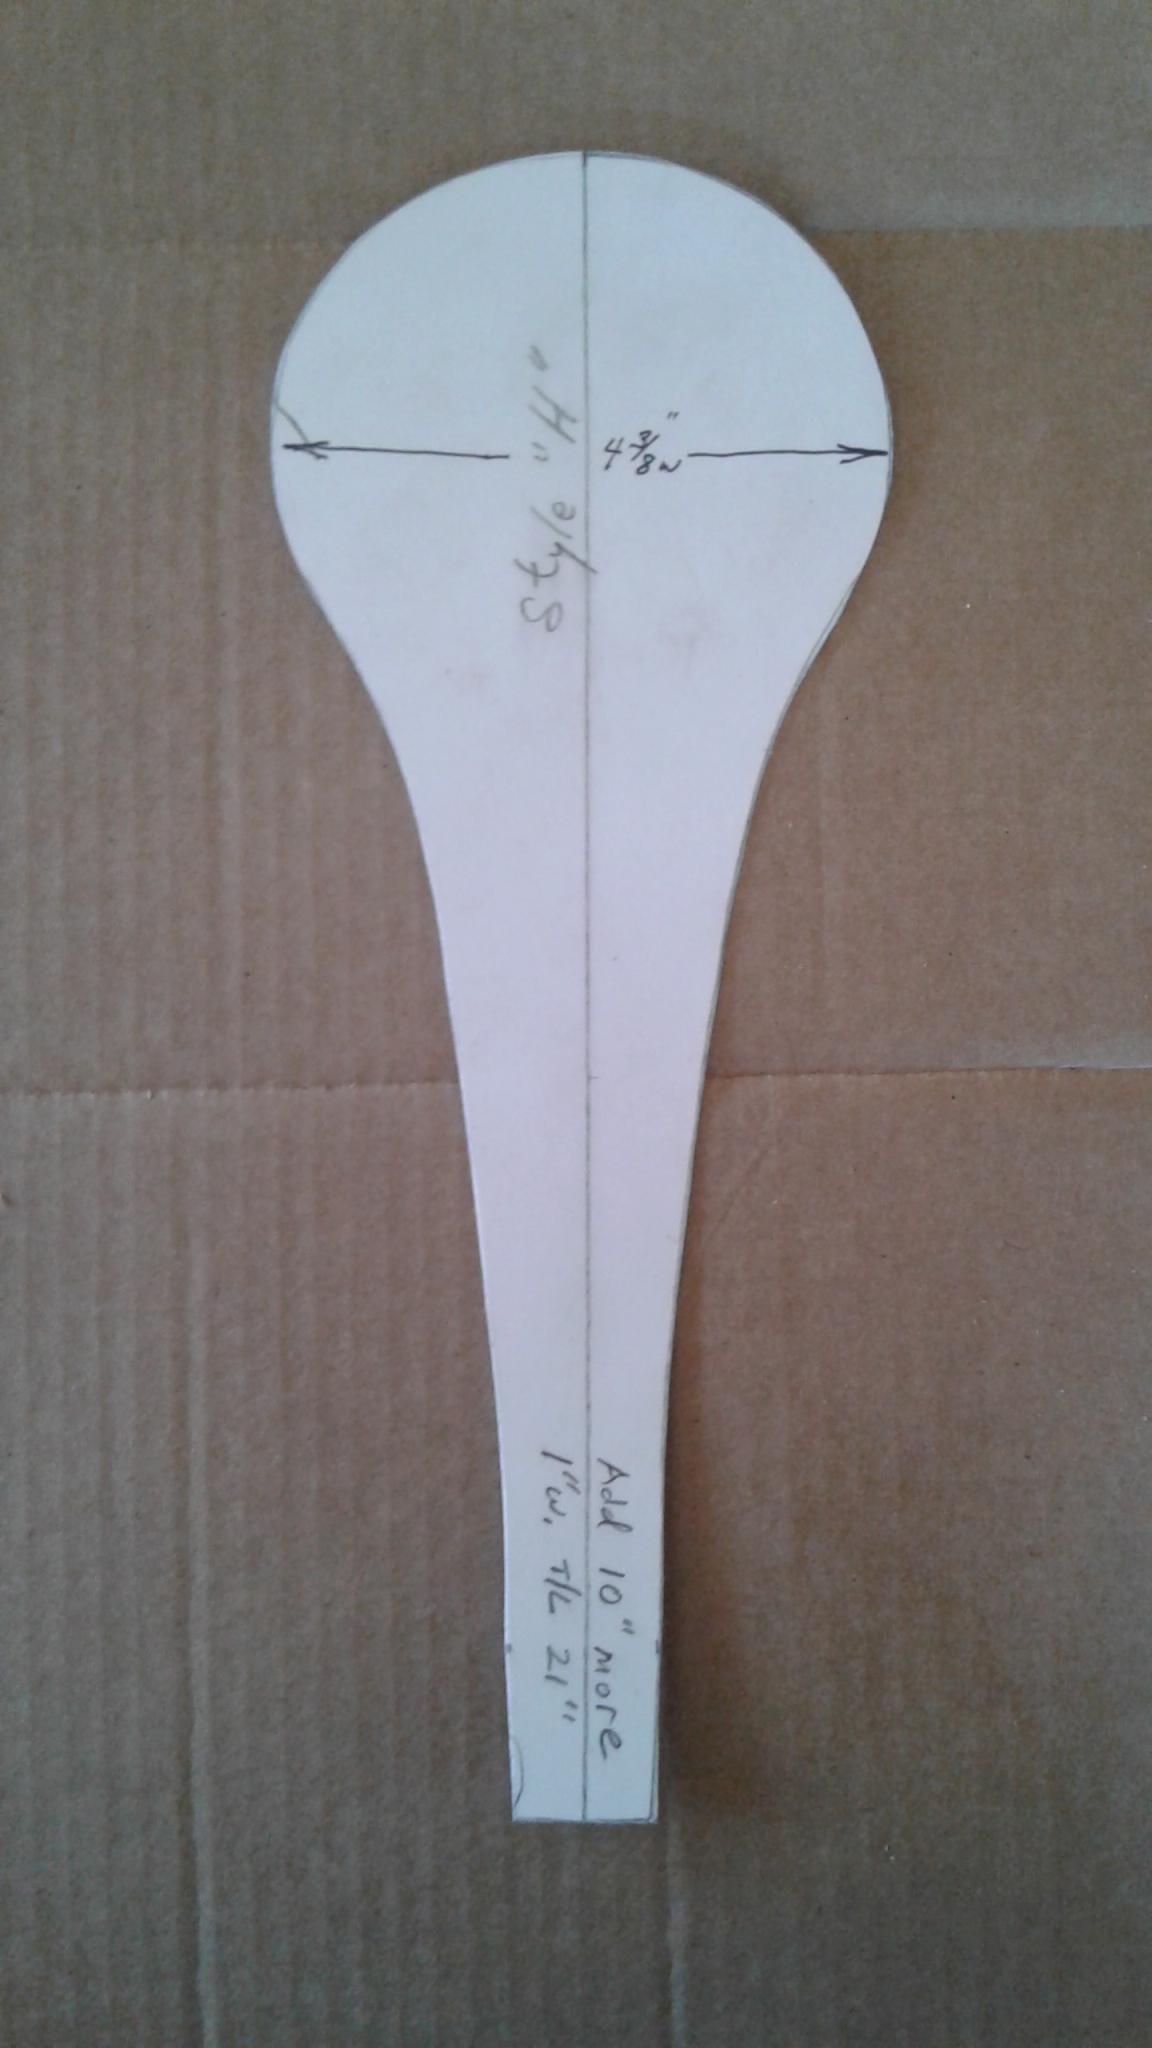
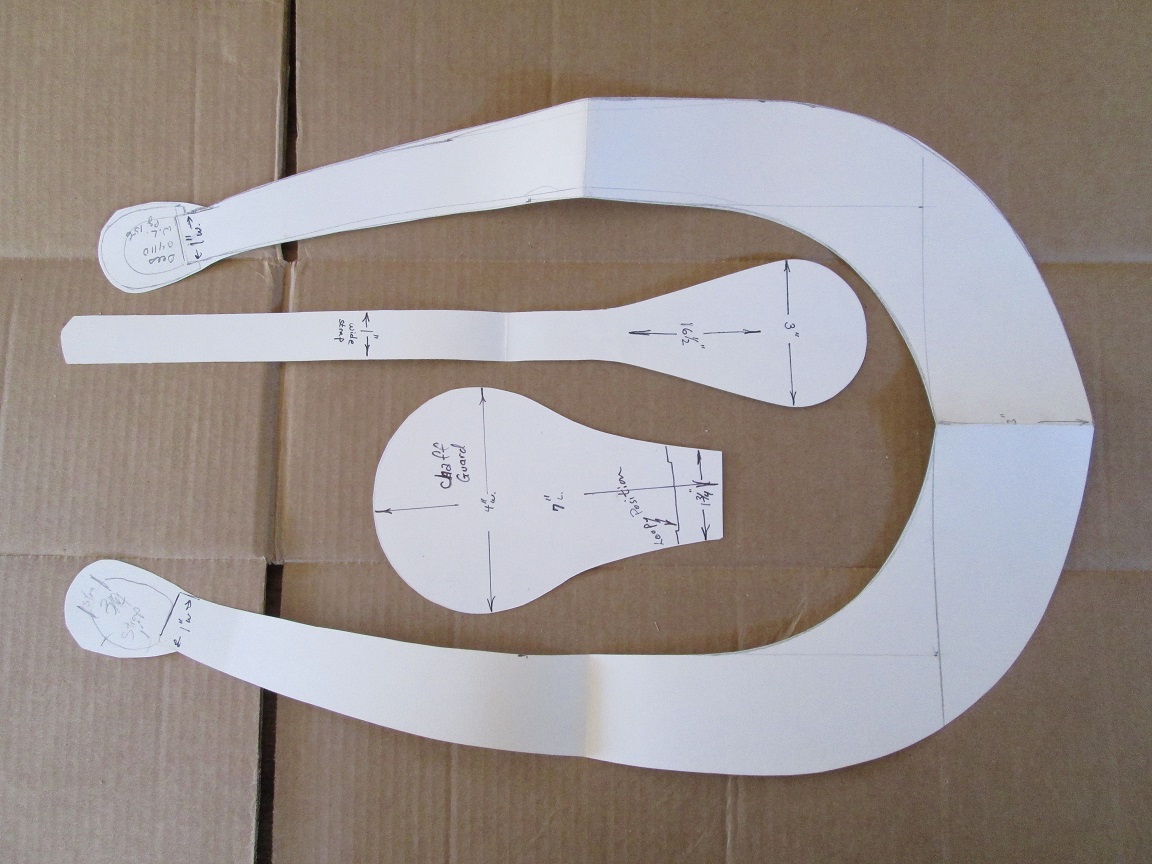
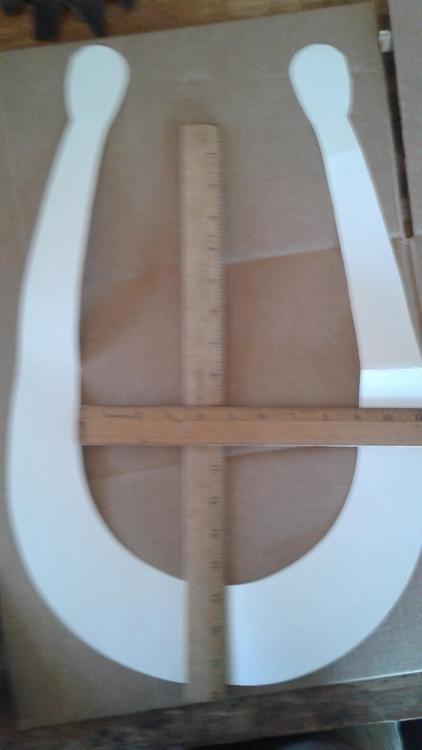
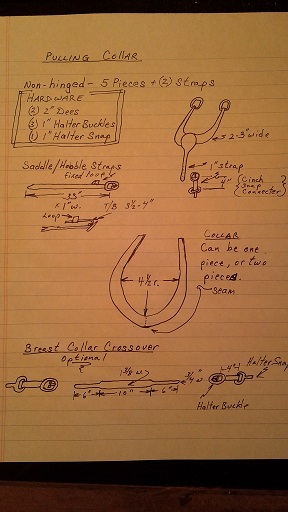
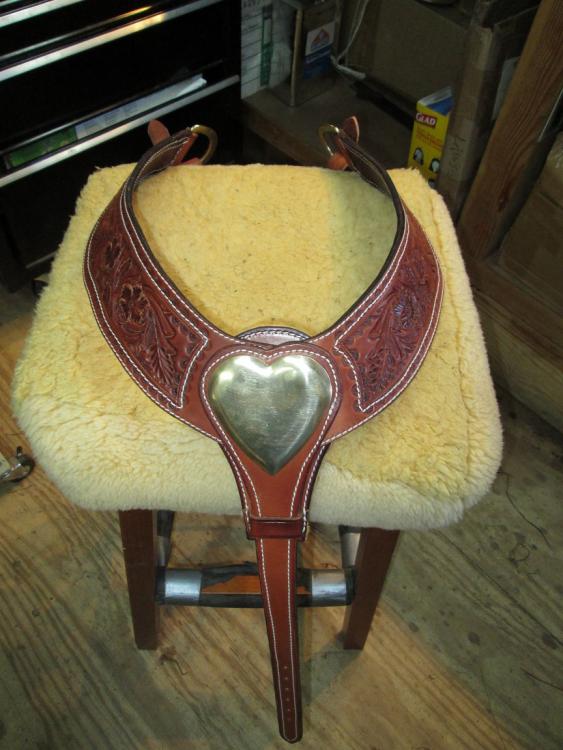
Attached are plans and instructions. Note that the radius of the arch is 4.5 inches. This may vary depending on the horse, but fits a 16 hand quarter horse mare (big girl). Photo 1 - collar, photo 2 center strap to cinch, photo 3 is all parts except the snap and buckle at cinch center dee. Chaff guard in optional.


-
I can post a jpeg of the pattern, and the instructions. But, a pdf version is beyond my computer skills. Ron
-
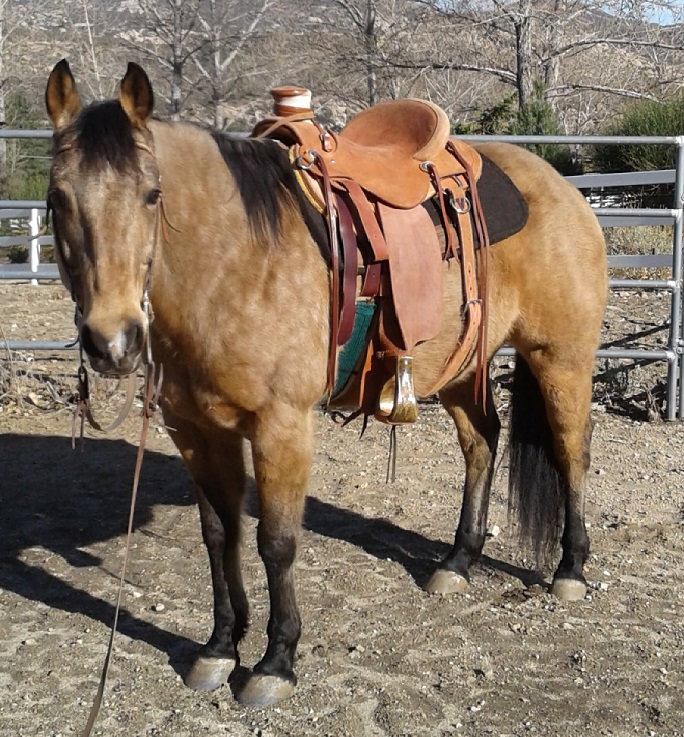
Are you looking for something like this photo.
-
Ken, I don't know your age, nor the area where you were raised; but being raised in Southern California, most of the people that I've met have been mainly recreational riders. They don't need heavy saddles, and the only jerking down that they do is on the cinch. In the last 65 years, I've met some ranch riders that had to rope a steer for doctoring, and young fellows that like to play cowboy (even those young fellows have grown up and use chutes more and more). I've worked with packers that tow mule strings, and they use lighter saddles, especially in the Eastern Sierras where less weight is good. A well built saddle doesn't have to be 40+ pounds. As a Back Country Horseman member, I see the aging of America when it comes to horse people. As we age that old heavy saddle has to give way to lighter saddles if we are still to enjoy the horse experience. I think the experience that you describe is that of people who make their living on horseback. Running cows doesn't have to be on horseback any longer. Heck, in my area, there's a family that have been running cows for over 125 years. One of the daughters rides her mountain bike to check on the stock (through areas where only a mtn. goat can go). I just hope horses stay around a little longer, even if people are using endurance saddles. People can still buy good roping saddles, but I think the trend is toward lighter and more comfortable recreational saddles. Ron
-
Ryan, Do you want a bronc saddle or a working saddle? I've read the replies to your tree questions; however, I keep wondering: "what kind of saddle do you want to build?" Do you want a ranch, roping, trail, pleasure, mounted shooting, or reining/penning style saddle. Forward swing is okay for some events, and there are always people that want a lot of forward swing; but that doesn't mean that it is the correct way to ride. When laying out your stirrup leather slots, you have to take into account your rigging placement and rider BALANCE. When you throw your legs forward, you are placing yourself off balance; thus, your body moves backward. Being young you may have the strength to adjust and hang on, but wait till you age. Balance will be your friend when you're in your 60's. I've added some lines to your photo to show you that moving your stirrup leathers forward affect how you'll place your rigging plates. My drawings show roughly a flatplate design. You can see that if you cut into your front rigging position, you weaken the area that supports the front ring. Forward swing can be increased with lighter leather for the rigging rings, but is this what you want? Blue line is rigging plate. Yellow line is the one you drew. and the green line is where the forward most edge should be for the stirrup leather slot. As you can see, if you cut out the forward yellow line, you decrease the amount of leather supporting your ring. If you ride up and over the rigging plate, you create a lump under your leg. Take into account that the rear swell edge of the rigging plate is usually skived thinner than the front to begin with, but skiving it more to allow for forward swing weakens your plate. I suggest you do a little more research in designs, styles, and rider placement. Ron

-
Billy, Did you ever think of carrying your rear part over to the middle of the bars and lacing both sides together in the rear. Then leave off the rear jockey, and just put a design on the rigging plates in the rear area. The more I look at your idea, the more I can see it as a way to reduce weight, yet still maintain the integrity and strength of the rigging. Just thinking outside of the box . Ron
-
 Sioux, you're right, most people will become use to a saddle being a certain way, and all other ways are wrong. I am in the opinion different to you. I build my saddles with the extra leather turned inward and may have to be tucked under the stirrup bar (when using Blevins buckles). I have ridden saddles where the extra stirrup leather (facing outward) was so stiff and long that it caught the toe of my boot. When I went to dismount, the leather wedged my foot in the stirrup and I had to reach down and dislodge my foot before kicking my foot out of the stirrup. I feel that this is a safety issue, especially for younger riders. One summer while working as a "dude" wrangler, I saw this happen a lot with inexperienced riders. Most of the saddles I make start out with the buckle pins facing inward, but when twisted, the stirrup leathers are outward. However, the twist keeps the excess leather from riding or touching the toe of your boots. The one thing about turning the extra leather around the stirrup bolt is that you will need to make a longer stirrup hobble, than usual, to fasten around the extra material. As a rider this doesn't bother me, but I'm getting as old as dirt anyway. Ron P.S. rat droppings on the seat is disgusting, and no matter what I have tried, you can't get rid of the marks unless you install a whole new seat. I have even dyed seats, but the little pockets that the critters poop left were still visible.
 -
Ok Billy, No one asked, but I noticed the swell cover comes down and is part of your rigging plate. Is this correct? If so, does this also go back under the seat jockey and forms the flat plate rigging? This all looks very clean, just unconventional. Ron
-
Workshop recommendations depend on your skill level, leather working project desires, and your particular interest in design (western, floral, abstract, modern). The tooling instructors are all good: Al Gould is good for beginners, Bob Park offers a different style than Al and is very informative, Gordon Andrus and Rocky Minister also have unique styles but their classes are better suited for intermediate and up. If you are interested in saddle making and heavy leather projects Smith and Klenda are good. I would recommend taking at least one class prior to visiting the vendor booths. This offers you insight on new techniques and tools. Then you'll have a better insight for the booths selling what you'll need, and always count on spending more than you expected. I don't think you'll go wrong with any of the classes and instructors. Ron
-
Quigley saddle bags
Goldshot Ron replied to fortdick's topic in Gun Holsters, Rifle Slings and Knife Sheathes
I'm leaning toward the "Sam Brown" ball stud for the thumb release. But, I need to experiment first to see what will work best. The gun I'm using is a 45 colt revolver, but the design for the bag will be more modern. It's a practice piece to keep creative, and move away from making headstalls and repair work. Dan, sorry for hijacking your post. -
Check out Luberto #9 machine in the New Category for sewing machines. Beaumont, CA not far for you to go.
-
Do you want to duplicate the leashes shown on the website? If not, I'd suggest using a 12-14 oz. harness leather back. Using copper rivets for the hand loop and attaching the snap. You can make this using a strap cutter, rivets, rivet setter, and a no. 3 edger. After using edger rub your edges to a smooth surface. Finish by rubbing a conditioner into the leash, example Oakwood Leather Conditioner. Simple without major tool cost.
-
Since no one has responded, and I would imagine that you'd like to move on, I'll give you some suggestions. First, your design always comes back to the center because your stems and leaves are not flowing as you would find them in nature. Flowers grow from a source, and the stems and leaves move from that source. Your drawing starts with the center flower growing out of thin air. There's no source for the flower; thus, your stems flow from the flower. Start your stems from a lower corner and grow from there. Eventually ending with the center flower as your focal point and finale. There's more to recommend with your drawing, but first things first. Good Luck, Ron
-
Quigley saddle bags
Goldshot Ron replied to fortdick's topic in Gun Holsters, Rifle Slings and Knife Sheathes
Thanks for the info. Josh. You bags look really good. I'm working on a design for a pommel bag with a holster covered by the flap. I'm leaning toward using a buckled strap, but it is actually attached on one end with a button for a quick thumb release for quicker draw of the pistol. Have you seen anything like that? Ron -
Quigley saddle bags
Goldshot Ron replied to fortdick's topic in Gun Holsters, Rifle Slings and Knife Sheathes
The strap running through two slots in the flap appears to be a hold over from cavalry bags. The leather that was used in cavalry bags wasn't a heavy veg tanned leather, and the straps over the flap gave it some support. To replace the straps when a horse chews them requires sewing, so I think riveted straps are easier to replace. Also Josh, is your bag with the gun have a pouch on the gun side, or is it just a holster covered by the flap? Ron -
This machine is good for heavier leather, 10 oz. plus. But is hard to adjust for lighter leather, and requires more attention to use. (Second above comments). Leather Machine makes a good machine for less money and is easier to use. There was a Cobra for sale in San Pedro a while back, check used machines on this site for information. Ron
-
Did you ever figure out your lap skiver adjustments? I just picked up a Landis 30 lap skiver, and I'm trying to figure out how to adjust it to skive the edges of chap leather to make my horn wraps. Also, the blade was sharpened on both sides instead of one side like most splitters. Is there a correct way, or is it up to one's preference? Ron
-
I usually use rubber cement for lining belts and straps, this avoids the sticky mess of contact cement. But, for my contact cement I put some in a plastic water bottle with a good lid and I use a piece of wool shearling to spread it. I find this better and cleaner than using a brush and a can. Once the glue sets and the leather pieces are set, I use a piece of rubber crape sole (just a scrap piece of the old opaque rubber sole off of a shoe) to rub off the excess glue along the edges and any string pieces. A shoe repairman gave me this tip years ago, along with the piece of rubber. I've used the same piece for over 10 years. Ron
-
Saddle looks good. What are some of the specs.? Tree maker, type of leather, etc.. Are you entering this into the Pendleton Leather Show saddle contest?
-
John, Re-fleecing a saddle is always a worry for me. People don't realize that the fleece raises the saddle higher than what they are use to, and it has to be broken in again. Was the original fleece real or artificial? What type of rigging is on the saddle? I believe this all has a role to play in how things fit after repairs. I did a saddle for a gal a while back, and she complained that her blankets kept squirting out the back and wouldn't stay in place. I re-fleeced the saddle, and this time I reversed the direction of the fleece and made sure that she knew it. I had even showed her several articles written by experienced saddle makers on how they position the fleece on the skirts. (As you know, every maker has a different opinion.) I let her tell me which direction she wanted. I put on the new fleece at my expense, and never heard from her again. Don't know if she was ever satisfied, but sometimes you can do just so much. It's all a learning experience, and I figure that in another 50 or so years, I might be half way there. Ron
-
I see that Springfield Leather has a pattern pack for collars. It shows a dee style and solid fixed over the shoulder designs. These pattern packs are a start; then you can adjust from there. Ron