

Goldshot Ron
-
Posts
405 -
Joined
-
Last visited
Content Type
Profiles
Forums
Events
Blogs
Gallery
Store
Everything posted by Goldshot Ron
-
Around here, horn wraps are decorative, so I use latigo. However, the last piece of mule hide I purchased was just long enough for one decent wrap. Luckily, I didn't screw up on it, because I don't believe I would have had a longer section to cover a mistake. Your story about hay haulers is similar to farriers around here. They are few and far between. Good luck on your saddle, Ron
-
Did you try Montana Leather. I know Weaver do not have them in stock. I even bought some last Fall from Springfield Leather.
-
Rob, The saddle looks good, and well thought out. I agree with Toot that your seat for the center of gravity may be a little too far back because of the higher position in the hand hole area. That maybe the photo position though. I think you have too much of the front of the skirts visible, and lowering your front jockey would take care of that. The placement of your breast collar dees seems a little high. The catcher and rosette could have been lower to be located in a meatier part of your bars. Do you strings go through the bars? I like your inskirt design, and will save this photo for reference for the next inskirt that I do. Thanks for sharing. Looking good. Ron
-
Well, I guess I did see it. It's even looks more impressive the second time around. You did a lot of tooling, that looks real uniform. Really neat saddle Randy. Ron
-
Randy, Whatever happened to this saddle? Did you post the finished saddle in a different section? I would like to see the finished product. Ron
-

Minor Surface Cracks on a Fender
Goldshot Ron replied to cnaun's topic in Saddle Identification, Restoration & Repair
Once the leather has developed those cracks, all you can do is put a conditioner on the leather. You said you have oiled the fenders, so there is not much else I could recommend. Also, I would not sand the leather. If the cracks are hard and rub your ankle or shin, you could get some different designed stirrup hobbles the would cover that area. For new fenders and leathers the price will vary, but could easily be around $175.00 for a set. A good usable saddle is always worth a couple hundred to repair. -
Opinions on Restoration
Goldshot Ron replied to Goldshot Ron's topic in Saddle Identification, Restoration & Repair
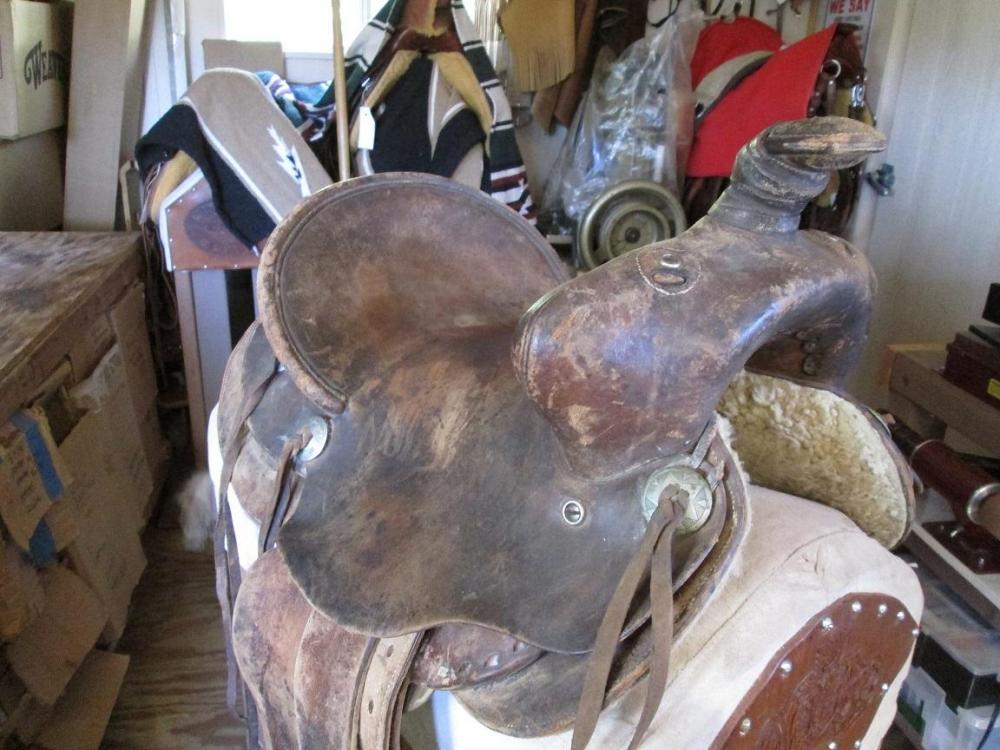
I'm running this up the flagpole again. Any ideas on restoration of the Bohlin saddle, or just clean it. The saddle should be worth something as a collectors item, but is it worth more fully restored or just cleaned? I know that with about $500 worth of materials and effort, the owner will have a saddle they can use or display. Thanks -
Opinions on Restoration
Goldshot Ron replied to Goldshot Ron's topic in Saddle Identification, Restoration & Repair
Also, this is an all "rough out" saddle, and the possible history of the saddle may be of interest to folks. -
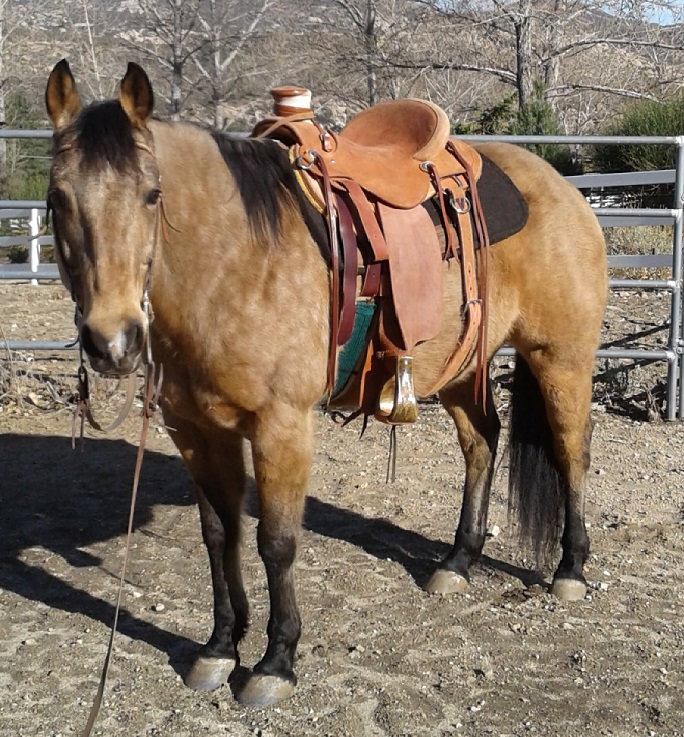
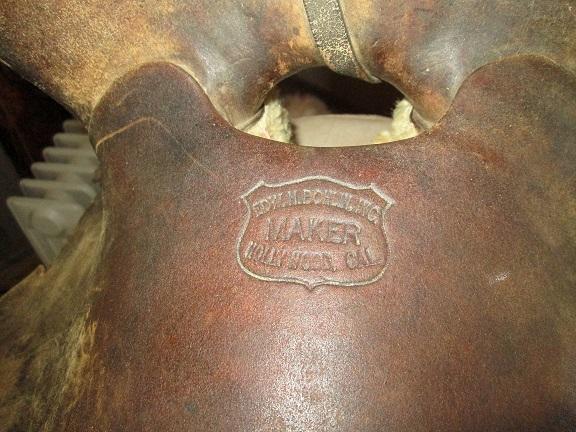
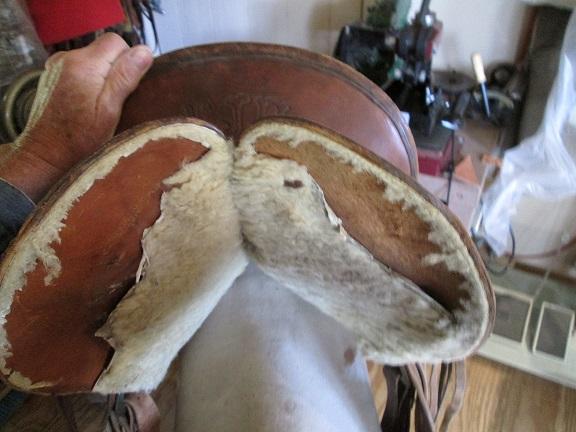
I received an Ed Bohlin saddle to repair and restore. Is the value of the saddle, in the name and condition of the saddle, or would it be better to restore? I foresee problems that if repaired, may lessen it's value. So, I am open for suggestions. Thanks.
.thumb.JPG.2c198eeb0c74e5f51e7905264a2b791b.JPG)
-
I googled you Jon because I thought your name sounded familiar. You have done some impressive work. And, you also made saddle trees? Being the same age as you, I wish you the best, and you have taken excellent care of that machine. I'd make you an offer on the machine, but California is a ways from Iowa. Ron
-
When I layer, or double, straps I cut the top to the measurements that I want. If sewing the liner to the top, I use rubber cement to adhere them together. The liner or bottom layer is cut oversize to the top. If the straps are curved, when attaching them together, bend them in the direction of the curve. Tap them together with your hammer, and sew them together. After sewing, trim excess and edge. I have never had the liner bend without some "bacon" waves. The key is to cut the liner oversize, not the same as the top.
-
Jeremiah Watt's DVD is probably the most thorough of the ones you mentioned. I really liked Bill Gomer's, but it may be hard to find. Harwood's is good, but some feel that you should have built one or two saddles before his video would viewed. Bruce Cheney has a YouTube site, so you may want to check that out first. Good Luck, Ron
-
Replace with No. 9, solid copper rivets. Probably 5/8 to 3/4 inches long.
-
OK, that number is for Sunny Felkins. That is too bad with them closing.
-
Are you talking about Sunny Felkins, Randy?
-
I use my 267 to sew chap leather and light weight veg-tan (approx. 7/8 oz.). I also use it to repair horse covers; it does well sewing nylon webbing to about 3 layers of nylon and padding. I also use it to sew belts. It does jump timing when you least expect it; but, once you know how to reset the timing, it usually takes less than an hour to reset and test. I sew usually with 207 top and 138 bobbin thread. I like the machine; however, I did change out the clutch motor for an electronic one.
-
Try Montana Leather Company, they show them in stock, but they may be the same as Weaver's.
-
Hey Pard, you know how I always mention that you could finish off your horn better, well you nailed it. This saddle looks really good. Keep up the good work, and have a Merry Christmas.
-
First Scabbard
Goldshot Ron replied to rktaylor's topic in Gun Holsters, Rifle Slings and Knife Sheathes
I like how you are branching out from saddles; the scabbard looks great. Whose BW stamp did you use? The border stamp looks like an Ellis Barnes. I have to echo everyone else's compliments. Keep 'er up pard!! -
Front/gusset twisting?
Goldshot Ron replied to Ashley55's topic in Purses, Wallets, Belts and Miscellaneous Pocket Items
I have made several sets of saddle bags, and when I do my gussets I use rubber cement to temporarily glue the seams together or clip them together to determine how everything will fit. It is hard to cut leather at right angles and expect everything to fit. This method allows you to make adjustments before sewing pieces together or braiding them together. -
The patterns you may find are all similar, but yet different in how they may feel. What I suggest is to take an old pair of Levi's, ones that you are going to toss because of holes in the wrong places. Put them on, and with a felt marker draw on them where you will want them to fit. Example: how high in the front, how high around your butt; do they feel good, and is the lengths correct. Cut off the extra material and try them on again. This will be your basic pattern. Now you can add material for batwings, or fringe, whatever. I suggest this method because only after cutting the leather and making the chaps will you know if they fit you comfortably. And, they may not, and you have wasted leather. This process beats using paper patterns that are only a guess at fit.
-
Randy, It looks like it came out fairly well; but, I can now see the "leg cuts" on the swell. I'd like to see how you deal with them installing the final seat. It looks like it will be another challenge. Good luck.
-
Design and hardware for balanced-ride saddle
Goldshot Ron replied to Squilchuck's topic in Saddle Construction
John, I know nothing about balance-ride saddles, but with only 6 saddles under your belt, I would suggest that you are not ready to experiment. I built a knock-off of a Pat Perelli saddle, or at least the best I could from looking at photos on the internet. I was dissatisfied, and I believe the customer was also unhappy. This customer thought I could save him a couple thousand dollars, and I wanted the practice. His savings was not worth it to me, and it was a saddle that I would rather forget. Just my experience, Ron. -
Adding in a back Cinch?
Goldshot Ron replied to seasidesunflower's topic in Saddle Identification, Restoration & Repair
That back ring looks like it is for a britchen strap. It is too far back for a flank cinch dee. A good location, for a flank cinch billet, would be in-line with your concho at the edge of the cantle. -
Remedy for broken Cheyenne roll?
Goldshot Ron replied to Squilchuck's topic in Saddle Identification, Restoration & Repair
It sounds like to me that the saddle was made using cardboard as a filler and not leather. I have worked on saddles that had the same problem, but the owner was willing to pay to have the padded seat replaced, and at the same time I repaired the problem. I agree with Ole Toot, glue won't do much.
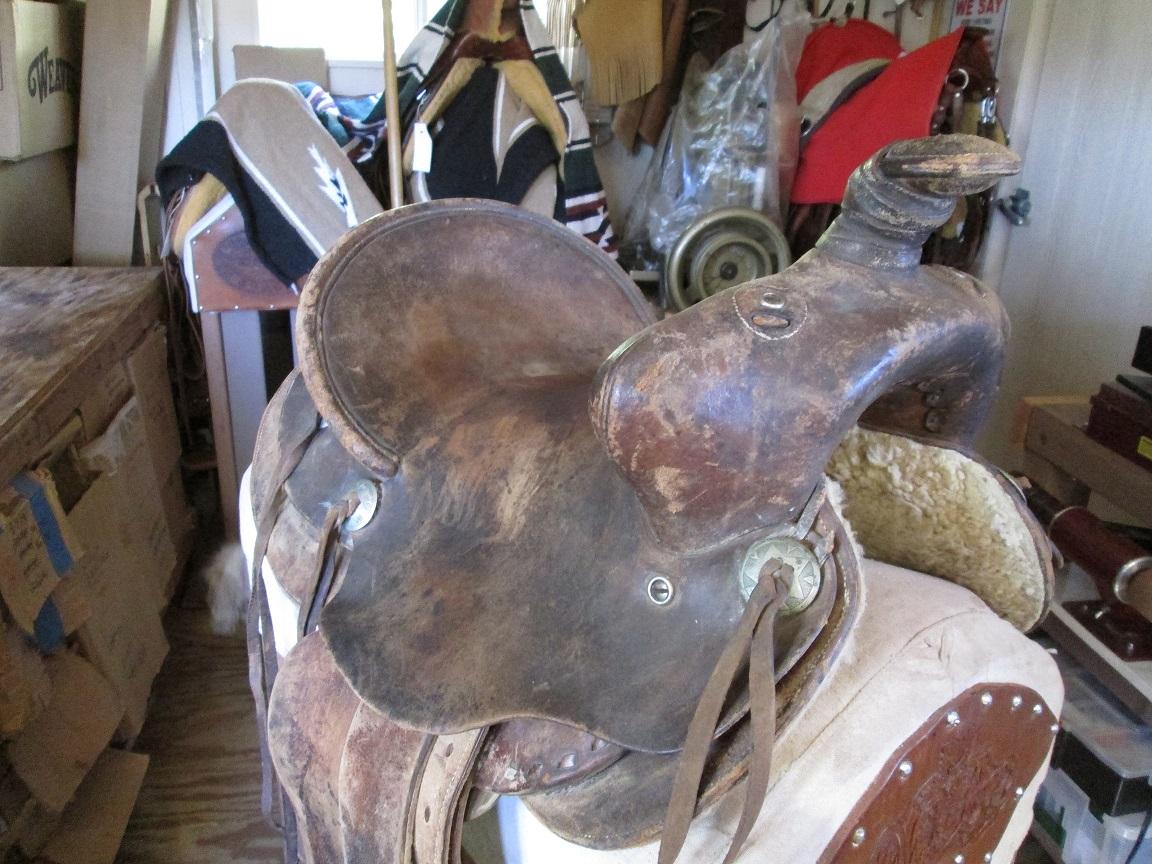
.JPG.08fa06994790fba15f768c401cf0c81a.JPG)