


billybopp
-
Posts
1,935 -
Joined
-
Last visited
Content Type
Profiles
Forums
Events
Blogs
Gallery
Store
Everything posted by billybopp
-

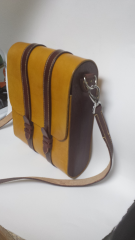
From the album: Billybopps Stuff
-
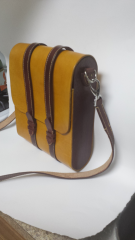
From the album: Billybopps Stuff
-
From the album: Billybopps Stuff
-

Holster Patterns 'n' MORE stuff
billybopp replied to JLSleather's topic in Gun Holsters, Rifle Slings and Knife Sheathes
ROFL ... I wish I had that joke in my arsenal when I used to work with drug companies, they would've loved it! And as you said, content is king! I can put up with quirks, a bit long-winded, and even awful background music as long as I learn something good! - Bill -
Just a 'lil coaster practice
billybopp replied to YinTx's topic in Purses, Wallets, Belts and Miscellaneous Pocket Items
I wouldn't mind havin' that under a nice glass of old enough to vote Laphroaig. Looks good! - Bill -
I just came across this on eBay ... It looks about right, and might be helpful if you ever do similar armor again! https://www.ebay.com/itm/Antique-Hand-made-Leather-Punch-Cobbler-Saddle-Maker/302989484499?hash=item468b94a1d3:g:0dEAAOSwhfRcDGRw - Bill
-
Antiquing is generally done with something darker than the surrounding leather. You can't get darker than black, really, so can't exactly antique that way! But, you could try using a lighter color dye or paint that will settle into impressions and wipe it off the same way you would antique. It'll highlight the tooling for sure, but may not be a look that you want!! - Bill
-
Holster Patterns 'n' MORE stuff
billybopp replied to JLSleather's topic in Gun Holsters, Rifle Slings and Knife Sheathes
I don't make holsters, and probably never will unless somebody asks me to make one for 'em. But still learned a thing or two that will be helpful for other items! I love to learn. Agreed about Sam's voice - and feel badly for his wife LOL. But I suppose like anything you get used to it.... There are other youtubers that I check out often and have to cringe through their voice, but the content makes it worthwhile. There are one or two others that I just can't get past. LOL. But, this does bring a question to mind @JLSleather. I know you do your own designs, and curious if you "get it right" first time every time now, or go through iterations? And if mostly first time, how many did it take you to get there? Just curious and food for thought! - Bill -
The best casters for you really depends on your situation! There are a ton of choices all with pros and cons. Personally, I'd go with something like this from Woodcraft (and probably available elsewhere as well). They won't raise your stand at all until you are ready to move it, and the wheels won't go out of round if things aren't moved around for a long time. You just flip the wheels down when you are ready to move stuff! The only downside to that particular wheel it that they are smallish and could be a pain on carpet or uneven floors. Maybe somebody makes something similar with bigger wheels? - Bill
-
It's a single LONG strip of leather with bleeder knots in three places. That video that @Mattsbagger linked should be very helpful, and I agree with him that if there is any concern about strength of the rivet, the leather will tear before a properly set copper rivet lets go. - Bill
-
I rarely make the same thing twice. And even when I do, there are usually minor changes from the previous version, so I'm always in prototyping mode. When it comes to gussets, I cheat and just make the gusset a bit longer than needed and trim off the excess! Works every time (it's not really cheating if it works, right?) . But yeah, gussets are one item where going from concept/paper to leather is a bit weird. I have pre-punched, and it works fine but it is tedious to me. You need to count an equal number of holes in panel and gusset so that they match and I work with far too many numbers in my day job to unnecessarily do 'em in my off-time! I tend to most often do it they way that @JLSleather mentioned, mark the panel, tack the gusset in place and to at it. But as I said, I leave the gusset a little long to be sure it comes out at exactly the right length. If I were making the same item repeatedly, I'd zero in on the exact gusset length and just use that, but I don't roll that way. You are right, resources that carry you from design through completed item are scarce to none. There are design books (mostly akin to idea sketchbooks from what I have seen), and there are technique books, with very little that covers the in-between part. That's probably not a bad thing, since that in-between part is where creativity comes in. With that said, Arthur Porter on Youtube has some videos series that take you from design to completed item - Mostly fashion bags and accessories using garment leathers. Nigel Armitage has a Youtube video in which he constructs a messenger bag, and explains many of his design decisions - worth a watch. For print resources, if you poke around on Amazon and search "Handbag Design" you'll find a number of books, but I have not personally perused any of those to recommend one or another. For construction technique, I always recommend The Art of Making Leather Cases Series by Al Stohlman: There are 3 books in the series and all excellent. The specific projetcts in them are mostly outdated (Are you old enough to remember instamatic cameras with flash cubes?) but the techniques are just as sound today as ever. - Bill
-
Lacquered Maple Butcher block for table top
billybopp replied to MrLentz's topic in How Do I Do That?
A LOT of what is being sold as butcher block isn't end grain, which is why I asked. End grain really is a fantastic cutting surface. It tends to not pull your knife off-course, is more or less self-healing, and certainly good and solid! Long grain is just not as nice (although also not terrible!) If you are trying to cut along with the grain, your knife can pretty easily be pulled off-course, and cutting across the grain leaves scars. They also tend to be thinner and lighter weight with less wood in them, and easier to make, which probably explains why the marketing folks are trying to pass them off as a true butcher block. More profit. They both need a little maintenance here and there, but more so the long grain kind. Also, with either one of them, I wouldn't worry about finish. If it came lacquered, no worries - leave it as it shouldn't hurt anything. If it is shellac'd you could have an issue with dyes or other alcohol-based stuff, and I'd remove it (alcohol softens and dissolves shellac). At some point you'll want to clean up the surface by planing, scraping, or sanding and any finish will come off: I'd just leave it off at that point. Workbenches ain't made to be pretty, although just natural wood is pretty without any finish. - Bill -
Lacquered Maple Butcher block for table top
billybopp replied to MrLentz's topic in How Do I Do That?
If the wood grain-end up, or long grain? -
Outstanding! Really impressive work. - Bill
-
question on doing a mexican round braid
billybopp replied to Windrider30's topic in How Do I Do That?
Chief retired from leather work and sadly took his videos down. Bill -
How to remove stickers from Tandy's leather straps
billybopp replied to Pappys Leather's topic in How Do I Do That?
I was wondering if Wendy's was branching out to leather so they could sell All aspects of the cow! - Bill -
leather stamping tools, price vs quality
billybopp replied to phjldcarden's topic in Leatherwork Conversation
At those prices, they are not bad. Tandy's pro tools are generally decent: Not as good as something like Barry King, Jueshke, or other higher end but worth the sale price - Full price is a little high. The regular Tandy tools are OK but not great, and I'd avoid basketweave and geometrics where precision is needed, but most of the others are worthwhile. My general opinion on tools such as these is that they are worth the money if you don't quite know for sure what sort of tooling you want to do since you can get a wide variety affordably. Once you know what you like to do you'll know which sorts of really good tools to buy with your hard earned money. Even then, the cheap tools that you find you don't use so much will still be on hand for those rare occasions when you need them. - Bill -
Portrait of a Scottish gentleman
billybopp commented on ABHandmade's gallery image in Our Leatherwork Galleries
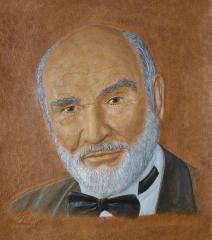 LOL! Well put ... and you're right. Very nice work ... I knew who it was immediately.
 -
Roper Wallet
billybopp replied to Rolandranch's topic in Purses, Wallets, Belts and Miscellaneous Pocket Items
Lookin' great as always, Ryan! - Bill -
Hmmm. I'm not ready to do a makers mark just yet, but had to give these a look. Found a couple of fascinating things at Steelstamps ... Who knew stamping ice and branding hot dogs was a thing! For that matter, wonder if a hot-dog brander would work for a heated makers stamp? - Bill
-
That really looks great! I don't think I've ever seen a billet and belt keeper done that way and I like it! -Bill
-
Clear picture or diagram or reshaped diamond awl tip?
billybopp replied to GeneH's topic in Leather Tools
Different people have different tastes in awl shape. Some like more pointy and tapered, like a rapier sword, some more rounded broadening like a spear point, and some more straight sided like a broadsword. Each will behave a little differently in the leather and in the way they shape the hole. All of them cut along two edges of the blade, and just get thicker toward the base along the other two sides. The rapier tip makes a nice clean hole that is not so different in size between front and back side, but you have to place the tip in EXACTLY the right place and orientation every time which is hard to do. The spear point tapers to be much wider along its length, which means that in thick leather the hole can be quite a bit wider on the side where it enters than on the side where it exits, and also you need to be fairly precise with how deep you push it through. One awl will let you do a wide variety of hole sizes, tho. The broadsword tapers a bit at the point, but is then straight after that, so holes are about the same size front and back, and you don't need to be so precise with the depth. The downside is that the blade has to be the right size for the hole that you want so you may need more than one. Both the spear point and broadsword point will settle into the marks made by a pricking iron pretty nicely and make it easier to get angle and centering right. The picture below might help a little bit: Leftmost is a Tandy all-in-one awl with a spar point, and is an old-school saddler's style. It's a crap blade, but I managed to get it sharp enough to use for a short time .. but long enough to know I didn't like it! You can see by the thick leather it's lying across how different the hole is one side of the leather to the other. The length of the blade also makes it harder to position. The middle three are Seiwa awls which are broadsword types with little to no taper beyond the point. There are three sizes since the width of the blade alone determines the size of the hole. The short blades make them a little easier to position as well. These are my preferred weapons unless I'm working on something too thick for the blades to penetrate all the way through. The rightmost one is more rapier-like, and tapers along most of its length, and is sharp for most of its length. It pierces the leather easily, but is pretty difficult to position properly. There may be other shapes and other opinions, but this is what I've discovered for myself! Hope that helps - Bill P.S. Somewhere in this thread, there is a really good description of the classic spearpoint with pictures and description on page 11 of this post: -
Rainbow Bracelet
billybopp replied to Thefynn's topic in Purses, Wallets, Belts and Miscellaneous Pocket Items
Looks good ... Great idea! - Bill -
I use cloth athletic tape around my fingers where the "wear points" are. It's cheap, readily available and even gives a bit of added grip on needles. - Bill
-
The Great Wave off Kanagawa
billybopp replied to datdraku's topic in Purses, Wallets, Belts and Miscellaneous Pocket Items
Really beautiful piece. Well done! - Bill