
.jpg.d60258221c476480a6e073a8805645bb.jpg)


billybopp
-
Posts
1,939 -
Joined
-
Last visited
Content Type
Profiles
Forums
Events
Blogs
Gallery
Store
Everything posted by billybopp
-
Check out this thread, I think you'll find some answers there.
-
My draw gauge is a Civil War era H.O. Sauerbier with a modern CSO blade, since the one that came with it was down to pretty much nothing. The Osborne blades really are terribly pointy, so I filed it down and dulled it near the tip just so it wouldn't be quite so dangerous. It really was scary before that, but not now: And it works great! - Bill
-
Blood on your work is just another form of "customization".
-
Awesome project! I started tooling with a rawhide mallet which worked OK for me, but eventually I wondered what all the hubbub about mauls was, so picked up one of the $15 Chinesium mauls from eBay and found that I liked it. Next I tried a couple of Shopfox mauls that I found on sale really cheap, but the rubber coating was a little too bouncy for tooling leather sadly. I eventually found a heavier used maul for a really good price on eBay and bought it .. I think it's a Weaver with a foam handle but don't see a name on it anywhere. Love it but it's too heavy for tooling but works great for punches and such. My leather working mauls are about 3 to 4 inch diameter for the head. The heavier they are, the bigger the head seems to be. As I understand it, a straight maul is used when you tool with your elbow up high so that the head hits the tool squarely. A tapered maul allows you to rest your elbow on the table and still hit the tool squarely. - Bill
-
It's getting there. Right now, it looks like one of the better scanners for this type of work is about $1400 - Not yet cost effective. But, several weeks ago I came across a vid on YouTube about 3D scanning using a cellphone camera and software. Unfortunately I can't find that again, but IIRC the price was pretty reasonable. Whether that type of scan would provide the level of detail you'd want for a dummy gun or not I can't say ... But the technology is getting there!! - Bill
-
I suspect that one factor contributing to short incomplete answers could be attributed to people more and more using phones and tablets rather than computers with real keyboards! Lets face it, onscreen keyboards are a pain to use! I know I'm more inclined to comment when not using a mobile device. - Bill
-

Sheridan tote bag
billybopp replied to Rolandranch's topic in Purses, Wallets, Belts and Miscellaneous Pocket Items
tooling took 66 hours... the whole thing took a little over 100 hours... Yes... I'm a very slow leathercrafter! ... If slow gets you that kind of results ... then by all means go slow!! - Bill -
Went to buy an embosser, ended up with a few items....
billybopp replied to mogwild's topic in Leather Tools
The belts are looking good @mogwild! I bought the same embosser and a bunch of rolls several years ago when Tandy was discontinuing it, and love it! I've done a number of belts, but there are other uses for it as well. The nice part about this design is that you can run larger pieces of leather through it to emboss the edge! Below are some pics of mug wraps that I've made using the embosser for edges,3D stamps, letter stamps, carving and tooling for the center part: One of the first things that I did with my embosser was to make these little boxes to keep the rolls and small bits like keys in. They are each embossed with the roller that they contain to make them easy to identify. I've attached a picture below . Rolls like the barbed wire are great for borders on skinnier items, and there is probably a plain line roller included with it to leave a nice edge crease, or even make a stitch line. It looks like you have the majority of the original Tandy rolls, so keep your eyes open for new ones (if you're interested). Bunkhouse tools has some inexpensive rolls that will work but the fit isn't perfect so you may need to use a bushing to help keep them from wobbling. They sell on eBay, as do others selling both new and used brass rolls, so give that a look. Just one more thing, be sure to keep the roller shafts dry and even oil them a bit. They are steel and will rust easily. Happy Embossing! - Bill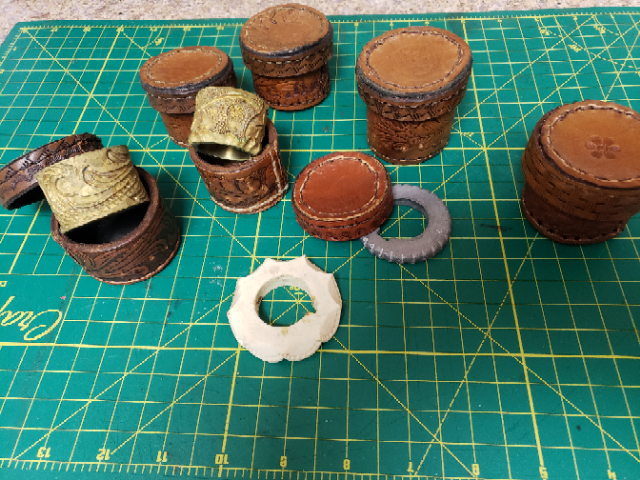
-
Blades for these metal draw gauges are pretty much universal, and fairly inexpensive at about $10 from C.S. Osborne. I have a Civil War era Sauerbier draw gauge, and bought a CSO replacement that fits perfectly. It will need some sharpening, and I suggest rounding off the end of the blade a bit for safety. Alternatively, Terry Kinpschield offers a blade for $45 that will arrive razor sharp. - Bill
-
I found it, I forgot it, I lost it, and then found it again.
billybopp replied to bikermutt07's topic in How Do I Do That?
@bikermutt07 I found it, I forgot it, I lost it, and then found it again. ... Welcome to Senior Moments! ... And thanks for posting this! I was thinking the same thing. As a saddlemaker of some renown, Seidel probably has need of a tool like this on a daily basis, so it would make sense for him to have some bench space permanently devoted to is. For most of the rest of us, some sort of temporary setup makes more sense. I was thinking a piece of wood or plastic with the jig mounted to it then clamped to the table, but I like your idea of using a vice mounted jig even better. Sometimes, the simple ideas are the best ones ... You know, the ones that you see and then think to yourself "Why didn't I think of that?". And that is especially true when it's something as easy to make as this! I've tried different methods for this problem, with the best being a dowel to run the leather against, and holding it down with the same hand holding the tool holds it down which worked OK, but eventually got uncomfortable and let the leather ride up sometimes. I'll be making something like this for sure! - Bill -
Sad to hear about your friend, but I'm sure he takes comfort in knowing his tools will be used and loved. If he is survived by loved ones, a little gift of something made with those tools as @Grumpymann mentioned above would be a wonderful touch for both him and them. Bill
-
Skive it down a bit thinner and wet before bending should help. Some leathers are just difficult tho. Bill
-
Tandy diamond awl blade a bad thing?
billybopp replied to fistfullofnails's topic in Getting Started
Tandy 4 in 1 is garbage. - Bill -
I suspect that is a ribbon pocket. Check out this link... - Bill
-
For a hobbyist, steel molds would be more trouble than they are worth. Hard to make, and easy to rust without proper care. Rust would stain the leather. The only advantage I can think of for using steel would be that they might be able to be heated to speed the drying process a bit. I've seen people using wood, plastic, foam and just about everything else to make a mold. As long as it's somewhat sturdy and not damaged by water it should work! Whatever you use, you may want to seal the surface, such as a polyurethane varnish on wood, to protect from moisture. That should do the trick just fine! Here are a couple of videos that might help .... Making a mold for wet molding leather and making a molded bag . - Bill
-
You could try HDPE from McMaster-Carr ... https://www.mcmaster.com/hdpe or from WW Grainger .. https://www.grainger.com/search/raw-materials/plastics/plastic-sheets-and-film?ts_optout=true - Bill
-
Sheridan tote bag
billybopp replied to Rolandranch's topic in Purses, Wallets, Belts and Miscellaneous Pocket Items
Lookin' great... once again! -Bill -
First aid kit cover
billybopp replied to compound's topic in Purses, Wallets, Belts and Miscellaneous Pocket Items
I love it! May you never need to use it. - Bill -
Simple Basketweave Belt
billybopp replied to LederRudi's topic in Purses, Wallets, Belts and Miscellaneous Pocket Items
Great looking belt, and brilliant insight into doing angled basketweave. Thanks so much for the detailed info for all of us! I know I'll be using your method! - Bill P.S. Do you think Santa's belt is basketweave? -
fingertip protectors for hand sewing
billybopp replied to Ragingstallion's topic in Leatherwork Conversation
I wrap some cloth athletic tape around my fingers at the "wear points". It's cheap, protects my fingers and provides a little extra grip. - Bill -
A sewing machine will not sew when turning backward. That would reverse the hook, etc and it won't pick up the thread from the needle then. - Bill
-
longer stitching punch?
billybopp replied to archeryrob's topic in Gun Holsters, Rifle Slings and Knife Sheathes
There are a couple of options that I can think of for using a stitching chisel in thicker projects. 1. Before gluing up all layers, punch through a couple of layers at a time, using already done layers as a guide for the ones below. 2. If it's already glued, use the hole already there as a guide and finish the holes with an awl. - Bill -
Hehe. Yeah, I realized you were selling ... but now you have alternatives for your use! - Bill
-
A well equipped first-aid kit is arguably the most essential tool in every workshop. It is an established fact that some leather projects require an infusion to bring them to life / back to life. A number of my projects have certainly been given life by infusion. I understand that the same is true of woodworking, metalworking, cooking, electronics (the backside of old circuit boards were treacherous!) and apparently fiberglass working. A few months ago I managed to remove a small bit of my left forefinger and fingernail while cutting up some veggies. Oddly enough, it did not bleed at all at first, then I went to the bathroom sink to wash out the wound. Who know an entire sink bowl could turn such a shade of pink! - Bill
-
... Just make sure that you get the right kind! The laser printer kind is fairly thick to stand up to the heat of laser printers and smooth with no tooth to hold inkjet ink but still does fair with overhead pens. The inkjet kind has a slightly matte side to hold ink, and is usually thin enough to melt in a laser printer. Regular "hand drawing" film is VERY thin and smooth, so not suitable for either type of printer. All three are decent for transferring patterns to leather, but I usually just use paper. Use once and throw away. - Bill