


Thor
-
Posts
1,038 -
Joined
-
Last visited
Content Type
Profiles
Forums
Events
Blogs
Gallery
Store
Everything posted by Thor
-
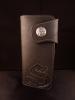
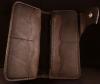
Black In Black Long Wallet
Thor replied to Thor's topic in Purses, Wallets, Belts and Miscellaneous Pocket Items
Thanks for the nice comments. Dwight, I'm slowly getting to where I want to. The guy is a life-time biker. I'm looking forward to his birthday and hearing to what he has to say about it. -
My Last Project For 2015, Happy New Years To Everyone
Thor replied to Chief31794's topic in Guitar Straps
Wertheim changed so much. I took final courses and exams for police training there. And you won't believe it but the old US facilities were our police facilities then. The province bought the areal shortly after the forces left. So we used your old gym (was burned down not to long ago - they wanted to prevent having more refugees living there - the whole place was changed into a refugee areal) and I lived in the old living quarters to the south eastern end. Almost all US military facilities have been abandoned now. Stuttgart and Ramstein will remain of course. A friend from Heidelberg told me that even the facilities there have been abandoned and are turned into refugees areal now. -
My Last Project For 2015, Happy New Years To Everyone
Thor replied to Chief31794's topic in Guitar Straps
Nope I'm German, just a PR to Canada. But moved back to Germany some time ago. -
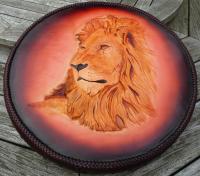
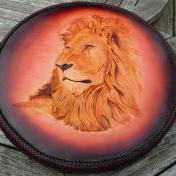
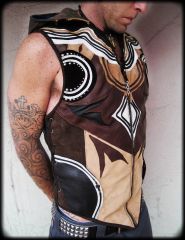
Happy New Year all! This is my last 2015 project a lady wanted for her hubby's 50th birthday coming this month. Due to an injury I'm a bit behind now. With some guidance in regards of materials to use or not to use from my side it was all the lady's choices. Two items are still missing on it. It will have a braided zipper pull and a wallet chain attached to the latch. The outer leather is Harley Davidson clothing leather. A pleasure to touch but a pain to work with. The S is inlaid with Stingray and the outer shell then lined with suede goatskin. Card slots and coin pouch is made from veg tan cowhide. Edges have been heat treated then painted, heat treated... The HD leather is a pita... The concho came from Japan on special order. Sorry the picture is a bit blurry. Dimensions around 19 x 9 x 1.5 cm All comments are welcome.
-
My Last Project For 2015, Happy New Years To Everyone
Thor replied to Chief31794's topic in Guitar Straps
Looks like Haida Gwaii linked or even origined symbols. I used to live in central BC so that stuff is pretty familiar to me. In Ontario a lot of things like cities, trails, and of course municipalities are named after native chiefs. Half my Canadian relatives are living across Ontario. Tecumseh is just another Indian Chief that is very popular in Ontario. I believe he was from around Chatham/Kent area. One of the most famous cities is Kanata a suburb to Ottawa. This is an Indian word for town and name giver for Canada. So there's quite a tradition to use Indian names. -
My Last Project For 2015, Happy New Years To Everyone
Thor replied to Chief31794's topic in Guitar Straps
Good job Chief. Here's some background info for you on the area the guy is from. Muskoka, also the name of the district municipality is one of the better known areas in Ontario https://en.wikipedia.org/wiki/District_Municipality_of_Muskoka not at last because of Muskoka Publishing and others involved in the tourism industry, which is one of the main industries of Ontario. People there are usually quite proud of their area. It's bordering to world reknown Algonquin Park, hunting and fishing in the area are among the best in Canada. A little to the south is Orillia, home to Ontario Provinical Police training facility and where the Police Academy movies have been made. Well at least the academy buildings have been used. I'm having a few friends and relatives living in this area. Oh and sorry I forgot... Happy New Year to you and all others as well. -
Phone them up and talk to Mr. Schmidt, not the other guy. He's an honest person an will give you an upfront opinion. I'm having the Osborne one and wasn't to pleased as I had to sharpen it right from the start as the edge was not done right. After having it sharpened properly it was just fine ever since. I wouldn't expect that to be the same with the Ivan one as that steal is a bit softer.
-
New Belt From Me
Thor replied to KY23's topic in Purses, Wallets, Belts and Miscellaneous Pocket Items
Great job! -
Purchasing Italian, French, German Leathers Via Online?
Thor replied to joanstrife's topic in Suppliers
Welcome to the forum. Customs is an issue for most. However, there are quite a few members from Australia which will hopefully read this thread and help you out. In regards of the Germany leather company, here are their reps http://weinheimer-leder.com/en/partners/representatives/ -
The repel is for denim and canvas only. So if you want to make it from leather and if it'd be for me I'd be using calfskin and for your purpose I'd be using some that's made especially for motorcyclist clothing. Maybe you can get an older leather pants.
-
LOL it says right below the pic on Pinterest that it's denim. However, there's a product called repel by Carr & Day & Martin which would make it waterproof. So if your question would be what kind of leather could it be made off, then upholstery or garment leather would be the answer.
-
From all the stuff you posted today I like this the most.
-
This is the guy you want to contact Doug. http://leatherworker.net/forum/index.php?showuser=39106
-
It's hard to tell from the picture you posted so I found this site http://www.lyst.com/bags/other-stories-small-leather-shoulder-bag-black-1/ and it's very clear to see that the flesh side is burnished.
-
It does look like a single loop. Go here http://www.kingsmerecrafts.com/page36.html and scroll down to the last third.
-
Hi and welcome Derle. Don't worry about your English it's good enough. If there's something you can't translate, just write in German, there are enough guys and girls on the forum speaking German as well "passt scho" If you want to post links, they require the leading http://. Therefore the link to your website would have to look like this http://www.derle-derer.de
-
This video may explain it a bit better. There's one thing that could be improved. All sheaths of this kind have the cutting edge run over the rivet/stud/bolt, whatever is there... If that would be done with a chicago screw and a plastic or leather washer in between it wouldn't dull the knife so fast. Here's another thread on the forum http://leatherworker.net/forum/index.php?showtopic=42781
-
Reducing the maximum width to 1024px and the quality to 75% on a JPG will usually do the trick.
-
First there are belts lined with suede or the better ones with alcantara http://lucafaloni.com/products/clifton-brown-suede-belt or here http://lucafaloni.com/collections/belts. So it'd be wrong to say there are no such belts. Here's a holster belt lined with suede http://www.lawmens.com/model-87-suede-lined-belt-w-buckle-2-192.php or just review this picture search https://www.google.de/search?newwindow=1&client=ubuntu&espv=2&biw=1314&bih=818&tbm=isch&sa=1&q=suede+lined+belt&oq=suede+lined+belt&gs_l=img.3...193634.195075.0.195965.5.5.0.0.0.0.80.335.5.5.0....0...1c.1.64.img..4.1.71.RqMWUBxm7XY The downturn I see is that suede leather will have to be roughened from time to time.
-
Like suggested in one of the Stohlman books using a hard felt works just fine. However for straight edges like on belts this https://www.etsy.com/listing/243210397/steel-rollercabinet-style-leather-roller works just fine. I've also seen people refilling felt pens.
-
Belt For Son-In-Law
Thor replied to pmieras2000's topic in Purses, Wallets, Belts and Miscellaneous Pocket Items
True except for the Batman thing very nice -
Also please include what kind of leather this is. Saddleback uses pigskin a lot.
-
 Stunning work
 -
Thanks for the explanation. Here ya go for a stamp maker with a laser cutter http://www.ebay.de/itm/141643038310?ssPageName=STRK:MESINDXX:IT&_trksid=p3984.m1436.l2649 Since your mother was that old she probably learned Sütterlin like many others in Austria and Germany. Maybe of these fonts fits the bill http://www.1001fonts.com/old-german-fonts.html. Here's a preview on my favorite I could see working well in downtown Vienna http://www.ffonts.net/18th-Century-Kurrent-Text.font?text=Walburga
-
I'm with Monica there. Is Walburga your brand name or your name?

