


dikman
-
Posts
4,860 -
Joined
-
Last visited
Content Type
Profiles
Forums
Events
Blogs
Gallery
Store
Everything posted by dikman
-
It's probably like a lot of things - better than some (motors), not as good as others. I'm sure it will work fine, whether it's good value or not I have no idea, just ignore the advertising hype.
-
Because they might be useful one day?
-
Machine for part time sail repair business
dikman replied to Jeff96's topic in Leather Sewing Machines
I don't know how it compares in Canada (I'm in Australia) but when I looked at buying a 441 clone from China I found the prices were very good but by the time I added on all the other costs - shipping, duties, taxes, various handling costs, broker fees etc - there were no savings to be made, the cost was the same as buying one here. And shipping-wise we are closer to China than Canada is! Plus any guarantee/warranty is also pretty useless, you'll be basically on your own. -
Questions re: DIY box style speed reducer
dikman replied to shelr1's topic in Leather Sewing Machines
Very nice job! Simple and effective. -
If you're talking about actually carving your logo into the back of a vest you might be in trouble. Not only that the leather probably won't be thick enough to carve but being flexible is likely to cause issues, most carving is usually done on thicker leather that ends up being fairly rigid. If you carve it into a thicker piece to sew onto the vest it might be a bit uncomfortable to wear.
-
Ingenious design and very nicely done! I can see where you might get a few requests for the parts. You must go through a lot of 3D filament!!
-
I'm going with Wepster's idea, an assortment of tools from different crafts. Some of the spoons look like clay sculpting tools.
-
I needed a replacement unit some time ago and just bought one off ebay (China), it worked fine.
-
Can't see much detail in the photo but my first guess would be some sort of fine wood carving?
-
If you can control the clutch motor straight off then you're a better person than me! I was raised on manual cars and drove trucks too but the clutch motor was too much for me. It would only take one slip and a piece could be ruined. Sounds like you're off to a flying start.
-
Larger Handwheel With Smaller Pulley, For Juki Lu-563 / Consew 226
dikman replied to Ken B's topic in Leather Sewing Machines
I fitted a rather large pulley to my Seiko, it meant I didn't need to mess around with a reducer, the pulley was in my spare pulley box and I just needed to make a sleeve for the shaft.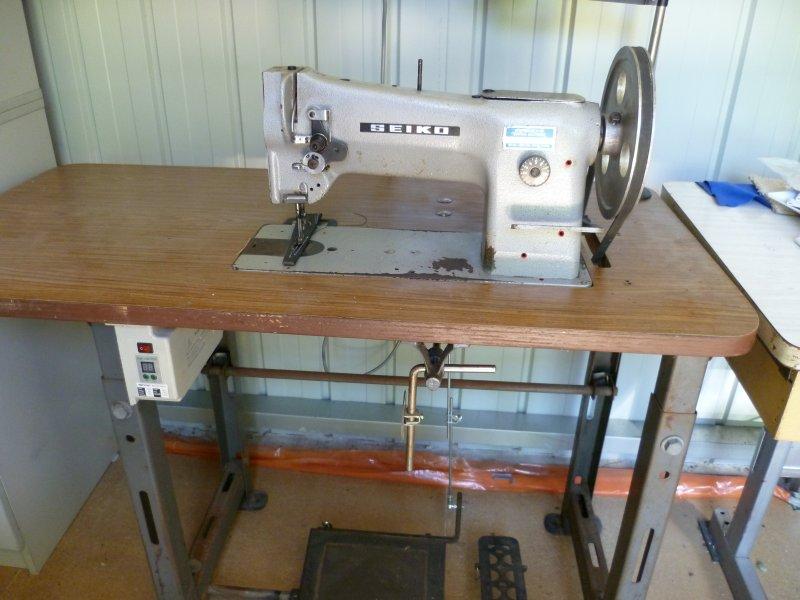
-
It's a capacitor start/capacitor run motor and needs that capacitor to work. You could move the entire box somewhere else as long as the cables are long enough but honestly just do yourself a favour and replace it with a servo, you will be able to start sewing straight away without wasting time trying to tame a clutch motor. The two "buttons" are spring-loaded oiling points, push in the ball with an oiler and drip the oil in. As for all the wicks, if it was me I'd just learn to oil it manually, just oil any parts that move!
-
They're a nice machine and it should serve you well. As for oil, if you've got sewing machine oil that will be fine. The commonly use Lillywhite oil is basically ISO 32 hydraulic fluid, it's main advantage seems to be that it doesn't stain material (so they say). Other than that any light oil will work. That metal box looks to me like it was the original switch mounting (in the hole in the front) and for some reason the switch was removed and the push-buttons added. If you are comfortable with electrical work it could probably be removed. Take the cover off and post a photo of the innards, we'll soon be able to tell you. Personally, based on past experience, the best thing to do is replace the motor with a servo and not mess around with the clutch motor. I wasted a lot of time on mine until I saw the light!
-
In my opinion, yes. At least the holes will be filled in, and in itself it makes it a bit different. Then put it on display somewhere.
-
Just when I was wondering about your progress this pops up. You've been a busy boy, looks great. I like the spool holders, very neat. "drive belt beauty cover and needle positioner were placed just for the photo's and have been delegated to the darkest corner of the spare parts bin." That made me laugh, my cover is still in the original bubble wrap! Only one criticism, first photo the top bolt doesn't match the others.
-
The next is always better! We all have to start somewhere, the experience of making the first is invaluable.
-
No argument from me about servos, at their price point I can't see any point in messing around with anything else for sewing machines. The tricky part with using anything else is working out a suitable foot control to give speed control. That is the point I'm up to with my rod-building jig, the speed control for the motor is a potentiometer and I have to figure out how to make it work from a foot pedal. Fortunately I have the time to do it............
-
Not a good comparison, he thought he knew better than the experts, ignored advice and believed in "breaking the rules". The result was inevitable. Some people (me) don't take into account any time spent on something like re-purposing a treadmill as it is a challenge and fun. The enjoyment outweighs the time. I'm currently making a fishing rod building jig and am already up to version 3 of the motor drive (the first two motors didn't do what I wanted), #3 is an old Singer sewing machine motor. To me the time spent on it isn't a factor - but that's just me.
-
You've got a deft touch at carving oak leaves. Having spent some time trying to draw acceptable leaves I can appreciate the detail.
-
Light weight press for making stitching holes quickly
dikman replied to SteveOz's topic in Leather Sewing Machines
Well, that's different. As long as it works is all that matters. -
I did a bit of research and the Badger brush isn't as old as I thought. It is a double-action airbrush, i.e. push the button down for airflow and pull back to release paint. One of the problems with that compressor is it doesn't have an air regulator, which you will need to regulate the air pressure, they usually have a water trap fitted as well.
-
You certainly have an assortment there. The Badger airbrush is quite an old model, I haven't seen it before, it is a bottom siphon feed, most these days are top/gravity feed (they require less air pressure to operate and can do finer details). The other two are essentially touch-up guns, probably a bit too big for leather use. The compressor is a very old model, dare I say it primitive by modern standards. Having said that the compressor should work ok with the Badger airbrush for doing basic colouring/shading of leather. I notice some of the fittings are different, it suggests to me that he may have had another, bigger compressor, particularly for the touch-up guns. There was obviously more stuff that is missing, for instance the airbrush is fitted with a cup but would have also come with bottles to hold the paint, you can see the black screw-on top in the third photo. First thing to do is strip the airbrush and if there's any sign of paint residue soak the parts in paint thinner to remove it. And then hook it up to the compressor to try it, most dyes should be thin enough to use as they are (you want the consistency of milk). Try spraying on some cardboard to get the feel for it, if you don't want to waste dye you could buy some modelling paint that is made for airbrushes, just make sure you clean the airbrush afterwards. Those compressors will generate moisture in the airline after a while so a water trap is a good idea. But try it out first before you go spending any money on it. Does this help in any way?
-
ProPaste epoxy glue
dikman replied to dikman's topic in Dyes, Antiques, Stains, Glues, Waxes, Finishes and Conditioners.
I've watched a lot of vids on bow-making and reckon it would be a good challenge but the problem here in Oz is getting suitable wood, believe it or not the commonly used woods in bowmaking aren't readily available here. As for that epoxy, it looks like it could be good stuff for cane rods, being flexible and durable, the biggest issue would be making a suitable temperature controlled "oven" for the curing. -
ProPaste epoxy glue
dikman replied to dikman's topic in Dyes, Antiques, Stains, Glues, Waxes, Finishes and Conditioners.
How dare they change their hours without telling you first! Chuck, I did a bit of research on gluing split cane rods and it seems people have used everything , from white glue, epoxy, UHU, to Gorilla glue. One flyrod maker used this ProPaste (I could see the tubs on the bench) to glue the grips on and used an epoxy to glue the canes together so I'm assuming he probably used the same stuff. The consensus appears to be that slow-curing epoxy is better as it retains some flexibilty whereas rapid-cure dries brittle. I also didn't realise just how much work there is in building split-cane rods! -
ProPaste epoxy glue
dikman replied to dikman's topic in Dyes, Antiques, Stains, Glues, Waxes, Finishes and Conditioners.
Not sure, it may be a bit stiff (as in rigid when cured) for that type of gluing? I have an old split cane rod that was my father's and I wouldn't mind refurbishing it, guess I'll have to trawl through some youtube vids to find out how to do it.