
alpha2
-
Content Count
1,653 -
Joined
-
Last visited
Everything posted by alpha2
-
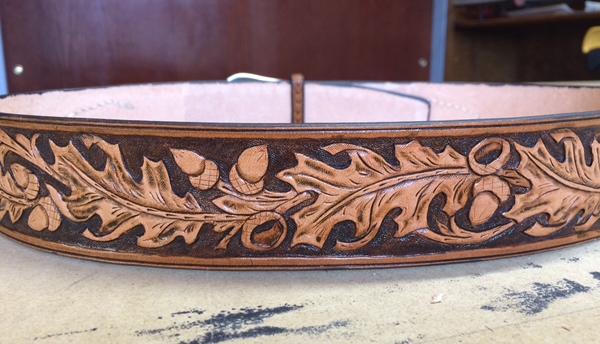
 Yep, small brush, VERY slowly and carefully. You need a definite barrier, like a knife cut, or sharp bevel, to keep the black from flowing where you don't want it. Mistakes don't go away easily. I used to use a dark brown stain, and had to go over it at least twice, then tried black dye...woo-hoo! Much faster and a better result. A lot of people don't do the dark background, but I really like the effect. I've done it without, and the contrast really adds something when you have the background, the resisted area, and the surrounding third shade. BTW, I have to say, the satin sheen as a resist is kind of difficult, as it dries quickly, and you can't tell where you applied it and where you didn't. It's not horrible, but you really have to keep track of where you've been already!
 -
I think this was done with "resist". Brush on a solution that blocks the floral parts, then dye over it with Black. I'm sure there are other ways to produce that effect, but I'd do the resist technique. Pics are of some items with resist applied to the floral areas. The darker brown of the checkbook cover was applied over the entire piece, but the satin sheen finish applied the to floral parts resisted the stain.
-
Don't worry about the wooden spoon, when you get a proper slicker, you'll find it's exactly the same wood as your spoon! It looks like your stamp bounced in the second attempt. It happens. Try to keep a firm downward pressure on the stamp while striking.
-
Nailed it!
-
Nice! So, when you ask yourself "what color thread for this project?", how do you come up with just one? I have to agree about the channel for the stitching. I've stopped using a channeler and just use a goover if anything now. And my first couple of projects with my new Tiger thread have been a real joy. There is certainly a difference. John James needles and Tiger, good stuff.
-
I was thinking Beetroot also, but it will just blend in, no contrast. Cream or white will contrast nicely.
-
thanks!
-
Lift the dot fasteners for holster?
alpha2 replied to SouthernCross's topic in Gun Holsters, Rifle Slings and Knife Sheathes
Just a thought, you might try lightly tapping a tapered tool into the female part of the existing snap. That will open it up just a bit and make it easier to open. That's what I have to do with Tandy's snaps. I use a drift punch of the right size. Anything you have on hand that is tapered will work. -
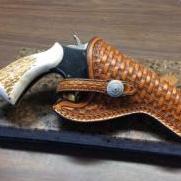
great holster! Great edges, too. A lot of effort, but worth it. I recently got the barbed wire stamp set also. Can't seem to make the various stamps in the kit come out even close to the same impression. The same stamp, yeah, but when you go to one of the other stamps, (straight or corner), the greater surface changes the set. Did you find that to be an issue?
-
First belt finished
alpha2 replied to JKHelms's topic in Purses, Wallets, Belts and Miscellaneous Pocket Items
Nice belt! Glad the pic posted. -
Thanks.
-
First belt finished
alpha2 replied to JKHelms's topic in Purses, Wallets, Belts and Miscellaneous Pocket Items
Hopefully OP checks back in, I'm hankering to see the belt! -
Yep.
-
Great collar! Love the hardware. What makes it a "Greyhound" style collar? Just curious.
-
Good info, thanks Matt!
-
My First Purse
alpha2 replied to Chief Filipino's topic in Purses, Wallets, Belts and Miscellaneous Pocket Items
You nailed the lacing. The first lacing I tried, I thought it would never end. Learned a lot on that one, though. The rest of it is great too! Watch some videos on "decorative cuts" on YouTube. They really make the flowers come to life. -
I see where I originally said the thread doesn't twist...well, it does, but only after 3/4 or more of the belt. No biggie. My fault I had about one third too much thread. Carry over from THICK holsters, when I didn't have enough thread. Apparently, thin stuff doesn't need near as much thread. Go figure. Live and learn.
-
Oh, and the tip about the smaller than 500m rolls twisting, I can verify that. I had to stop every and then and strip it off between my fingers and unwind the thread. Not a big deal, but noticeable. All in all, with the belt I just finished, and the checkbook cover that I had to finish for my trophy wife, (was SUPPOSED to be mine), the stitching went very well. Now I have a hand-me-down first attempt checkbook cover for myself, and the aforementioned trophy has the new, improved one. Took her about two seconds to claim the new one. (Happy wife, happy life, though, right?)
-
Well, I've finished a checkbook cover with 1.0, and started a belt with 1.0, and keeper with .08mm. I really like the thread. It is "well behaved" for want of a better description. The length of the thread for the belt is quite long, and the thread doesn't twist or tangle, and glides through the leather nicely. I'm still experimenting with stitches per inch and awl sizes for the various thread sizes.
-
I use painters tape or shipping tape. Lately, I've been punching holes after everything else, then using a Q-tip to apply stain in the holes, followed by a good burnish.
-
I did NOT know that bikers needed this. Nice job, though!
-
Bifold Wallet
alpha2 replied to andrewsejlv's topic in Purses, Wallets, Belts and Miscellaneous Pocket Items
That does it, thanks! -
"The collar with the truck makes me wish I had a dog." That's hilarious! And true!
-
"so any form of handheld magnifier is automatically out of the question"...oh yeah! Ya got that right!
-
Bifold Wallet
alpha2 replied to andrewsejlv's topic in Purses, Wallets, Belts and Miscellaneous Pocket Items
I can't imagine hand-stitching without a pony. So what size, in mm, is Serafil size 15. I always try to imagine how my thread will look on a given project, but everyone has different ways of referring to their thread. Is there a master conversion chart from your sizing, mm, etc?