-
Posts
3,265 -
Joined
-
Last visited
Content Type
Profiles
Forums
Events
Blogs
Gallery
Store
Everything posted by RockyAussie
-
Martingale Collar for my newest hound
RockyAussie replied to Michael Sheldon's topic in Collars, Cuffs, Leashes and Leads
Very nice work Michael that should be one flashy dog. It looks like there is no adjustment for length, is it a made to fit size may I ask? -
Hatband
RockyAussie replied to Plaitinem's topic in Purses, Wallets, Belts and Miscellaneous Pocket Items
Toowoomba saddlery has great service and ask for Terry and remind him I said he would help you (Normally business). East Coast leathers in Brisbane are pretty good and a fair range. New South Wales Leather Co in Sydney ( ask for Claud and say I said so) Lefflers and sons in Melbourne for a very large range also. Mac Lace in Brisbane are good for lacing quality and cost.Let me know if you need something specific. Regards Brian -
Hatband
RockyAussie replied to Plaitinem's topic in Purses, Wallets, Belts and Miscellaneous Pocket Items
Just up the road in Rocky. Drop in for a yak if you're up this way sometime. -
Hatband
RockyAussie replied to Plaitinem's topic in Purses, Wallets, Belts and Miscellaneous Pocket Items
Looks very good work + hope to see more.Which state may I ask? -
I have found that if I mistakenly try to download too large a file, meaning more than 1.46mb it then continues to to treat all other files as too big. I found it best to go back to forums then return to the message. The message wording is not lost it comes back again, and then you can put in the smaller file size OK. Hope that makes some sense. Regards Brian
-
Well for a start it don't look 30x40, its way to tidy, think if other members wives see this for *#@ and at least I don't see the sewing machine in there ,I guess you got rid of the wife instead? Get rid of the other chair You don't need someone looking over your shoulder. Hope this helps. Regards Brian
-
Stuck/stripped screws on Singer 2281
RockyAussie replied to brandyb's topic in Leather Sewing Machines
One more thing if the vice grips are not able to attach well, I use a pair of small nail pullers a lot for similar situations. Hold in the direction you would a screw driver and grab outside of screw head and turn anticlockwise of course.Something left over from years of shoe repairing I guess. -
I think the hook would need to be of the end like the machine here. Landis have something similar I believe.This works great for sidewall stitching but I'm not sure about through a hard thick sole.
-
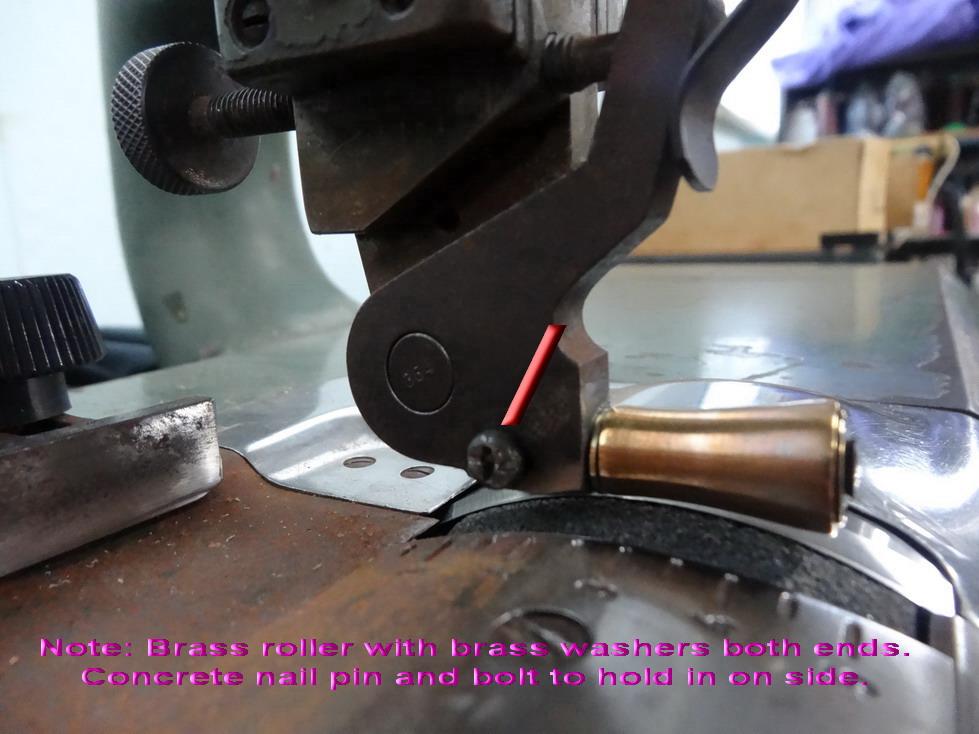
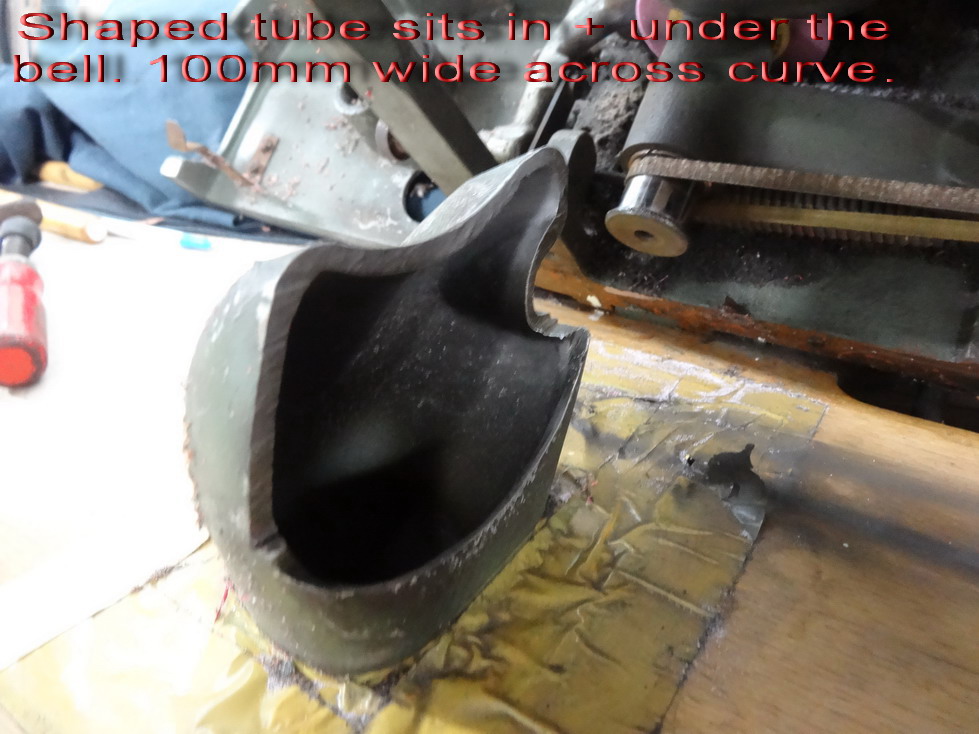
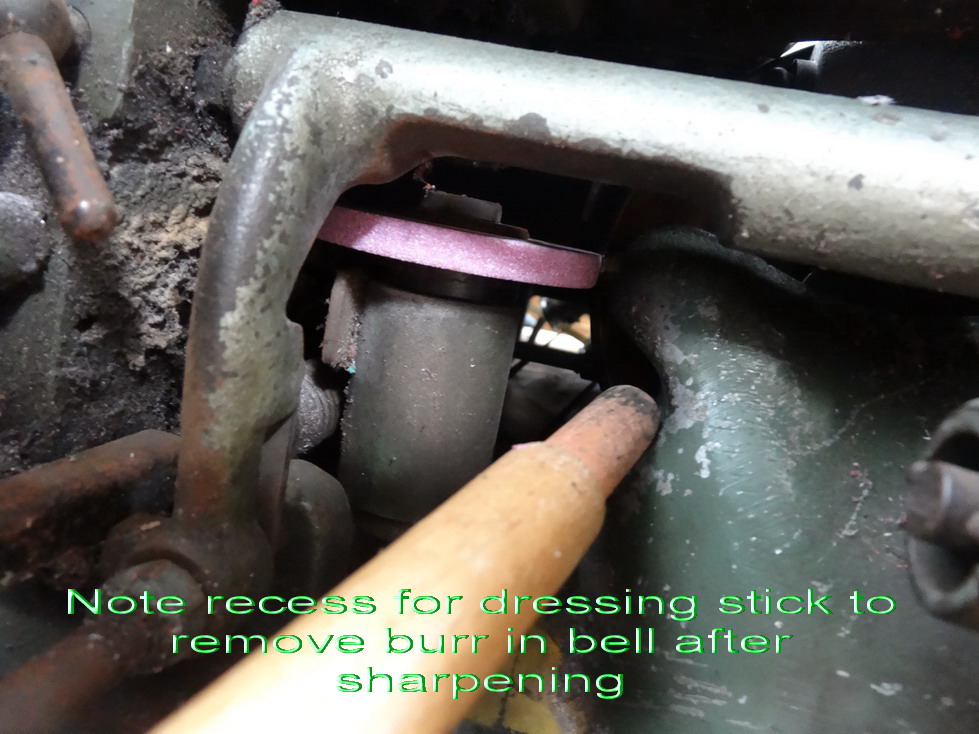
I am so sorry you have a no suction skiver as that can wreck a lot of good and expensive leather. I had one once. Maybe consider you could make up a suction method by following my pictures here. I think you can get a pvc elbow around 65mm nb for vent pipes. A bit of playing with a heat gun should produce some results I think. Don't forget the recess for the dressing stick if you decide to try it. Run the pipe into a box where the trash goes and use a gauze like mozzie mesh to stop any getting through to a vacume pipe set up high going out of the box. Pvc fittings can normally be pushed together and removed quite easily for emptying the box. Also don't forget to take and post pics of it as many others here would appreciate it I am sure.The idea of the roller is mostly to allow better feeding without friction and no scrape marks on the glazing. This helps to stop the rolling over, as the croc skin goes in and out of the scales.The roller I made but I think you can buy something similar nowadays I'd check first. If not and you want further "how to" let me know. Is the feed roller on yours stone or a rubber? A fine stone feeder is sometimes good to lightly remove a nasty burr after sharpening. As for the splitter I would think you should be able to pick up a good 2nd hand one around 4 to 5 K and sell your other to help recoup. You can split a bit with the skiver but thankfully for bag work you probably wont need to very much. Hope this helps and let me know if you need more. Regards Brian
-
projects for leather splits
RockyAussie replied to builderofstuff's topic in Leatherwork Conversation
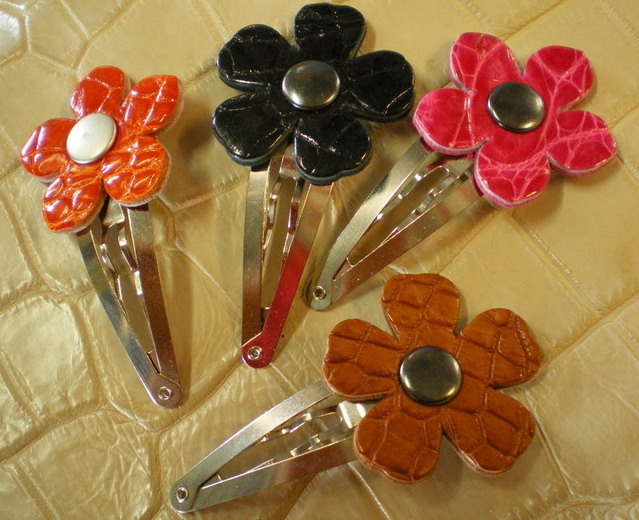
If the suede side is good coin purses and card holders may be good. Depending on thickness they may be good to attach together for some things that need more stiffness such as the little hair clips below. I checked your web page and did not see any clicker press or sewing machines. Does this create any limitations. As I mostly work with Croc skin I tend to get down to itty bitty pieces a fair bit as you see in my yellow duck bracelet picture I guess. Hope this gives a little inspiration. Regards Brian -
projects for leather splits
RockyAussie replied to builderofstuff's topic in Leatherwork Conversation
Hi Chris, what size bits have you got to play with. Maybe a laid out pic would help. -
Watch Strap
RockyAussie replied to Dunluce's topic in Purses, Wallets, Belts and Miscellaneous Pocket Items
Looks excellent for your first band. Area's to improve I guess you already know the hole spacing and I would think the buckle slot too small if that is what it is. I would prefer to not polish the lining but would not think of it being a big sin either. Depends a bit on the leather used and what it looks like. -
Sorry what electrathon is correct if I had thought about the boots above I would have realised the were of a welted construction. Although in the past I've made a lot of shoes I never made a lot of true welted style boots or shoes.
-
Most last have a steel plate on the bottom and this allows the tacks to curl back in and clinch down. This then get covered with your insole.
-
Stupid mistake on my Consew 206
RockyAussie replied to Colt W Knight's topic in Leather Sewing Machines
Had a similar problem once trying to work out why my tension at times varied and stitch length was all over the place. They can be adjusted further out of the way but you still gotta sit like a chick a bit for some reason or other. -
Sewing a lining into leather bag - help needed
RockyAussie replied to jakc3's topic in How Do I Do That?
Looks beautiful...I'm jealous. I think we will be seeing some serious products very soon.Let me know if you need to know anything about its use. -
Advice needed for shoe sewing machines
RockyAussie replied to jollins's topic in Leather Sewing Machines
I would ask that you let us know what the model numbers of the machines you are wanting. I have in my collection of machines a twin needle which can sew with one needle as well but the twin is to a single bobbin and designed to do a pull up effect on the top of the vamp and even slice it if required as well. Not knowing your knowledge of machines it is therefore best if we are playing with the full deck. -
While you're in Victoria if possible check out H.Leffler and sons. They have more hardware and leather than you could imagine.
-
I would have thought the cb227r was more suitable for heavier bag work but possibly a bit short in the arm sometimes. For wallets I would favour the artisan 335b. From what I see it looks like a very useful machine but not for heavier holsters and such. My preference would be go with the 335b and go up to 4500 in order to cover most bases.
-
Re the splitter. I had one like your's once and I was most happy when some one payed me half of what I paid for it. Don,t get me wrong as for saddlery type of operations they can be good but for bag work and such they are IMOP a waste of space. A Comoga or Albiko band knife splitter are both good machines and I would urge you to try and get one. With croc or aligator work mostly you could do a fair amount without one but for wallets and purses if you want to do the insides you would need one for sure. A splitter here with 5 people in total runs between 1 and 2 days a week. Can I see a pic of your consew and the presser feet as I only have a FAV and a Fortuna at present. Doe's it have waste suction on it?
-
Sewing a lining into leather bag - help needed
RockyAussie replied to jakc3's topic in How Do I Do That?
Very good choice of skiver. Post us some pics when you get it with the presser feet as well. From what I just looked up it appears to be the same as one I have and it is my favorite.Mine is branded Fortuna SAS though. Here is the link to what I just checked. It would be great if you get a roller foot like shown in this link.http://www.pressdepo.com/machine/en-42061/fortuna-50-pu-ag -
bi fold wallet
RockyAussie replied to Windrider30's topic in Purses, Wallets, Belts and Miscellaneous Pocket Items
The lacing looks well done but would look better if it went right around. I would not not not use sheepskin in an application such as this. Get a bit and see how easy it is to rip. Regards Brian -
Coloring or Painting leather lighter than its original color
RockyAussie replied to RussInVegas's topic in How Do I Do That?
Leave the leather under some strong lighting for a few days. That is generally the worst thing that some shops do with products and believe me what it can do to a product is sometimes unbelievable.Nice hat and I agree the orange is a great choice. Like a corset that should be fun to make. -
Inconsistent bottom stitches - HELP!
RockyAussie replied to JimRaynor's topic in Leather Sewing Machines
The picture you have given is a bit short to go by but it looks to me that every 6 to 7 stitches you are having a too tight pull with the bobbin. This could be by the thread cone being a bit offset and going loose as it straightens up every now again. Sometimes when cones get close to finished they can do this a bit also. If you don't have a second bobbin case to try take a picture inside of the case and see if you can see any burring anywhere.(And post it). If the bobbins have a slot for loading the thread these can get caught a bit every time they pass the burr or whatever. A bobbin being pulled by hand may seem smooth but push and hold the bobbin down into the case and then see if it still pulls smooth and doesn't grab. Next if the tension disk for the bobbin winder is too tight the threads can pull into the other thread and wind on badly but that would be more intermittent i think. Could slip spray have gott on to 1 side of the cone? Bugger of a problem sometimes.Regards Brian


