


RockyAussie
-
Posts
3,265 -
Joined
-
Last visited
Content Type
Profiles
Forums
Events
Blogs
Gallery
Store
Everything posted by RockyAussie
-
I don't know if this will help but just in case it does.....many years back in my business I recoloured shoes as part of the service and some leathers and in particular oil tanned leathers were next to impossible to colour. Any oils including oils from your hands can migrate out of the leather and blemish and sometimes soften the paint finish. Angelus and most shoe acrylic paint suppliers also have a preparer solution to help remove any oils and I think with tooling veg tan, a clean up with oxalic acid is a part of the normal procedure to do before any dying is undertaken. I mention this only in case this part of the process has been missed or forgotten and because I find it hard to believe that both the resolene and the Tan Kote could be both faulty and causing the same issue. Use surgical gloves to stop any contamination when handling the leather once it has been cleaned up.
-
I think so but you could check by asking for the more info section on Campbell Randall or pm a message to member @CampbellRandall
-
Looks good....but for how well they last I would not worry ...... next Christmas and all of them trained dogs to clean up after.....might not be so popular ???
-
The Texon or Bondtex can be good on some bags but for one along this line you need to play with some foam on the sides for a flexible stiffening. A stiffener at the bottom and possibly some at the ends if needed but for the most part just spray glue and attach foam before stitching up and folding. The board stiffeners go in after folding outside in. This bag below is done as described as an example.
-
Just my experience.....The larger tables tend to get stuff left all over them and when I want to lay out a hide I never have enough room. Solution ....I bought 2 of them large plastic foldaway tables that come out for just those occasions.
-
Just curious ...is the shaft itself flexing or is it flexing at the base where it attaches? I have seen some now that have some springs attached at the hot plate part that appear to let the head centre down more evenly maybe on non even products. Not the best solution but it may help some to look into that. Having a few different hot stamping machines myself I can say that none of them have such a thin looking base to connect into and I wonder if the post could be mounted into a more substantial base perhaps?
-
Cant help much but from what I see there are different grades as shown in this link - https://www.dupont.com/knowledge/grades-of-delrin.html
-
Here are a couple of things may help .- https://www.aliexpress.com/item/32993984374.html The disk does not look to be in there correctly or perhaps it is not even an original disc?
-
Can I ask if it is possible that the disc that the spring is pushing on that is between the spring and the tension discs has been turned around the wrong way? If it is then it is possible that the pin can not reach the normal contact point on that disk that the pin pushes against to open.
-
It may depend on the machine and your picture is too close to be sure. The ones I have and all the others I've seen the bottom roller turns with the top meaning they are connected by gears. If the bottom plate is hinged and taken down too far it may be possible to disengage the gears perhaps. The top that at the moment shows no blades looks too close to the nylon roller for that to be likely so I can only ask for a few more pictures taken further back. If the nylon roller is turning freely then it has not been tightened up correctly and will cause damage.
-

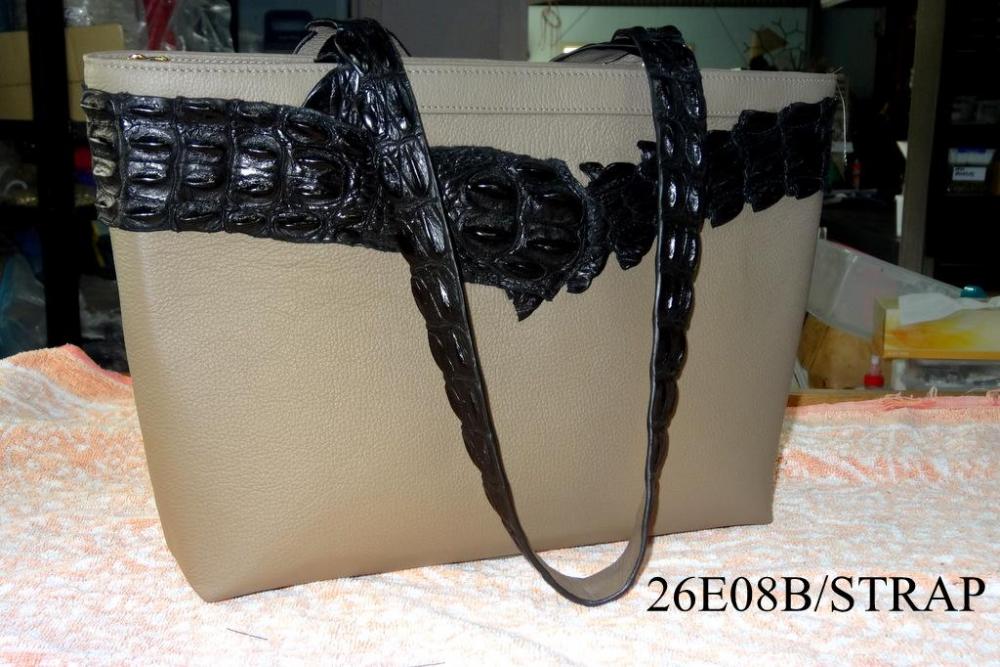
Crocodile / calf leather duffel
RockyAussie replied to motocouture's topic in Satchels, Luggage and Briefcases
I was just thinking that bringing a piece off of the top with a snap fitting could work quite nicely. The snap fitting could do up on the strap D. The one I used in the making of this bag opens up a bit like a clothes peg and works very well single handed as well. Regards Brian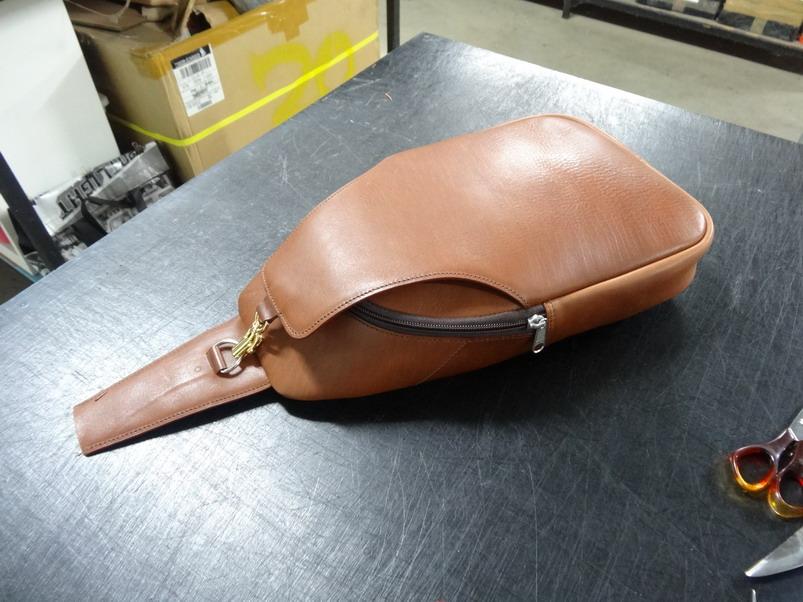
-
Cobra Class 4 Fraying Thread
RockyAussie replied to NewfoundlandLaw's topic in Leather Sewing Machines
There was an excellent video that showed how to do a basic timing fix on this type of machine by Solar Leather but that now appears to have gone private now. First thing I can say is check that when your needle is all the way up that there looks to be a 3mm (1/8") gap between where the needle bar shaft and the needle holder piece attach. Any much less and the needle has been knocked up. The best video I can suggest is one by our most honourable members @Uwe in this following video- https://www.youtube.com/watch?v=ZT3AVgj_HLI Note there is a measurement early on in it that gives the height that the needle bar should be at. -
Cobra Class 4 Fraying Thread
RockyAussie replied to NewfoundlandLaw's topic in Leather Sewing Machines
A bit of emery cloth would be better than the file but I would suspect that you may have knocked the timing out. Double check that the needle bar has not moved up before any other adjustments. -
I have to say that they are about the most forgiving machine I have ever come across. When you go through all the specs and see how many things can be out and yet they still mostly seem to do a decent job?????
-
That's one where a little bit goes a loooooong way. If you get it right with less than 3 try's you're way better than me.
-
I don't see much point telling them where in Australia they might get leather or thread or good sewing machine service......so if they can't be bothered why should I??? If I know they be from this neck of the woods I'm not wastin my time ...............so much.
-
Crocodile / calf leather duffel
RockyAussie replied to motocouture's topic in Satchels, Luggage and Briefcases
Beautiful work and attention to detail.....as always from you. Congratulations. -
Vintage pfaff 335G-h3 stitching problems
RockyAussie replied to tibee's topic in Leather Sewing Machines
it seems good ( do I have to change that every time I change thickness? ) I don't usually have to but if it is not behaving well I do. I have to say that your bobbin appears to be sitting inordinately high up on the anti backlash springs and perhaps the bobbin slots are getting intermittently caught as the bobbin revolves. When the bobbin is in the machine and you pull the thread can you feel and catching as you pull the thread out? I could not find any manual specific on this machine and I am wondering if the thread/needle size is supposed to go this large. For instance from Pfaff on a 335 shown it says needle size 80-100nm https://www.pfaff-industrial.com/en/portfolio/sewing-machines/cylinder-arm/pfaff335 That would mean a size 40 thread max. I can run a 20metric or 138 in mine without any problems but it is not a G type like yours as shown in the picture below. Given what you said about cranking your top tension to near max I would reduce my bobbin tension by about a 1/2 turn and see if that helps. Loosen your top tension to match.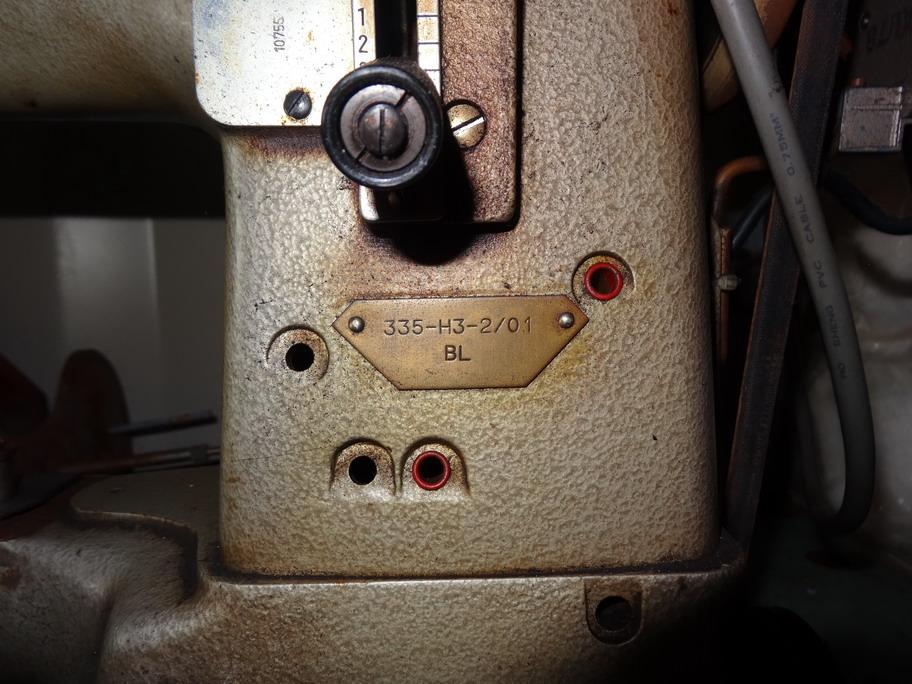
-
That is great if it continues to work. I have a clone one as well that the in the end I had to remove one of the linkage arms at the back to stop it going past where it should and jamming the thread release tension part open. After trying all sorts of bending and grinding etc I removed it and now do not have any tension release action unless I lift with the hand lever only. Foot lift can now go extra high with no jamming ....just no thread tension release. Thankfully I don't need any thread tension release unless I am removing the job. No big deal.This is one reason why I asked what brand of 335 you have. There are a huge range of 335 types even in the original Pfaff 335 range. Knowing the machine type can help when others encounter the same problem with theirs if they do. My clone in this case is an Elizabeth TK 335
-
M Size Bobbin Center Hole Inconsistency Question....
RockyAussie replied to Bmwmoa67707's topic in Leather Sewing Machines
Do that very carefully as I have done the same and broken off one of the sides when closing it back up. -
Vintage pfaff 335G-h3 stitching problems
RockyAussie replied to tibee's topic in Leather Sewing Machines
I'm pretty sure that the thread does not go up over the post at your tension discs. https://www.google.com/search?client=firefox-b-d&q=how+to+thread+a+335+pfaff#kpvalbx=_WSEZXuXLJtXCz7sPoqOQcA24 Also your thread return spring should just start to slacken off as the needle enters the leather. Thick leather check for this. Make sure you leave no thread hanging out when you refill the bobbin and test the bobbin how it rotates in the bobbin case in your hand. If it feels catchy try another bobbin and if still catchy look for burs etc on the bobbin case shaft and that the backlash spring has not been bent out of shape and catching in the bobbin slot when it rotates. -
Am I seeing missed stitches or are you just skipping back a few when you finish off? If you are skipping back can you not just turn the job around? Having a reverse on the Singer would be nice. I am curious as to what function that this article does. I assume that the silicone bumps are to stop some slipping from happening in some way or another?
-
I don"t see anywhere here that paper was suggested to be used under next to the feed dogs.??? The purpose @kgg offered this is because if the dog foot hole is large or has been worn larger (common on old singers) it is easy for the material to go down into that hole and the elastic effect of that helps the loop from fully forming which in turn leads to missed stitches at times. Paper under the job can help with this as well as a new feed dog may help as well. Reducing the foot tension can help the elastic not spread as much and have the needle spear it as much as well perhaps. As you have suggested that you do this every day and that another flat bed machine would be a better answer perhaps you could suggest one type of the few different machines you have. Do you have any needle type recommendations to offer or perhaps threads that behave better? Lubrication? Thanks ahead for your kind knowledge sharing.
-
2 thoughts. Thread lubrication. Next up round point needle size as well. Elastic can stop the loop forming that the hook catches so a bigger needle can help.
-
So what is this machine called now?
