


wizard of tragacanth
-
Posts
569 -
Joined
-
Last visited
Content Type
Profiles
Forums
Events
Blogs
Gallery
Store
Everything posted by wizard of tragacanth
-
 Hey, you are welcome Zoomer! No charge Real or Really, Nice, Leather or Leatherwork nick
 -
Super nice... as always! nick
-
Yep... the back looks good too. RNL must stand for Real Nice Leather. Well, it could, anyway.
-
You can post this request in the "Help Wanted" section. It is approx. 6 sub-forums down from the Leatherwor Conversation that you posted this in. nick
-
Longwallet
wizard of tragacanth replied to Lineets's topic in Purses, Wallets, Belts and Miscellaneous Pocket Items
Really nice work! nick -
Nice work and nice pics too! I am no judge of stamping (because I don't do any) but I can say that your edges look great. Being totally honest though, I think a little bit of a radius on the tip of the sheath would be an improvement. nick
-
Tippman Boss user groups
wizard of tragacanth replied to Jerry173's topic in Leatherwork Conversation
Don't know about user groups and I don't own one myself but there are many videos on YouTube. Have you had a look at those? I found this one a couple of weeks ago, just wanted to learn more about them. nick -
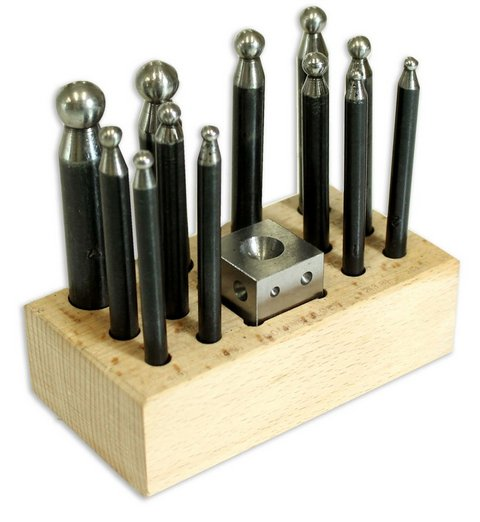
Hammered Metal Texture on Leather
wizard of tragacanth replied to mchaney2003's topic in How Do I Do That?
Do you have any dapping tools? These are the cheapest ones that I could find on Amazon. There are many other sets. Some are only a dollar or two more than these but look better (straighter shafts, painted, etc.) so look around. https://www.amazon.com/Dapping-Punches-Silversmith-Staking-Punch/dp/B000RB311M/ref=sr_1_27?crid=3NQ7NLIM83BYO&keywords=doming+block&qid=1575305055&s=hi&sprefix=doming+%2Ctools%2C186&sr=1-27 nick I would probably go for these, since they come with a wooden holder. You don't need the metal block for you leather projects, but maybe in the future for some metal work. https://www.amazon.com/ToolUSA-14-Piece-Domming-Block/dp/B00FNZARYG/ref=pd_sbs_469_4/133-3862085-6210725?_encoding=UTF8&pd_rd_i=B00FNZARYG&pd_rd_r=fa13f38f-8739-49b0-b453-6ba2067c822d&pd_rd_w=CxfoG&pd_rd_wg=CRt03&pf_rd_p=5873ae95-9063-4a23-9b7e-eafa738c2269&pf_rd_r=K6K5346PFGN0DFJE8S50&psc=1&refRID=K6K5346PFGN0DFJE8S50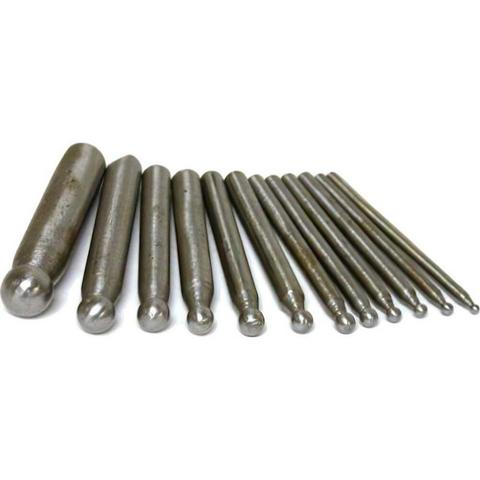
-
What is the best office chair?
wizard of tragacanth replied to lynn53435's topic in Hardware and Accessories
I don't know if it is the best but I have an Iron Horse 3100. It is around 10 years old and doing fine. They call it a 24-hour "control room" chair. i paid ~$1300 for it at the time. No idea how much they are now. After owning several cheap, uncomfortable office chairs, I just said, to heck with it, and got something that I thought would be truly comfortable and last for years. I hated spending that much money but now I am glad that I did. I had tried some chairs at Relax the Back store that were even higher priced., like $1800 to $3000 and I think that I hit the peak of the price/performance curve with the Iron Horse. I don't use the head rest very often but I would not buy a chair that did not have one, just for the times that I want it. Mine has the HD Tilt Up arm style. I particularly like that feature. Sometimes I will have both arms up and out of the way, sometimes one up and one down, sometimes both down. I also like that the arms are super strong and stable, when in place, not like many of those wobbly arms on many office chairs. https://ironhorseseating.com/office-chair/products/ nick -
Techniques for finishing edges quickly
wizard of tragacanth replied to Jason046's topic in Leatherwork Conversation
To save time, you need a one step process... dye it first, then burnish with Tokonole. Done. I think Tokonole is available in clear, brown and black. I only have experience with clear. nick -
1911 Mag Pouch
wizard of tragacanth replied to sinpac's topic in Gun Holsters, Rifle Slings and Knife Sheathes
Great story and nice work! nick -
I watched the video above, then watched linked videos and finally, landed on this one. Really good.
-
Welcome to the forum. We are very lucky to have it. Please, post some pics of your work. We only know people through their work. nick
-
New and Excited - Los Angeles, CA
wizard of tragacanth replied to DownSheba's topic in Member Gallery
You found us! Welcome to the forum. You can learn everything that you want to know about leathercraft here. I remember how happy I was when I found this place. Have fun! I think that you will want to hang out in the Historical Reenactment area but I have never visited there myself. nick -
Nice stuff!
-
If you are just doing small stamps like the one that you are showing, it may be safer (more controllable) and easier to use an arbor press for that. https://www.harborfreight.com/1-ton-arbor-press-3552.html nick
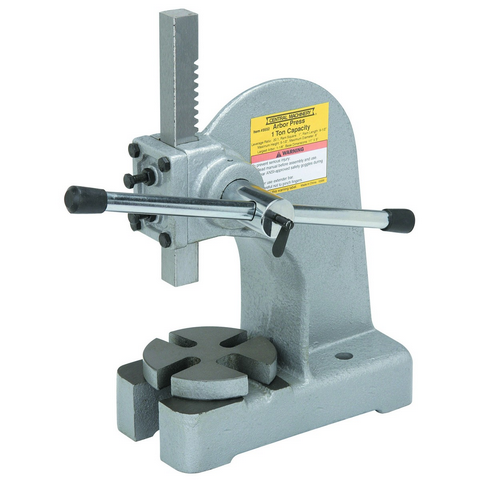
-
Inlaid Beaded Belt
wizard of tragacanth replied to kbarker's topic in Purses, Wallets, Belts and Miscellaneous Pocket Items
Looks interesting but it is difficult for me to see very well. Maybe you could post a larger image. I think maybe 600x800 would be good. I think. nick -
Interesting design and colors. nick
-
What is it that you did not like about horse hide, if I may ask? nick
-
Just brain storming here but you could inset some neoprene panels for contact patches directly under your sit bone. Make a pleasing shape, like a couple of tear drops that follow the contour of the seat. Back up the neoprene with leather of course, to keep it dimensionally stable. I saw rolls and panels of neoprene on Amazon. It come in 1/8" and 1/4" thick. Just search Amazon for neoprene. nick
-
Never done this myself but I agree with Rockoboy. I would not sand it at all, that would really mess it up. Start with de-glazing and re-dying. Re-dye using Fiebing's Pro dye. Buff it well and I think that most of your scratches will seem to disappear. I would not try to soften the leather at all. These are not sling seats. The firmness is for support as it would be for a wooden chair but just in a leather surface. For a finish, I would use an Automotive Leather Seat Conditioner. Unlike neatsfoot oil, that stuff is made to sit on and is not as likely to ruin your clothing. nick
-
Spraying dyes and sealers
wizard of tragacanth replied to Pappys Leather's topic in How Do I Do That?
Wouldn't denatured alcohol be the best cleaner for an airbrush? I don't know, just asking. nick -
That is a gorgeous project. I am not a skull guy myself, but the whole design works. I love everything about it... the muted colors, the unfinished edges, the carving, the "antique" buckle matching the colors... everything. nick
-
Customer doesn’t want a maker’s mark
wizard of tragacanth replied to Cleatherdesigns's topic in Leatherwork Conversation
There are definitely arguments on both sides of this issue. I have had some previous co-workers that were very disappointed when I forgot to put my stamp on, but these people knew me on a personal level. OCD people probably see a stamp as a blemish, especially generic stamps like mine. Beautiful stamps are probably much more welcome, such as JLS's stamp. If they are not OCD, then perhaps they are agents, possibly International and wear watches and clothing with no marks of origin. Whatever... it is a custom product and that means giving them what they want. nick -
Hey, wait a minute... aren't you the one that brought this up... accompanied by a pic of two 1911's ??? I'm confused... as usual. nick