johnv474
Members-
Posts
664 -
Joined
-
Last visited
Content Type
Profiles
Forums
Events
Blogs
Gallery
Store
Everything posted by johnv474
-
For cutting and finishing sole leather, look to the people who do it most: shoemakers and shoe repair people. Cutting is commonly done with a machine similar to that posted by gigi, but it is used to cut the soling oversized and then sand it down to size. Typically this is done with belt sanders, following a sequence of 24 or 40 grit, then 80 or 100 grit, then 120-200 grit. At that point, people differ on whether they use ink, dressing, or wax. Ink, aka burnishing ink, is applied as a liquid with a dauber to the edge. The ink is left to dry, and then it is burnished via a rotating horsehair wheel. Others use sole & heel edge dressing, which is a bit thicker than ink, but applied and used the same way. Still others use hard wax (Yankee Wax is a common one). The wax is very hard as is applied to a rotating wheel, a "flap wheel" of leather. The wax is then applied to the edge of the leather by holding the edge to the wheel. Once applied, the edge is taken to the horsehair wheel to burnish/shine. That is typically how they do it. If you have to do the finishing by hand, then I would look at the edge ink or edge dressing, because they would be easier to shine up by hand than the very hard wax. In any case it would be uncommon not to see sanding first. If you don't have access to a belt sander, then a small sanding wheel in a Dremel or other rotary tool can do the job adequately.
-
If you contact a shoe repair shop in that area, any of them should be able to set a snap.
-
LeFarc. That is the leather used by Saddleback, among others.
-
The awl dimension would be affected by the stitch spacing and thread size. However, if you are looking for something on the fine side, you could start with something like 8 spi and a thread that is approx .04 inch in diameter, and an all that is 1.5" long and 1/8" wide at the widest point. Of the 1.5" long awl, approximately half of it would be buried in the awl handle, leaving 3/4" to 1" exposed. You would want the awl blade to reach its full width, say, 1/4" from the base of the *exposed* awl... so roughly 1/2" - 3/4" in from the tip. The more gradual the awl tip gets to full width, the easier it will be to pierce the leather (but the more delicate the tip). This is not an exact science because there is a degree of preference for looks etc., but that gives you some numbers to start with.
-
If it's actually latigo, it will probably have a greasy feel to it, like bacon. It is quite difficult to waterproof and keep the colors from bleeding because of all the oils they contain. You can try Resolene, diluted 50:50 with water, and apply per the instructions, and then follow that up with a wax-based layer (such as clear shoe polish). This isn't a guaranteed solution, but would be a good start.
-
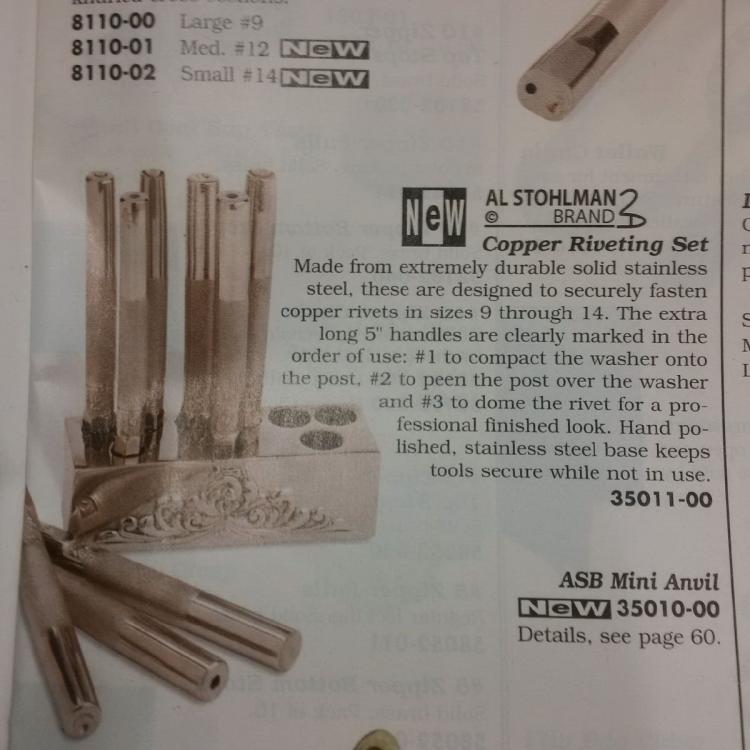
Found it. In the 2004 Tandy Leather Factory catalog. Retailed for $169.99. Here's the description for those who search for this later. 35011-00 Al Stohlman Brand Copper Riveting Set
-
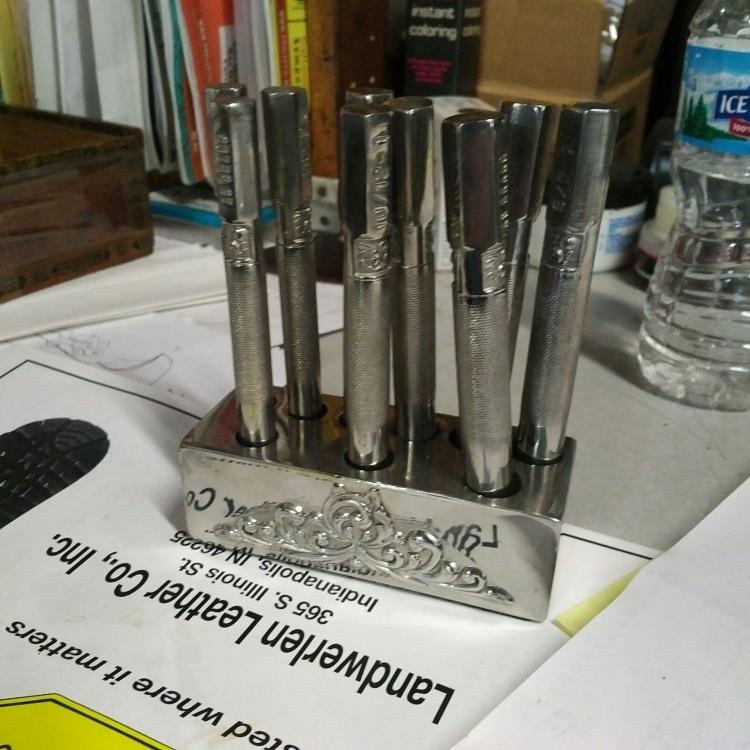
Can anyone tell me about this set of "Al Stohlman Brand" copper rivet setters? I know of other Al Stohlman or "AS Brand" tools but can't find a part number or year printed on it. There are three sets: 8-9 gauge, 10 gauge, and 12-14 gauge. Each set has a burr/washer setter, the cap domer and the tip domer. Does anyone know about how recently these were still for sale, or what they sold for?
-
That is a broad question. Look up British Museum Leather Dressing and Renaissance wax for museum-quality restoration. Otherwise look at shoe repair products. They often are asked to 'restore' leather goods.
-
It looks good. With that significant of a curve, it would be easier to apply a flat, not turned, lining. You're off to a good start.
-
If it's oil-tanned, the oil will migrate some. When used for work boots, etc., the extra flexibility and water-resistance is worth the risk of stained socks after walking in a puddle. For a camera case I would look at something that had its water-resistance from wax not oil, so perhaps bridle or just plain veg tan. You can use Lexol conditioner more safely than some oils because it does not migrate as much. Also, you can line it with fabric or veg tan to protect the camera equipment, as well as applying water and stain protectant to the case inside and out.
-
If you want fast and effective edge treatments, look at what are done by larger-production manufacturers. Usually burnishing is not involved (in the usual sense we talk of it). It's more common to just use edge dye or similar and be done with it. I am not aware of a fast and also effective and also inexpensive approach. But if the cost isn't what matters then look at leather flap wheels ($90) and motor-mounted horsehair brush wheels ($90) and the various burnishing inks or waxes that are available from Fiebings or others. Last I saw, a machine for this purpose cost a few thousand dollars, used, and included three or four sanding stations. Shoe repair shops have them. That said, even with a machine it takes skill and practice to do it well... even if it could be faster.
-
I don't understand what you are trying to do. You want your leather not to scratch? What effect is sunlight having that you don't want? Are you trying to find out where Premo gets their leather from? Do you think their leathers do not have the same issues yours do? Or are you just looking for a new source for veg tan leather? There are many.
-
deer hyde dying dye colorfast Colorfast Deer Hide
johnv474 replied to JackWack's topic in How Do I Do That?
Have you tried diluting your Resolene? 50:50 with water and then applying two thin coats is usually enough to prevent it from looking plasticky at all. I use it this way on all of my projects. -
You might need to post a picture/drawing of what the bag looks like. A picture is worth a thousand words in that regard. In general, a liner can just be glued to the panel it is lining, but you are also talking about a drop-in liner. You can do turned edges if the leather lining is stretchy. Otherwise, anything involving curves can be done but requires greater effort, like cutting wedges out.
-
Fiebing's, Angelus, Lincoln, Kelly's, Tandy, Dyo aka LCI, Tarrago, Bostonian, Veco, BASF, and others. When it comes to tanneries, you may find no concrete answers but I would guess that they buy from either the common names (Fiebing's, etc.), from specialty suppliers like Oxitenow, Chemtan, First Source, or from large chemical houses like Dow. All of those companies make either dyes or other products used with the dyes. I noticed that even Fiebing's sells dye (and other products) in 55 Gallon drums, so someone must be buying it in that kind of quantity. I would not expect any of the larger suppliers to have a minimum order any of use could reach. (Once I contacted a tannery directly and found their minimum order was 10k square feet of leather in one color and thickness or they wouldn't talk to me. Ouch! I imagine it's the same type of situation with the larger suppliers of dye.
-
Braintan.com I think is a site that teaches about how to tan stuff yourself. It won't be much cheaper to do it yourself than to ship it off unless you already have all the equipment and supplies. You can, however, dye it yourself.
-
It depends on the effect that's desired. For slick, use leather with the grain out. For soft, use suede side out. I often line with pig suede or other veg tan. If the gun is not stored in the holster you could use chrome tan but it's generally discouraged for long-term contact with the metal.
-
If you look at historical reenactment stuff you can find teeth, skulls, bones that are chrome- or nickel-plated. If you just want canines (fangs) you could probably find them (or reproductions) and have them coated or painted metallic, as well.
-
What you need is heat, moisture, and, optionally, color. For it to last, you want some protection. A coiled up belt can have the entire edges dampened with a kitchen sponge within seconds. Flip it, repeat. If you use a 1/4" nap trim painting pad or sponge dauber you could also dye the edges quickly, if you cared to. There are many options but dampening the edge makes a big difference for me. Saddle soap helps keep the moisture in place. Moisture allows the fibers to form and compress to the shape I want. Usually I burnish by hand and just use a scrap of cloth or a ceramic electrical insulator from old knob and tube wiring... since it was free.
-
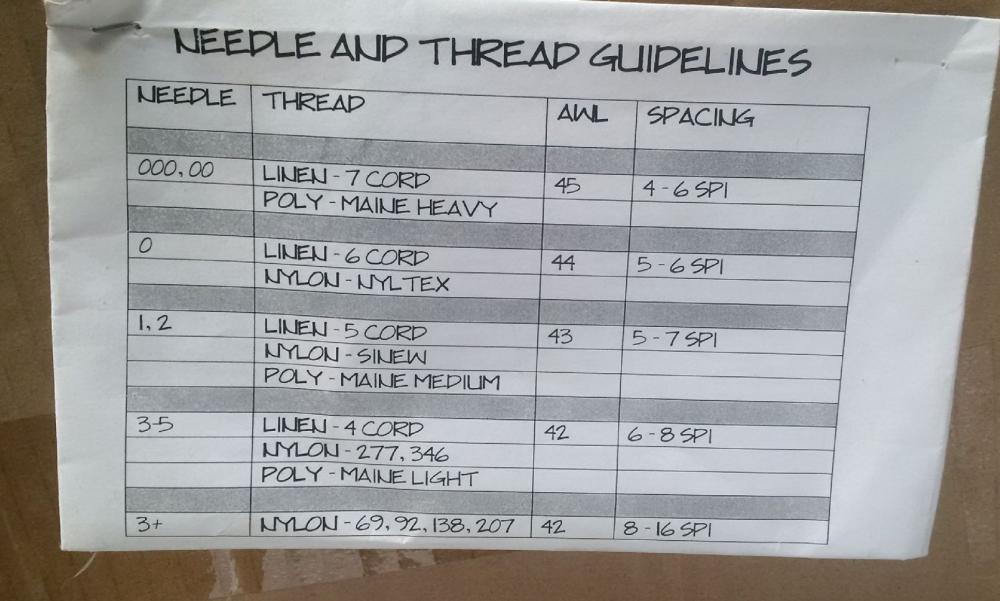
A rule of thumb is place your stitch line in from the edge at a distance equal to the total thickness of the leather being sewn... up to about 1/4" maximum. Thread, needle, awl, and spacing choice is partly based on tradition and partly based on preference. Between two options, thicker thread will look more rugged/chunky and thinner thread will look more refined/designer. In general I recommend 5-6 stitches per inch for strength/rugged goods (never less than that) and 7-9 spi for finer, smaller stuff. This is for sewing by hand, not machine. Here's a little chart that will give you a starting point and you can experiment from there. In this chart, Maine "light" is 0.03 (0.75mm), medium is 0.04 (1.0mm) and heavy is 0.05 (1.25 mm). I did not have 0.02 (0.5mm) extra-light at that time but I like that at about 7-8 spi.
-
The general view is that brass is the most durable of the zipper options. I should say that this is the public's perception. The point is debatable, but it is a safe way to go. Due to the cost of brass, they are also more expensive. I recommend YKK primarily. They are one of the biggest zipper manufacturers, and have a good reputation. Nylon coil zippers have a few advantages: they slide smoothly, they are inexpensive, and in something like a dopp kit there is no chance of teeth rubbing against the hand when reaching in. One disadvantage is they don't look especially premium. Vislon zippers have a few advantages: they are less expensive than metal, they are supposed to be self-cleaning and usable even when dirty, and they are supposed to be durable. They are used a lot in military gear. Disadvantage: very utilitarian-looking. Metal tooth zippers have the perceived advantage of strength/durability. Aluminum looks dull compared to brass, and perhaps lower quality (looking, I mean). Nickel zippers look better, but are mostly available in short lengths. All told, for durability as far as sheer strength, the larger the size of the zipper teeth or coil, the stronger it is. The main sizes are: 3, used on skirts, small coin purses, etc. 5, used on jeans, jackets, etc. By far this is the most common size. 7, used on some coveralls, some coats, other gear intended to have rugged use. 10, used on zippered windows (eg Jeep), heavy coveralls, hockey bags, etc. A dopp kit will get light use over a long tim.e. For that application I would probably choose a #5 metal zipper in brass or a 5 coil zipper in a color that matched the leather or stitching. You could use 7, as well.
-
You'll need something that will remove acrylic paint (deglazer or nail polish remover, perhaps).... but whatever you use won't know which paint you want to keep or remove so you'll have to be very careful. You may need to touch up some spots with a toothpick that has paint on the top.
-
What did you use to color the lettering?
-
To get very straight lines of stitching, here is one way: lay your leather on the worktable. If it is stretchy leather, put some masking tape on the back so it doesn't move around on you. Slightly dampen or use saddle soap to soften it. Using a scratch awl, poke a small hole at the beginning and end of where you want to stitch. Using a ruler, pull the scratch awl along the ruler to draw a straight line between the holes. Use a stitching chisel/pricking iron to mark/make your holes, being careful to center the chisel/iron on the line you drew. When advancing the chisel/iron, insert it into the last TWO holes you previously made in order the keep it straighter. Continue until you reach the other end of the line. Alternative to chisel/iron, use a stitch marker wheel/overstitch wheel and run it carefully along the ruler. Without starting to sew, put scrap leather or cork behind the leather and push your sewing awl vertically through each hole, being very careful to keep it vertical. Continue from one end of the line to the other. You may need to still use your awl during the actual sewing to re-open the holes, but this will help you keep the stitch lines straight front and back.
-
So far as I can tell, all latigo will bleed. You might have better luck with bridle.


