


fredk
-
Posts
5,974 -
Joined
Content Type
Profiles
Forums
Events
Blogs
Gallery
Store
Everything posted by fredk
-
fyi its not happening with me. All SLC links go to an Oxford leather and stay there, no redirecting to any log in page I'm using Chrome and Windows 7 Home Premium
-
Perma-lok; you thin the end of round lace then screw it into the end of the needle. It can be used for flat lace as well https://www.tandyleather.eu/en/product/perma-lok-needle But flat lace is best used with this type; the Lok-eye; https://www.tandyleather.eu/en/product/lok-eye-needle-hook-n-eye-10-pk or this version; https://www.tandyleather.eu/en/product/2-prong-lacing-needle-10-pk
-
very much a very big yes they are
-
to add my $1 worth; a. skive the edge of the gusset and the main bag where it attaches to the bag b. wet the leather and bend the edge up or down with your fingers. Usually up as the gusset sits into the bag by the amount of the sewing allowance, but it can be done the other way c. I like to use a slightly thinner belly leather for gussets as it is a bit more stretchy d. I glue the gusset to the bag first, then make the holes for stitching
-
1. on a pocket it is good to go over the edge as that stitch re-enforces the previous one joining the two pieces, it adds strength where the leather will try to pull away 2. read your stitching before making the holes. Make the holes from both edges of the pieces towards the centre. eg first hole, about 3mm from each edge, then prick or punch holes towards the centre from these edge holes, as you get to the centre you'll see if the last few need adjusting in length for a tidy look 3. similarly on corners; do the centre corner hole first, then a hole on each side of that, then work from each corner to the centre of seam, adjusting the last few holes for an even look 4. never worry about the odd stitch being too long or too short if its aiding good construction. You/me/we see it as a 'fault' cos we're looking and studying it close up but a client/customer/friend won't see it that way - they'll be saying, 'wow, you hand stitched this!!'
-
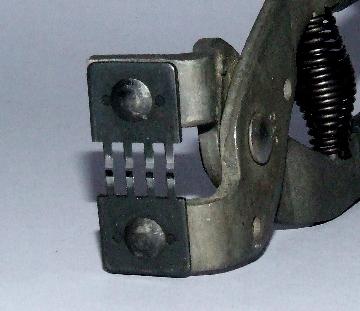
Later you can invest in two pairs of these; Available with four teeth and two teeth. Costs as little as about 12 Euro a pair. They make diamond shaped sewing holes suitable for 0.6 to 1.2mm thread. Most of what I make is no more than about 5mm thick (about 7 oz I think) and these do the job first class. With these I can punch stitching holes round an item really fast. Downside is the depth of the jaws, that is from the teeth to the hinge, only about 2cm so I can't punch holes within something which is further in than that, so the hand chisels come out for those jobs.
-
1. The teeth/prongs will be case hardened. You'd have to file away quite a bit to get through it. A bit of polishing by using a jewellers file or a metal nail file followed by smooth grades of wet & dry grit paper will make a lot of difference. 2. Mix a pot/jar/tin of soft bees wax and olive oil. Not soft and runny, just softer than beeswax on its own. Before you make the first set of holes dip the chisels into the beeswax mix, then as you go on, after about every third time dip the chisels again, if the leather is really dry you may need to dip after every second hit.
-
Fiat Abarth, full leather interior, high performance racing spec engine, limited edition colours, especially as my friend wanted two in colours that Fiat did not offer - but you don't turn down an order cos you don't offer it in Ballilia Yellow. and Italian cars were more expensive in N.I. than GB
-
 Very possible to re-dye. Going darker is always easier. First though you need to remove the polishes and lacquers that have been on them. I'd use cellulose thinners, aka lacquer thinners, and clean cloths to really wash down the surface to get those layers of polish off. This may also start to remove some of the original dye. If it does you'd need to keep going until the surface all looks a fairly even colour. Then when thats done you can start to apply the new dye, But first dampen the leather surface all over, not soaking wet but damp, then apply the dye with a sponge or piece of sheeps wool cloth. Apply dye in a 'circular motion. Apply lots and spread it around quickly. Let the first coat soak in for a few hours, then apply a second an even a third coat if necessary. Allow to dry out for at least 24 hours. Then buff and buff and buff with clean cloths. After this a lacquer sealer like Resolene or Super Sheen can be applied, in diluted coats, to seal the surface. When this is dry a good quality beeswax polish can be applied and buffed up.
 -
To the OP, take care, check everything out, it might be a good genuine contract or it may be suspect. Don't judge it by the way it looks or what we say, judge it on the facts that you discover. Let me divert into a story for a moment. This happened to friend of mine. He's in the same motor club. He's retired. This event happened several years ago now. My friend dresses like a hobo/gardener when he's out 'casual'. His family have always liked and bought Italian cars, buying them in preference to any other. One day he decided he wanted to buy a new sports car. All the Italian makes had new models of 'spyders' that year. His first call was to the Ferrrari & Lamborghini dealership. As he was looking at the insides of one of the Ferraris the dealer management called security and had my friend literally thrown out and told not to come back. Next stop was Alfa Romeo dealers. Here the sales people refused to talk to him and insisted he touch nothing and leave the premises. Next call was Fiat. A young, fairly new, salesman dealt with my friend. Test drive? no problem sir. They went for a test drive and as a racing driver of experience my friend took the car to a quiet area and stressed it. On getting back to the dealership with a rather 'frightened' salesman my friend said he'd buy. How do you want to pay? "Cash transfer or cash in hand" says my friend. My friend got a good deal. Then he told the salesman, "oh, I don't want one, I want 6. One for me, one for each of my 2 sons, one for my daughter for her birthday, and I'll have to get my wife one as well and my eldest grandson will want one too and here's the colours I want them in and the dates they are to be delivered." The cost of each of those cars was about £35, 000 (afair), thats x 6 = £210, 000 which that salesman sold that day. When my friend went back a few days later the salesman told him he'd gone to other two dealerships and rubbed their noses in the loss of that sale. Although my friend dresses like a hobo, he's a multi-millionaire. Last estimate was he's worth about £50 mil, and thats not taking into account what the rest of the family is each worth. So don't judge things on how they look at first. Deal with it as if its all genuine and decide on the facts as you learn them.
-
Spotted this under 'Returns'; To return your product, please mail your product to: 610 Commerce Center, 7200 93rd Ave N #140, Brooklyn Park, MN 55445
-
An order like that is not to be sniffed at. Tread carefully Grasshopper
-
You're all loonies, naming hammers and sewing machines . . . . I call the foam heads I keep hats on Charlie and Louis, and my armour stand Norman, cos he is one, and my car is called LOOPY (reg is LD05 UPY). I call my basic scratch awl 'the pokey hole thingy'. An Ulsterism is to call something which you either do not know the name of or have temporarily forgotten 'that wee spud', eg "Pass me that wee spud over there" (pointing) and anyone knows what you mean. Has nothing to do with potatoes PS. This reminds me of; Did you hear about the sewing machine which dreamt of going on and winning US/Australia/Canada/Britain's Got Talent? It was because it was a Singer! I'll get me coat
-
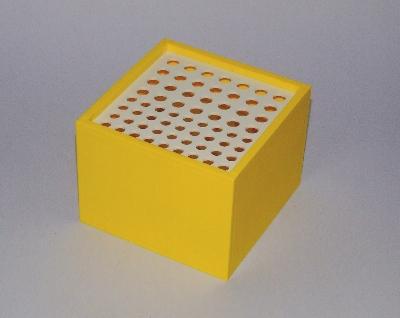
That block of wood holds 104. My plastic boxes hold 64 each at a cost of £7 each ~~~ 104 at £38 or 128 at £14 ? mmmm I like that idea. I'll have to work something out for the 'picture' type stamps
-
conditioning old leather - advice needed
fredk replied to NeilMott's topic in Leatherwork Conversation
basically yes, try just one end, or a piece of the strap. Really soak the leather and keep wiping it. I think it will eventually start to show being too dry again. There are many and good conditioners available in supermarkets. Don't use a cheap one tho. I'll not mention any by name as I'm in a different country and I don't know brands available to you. -
In other things I store small items in re-purposed soft cheese boxes, but these days they are made bio-degradable and they only last a couple of months at most before they start to crumble into dust. Good for the planet earth, not good for my storage. say laa vee
-
conditioning old leather - advice needed
fredk replied to NeilMott's topic in Leatherwork Conversation
First off, do not put the leather into hot water. For sure you'll be putting it into the trash after that. Hot water will 'cook' the leather, shrinking it and tightening it up. 2. I once put too much NFO on a piece. I ended up dumping it as no matter what I then tried would lessen the oil content - corn starch, cat stuff, newspaper, certain chemicals. These days I'd try washing it down with cellulose thinners [aka lacquer thinners] and clean rags. I'd try to get it back to a 'dry' condition which read 'feed me' then I'd start again on it. I know from experience cellulose thinners does remove oils out of leather but whether it will work on this scene I do not know hth -
I started with a stepped block of wood drilled out, then graduated to two blocks, but as the tools multiplied more blocks seemed not the best idea. That is very nice indeedy. Unfortunately I do not have the facilities to make my own
-
Buying my first piece of leather in UK - advice please
fredk replied to Allotment17's topic in Getting Started
On the matter of edges; First. Make sure your blade is really sharp. Put in a new blade, or snap off a section for every project. Cut on a smooth surface. Cutting on an old board will not give a smooth cut. Get something like a piece of MDF, hardboard or self-healing cutting mat. 2nd. get some 'sand' paper of various grades from about 80 to 800. Each sheet should cost about 60p. Do not get the cheap packs out of PoundWorld, they shed the sand more than they actually work. Get Wet & Dry type out of a car accessory shop, maybe Halfords. Grades; 80, 120, 240, 320, 400, 600, 800 Use the W&D paper to smooth the edges after cutting. The roughest grade can be used to smooth away cutting line wobbles, the smoothest grade will get rid of those wee bits of fibres which tend to stick out. Get a cork sanding block out of Home Base. They cost £1.50. Its use in leather work is manifold. Here it can be used to sand a better edge by wrapping the W&D around it. Using W&D in your fingers won't really smooth out any cut line wobbles 3. I use beeswax and neetsfoot oil (aka NFO) mix on my edges. As a starter; get yourself some 'clear' shoe polish in Tesco/Asda and use that to burnish into your edges. Later you can mix some beeswax and olive oil or NFO as an edge burnish. Also use a piece of linen, calico or denim to rub the shoe polish or wax into the edge first. Rub very hard and fast, the friction builds up heat which helps melt the wax into the edge -
I'd reckon they'd be looking about a 50% reduction Your extra outlay would be (minimum): sewing machine $500, Press & dies $500, edger machine $300 = $1300. Or $1.20 per tag. You'll need to put that out first. If you have funds ready thats ok, but if you need to buy on credit (credit card, bank loan etc) factor at least another 20% = $260 = $1560 = $1.42 per tag just for the machinery. Get a contract if you are going to have to make extra outlay. Get a forward payment that at least covers the cost of the new machinery. To my error I often did not and ended up well out of pocket when the client pulled out of the deal
-
Not 4 in total, but 4 per group, ie, 4 for A, 4 for bevellers, 4 for camouflage etc. So thats about 50 spaces
-
Questions for you good folk who do tooling. How do you store your tooling stamps and is each tool easy to find in the way you store them ? I've not done very much tooling on anything but having just had an unexpected windfall of very many raspberries** I decided to buy lots and lots of tooling stamps and try a lot of tooling on things this year. First thing I'm doing is painting the code numbers on the handles with matt black paint then I intend to sort them into these paint brush holders. The few tooling stamps I had were stored in one, so I bought a few more of them I'll group them according to initial letter, eg all the A series together, B (bevellers) together. Then each row will be lowest number to front, highest to back. In each group I'll leave maybe 1 to 4 spare spaces for future purchases. The paint brush boxes are plastic. I have sheets of plastic card which I'll cut and make wall dividers for the groups, gluing these on the top grid. Down the front of each box I'll mark the group division and either just label the group, eg A, B, C, or the letter and type ~ B bevellers, and maybe even list the numbers in the group below that. Thats the basic plan. Its currently a work in progress. Please share with me your storage methods, ideas and anything you might have to say about my plan. ** for the UKers; I got one of those companies to chase PPI. I got over 8 times what I thought I might get so I decided to buy a load of leather work stuff as a treat.
-
Western kit
fredk replied to farns005's topic in Purses, Wallets, Belts and Miscellaneous Pocket Items
That looks very nice indeedy. -
yeah but . . . . yeah but . . . . yeah but . . . . . as a Manchesterite you'd not, but in Ulster ~~
-
Buying my first piece of leather in UK - advice please
fredk replied to Allotment17's topic in Getting Started
That looks the bizz alright,