Dwight
-
Posts
5,236 -
Joined
-
Last visited
Content Type
Profiles
Forums
Events
Blogs
Gallery
Everything posted by Dwight
-
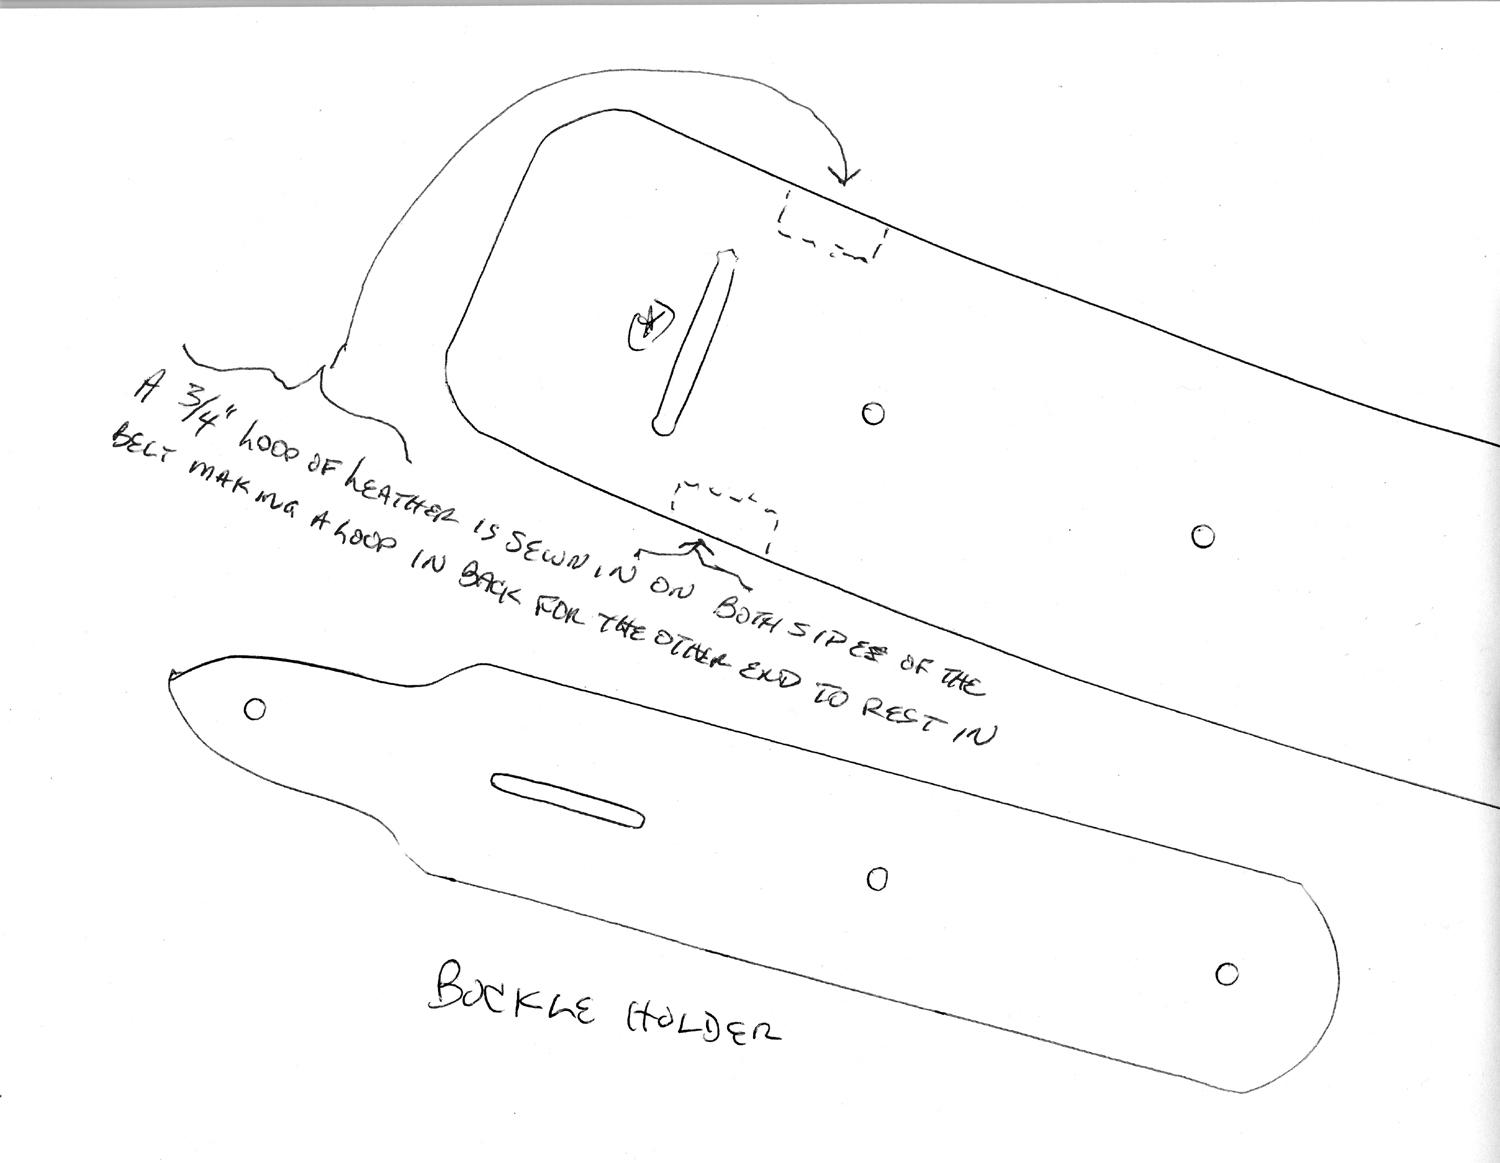
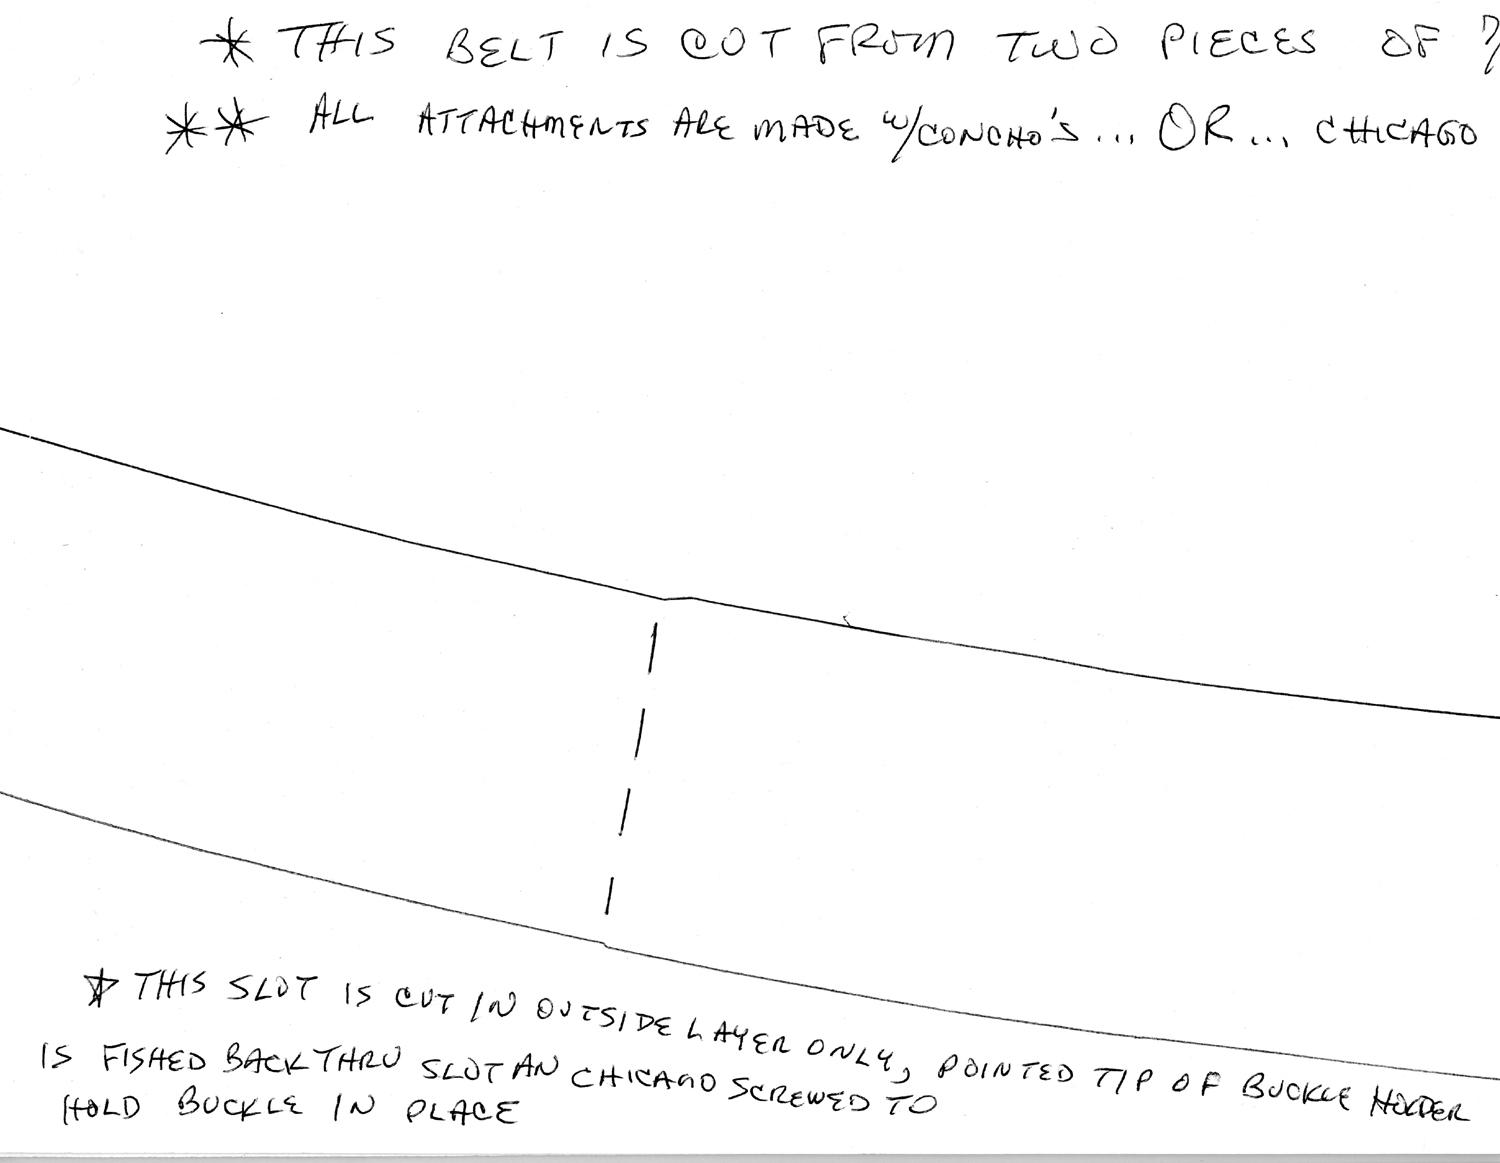
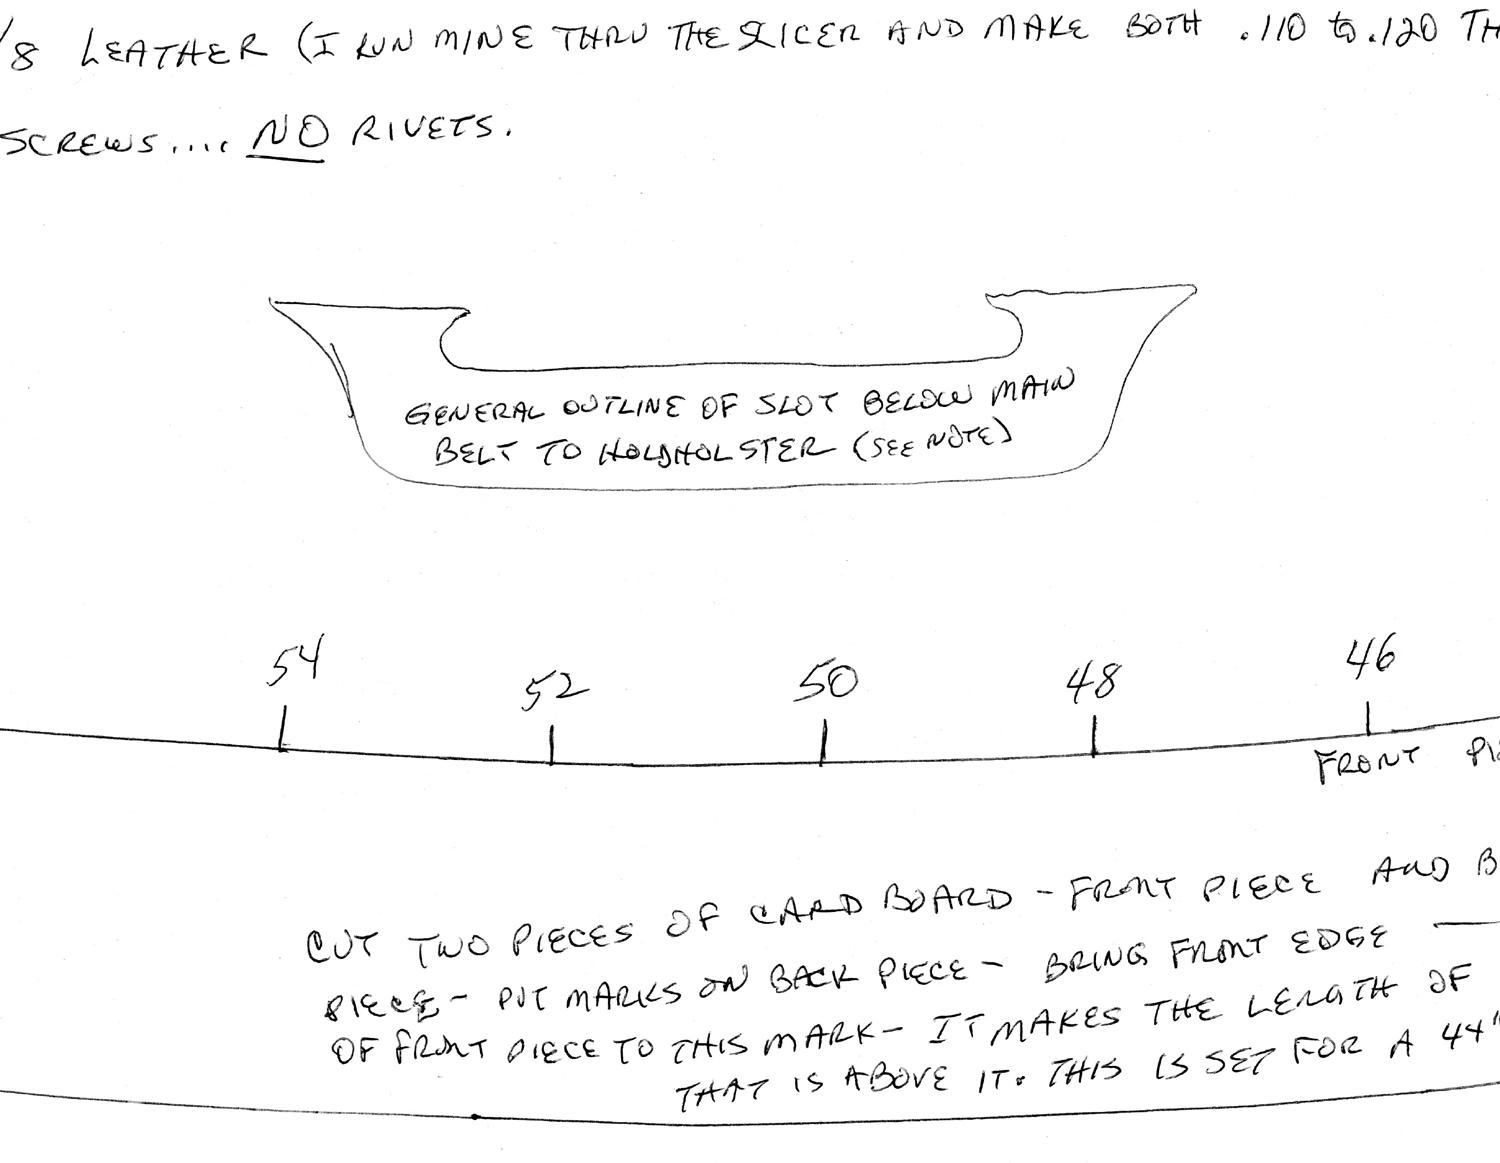
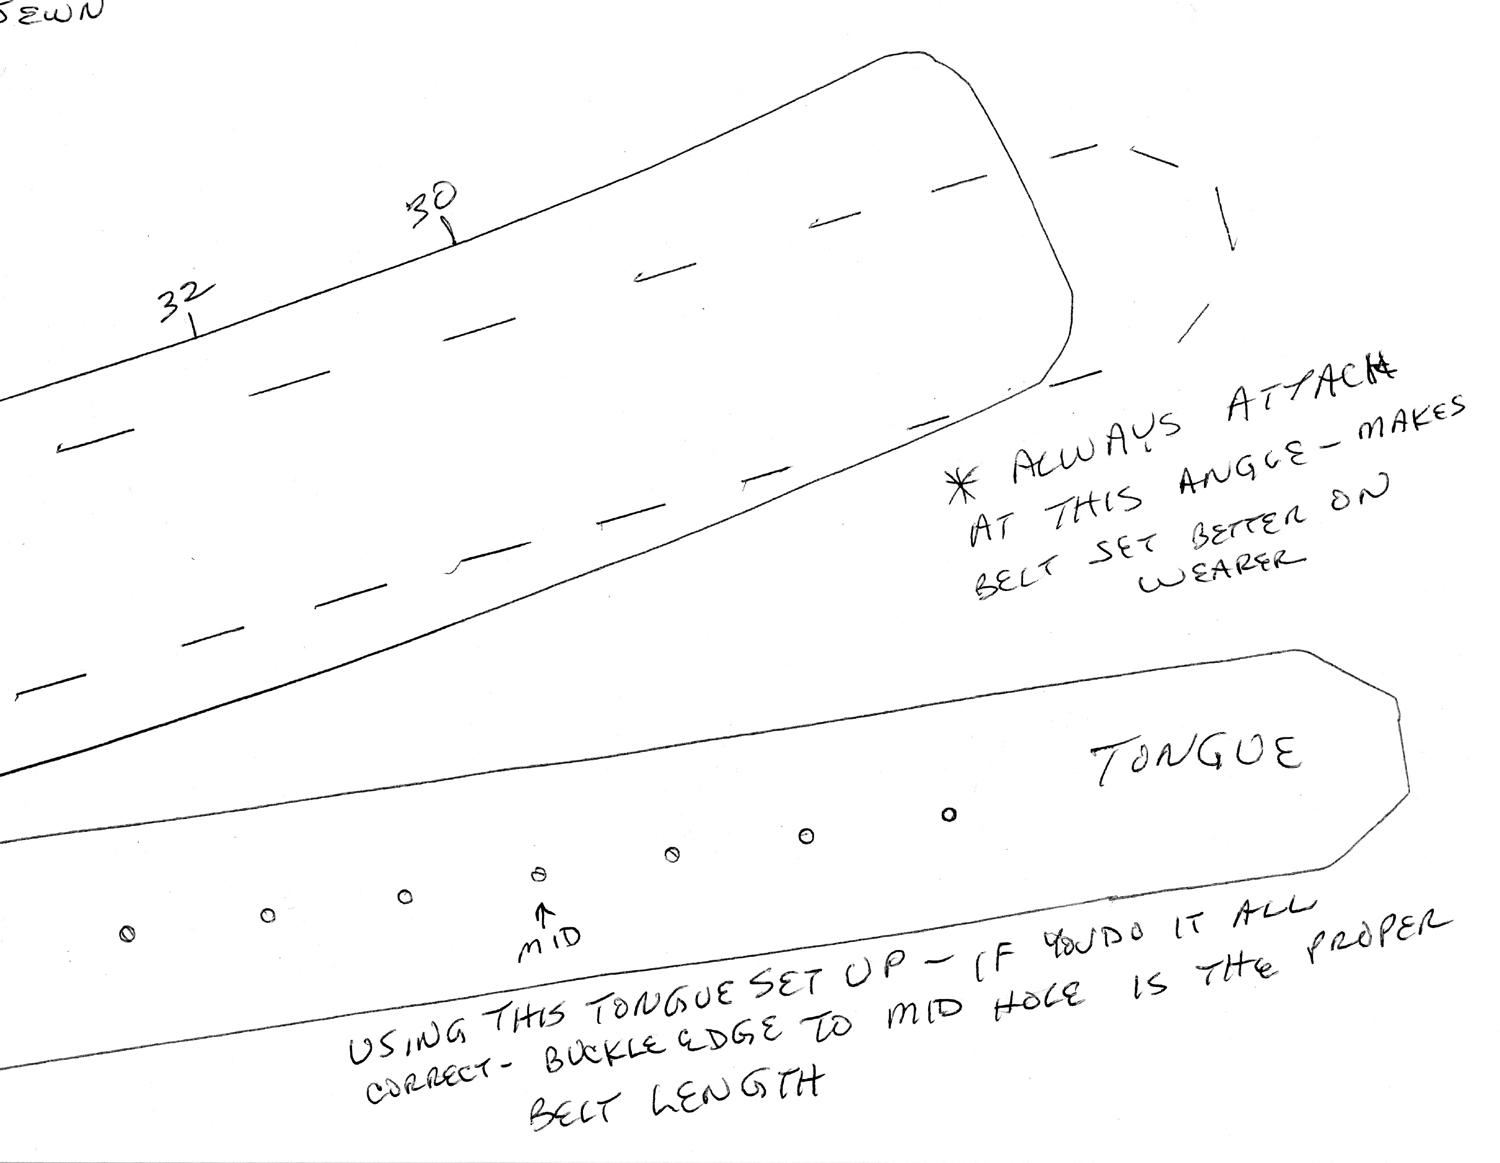
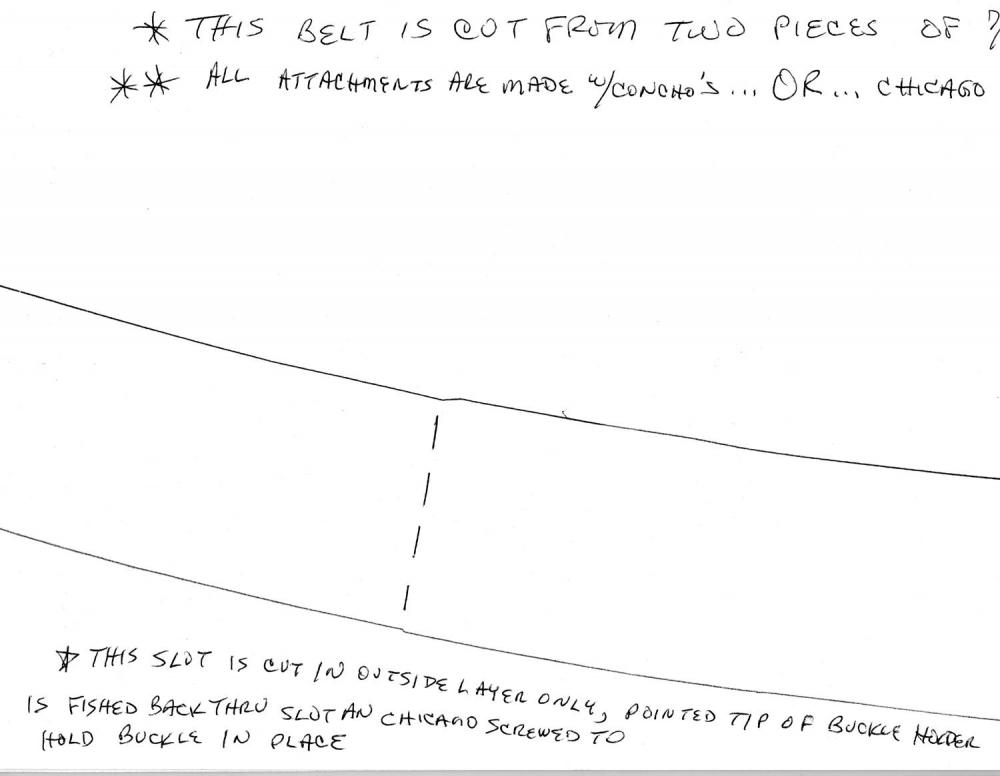
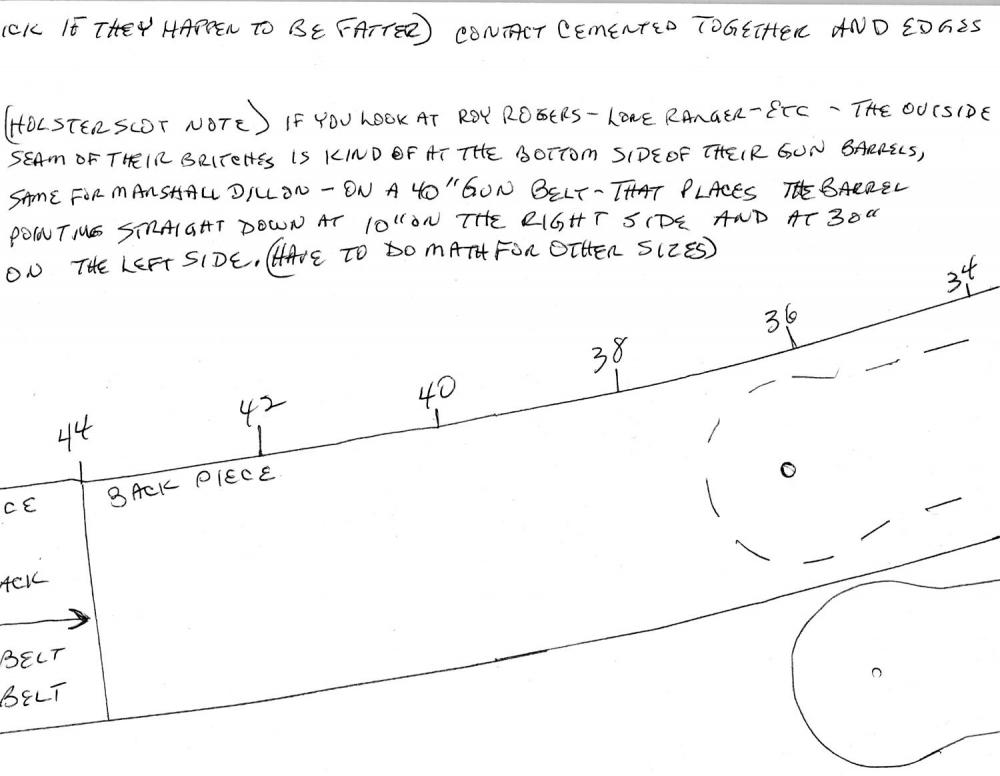
 James . . . Here is how I make gunbelts for cowboys. Take 5 sheets of regular printer paper . . . copy the enclosed pictures with no margins . . . tape the 5 pieces together . . . shows how I make a 2 1/2 inch wide gun belt. I've made 3 inch wide . . . most guys like the 2 1/2 better. Pretty much all the info is on there . . . holler if you have any questions. This is the "technique" I got from John Bianchi's old VHS tape series a guy loaned me about 20 years ago. The only think not on here is the belt loops for the cartridges. May God bless, Dwight
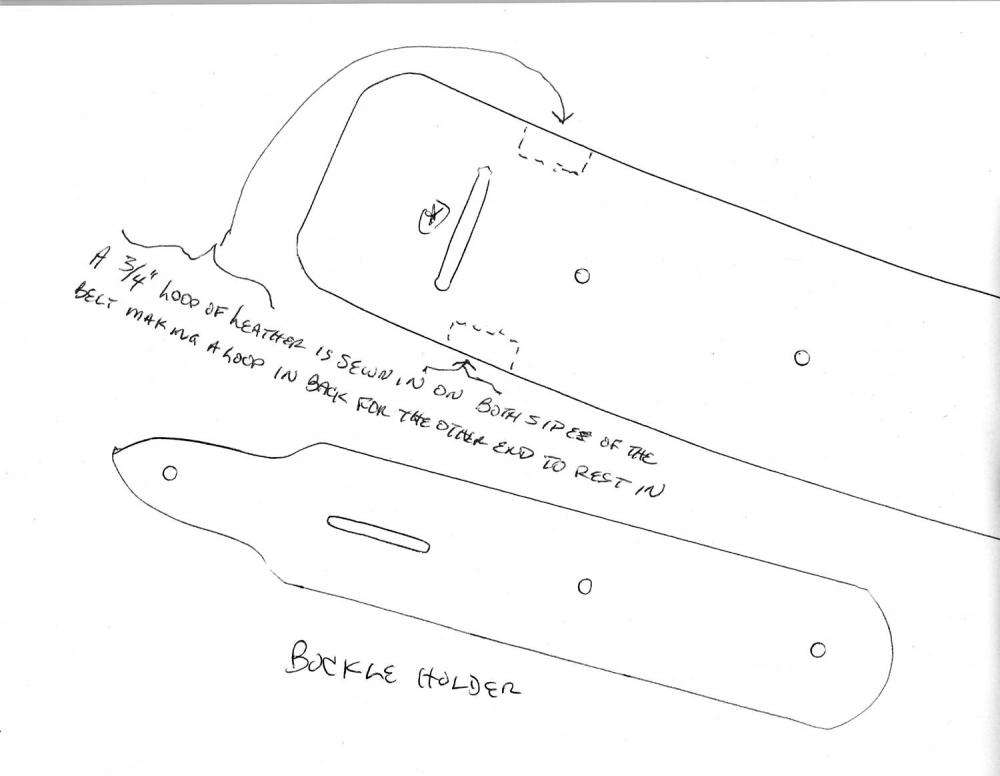


-
IT IS a buscadero if it does one thing . . . the holster hangs from a loop on the bottom of the cartridge belt. That is the only requirement to turn a normal holster into a buscadero. My comment comes from the teaching of John Bianchi . . . (super master holster maker) . . . who stressed that any gun belt that was cut so that most or all of it was pretty much one straight piece . . . you just couldn't get it to hang on a buttless cowboy . . . an age related thing that happens to a lot of men. Their butt does not disappear . . . it just moves around front above the waist line . . . leaving bones and cheek skin . . . needing a curved belt to keep up the three pounds of shooting steel and 2 or three pounds of ammo from falling to their ankles every time they cough or sneeze. May God bless, Dwight
-
JamesRiley has it all correct from my understanding as well. Plus . . . I personally would never make one like that. Without the proper curvature of the belt . . . lots of the "buttless cowboys" would never be able to keep the gun belt from sliding to their knees every time they coughed or sneezed. May God bless, Dwight
-
I Tried To Make A Pancake
Dwight replied to AzShooter's topic in Gun Holsters, Rifle Slings and Knife Sheathes
I never worried about the blue gun (or green gun or red gun) popping . . . I was just afraid some day I'd get a Glock or other plastic fantastic wonder . . . and the "pop" would not be a friendly sound. I know the odds of it happening are really infinitesimally small . . . but I'm the guy who collects those small odds. Bought the Vac pump at Harbor freight . . . made the bags myself . . . sold off the rubber and dismantled the press. Haven't been sorry for a second. May God bless, Dwight -
Hmm . . . I do it a lot on different things I make . . . never had a problem at all. May God bless, Dwight
-
Stunning would be the word I would use . . . great job Bruce . . . gives the rest of us a higher level to shoot for. May God bless, Dwight
-
I don't know if it will work as I have no *.pdf sketches to check with . . . but Microsoft Publisher usually prints very close to the rulers on the top and bottom . . . and by grabbing the object and pulling it or compressing it on the page . . . I would think it would work for you. May God bless, Dwight
-
I Tried To Make A Pancake
Dwight replied to AzShooter's topic in Gun Holsters, Rifle Slings and Knife Sheathes
As time goes on . . . you will learn to love it more . . . take my word for it. I used to use a press . . . got scared with all the plastic guns . . . vacuum system can't hurt one I don't believe. May God bless, Dwight -
Chest Holster Pattern
Dwight replied to JWheeler331's topic in Gun Holsters, Rifle Slings and Knife Sheathes
Just a little kibbitsing here . . . if your father is a veteran . . . and if he carried a 1911 as a sidearm . . . might want to take a look at some of the "US" replica rigs that are sold on Ebay, Pinterest, and a place called Sarco. Most of them are fairly true to form . . . and he may enjoy one of those. Just hobknobbing . . . May God bless, Dwight -
I Tried To Make A Pancake
Dwight replied to AzShooter's topic in Gun Holsters, Rifle Slings and Knife Sheathes
1. Cut a piece of leather for the front . . . that you have laid over the revolver . . . you know for sure it will be big enough that you can trim it down to fit. 2. Get it wet . . . not dripping . . . but good and wet. 3. Put it in a vacuum bag . . . and vacuum form it to the revolver 4. GENTLY hang that leather in a 135 to 140 degree hot box until it dries Now all you gotta do is make the back . . . trim the front . . . and sew that dude. Pancakes are a piece of cake . . . and this one will turn out being 80 % flat backed if you sew it right. May God bless, Dwight -
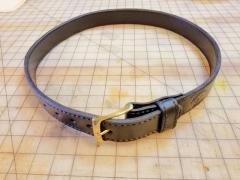 Thank you for the kind words . . . When I first started doing these . . . I thought about trying one with some sort of stiffener in it. Decided against it after wearing a similar belt to this one for a while. Personal opinion is it is a waste of time and resources . . . plus I believe it will eventually work loose . . . possibly cut the threads . . . belt ruined. I'm going on 20 years with mine . . . still holds up the britches. . . . magazines . . . cell phone . . . .45 auto . . . what more could I ask. I have a machine to thin the leather if need be . . . I shoot for a belt between .185 and .225 thick . . . depending on the length. May God bless, Dwight
 -
How to prevent "droop" for a split-tank bib?
Dwight replied to JHLeatherwood's topic in Motorcycles and Biker Gear
Here's a second vote for the kydex . . . easy to work with . . . not that expensive . . . if necessary it can be heat formed if you need a bend, wrinkle, or whatever. Didn't like the stuff when I first started messing with it . . . am quickly warming up to its many uses. and if there are seams where the tanks meet . . . take you time with a tough sewing machine . . . sew right thru the kydex as well. May God bless, Dwight -
Double Buscadero Belt Sizing
Dwight replied to Forester's topic in Gun Holsters, Rifle Slings and Knife Sheathes
Yep . . . bottom . . . sorry about the confusion. May God bless, Dwight -
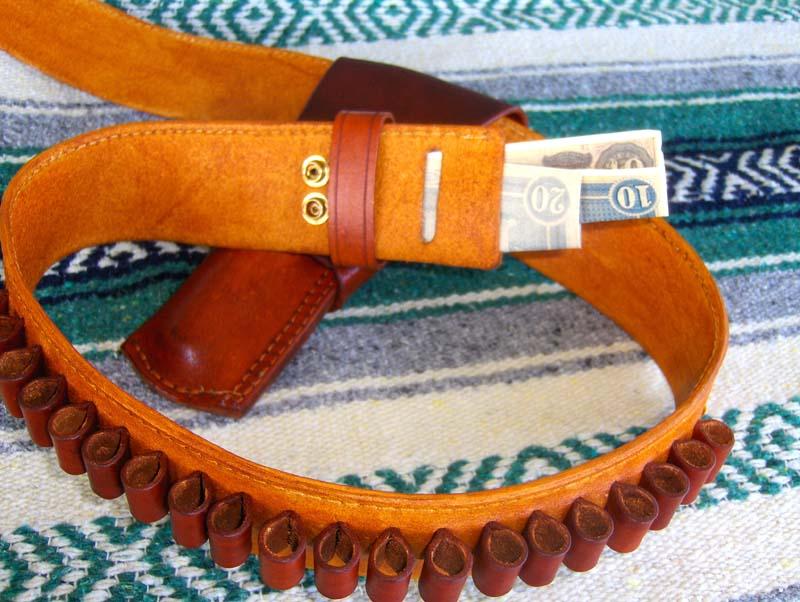
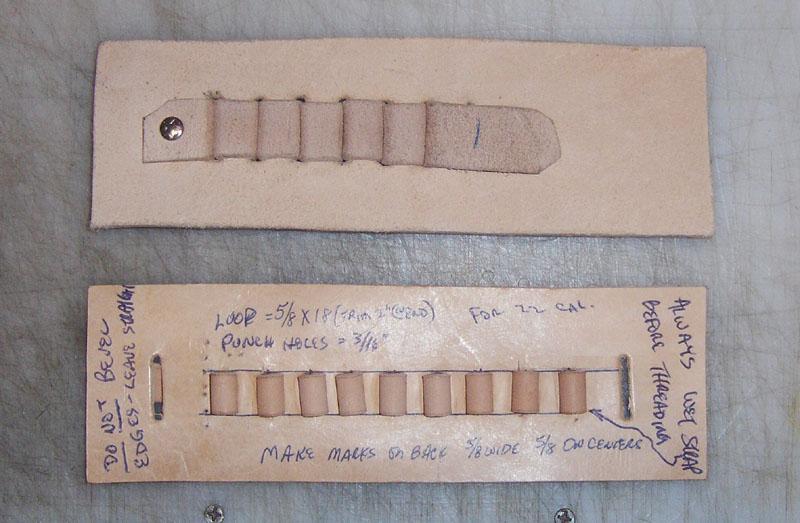
Many cops from decades back carried ammo in a belt carrier for their revolvers . . . very similar to the Ebay picture here. https://www.ebay.com/itm/Wild-Alligator-leather-Cartridge-Ammo-case-Belt-Carrier-Gator-30-cal-357-FB7/202642612871?hash=item2f2e70e287:g:c5MAAOSwH2RcUMdr If you want to make one of these . . . take a suggestion . . . make the carrier portion out of 7 oz vegetable tanned leather . . . make the loops out of 4 oz vegetable tanned leather. Cut the slots for the loops 1/16 of an inch shorter than the width of the loop material . . . get the loop material very wet (not dripping . . . just wet) . . . and form them around the actual type of ammo the person will be carrying. Don't use snap caps . . . unless you plan on hammering the ends of the cartridges while forming them. Snap caps many times are not the size of real ammo . . . Don't worry about the leather "stretching" . . . if you form it right . . . that belt carrier will be serviceable for 20 years providing it is not seriously abused. Closing up the bottom under the cartridge makes you have to drag it out of the holder by it's rim . . . a precarious thing to have to try to do if you seriously need to reload that two shooter. Leaving the bottom so you can lift the bullet up by the index finger . . . is much quicker and easier. If you make it quick and easy with the bottom covered . . . the bullets will probably fall out given the chance. And yes . . . I have made a bunch of cartridge belts. Use the pictures below to show you how to lace the loops. Put a stitch or rivet at each end of the loops. As you can see . . . the loop goes into and out of the same hole as it makes the loop. May God bless, Dwight


-
knife sheath for a finnish blade.
Dwight replied to WyattEarp's topic in Gun Holsters, Rifle Slings and Knife Sheathes
Beautiful May God bless, Dwight -
Double Buscadero Belt Sizing
Dwight replied to Forester's topic in Gun Holsters, Rifle Slings and Knife Sheathes
I'll bring the customer in if I can . . . take some scrap leather . . . make a "belt" that is 4 inches larger than the most used hole in his standard belt . . . stick a buckle on the thing and have him put it on . . . below his regular belt. Line up that hole with the snap on the front of his jeans. Place marks on the left and right side of the person . . . on this "belt" where the seams of his jeans are. That mark will be placed at the back side of the barrel of the weapon in the holster. Make the holsters first then do the outline of the belt . . . place the weapon in the holster . . . bring it around on the outline of the belt (this is done on a series of manila folders taped together) . . . and mark the backside of the barrel . . . that is the center of the holster placement. At least that is how I would do it. But I do my best to not do buscadero belts . . . single holsters like Clint Eastwood wore usually are fairly easy to do as they can be shifted as needed . . . better yet is the rig that John Wayne favored . . . they are even easier to make. Buscadero's were truly never a part of the "real" old west . . . it was a Gene Autry / Lone Ranger / Roy Rogers invention to give it some pizazz on the big screen. Even Marshall Dillon's rig . . . or the Have Gun will Travel . . . they were only sound stage stuff . . . not real. May God bless, Dwight -
Double Buscadero Belt Sizing
Dwight replied to Forester's topic in Gun Holsters, Rifle Slings and Knife Sheathes
Neither . . . measure the "most used hole" in the belt the person wears today . . . Add 4 inches . . . that is the measurement from the outside of the buckle on the buscadero belt to the center of 7 holes on the tongue of the buscadero belt. Doing it that way . . . it has never failed me. But . . . yes . . . you do do the measuring the bottom way. May God bless, Dwight -
Chest rig for a Glock 26
Dwight replied to Hags's topic in Gun Holsters, Rifle Slings and Knife Sheathes
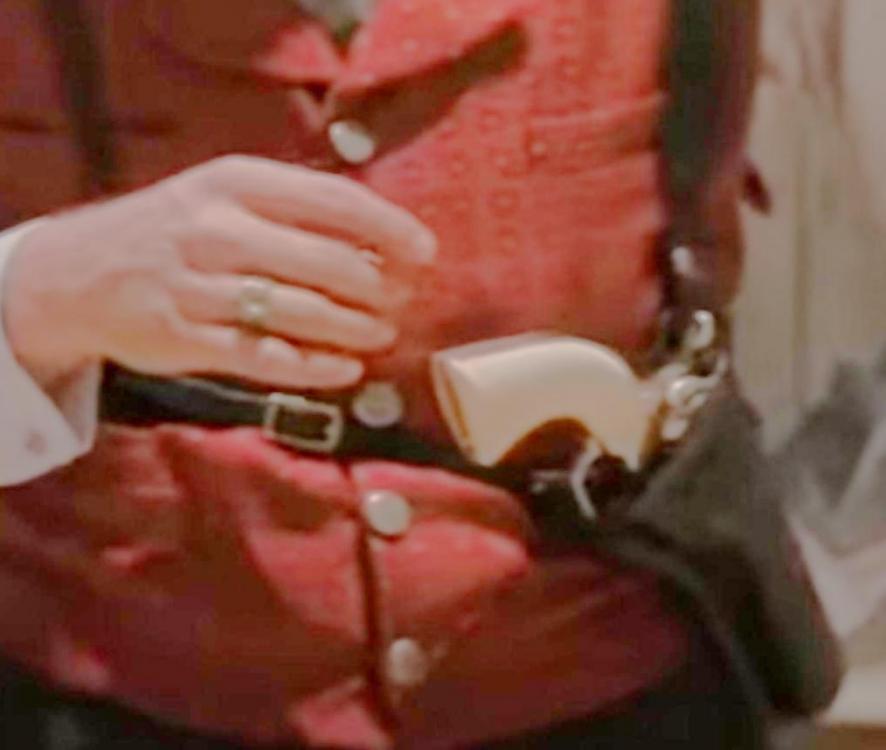
Why do I get the feeling some of y'all watched the movie Tombstone?? Doc Holliday is alive and well . . . at least in spirit . . . May God bless, Dwight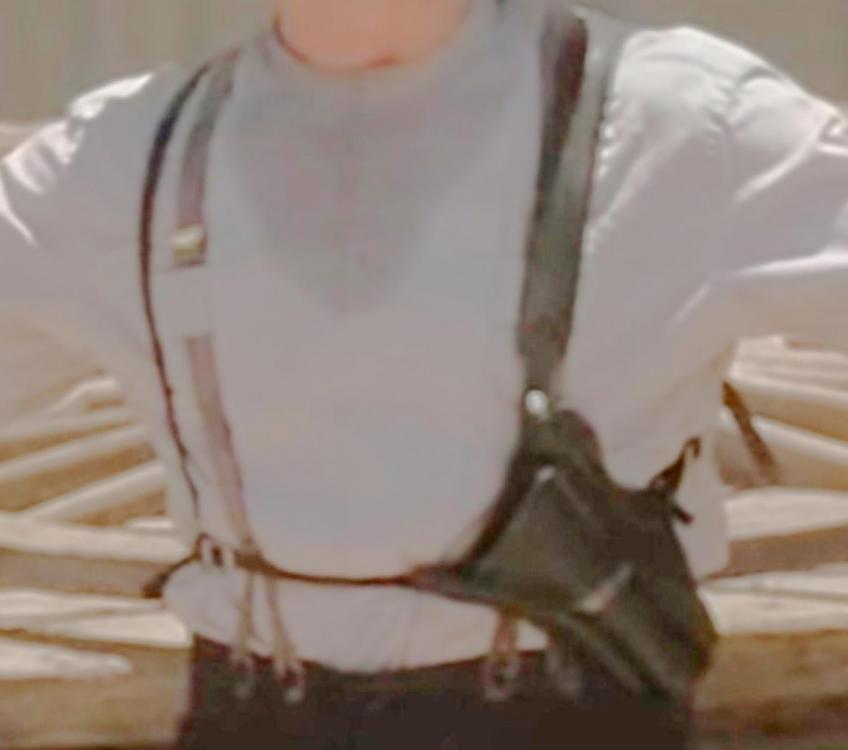
-
Here is an example of the weaving . . . Very little bulk . . . and even when the leather of the belt stretches (as all leather does over time) . . . the loops don't have anything to pull them wider as is possible with the sewn on loops. Plus . . . I only have a Tippmann Boss sewing machine . . . I can weave one of these belts in about half the time it takes to sew it . . . May God bless, Dwight
-
Well . . . james . . . first off . . . don't do what you are talking about. THE way to do cartridge belts is to weave them . . . not sew or stitch them. Others on here will disagree . . . but a sewn loop will one day become a loop that the bullet either falls thru completely . . . or falls out of while you are walking down the road . . . in my opinion. The pictures tell the way to do these . . . basically you punch a hole in the belt . . . weave the leather loop thru the hole . . . then back thru that same hole . . .leaving a loop of leather on the outside to hold the cartridge. All you do is rivet both ends . . . no sewing at all. May God bless, Dwight


-
Doc Holiday Shoulder Holster Pattern Needed
Dwight replied to Dwight's topic in Gun Holsters, Rifle Slings and Knife Sheathes
My email is good . . . check the PM up above . . . May God bless, Dwight -
Doc Holiday Shoulder Holster Pattern Needed
Dwight replied to Dwight's topic in Gun Holsters, Rifle Slings and Knife Sheathes
That would be quicker and easier . . . Measure his belt . . . from the outside of the edge of the buckle . . . to the hole he uses most . . . and get his jean's size. Lemme know. Also need to know what gun he plans to use. AND . . . is he left handed or right handed?? May God bless, Dwight -
Doc Holiday Shoulder Holster Pattern Needed
Dwight replied to Dwight's topic in Gun Holsters, Rifle Slings and Knife Sheathes
Good morning James3 . . . yes, I guess you could talk me into making another one. But you are back a ways in the line of "stuff" I'm doing. Among a pile of "other stuff" . . . Got a Fury holster to do (from Brad Pitt . . . tank commander in the movie "Fury") . . . which is a kind of a complicated piece of work. As well . . . a full size 45ACP in a shoulder holster . . . with 2 mag ammo carrier under the other arm . . . all incorporated into a pair of leather suspenders . . . for a fellow who steps down the road at about 6'3" and 300+ lbs. While having to put up with more snow this winter than in the last 3 or so . . . But we'll get to you . . . but gotta find the patterns first . . . somewhere in my menagerie of a leather shop. I'll need your height / weight / right or left hand / gun you plan to use / color you prefer etc . . . May God bless, Dwight -
Nylon or polyester thread
Dwight replied to ps0303's topic in Gun Holsters, Rifle Slings and Knife Sheathes
I use waxed 346 nylon . . . hand stitching . . . Tippmann Boss . . . or any other leather sewing. I seldom . . . emphasize seldom . . . use anything else. May God bless, Dwight -
New Holster For Special Pistol
Dwight replied to AzShooter's topic in Gun Holsters, Rifle Slings and Knife Sheathes
Your holster reminds me of one I did a number of years ago. Long barreled .22 . . . think it was a Browning . . . had a scope on top of it . . . should have gotten a picture of it . . . but forgot to. Yours looks really good . . . May God bless, Dwight