RockyAussie
-
Posts
3,265 -
Joined
-
Last visited
Content Type
Profiles
Forums
Events
Blogs
Gallery
Everything posted by RockyAussie
-
Are strap cutters rare over there?
-

How to make a press for moulding leather pouches and such
RockyAussie replied to RockyAussie's topic in How Do I Do That?
Thanks Stetson912, I have a vacuum press but 1 its not big enough for more than say 2 at a time and 2 once the membrane is down I cant clip the moulds together to take out and dry. TBH I have only ever used the vacuum for one off type casting with leather forming. With plastics moulding they cool off within seconds and therefor no problem as such. What I have to allow for is although I may only get an order of 100 to start with that can easily go to 200 and so on. That often happens with stuff I make and it is best to think what is the next step. If it takes of I will dig out a large pneumatic press I have in storage and remake with that. At present it is a back part moulder as is used when forming the back part of shoes surrounding the heel counter area. Weighs a ton and chews up a lot of floor area. Thanks again for now. Brian -
How to make a press for moulding leather pouches and such
RockyAussie replied to RockyAussie's topic in How Do I Do That?
Thanks Mikesc, I am tempted to look at the scissor jack idea. It would probably be quicker to make up and I would not need any great turning handle. Would make packing away later a bit more tidy as well. Will see what other ideas come by the end of the day. Brian -
How to make a press for moulding leather pouches and such
RockyAussie replied to RockyAussie's topic in How Do I Do That?
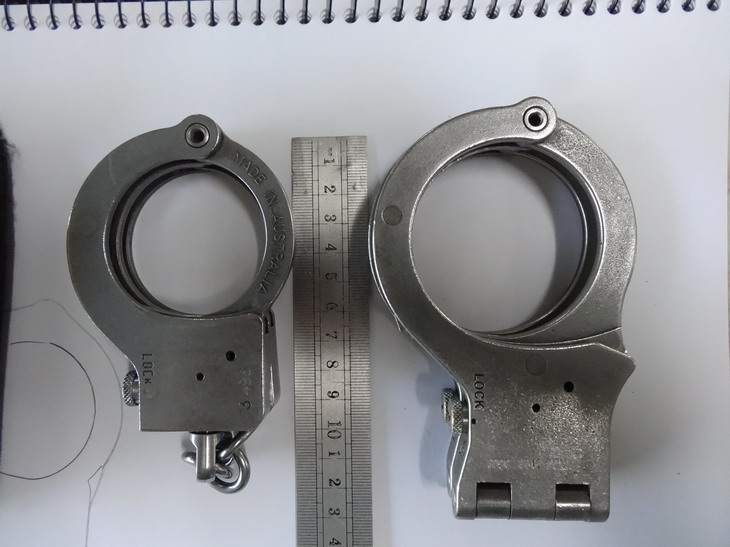
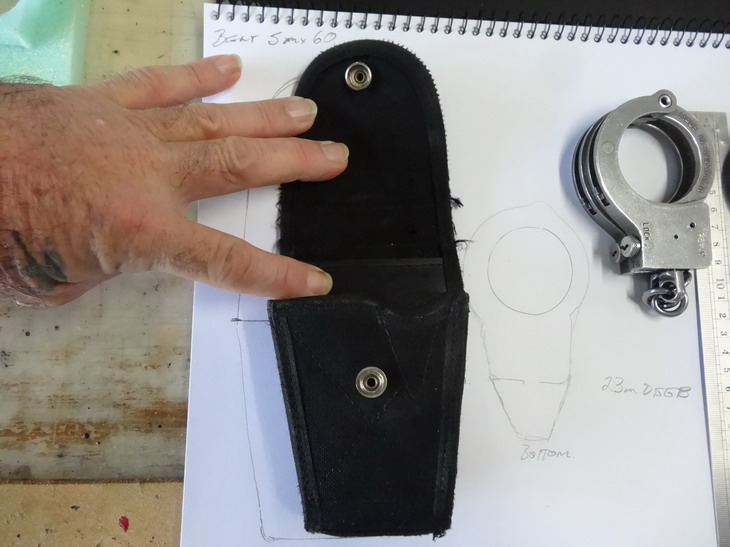
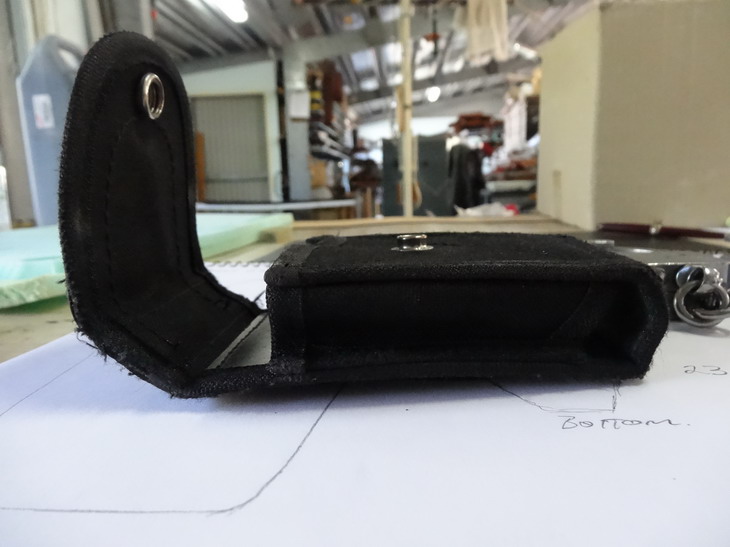
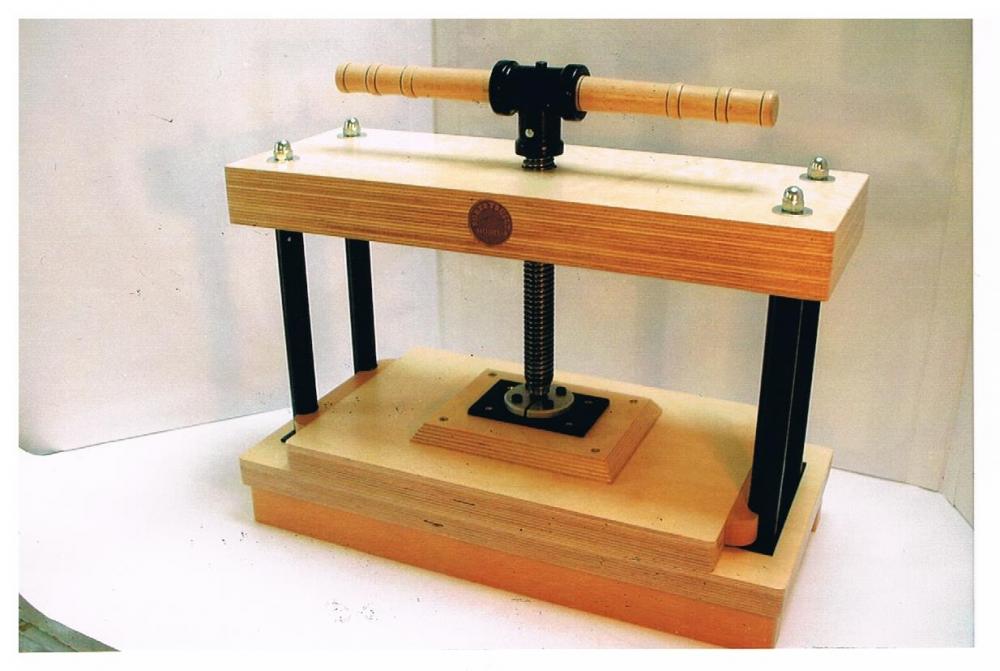
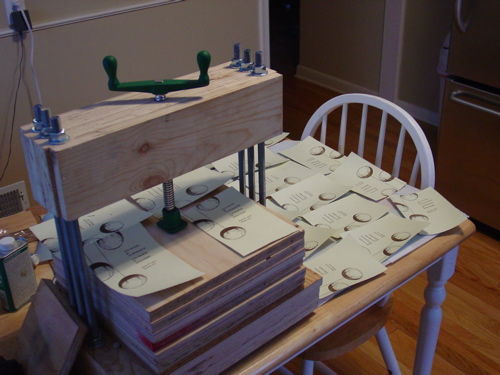
Thanks Itch, I had considered something similar but over here the price is maybe 3 times that delivered. The hydraulic part of it makes me think a little slow for getting it down but maybe not.Another against it a little is floor space. I would like to tuck under a bench when not being used.I might just get 1 anyway. Brian The mould I am hoping to use is a pla printed shape that I hope will do the job. One for the inside shape and one for the outer to force down over. As long as I can get these 2 to come together enough I hope to have clips in the bottom mould which clip up and hold the top mould in place. Then the plot is take it out of the press to dry and start a new one again. I haven't finished the drawings of yet but I will try and load up something later today. For the trial/prototype version it wont have the holding clips. I have loaded some pics of a pouch that is a little similar to what I want to make (the leather one) and the fabric one they presently use along with the 2 styles of hand cuffs that the pouch must accommodate. The larger set are 27mm deep (bit over an inch).
-
Recently I made a lot of personal alarm pouches for the local prison here. They now want a heap of other types of pouches, starting with handcuff pouches. As I have to be able to do 100 or more at a time I will need to make a quick change press able to apply a fair amount of pressure. The moulds I hope to be able to print out on the 3d printer and in such a way that they can clip together once they are pressed down. More on that later. As they will need a fair time to dry out I will need to have quite a few moulds. First I have to have this prototype ready within a week so this press wont be pretty but must be strong. The press I am thinking of making up is a bit like a book press in operation perhaps. At this stage I am thinking of a 4' stair tread cut into three and 4 pieces of 3/4" threaded rod to strap them together. To apply pressure I am thinking to cut up an old office chair which has a nice large thread under it that allows for height adjustment. Its nice and heavy and should be strong enough I think. The second thought is to screw in a car scissor jack and fast turn it with a socket and battery drill. For now I have loaded a couple of pictures that I found online that give a rough idea of what I am thinking. I would like anyone's thoughts and examples if they have any before I go ahead. As I said time is short so I will need input by Thursday if you have any. Thanks ahead for any help offered. Brian
-
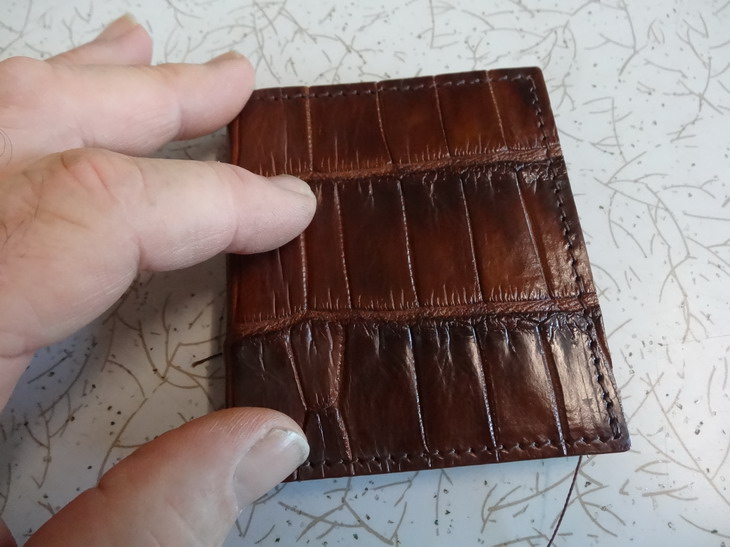
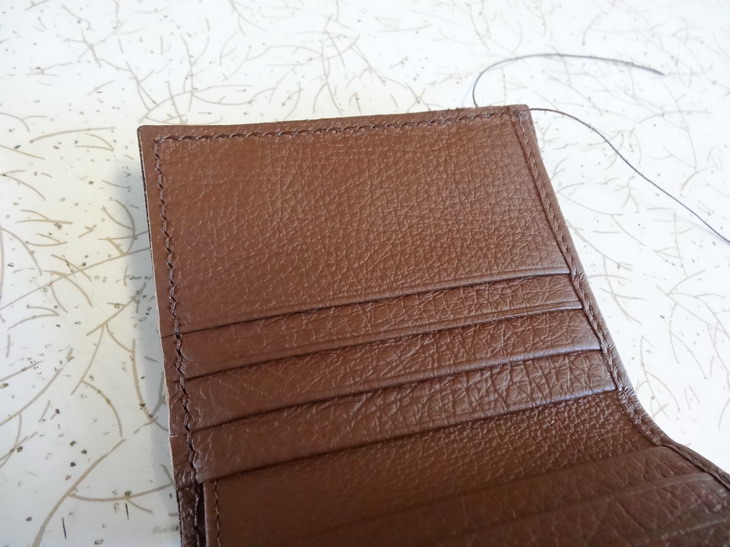
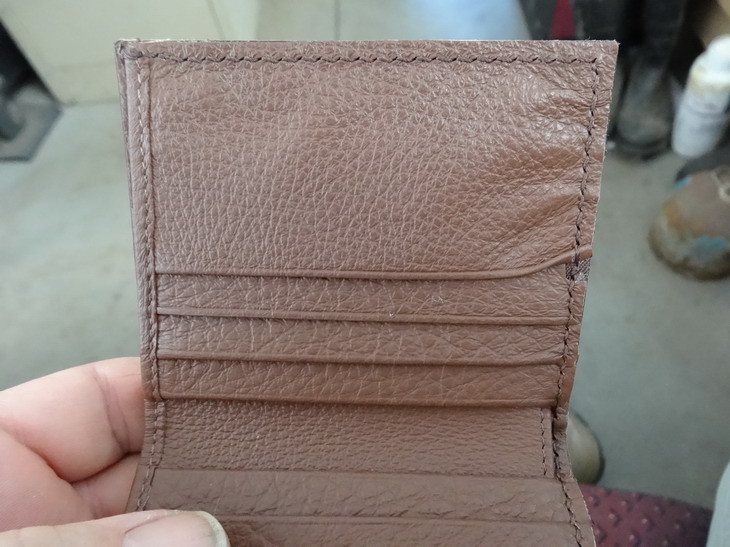
Onto the third bag....
RockyAussie replied to motocouture's topic in Purses, Wallets, Belts and Miscellaneous Pocket Items
I would put the feet through as whether the are fold aside prongs or screw through or even the hammer in type they all will sit better if they have something to support them on the side edge. That will stop them bending over in the hole etc. Most types allow for a fair bit of thickness. TBH I hate the bloody metal ones caus if you ever had a shp with glass counters it is a supper PITB when some come in and slap them down like nothin or no one is more important than them. That is why I like to cover a lot of mine over one way or another. Brian -
Hi Matt S, Perhaps you have some particular type of project that you would like to achieve and would like to have the best machine for the job. I think for this thread to have some good reference value it would be an idea to ask people to post pictures with comments on how close they can stitch from the edge with a particular set up. Say you want to stitch a 1+ 1/2" veg tan ring that has one end blocked of with no flex in it. I want to stitch in 2 or 3 mm from the edge. Most machines except a patcher will not work. If I wanted to do this perhaps I could make the end thin and flexible then glue in a stiffener later after being sewn. Probably on my 331 or 335 Pfaff or 69 Adler but any of those would work on a 2"(50.8mm?) ring better. The important point I am trying to say is that on some machines like with a holster plate just because you could say I can stitch ? mm from the edge is not true if the article is not able to fit over the cylinder diameter in some cases. If it were a straight job than being a cylinder might be irrelevant anyway. I think if I remember in another similar thread it was suggested that a machines needle was only this small distance from the end of the cylinder which at a glance sounds good but if the machine is fed by the dog foot and the dog foot is only to the right of the needle then what is the use of that? Maybe think up some parameters (thread thickness,leather thickness etc is the end to be blocked off as in a gusset end?) and challenge us to come up with some answers then. For an example I will load a picture of a tubular tool bag to further explain. Hope that makes some sense. Brian
-
Onto the third bag....
RockyAussie replied to motocouture's topic in Purses, Wallets, Belts and Miscellaneous Pocket Items
Maybe a top and bottom on a dog collar which then become front and back........ -
Ideas for attaching watches cases to leather
RockyAussie replied to vonBobo's topic in How Do I Do That?
I think a picture of the watch and the bracelet or a drawing would help if possible. Is it to dangle or attach like a watch band on both sides? -
Onto the third bag....
RockyAussie replied to motocouture's topic in Purses, Wallets, Belts and Miscellaneous Pocket Items
Very nice looking work so far as usual. I am a bit curious whether you have put a stiffener into the base this time or not? Normally if I am putting feet on I insert a stiffener to stop the feet just pushing up into the leather. Thanks for posting the pics. Brian -
My Latest Belt
RockyAussie replied to Dwight's topic in Purses, Wallets, Belts and Miscellaneous Pocket Items
I've been using these Chicago screws on a lot of belts over the last 20 years and that is many thousands of belts. I have never had any negative feedback on the use of them other than over the years some have come unscrewed. I make a point to be careful not to burr the screw head when doing up. BTW that is a nice and very durable belt you've made there Dwight. -
Lining selection for your leather work
RockyAussie replied to KelvinL's topic in Leatherwork Conversation
Hi WillieO , in answer to that it depends,some do and some don't. I always do with pocket tops be that the fabric I use does not fray anyway. I get the fabric I use from Italy from a company called TABRU. If you check out the link here following you can see a video where we are making and attaching some pockets for some wallets we make. The advantages of using this method is that the fabric can be cut with a clicker press and there is no fraying. Takes glue with out fraying.The thickness is about .2mm and way stronger than leather at even twice that thickness and it enables a fairly even edge to get the stitching to give the best results with regards to tensions etc.The video was made to show the line up device I made but shows enough of the construction to help I think. Here is the link- -
They well could be, but that is just a part of the fun of this is it not? You just raise the bar and keep looking at ways to raise it higher and better etc. I find a lot more fun in designing these things than making them in the bulk orders that invariably they lead onto. I have orders for products to last some years to come yet so ... Some I know like to keep with the past traditional ways of doing their leather work but I get bored easily and love finding ways to stretch the boundaries all the time. Keeps me better amused.Participating in a forum like LW and occasionally seeing something new and interesting helps us all to become better at what we do and sometimes love. Brian
-
Glad you enjoyed it and I hope the video does a more entertaining view of the process. Just go an order for another 60 of them so The video will probably get finished some before Christmas. Brian
-
belt buckle Belt Buckle from Sergey Neskromnyi
RockyAussie replied to arbalet12's topic in Hardware and Accessories
Nice looking work. Interested to see how the chain link one does up. I wish you the best in your new direction. Wish the price was a little more south for me. -
I wish I had a brother like that. That is a nice looking bag and the embossing font looks excellent. Well done. I'm pretty pleased with myself today as I just found out we have made a sale into China on a ring box. Normally we only get products made from Croc selling there. Brian
-
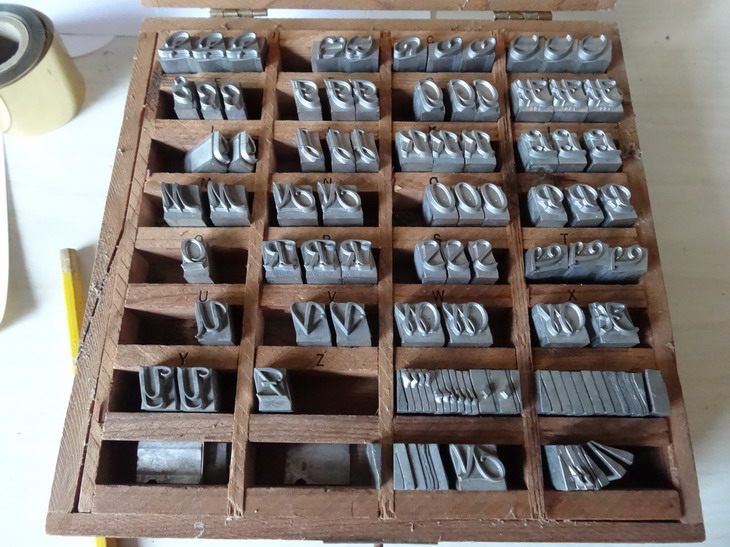
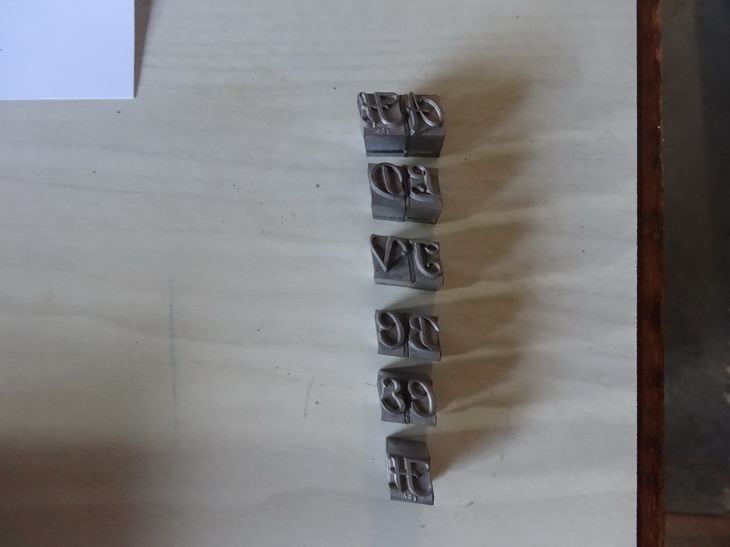
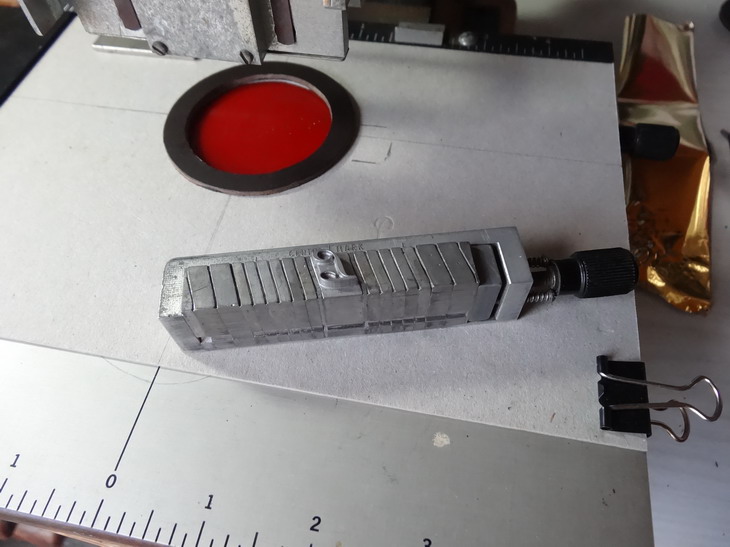
I was lucky to be given this one from an old business friend that now runs an upholstery business called "Swains Canvas" here in Rockhampton. I was telling Pete I could use another one and he kindly gave it to me for as long as I want it. Love good business relationships. They are great little machines for this "type" of thing. I have three of them so I hope to be able to keep this one sort of permanently set up for this job. Mostly I like their type sets as they always high quality and I have not found any decent copiers of them yet. What fonts and sizes do you have Chuck?
-
Does a sheath need a safety lining?
RockyAussie replied to Willie0's topic in Gun Holsters, Rifle Slings and Knife Sheathes
Some times I get a bit inventive so I might be tempted to get a bit of pvc pipe (electrical conduit) and heat it up to flatten it out then encase it into the pouch. No welt needed then really. I would only bother if I was really worried about the stabbing point or If I just wanted to impress myself some. I did some years back do a lot of croc covered knife sheaths for a knife making crowd in Norway and they supplied a plastic insert shaped for their knife blades. I think the knife was called a Puukka. -
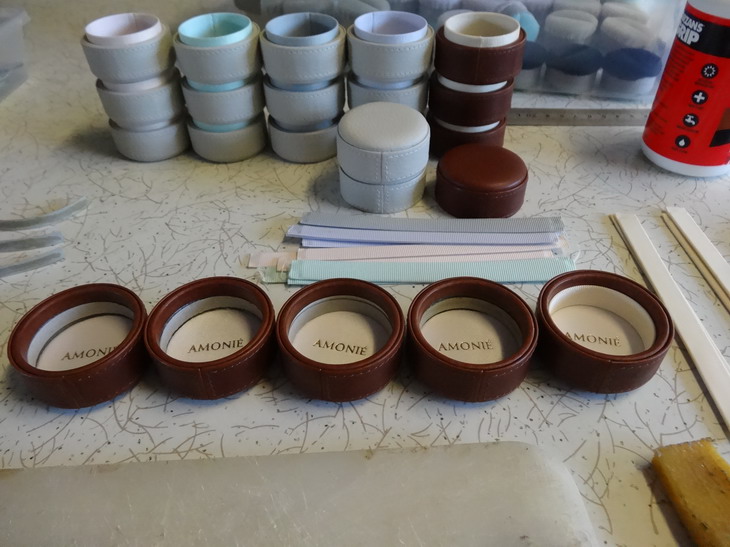
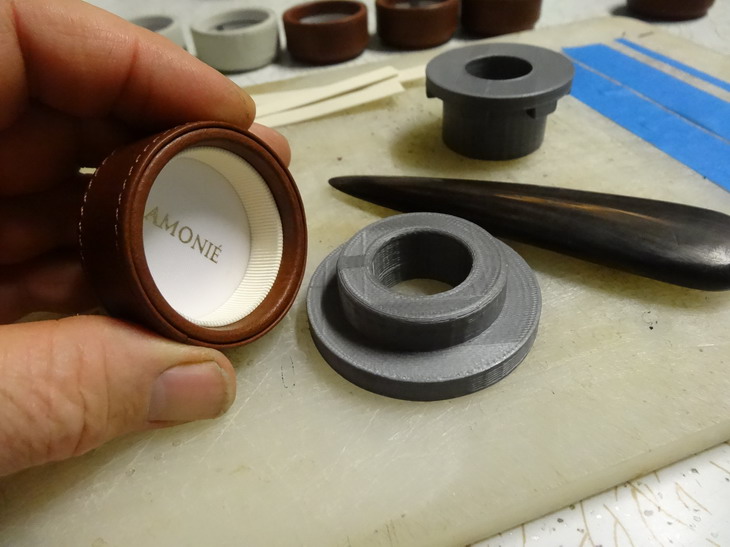
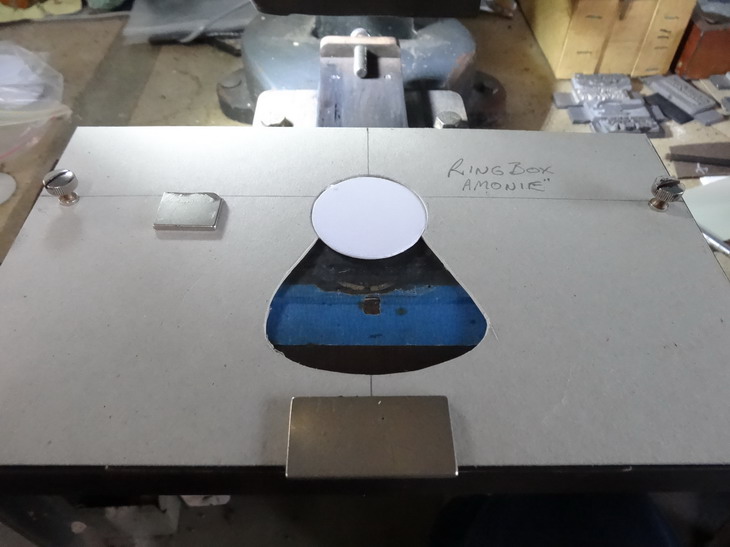
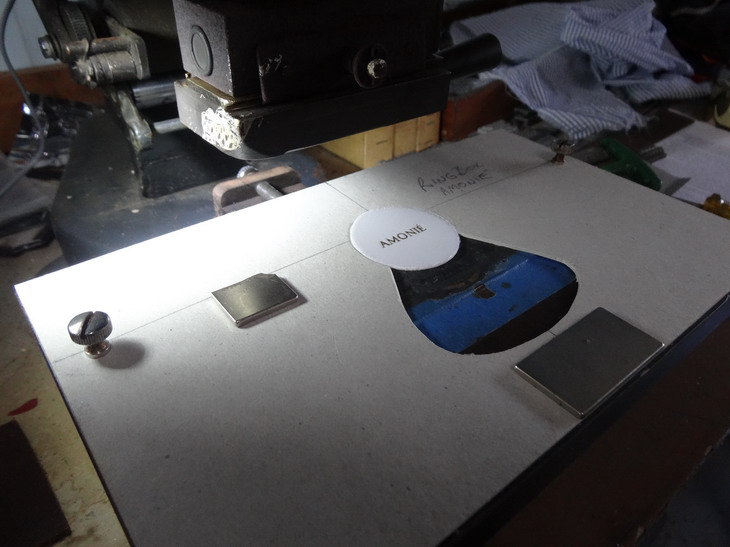
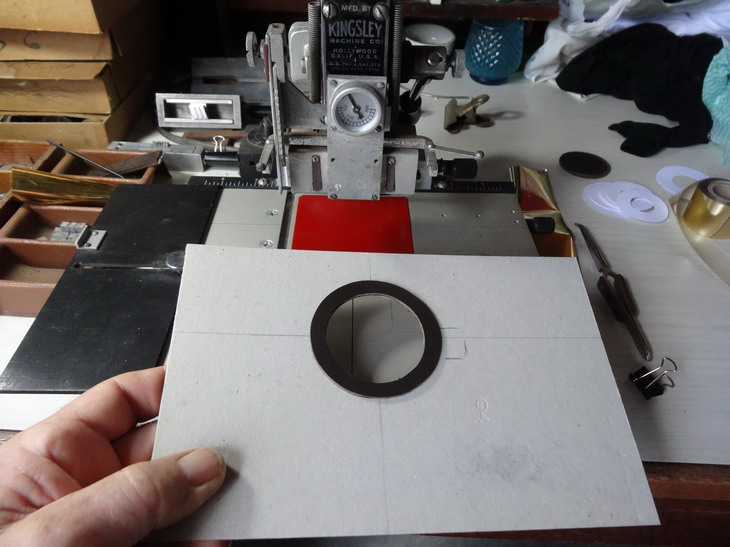
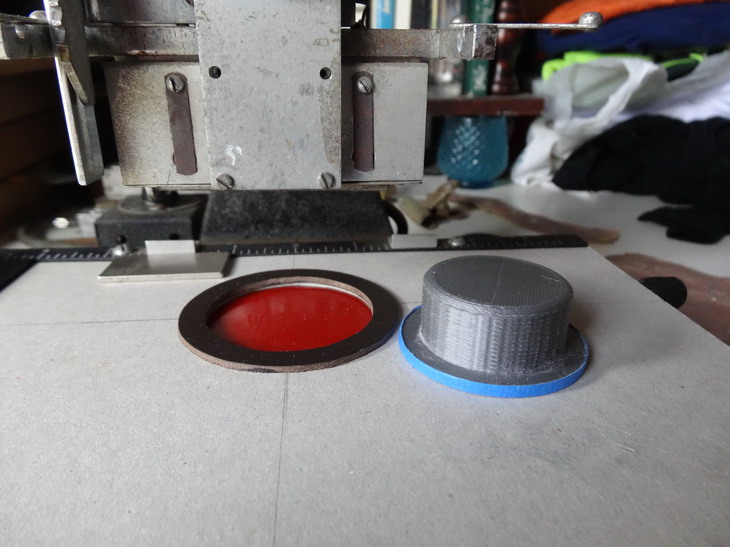
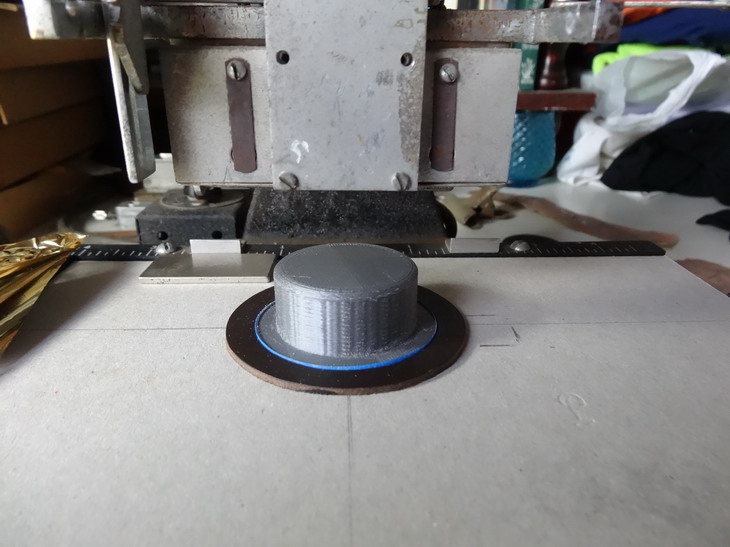
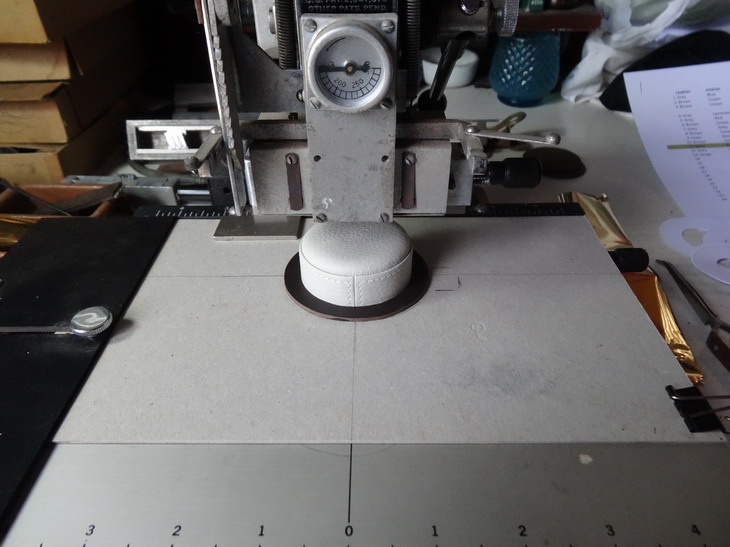
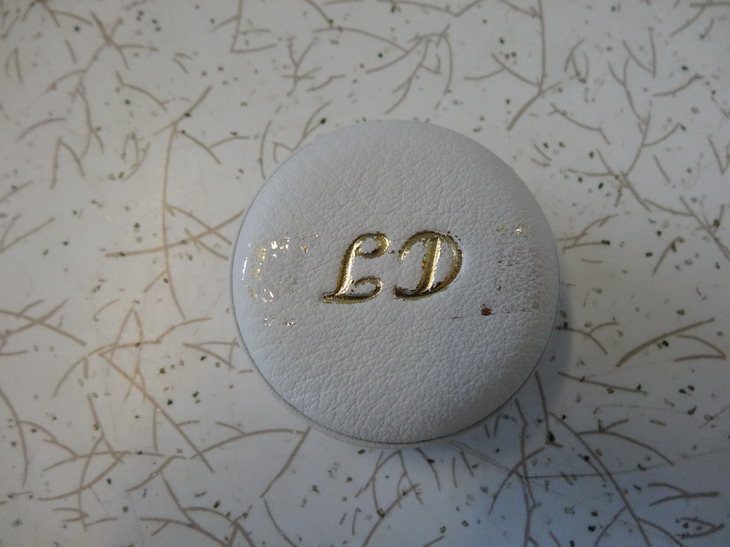
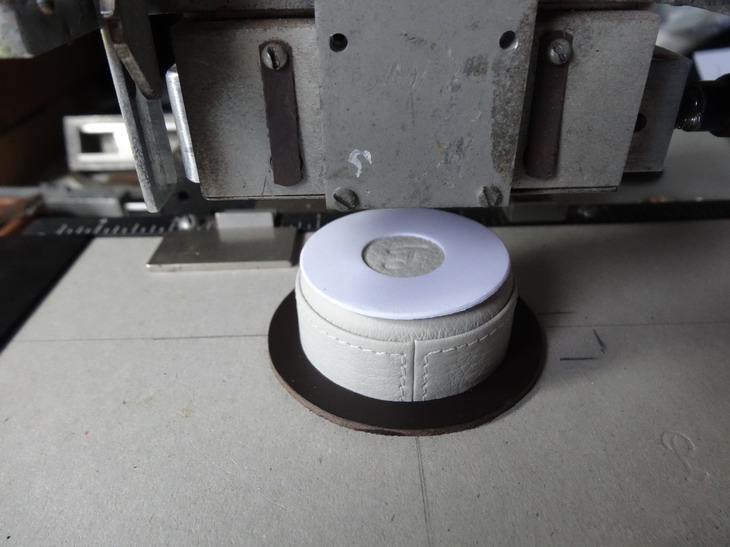
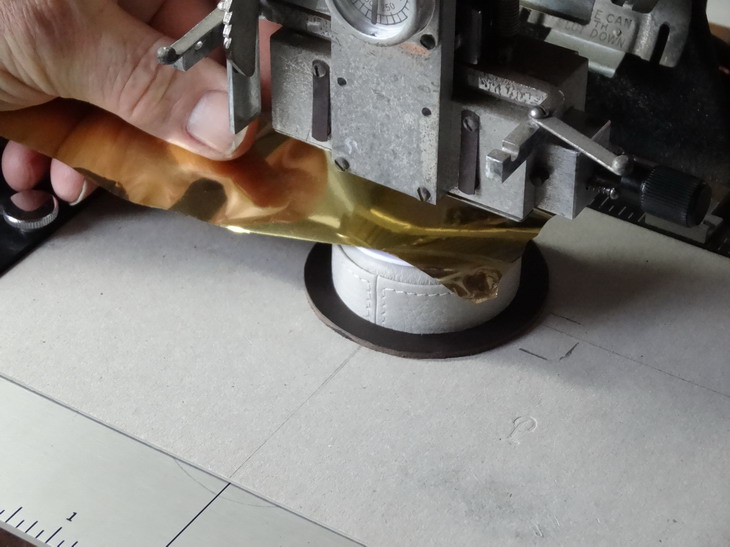
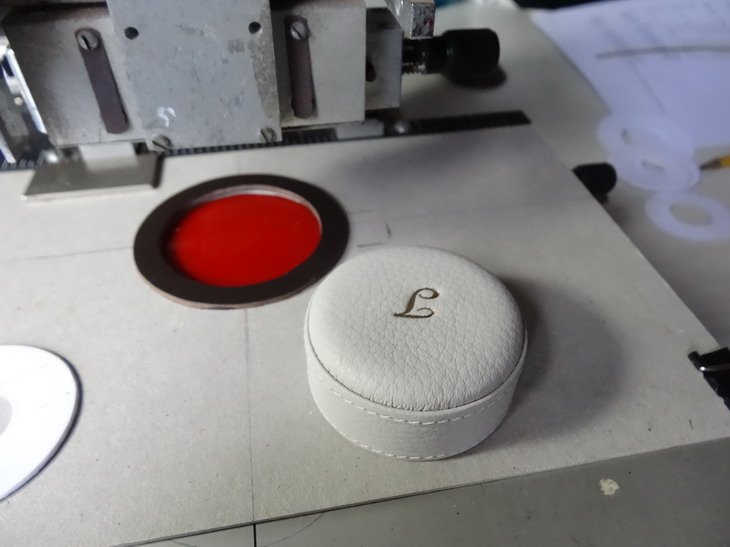
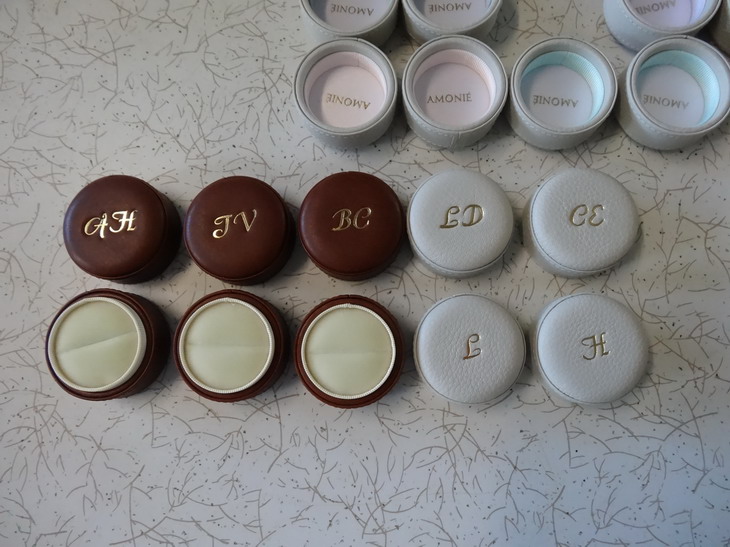
Here's how I go about the embossing and monogramming of these boxes. Because many of the products I make get done in batches on a regular basis it is necessary to have a quick change over system.The first 2 pictures show how with a cardboard template that gets screwed down to the embossers base plate I can do a quick change from 1 piece to the next. For the monogramming I have set it up to enable me to achieve this after the product is fully made by setting up a sturdy holding ring that retains the block that supports the pressure of the embossing. Some time back I was lucky enough to pick up a font set called Redwood and it is very nice in this application I think. As I have a few to do and while the machine is heating up I go through and get out all of the letters that are going to be needed. It takes awhile to learn to set it all up backwards at first. This is what it looks like set up in the holding block The ring box lid is now set up for the stamping This is what can happen due to the foam under the leather. Gold everywhereThat's alright I am used to making mistakes and know how to fix. In order to not have to fix any more on the run I have made up some protection pieces. Here I have tested with a pre stamping first. Foil being located And success All done. Thanks for looking and I hope that something in here inspires some or has something that you can make use of. I am working on some video stuff on this product but I only got 10 minutes or so on this run. Follow me if you want to be notified when the video is loaded and please make any comments that could make it better. Regards Brian
-
Finally finished belt
RockyAussie replied to Stetson912's topic in Purses, Wallets, Belts and Miscellaneous Pocket Items
Good job and I don't think he is ever going to need another one in this life time. -
Dwight, Knowing someone like you may get some use from it is more than enough thanks for me. The punch in the tab end does not line up to well but a repunch will fix that easily. I hope that it works well enough and may it bring blessings to all who are lucky enough to receive the work you produce with it. Brian
-
Thanks for the acknowledgement and he is a she and typical of great dane's and wolfhounds she loves to lay around everywhere. Mostly she loves laying in the busiest crossroad paths in the factory and therefore I think your envy is not always so well shared.
-
DISASTER - A couple of days back I said I'm off to try a wallet now. Did a bit of grinding of the needle plate (about 2mm) to enable getting in a bit closer. Note: I like to stitch across the bridge section when I can as I hate stopping and starting, tying off etc. It went pretty well except I did not glue the liner in myself and although the machine did the stitching well enough the result means I'm going to have to pull it all out and start again.
-
Thanks Chuck. I hope that the video is going to be better. Please have a look at Sally's site as her pictures leave mine for dead I think. I'm thinking of making up a watch box version along a similar construction but I might have to find me an ideal marketer for that first. Ahh so many ideas and so little time....Brian
-
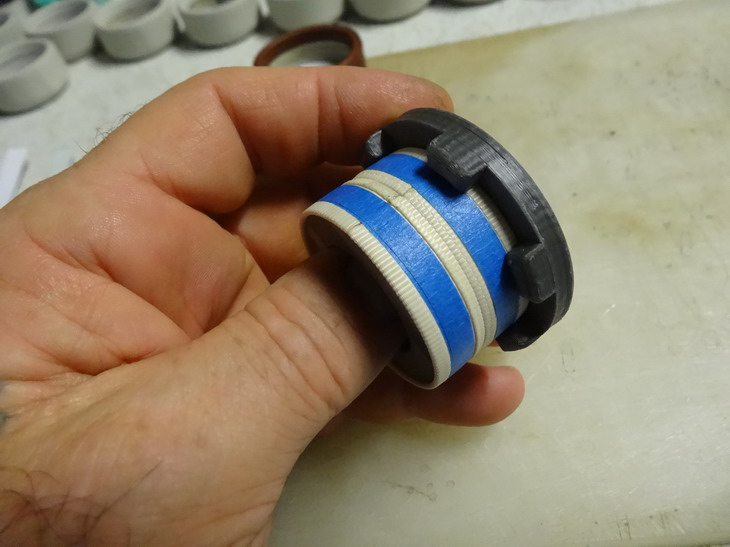
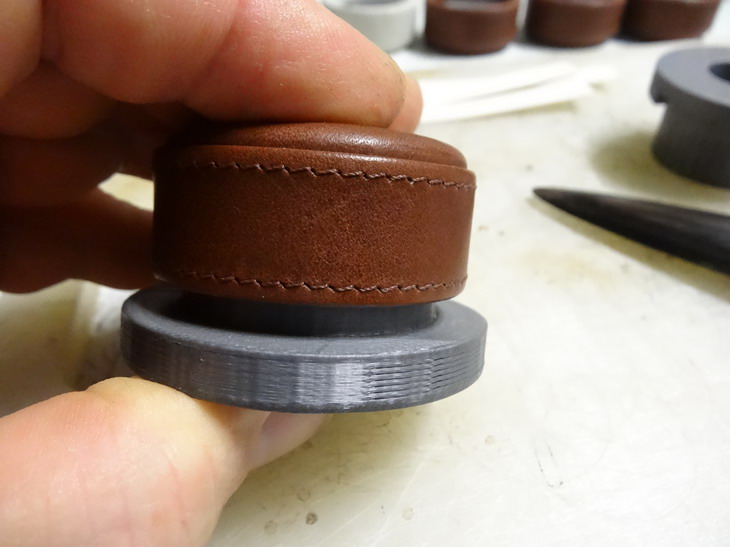
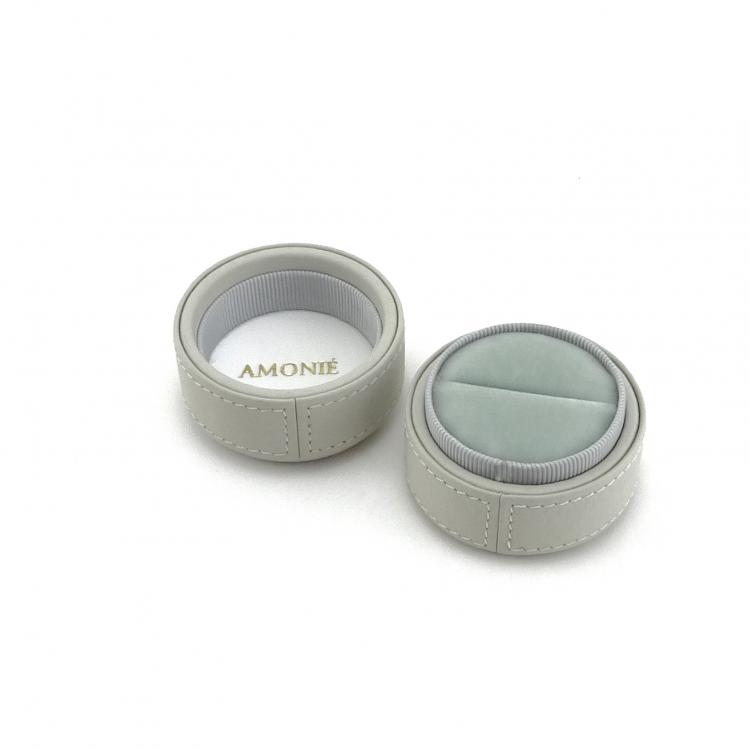
Now I make up the strip for the lid section in a similar method to the bottom section after the contact glue is dry enough. After the ring is made ready I push this piece into the cup and then follow this with another tool to press down on the outer edges of the ring. I hope you have enjoyed learning how these ring boxes are made so far and I must mention the customer I make this product for as she is a wonderful young lady named Sally and I can assure you she strives to have all of her products made to the highest possible standard and give her customers a truly wonderful service. Here is the link and please take a look. . http://www.amonie.com.au/?v=6cc98ba2045f Sally has assured me that if you mention seeing this post on Leatherworker.net she will supply it FREE of freight charges. There is one more section to add to this and that is where I do the monogramming and that is also done for you with No extra Charge.