RockyAussie
-
Posts
3,265 -
Joined
-
Last visited
Content Type
Profiles
Forums
Events
Blogs
Gallery
Store
Everything posted by RockyAussie
-
Hi Sonya, I think every ones advice here is correct and well put. The only thing I can offer is that soft and particularly thick soft lambskin is going to be very difficult with even a very well sharpened and well set machine. You could try doing the skives in 2 or more steps. This can take away the rolling/seperating action sometimes The sheep skin has a tendency to squish and act like it has separating layers and the blade then goes where you don't want it too. Myself.... I would not even try without a roller foot. You can see an example of the use of a roller foot on my you tubes as in this link- Hope that helps . I noted that your early pictures show that your setting up was way wrong and I would ask if you could show some pictures close in to where you are now. (distance of the blade edge from the foot and how well you have now sharpened it and also how good is the sharpening stone now. If the sharpening stone is worn down too small may not be good and or if it has too much residue on it would not be good either. Sorry you are a little bit far off to help directly. Brian
-
I would try first off Texon Australia and ask for John Mertsis or Spirro - 0394640744. They have been one of the main suppliers of machinery to people in the shoe making trade for many years. These are not a quick and easy machine to learn how to use properly and I would recommend that you try and get to use one with someone that knows what they are doing and can show you how and what to adjust. They are an essential machine when manufacturing but I have seen a lot of people run into trouble not being able to use them or get someone to show them. Are you in the Brisbane area? If so I can ask some one at J.A.Brooks down there who would be best able to help you with it. Regards Brian
-
The machine looks in pretty good order but is a different machine than the one in the listing above. I personally will not have another skiving machine that does not have an aspirator. That is a suction devise that helps the leather not get caught up on the feed wheel or stone. quite a few you tube videos will show this happening. you can PM me if you would like to know more and I will give you my phone number. Also if you check my you tube it will show a little on a skiving machine in use. Brian
-
I going to take a guess and say your somewhere around Queensland and therefore I'd start off with Mac Lace and East Coast leather. They have a fair few things you will want beside the leather and will want to learn about as well. Your buying power and relationship with them will improve also with the overall products they can supply you. It may be of help to say where in the country you are as many here may be able to assist better if you are close to them. I am always happy to have a member drop in to swap notes and try machines etc. I am in the Rockhampton area. Brian
-
There are a few more than that but you wont find much difference. A point may be as to where you are situated with regards to freight and how much you can use up or afford in a buy. What type of products do you want to make? There are a fair bit more affordable leathers that can often do the job as well or better at times.
-
Or Zita Jones types living in Austarlia
-
I'm generally not much for sugar coating things myself and rather than make a negative comment I will think best to make no comment at all. Not so this time. I can make adjustments alright and I have a similar machine but I have to say if this works for JK Helms and he is happy to share that with us then good on him. If you are interchanging feet for jobs and this saves doing several adjustments is this wrong? Its easy to buy a new set of longer feet again if needed so I don't see a big problem myself. I do admire your machine knowledge and appreciate your frequent and helpful assistance to members here but in this case asking why he elected to do it this way first, would have been a good thought. After all we all make mistakes at times and as you said .... I honestly hope when I do "not so clever things" people let me know their honest opinion . And I'll skip the rest... Brian
-
I was just going to say that......
-
What do you mean Oops??? If he raises that presser bar he'll have a higher clearance for thicker stuff
-

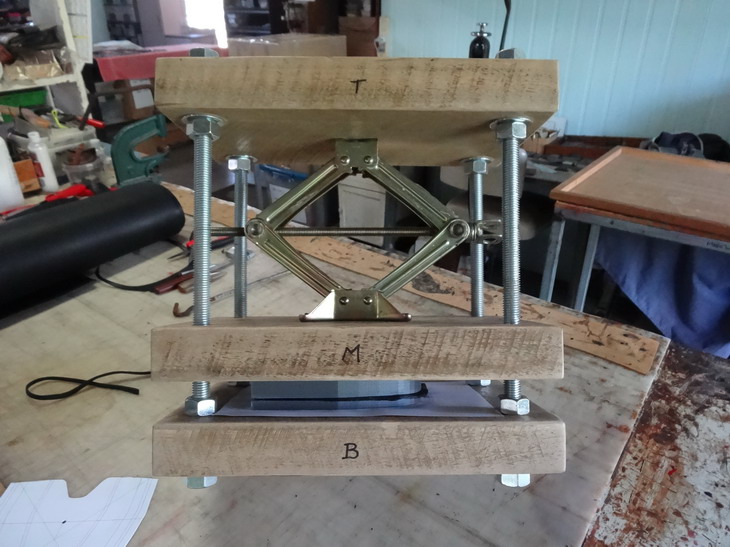
How to make a press for moulding leather pouches and such
RockyAussie replied to RockyAussie's topic in How Do I Do That?
Thanks for the answer Gary. At this stage the way the mould I made works so far I have cut back and cut back again and still no creases etc. I have made up a new pattern with offsets at 2mm increments to see how small I can get away with. I was just hoping that someone might have experience working with moulds similar to these that might know likely have far I can go. I need to give a quote and get them to test the prototype as soon as possible so I was hoping to save a little time. I might just jump to a 1/4" off and see what happens. I'll let you know. Brian @gigi The machine I used is a 441 with a new footplate thanks to Uwe. The tab is still there but I have gone to a bit more refinement than previously. -
How to make a press for moulding leather pouches and such
RockyAussie replied to RockyAussie's topic in How Do I Do That?
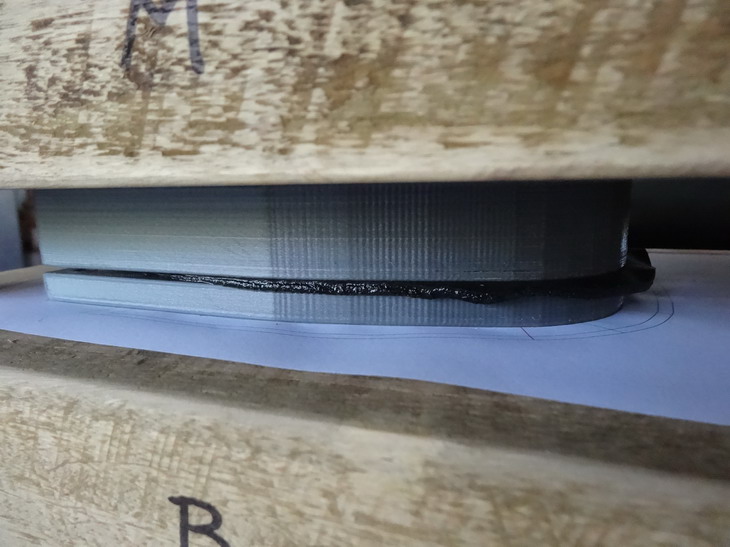
I will point out that this is not a veg tan leather and is a retan of some sort. It would have been a bit easier to mould on an unpainted smooth veg. The thickness of the moulded part is 2.8mm (7oz) at the moment. It is fairly hard and takes some wetting/working to get soft and mellow enough to mould. Here in Australia I get it from East Coast Leather and they call it Alaska. Partly I have chosen it due to price and strength and resistance to shrinkage as would be the case with full veg. There would also be a reduced need for maintenance as far as replenishing oils etc. Brian -
How to make a press for moulding leather pouches and such
RockyAussie replied to RockyAussie's topic in How Do I Do That?
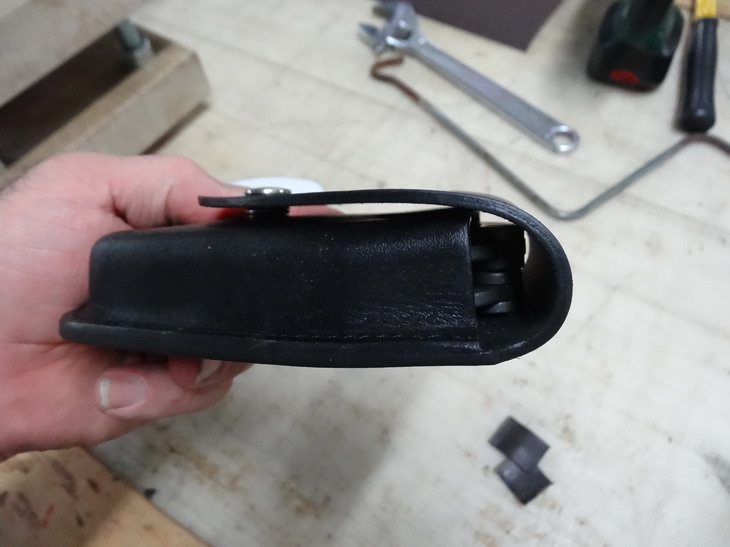
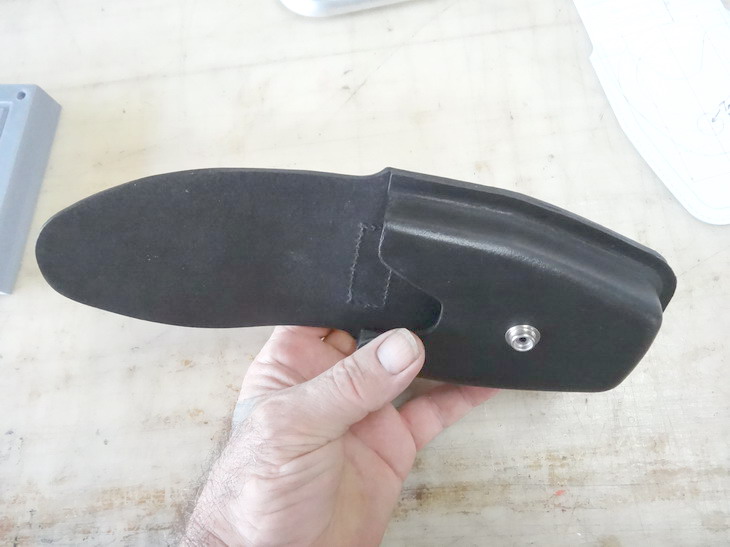
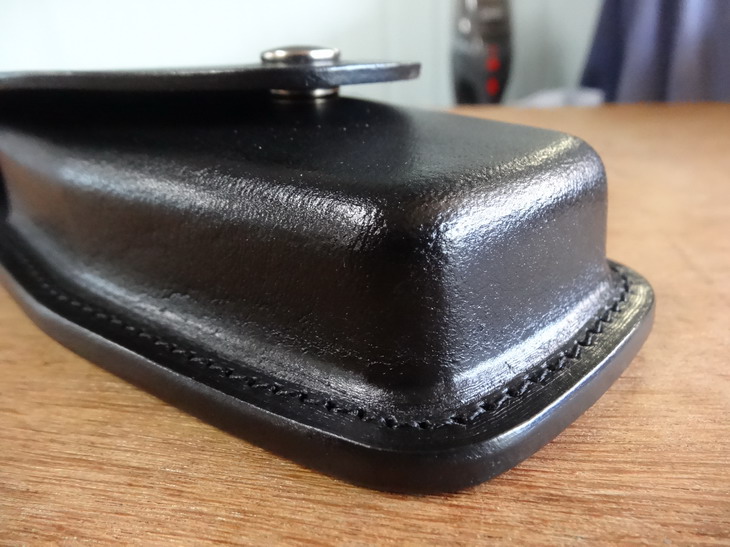
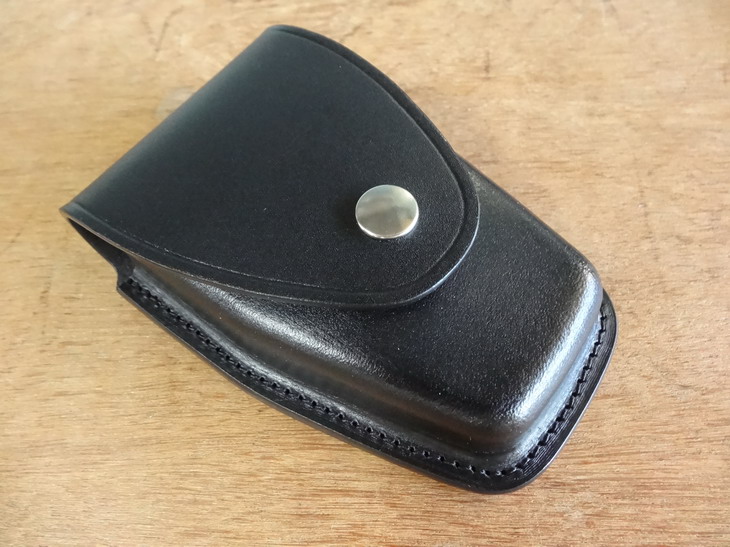
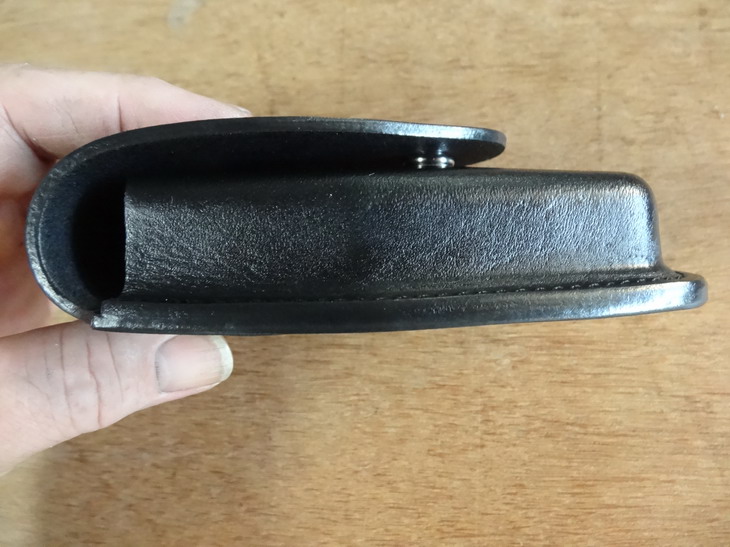
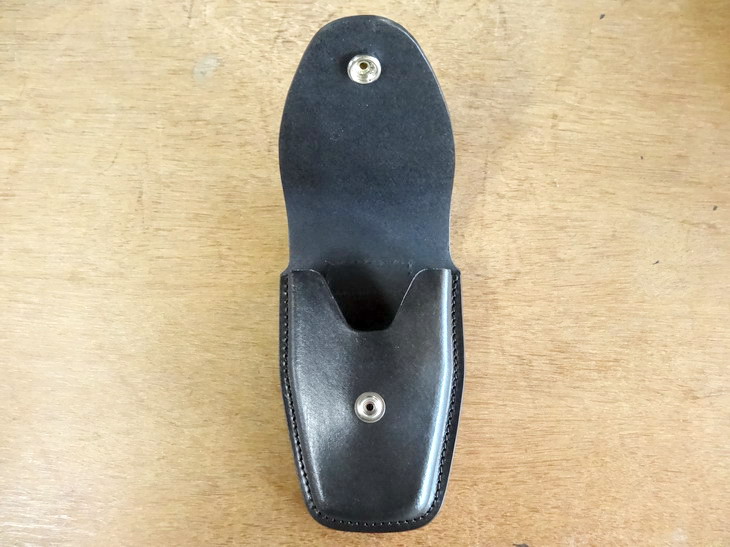
Good news.....I got to try the handcuffs on Friday and they fit both models well. The Armoury person was happy. Now I've got a question. After looking online at anything similar that I can find on wet moulding, every one that I have seen waste large amounts of leather on the curved edge. I have now done a couple of more casts taking more of the edge each time and I still dont seem to be having any problems yet. Does anyone here have similar experience with this method and can tell me just how much more I can get away with??? At present I am wasting about 16MM or 5/8" as can be seen in the below picture. Following pictures show the handcuffs in the pouch.
-
Just quickly... in the past (20+years ago now I had a show repair business and one of the big area's was colour changing and material covering shoes for weddings and such. After this I went into a lot of shoe making. In this case if you do not have a good knowledge of shoe repairing already the first place to start is getting friendly with a shoe repairer. Back then the range of shoes that could be pulled apart without destroying was getting difficult and the methods of making shoes today would have narrowed that field even more. A good pair of well made shoes with a pair of nail pullers/pincers should only take 5 minutes to pull apart but if you want the heel off that is a whole lot more time and tools to get apart and back together. You could make altogether new straps if you wanted but attaching the straps onto the existing would be easier more often and what looks to have been done in the link you have here. Regards Brian
-
I'm not sure if there can be any sure fire way. The guitars can be so different and the way a user wears them as well the only safe way would be to measure in person....somewhat. If you can get a previously used one from them can help. Other than that they would have to give you the measurements between the holes and as I have done put one either side in case of stretch or extra width problems etc. As the Chief has kindly shown above, I think would cover just about any possible size variations. Brian
-
Onto the third bag....
RockyAussie replied to motocouture's topic in Purses, Wallets, Belts and Miscellaneous Pocket Items
Nice work.... You make it look so easy... -
How to make a press for moulding leather pouches and such
RockyAussie replied to RockyAussie's topic in How Do I Do That?
Thanks @LumpenDoodle2 that is a good idea and I will get onto that idea asap. Ok then ....I guess the velocity musta vaporised the bullets......how bout one of them ninja star things in ice and fired from a spear gun style slingshot??. Hey wots this real world stuff about anyway????? -
How to make a press for moulding leather pouches and such
RockyAussie replied to RockyAussie's topic in How Do I Do That?
Why not ice instead of glass? Just make em in the freezer. Could even just print the tray. Ahhhh tooo many project and so little time..... back to that radio controlled robot Brian -
How to make a press for moulding leather pouches and such
RockyAussie replied to RockyAussie's topic in How Do I Do That?
I have learnt to keep the filament in a sealed packet when not in use as it does suck up the moisture when the humidity is high. Also I have found it better in Cura to put the filament setting at 1.74 instead of 1.75 as this makes it pump a little bit extra which makes the adhesion to each layer a little more attached. I have found that with some colours that they like a different heat setting and so far my favourite all rounder is the silver at 212c on my machine. Running a little hot can also give a better adhesion to itself. I run the bed temperature at 65c and as long as I clean the glass each time with a quick spray of isopropyl alcohol I almost never have any problems with the job coming loose or unstuck. Brian -
Inline Cowboy presser feet on Cowboy CB4500
RockyAussie replied to Wizcrafts's topic in Leather Sewing Machines
Thanks Uwe. I will keep an eye out but let me know when they are done if you don't mind. Brian -
How to make a press for moulding leather pouches and such
RockyAussie replied to RockyAussie's topic in How Do I Do That?
How many to you expect to produce in a day with that setup?? Sorry Dwight I may have misunderstood your question with regards to the numbers. What I though you were asking was how many pouches do I expect to produce in a day not how many moulds could I print. The printer would be busy for nearly 2 days to print I set and the cost $8.23 for 1 and $12.96au for the other + a bit of power. The printer is just a Prusa i3 with a few improvements I made with regards to stability of printing etc. How long to learn how to program it....... maybe 3 days of reading online in reprap forums and the like and the drawing stuff is just a bit more playing with stuff in AutoCad .Hardest part was teaching myself to always keep copying the part and move it by having a 2 line reference point to always get back to exactly the same position on any copy. Basically a couple of days or so. There are a lot of simpler and cheaper drawing programs out there that can do the same thing now days. Once the drawing is done you just make a stl file out of the part and then put it in to a program like Cura which is what I use. From there it works out a lot of what you want to print and has suggestions for settings and can be sent to any 3D printer in the world.There is a lot of forums and stuff on line to help with this but really it isn't all that hard. Many people on this forum could use it well as the main thing needed is the ability to conceptualise something and find a way to make it happen. Robots will take over much of the work in the near future but there will be work for those that can conceptualise what people will want those robots to produce. Regards Brian -
I have to point out that even with a large swing head hydraulic press doing big knives can be difficult. If you need to click left and right you will end up with bowed knives. Polished sharp knives can reduce the pressure of the cutting a lot. My opinion for what it is worth would say that any knife bigger than a 12" circle would be hard to do with a manual pull down set up. Using a hydraulic jack set up could give you more but the need to get the pressure in the middle is a pain. Have a look at the recent topic I posted-http://leatherworker.net/forum/topic/77677-how-to-make-a-press-for-moulding-leather-pouches-and-such/?page=3&tab=comments#comment-515365 You can see in there where I tested this set up for small clicking. I am thinking of doing one more for clicking along that construction line but with double pressing rods actuated by a single hand lever all mounted on top. With 2 rods pushing down together the need to centre up before cutting would be reduced considerably. A bit of metal work drilling mostly would be required and a touch of welding may be necessary. Have you any patterns/pics in mind you would like to cut?
-
How to make a press for moulding leather pouches and such
RockyAussie replied to RockyAussie's topic in How Do I Do That?
In the past I have mostly had to do this sort of thing in wood but there are quite a few advantages to working with printing plastic. One I like a lot is that if I want to change the mould a bit a little bit of redrawing and a new one gets made while I can keep on working. Another is once I'm happy with the mould I can get many more made whenever I need them and again while I keep drinkin working. As for how many in a day I expect 25 would be easy but I suppose 100+ if I wanted to get all serious. -
What do you do with small leather scraps?
RockyAussie replied to 2SSophie's topic in Leatherwork Conversation
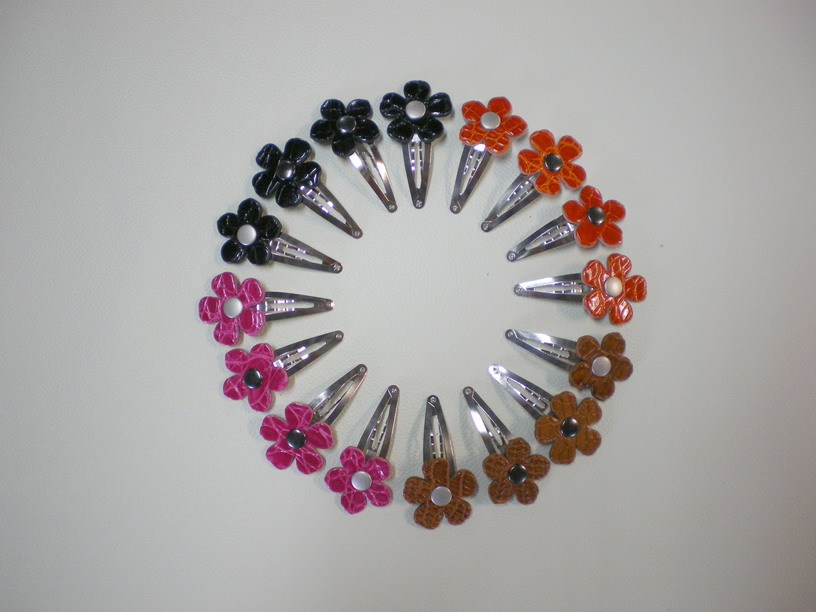
Here a few more ideas you might like.
-
How to make a press for moulding leather pouches and such
RockyAussie replied to RockyAussie's topic in How Do I Do That?
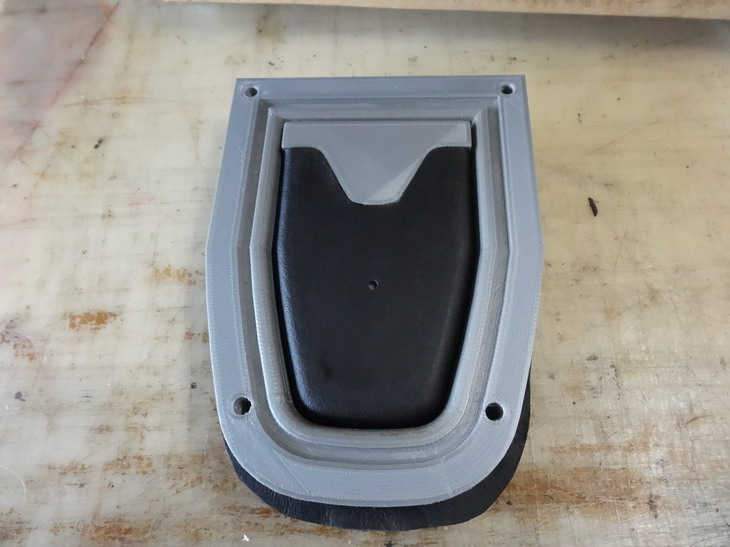
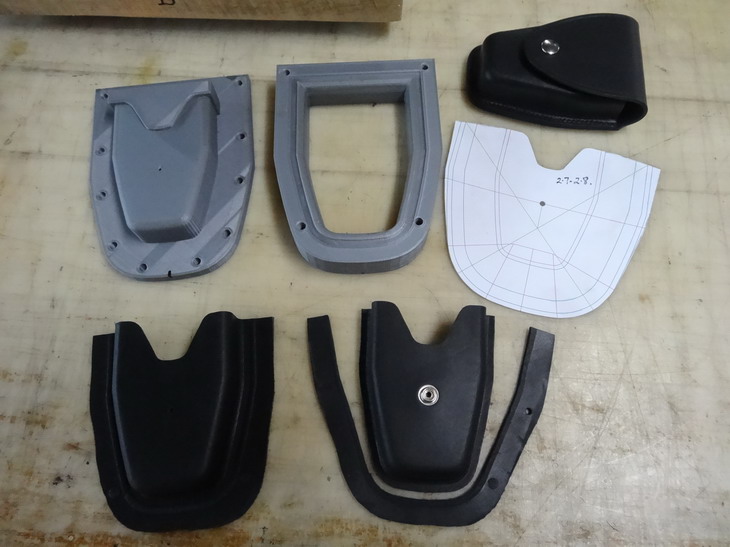
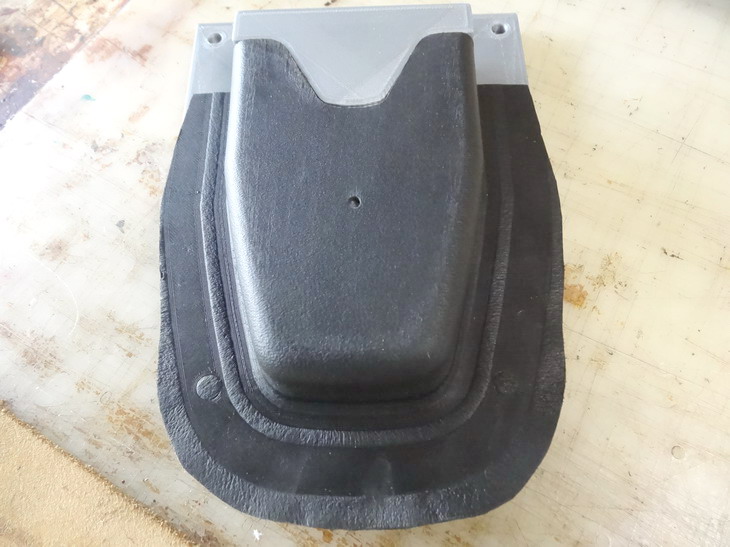
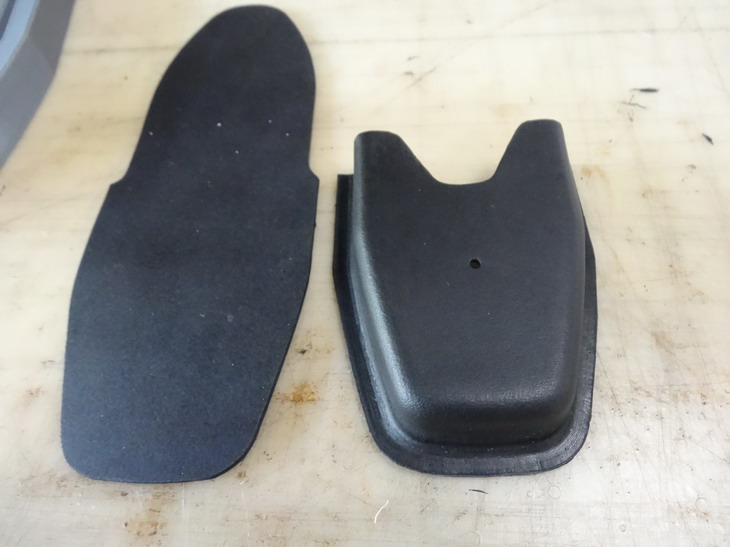
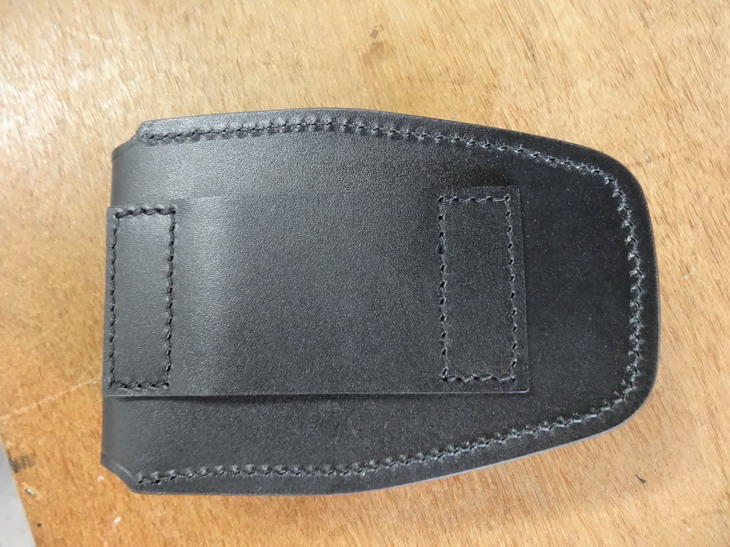
In the next lot of pictures you can see the making of the handcuff pouch after the moulding. This is about 27mm deep (1 1/8") For you Aussies it is black Allaska (buffalo I think) from East coast Leather. Reckon they'll give me a discount on the next order for the plug ??? The inner mould came out most easily first. Here you can see where I did not sand down my hardwood all that well on the press and it left a few grain marks in the top. Blunt sandpaper and too far from town. This picture shows I could have reduced the leather overhand a fair amount on my first cutting. The next picture shows that I have trimmed the overhang off neat with the relief line and cut out the back as well. Now I have stitched a strap to the back which I forgot to photo and proceeded to glue the pieces together. I did some edging first as well. following pics show it stitched and edged and polished and this prototype is now ready to check if the handcuffs will fit. With a bit of luck I will find out tomorrow. That's it for now. Brian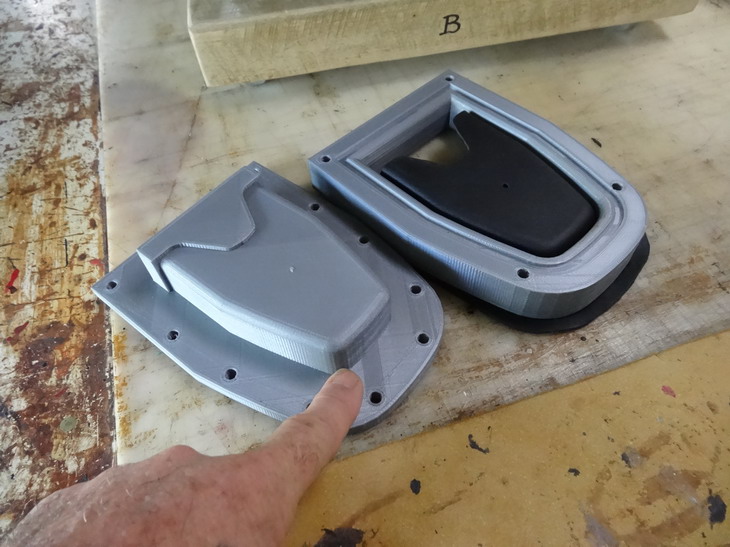

-
How to make a press for moulding leather pouches and such
RockyAussie replied to RockyAussie's topic in How Do I Do That?
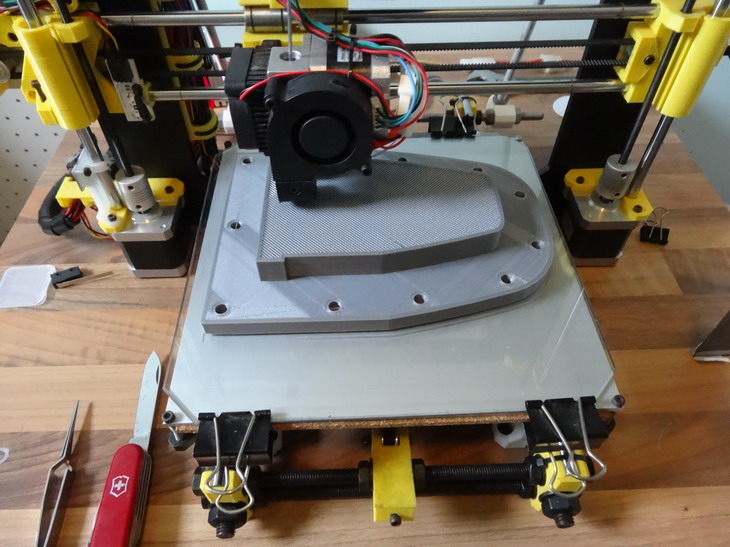
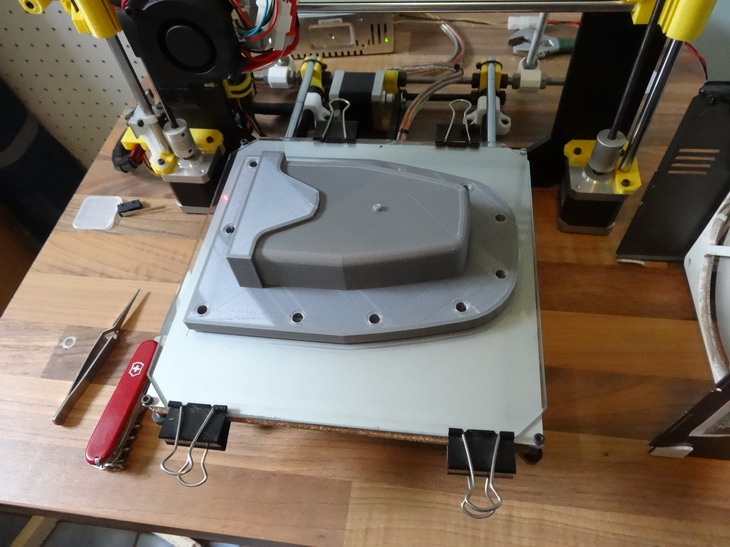
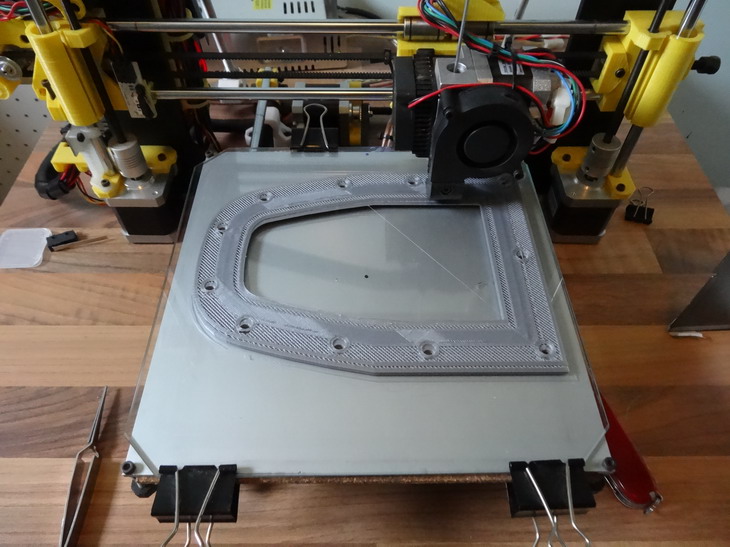
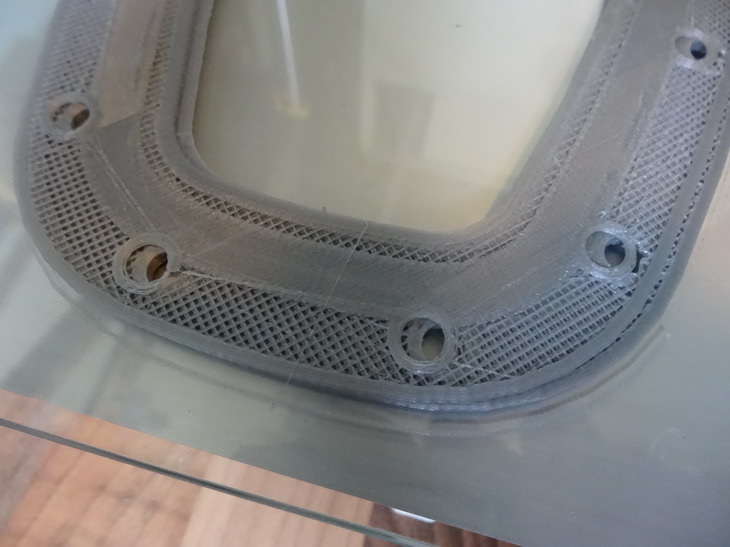
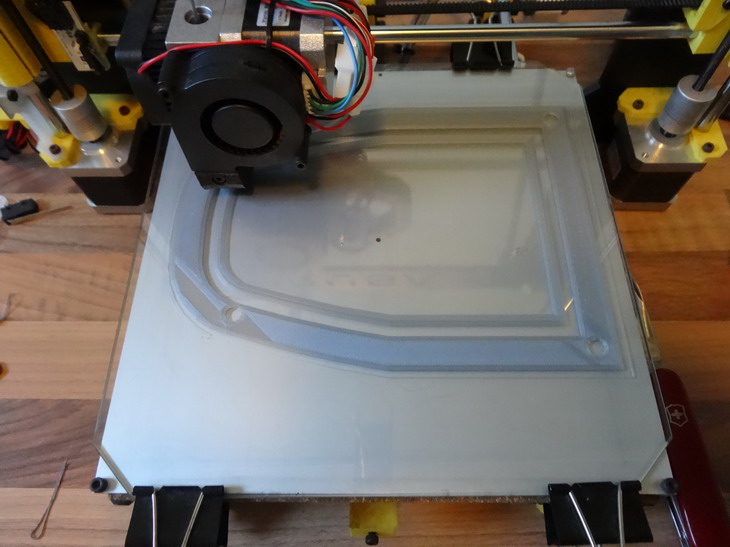
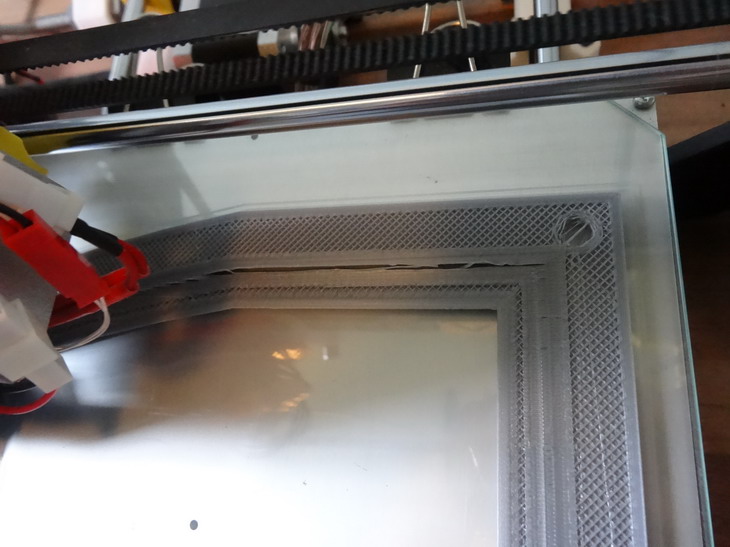
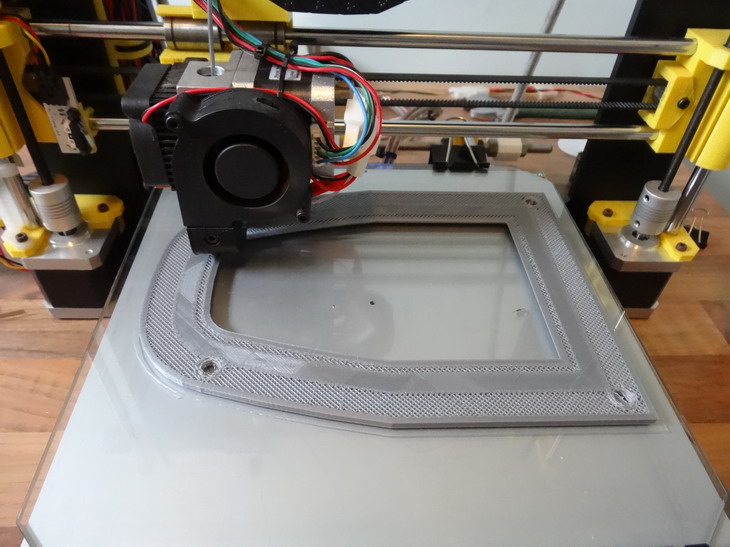
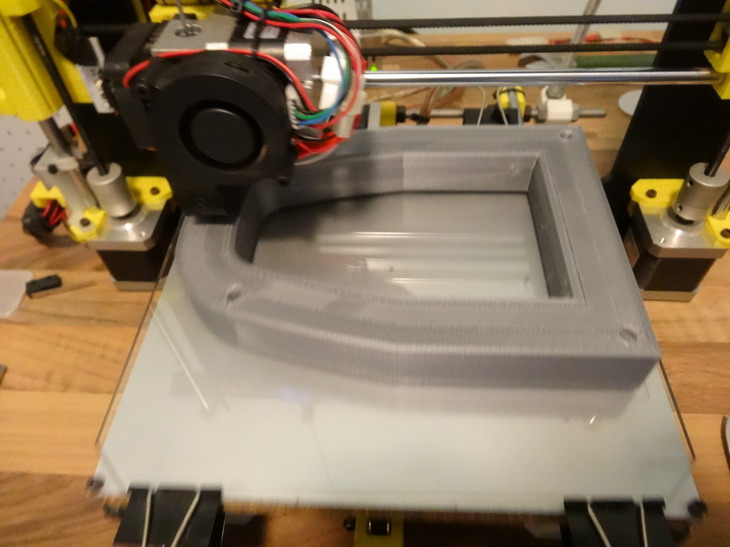
For those interested to see the 3D printed mould for the handcuffs here are some pictures to see. The first 2 pictures show the inner mould printed OK but did take nearly a full day to print. I will point out that this is not a veg tan leather and is a retan of some sort. It would have been a bit easier on a unpainted smooth veg. These next pictures show the printing of the outer mould which failed. Where I had put a 6mm(1/4")wide hollow to give the leather some relief on the fold it got caught up at the top of the hollow. It gets a bit funny when you print in the air without supports some times. Fussy B things. Went back to the drawing board and made a few changes as follows. Note: I decided to leave out a few of the support holes and made the top and the bottom of the mould splayed more on one side and reduced the hollow to 5mm wide. One side of the mould can now do a bit of pre shaping if needed. Oh and for you 3D people the fill is 30% and the wall thicknesses and top and bottom etc are 2mm. The tube holes are to give extra resistance to crushing as they as well get a 2mm wall. Next one I will try 20% fill and 1.6mm wall thicknesses to save some printing time. Had to watch this layer to make sure it didn't fail again and I did have to push some raising spots down a couple of times. Turned out alright. Next pic shows the press had no trouble pushing the leather in to shape. Did the jack turning down by hand mostly. Notice the water being squeezed out of the edge of the leather. I left the mould in the press overnight in this case to dry as this mould was made to test my sizing and design first before making the more elaborate moulds that will have allowances for clamps to be clipped into whilst in the press. As usual I should not have worried so much as it came out pretty well as the next round of pics I load should show. Can't fit any more pics in this load so I'll be back later.