


RockyAussie
-
Posts
3,265 -
Joined
-
Last visited
Content Type
Profiles
Forums
Events
Blogs
Gallery
Everything posted by RockyAussie
-
Your welcome ....I just hope you can get it to work out alright.
-
That is a nice looking job panku82. I have never used olive oil as you have and can only assume you have done previously and are comfortable with using it. I can only think that the combination mix you have come up with is able to react with the eco flo. I don't know but I think the only solution is to make up a few sample bits and get them to the same stage and then try going through a few cleaners and see which will give you the best dry feeling finish to try again, with a different finish of course. I would check your local shoe repair shops for a product for cleaning shoes before they are colour changed. It would normally be caller preparer in one brand or another. I can not think of any thing else I'm sorry. Brian
-
Is the dye penetrating into the leather at all? Have you dyed this leather previously successfully.? Is the dye holding in place well and is it just your sealing coats playing up?
-

TECHSEW 85017 Post Bed Sewing Machine
RockyAussie replied to howlback's topic in Leather Sewing Machines
I would be very surprised if you could get around that and not run into a lot of problems in one pass. Back and gusset should be no problem, cylinder or post machine but once past that I think you would need both or a different machine with a movable arm perhaps. If you can get a bag along that shape you could try standing a rod or pipe about 2" round up in a vice and then try seeing if you can get it to go all the way around remembering you have to have foot pressure on top most of the way around. I have thought about trying a sole sidewall stitcher for shoes for this but am still doing my homework on that as yet. I would look at their videos first. Things I have to look into are the needle/thread range and the lack of thickness height claimed (6mm). I would have thought more was possible. The following link should make it clearer. I have a friend in town that has a similar machine and I will have to see if I can do a trial with him on something similar. Brian http://www.robinindustry.com/product/395.html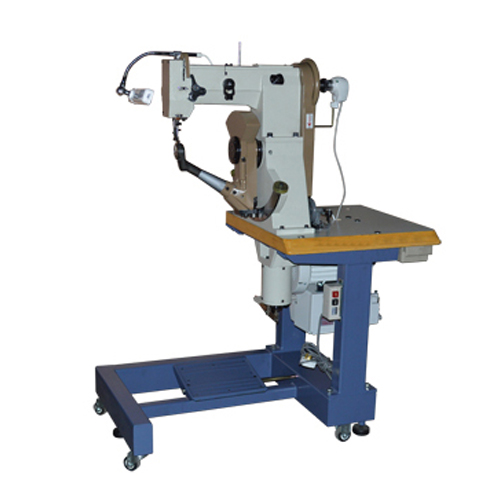
-
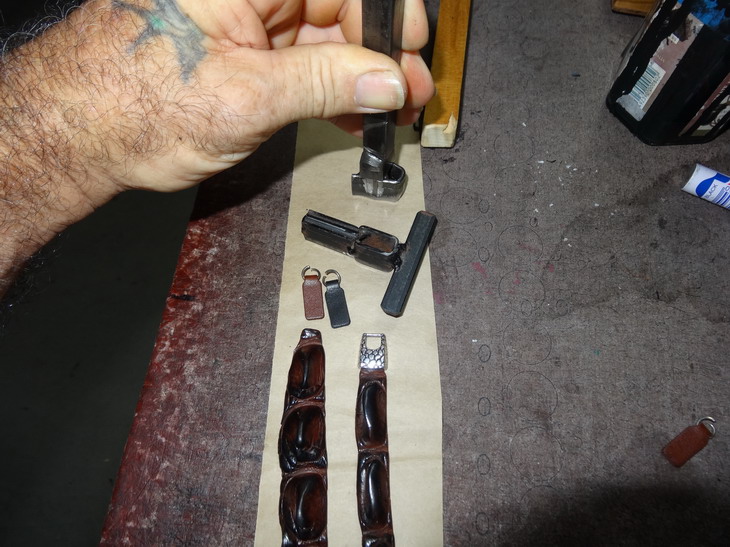
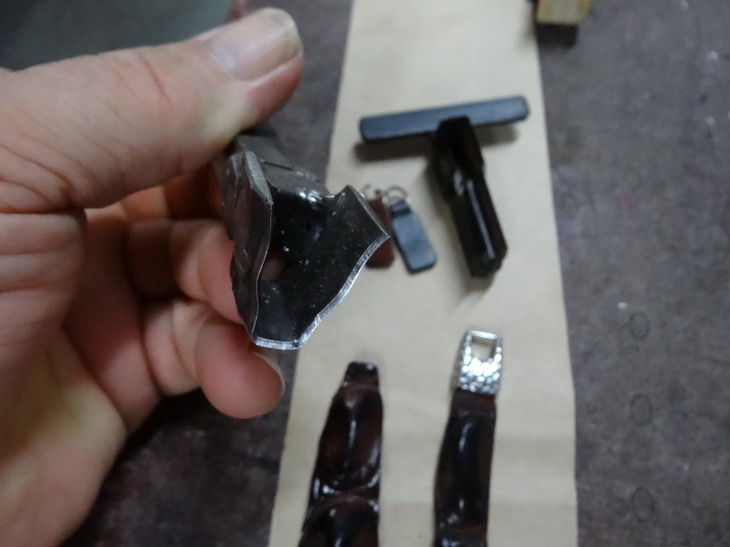
How to make leather zip pulls in less than 1 minute per
RockyAussie replied to RockyAussie's topic in How Do I Do That?
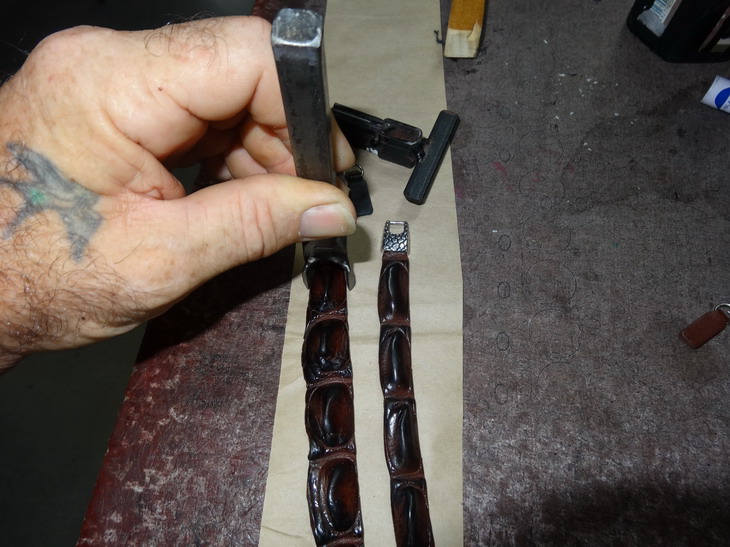
Thanks Eric. Truth is if it wasn't simple I probably couldn't done it. For those who would like to see more of it and how it works here is a link to the post and there video that shows it in action and a pdf file with all the measurements and stuff to make it. @SonderingSusan I get my knives made up here in OZ to whatever shape I want. I normally send a thin cardboard cut out of the shape I want and it gets made up. The knife here made by Tony would cost about $35.00 Aud (around $25.00 US) if that helps. The knife shown is as would be used on a clicker press but for a few dollars more it can be made as a hand punch version. I have attached a few pictures to help understand better what I am trying to say. This 1st pic shows how small this zip pull is and the knife used to cut it as above. This second one shows how the same 3/4" or 20mm steel knifing can be done as a hand punch tool as well. This one is to show what the hand punch looks like closer up... and note it is used for cutting the ends of the bracelet straps in the picture. This hand punch is used due to the various width and boney nature of this part of the crocodile skin and being quicker to achieve the cut than in a clicker press. Hope this helps a little more. Brian Ha Ha ....Maybe one day if they start up a Manufacturing Tips section. I don't think this is viewed as Leather work quite. BTW I would love to see that section a lot. Brian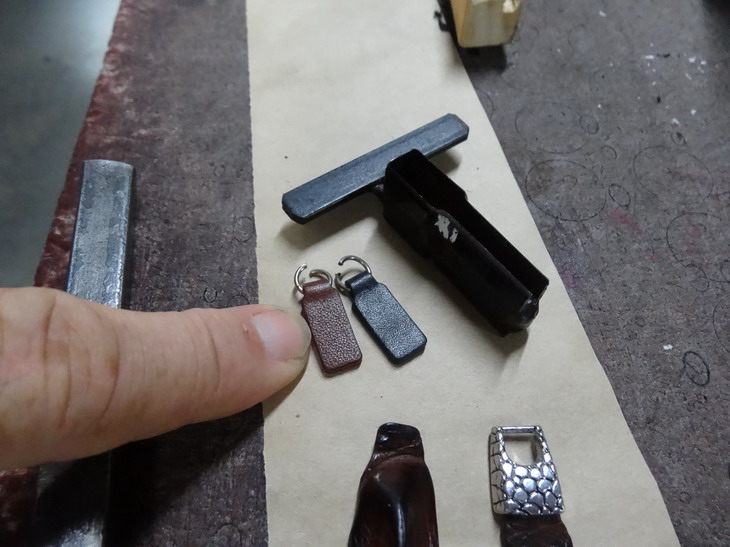
-
How to make leather zip pulls in less than 1 minute per
RockyAussie replied to RockyAussie's topic in How Do I Do That?
Wow ...that's going back a bit to find. Thank you and I hope it comes in useful. -
TECHSEW 85017 Post Bed Sewing Machine
RockyAussie replied to howlback's topic in Leather Sewing Machines
May I ask if you are thinking that you will be able to go right around the gusset with this post machine or are you thinking at crossing over part way with a cylinder machine as well? Regards Brian -
Quick barrettes
RockyAussie replied to barbedwireboutique's topic in Purses, Wallets, Belts and Miscellaneous Pocket Items
@Rockoboy yes mostly it is like working with timber and sands nicely and I just finish of with tripoli polish and a rag wheel. I make a lot of our slickers from them as well and they work as well or better I think than bone. Thank you. Remember to use a good mask and look after your lungs if you decide to give it a go. -
Arm first is my advise....they are way more versatile.
-
Quick barrettes
RockyAussie replied to barbedwireboutique's topic in Purses, Wallets, Belts and Miscellaneous Pocket Items
I had just the same problem awhile back and decided to go with cow horn. Not the best picture I'm sorry but should give you the general idea. Lovely work BTW
-
 I think it looks like a boring bit they use on drilling rigs. The type that comes in great for drilling through rock.
 -
Just check that you are getting enough foot pressure down. If you have been mostly doing fabrics the foot pressure may be lighter than what that leather needs. If the leather is veg I would expect to see some at least light pressure marks on your sample piece. Just look and see if the leather comes up a tad when the needle is on its way out ....if it does your knots will form on the bottom.
-
I think the lack off throat clearance for that sort of work let alone the price value should be a no go.
-
https://www.ebay.com/itm/441-walking-foot-sewing-machine-leather-kydex-/152843756069
-
I would consider this machine to be a good in between machine. Can do pretty heavy but fairly light as well and has a good narrowed cylinder edge that would allow tighter gussets and such than the bigger machines. Needle not over long and thus less needle deflection problems as well. http://www.solar-leather.com/cowboy-cb341/ I don't see it mentioned much and I'm not sure why? The price looks bloody good to me as well.... Only goes to 138 thread it says though.
-
Cowboy CB-4500 waliking foot pressure
RockyAussie replied to spurdude101's topic in Leather Sewing Machines
NO VIDEO needed this time UWE ....please....I guess it would get a lot of sharing around though -
Cowboy CB-4500 waliking foot pressure
RockyAussie replied to spurdude101's topic in Leather Sewing Machines
Here is a picture of the feet set up and on the machine in action. As I said that edge could be ground down and give you the wider surface contact area. As you can see both feet would give close to twice as much contact area as the standard feet in the next picture.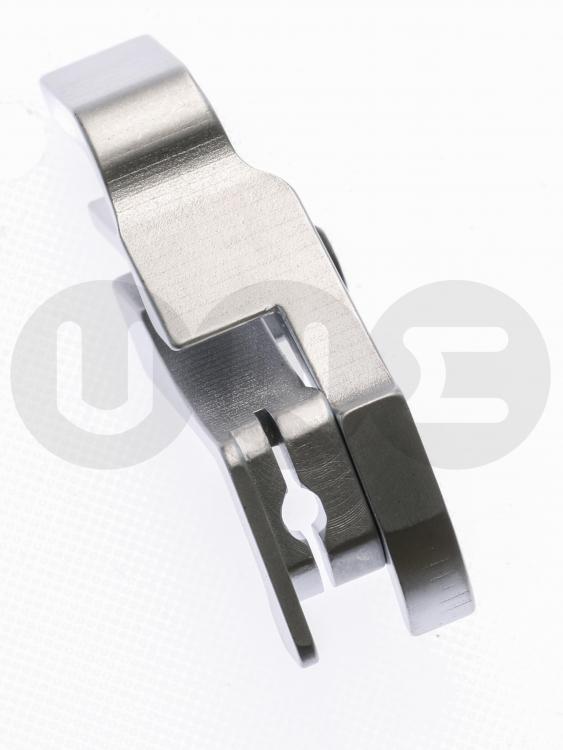
-
Cowboy CB-4500 waliking foot pressure
RockyAussie replied to spurdude101's topic in Leather Sewing Machines
As the 2 feet are interconnected the pressure applies to both so the only solutions that I can think of are to let the leather dry more fully before stitching or get a wider middle foot which may then mean getting both feet as a set to allow the wider space needed. Recently I bought from UWE a full set of feet and a narrow throat plate and dog foot set as well and I would say if you got this foot set and ground off the step down on the middle foot you would have what you need to avoid that problem. I think UWE is getting some more of these in quite soon. Regards Brian. -
I need Ideas. What can I make from a deer hide?
RockyAussie replied to Misterbeesleather's topic in Leatherwork Conversation
Is this a hair on hide or suede or full grain and what is an average thickness you would have to deal with? A pic or 2 might help. -
Nice looking work there. It will take a bit of practice to learn how to make the machine stop and start just in the right point on your turns and on that point I'd say to put in some pin hole marks where you want the needle to go first and consider opening up a slot in your front foot as well cos that'll make it easier to see. Another thing that I found helpful is in this link
-
Ditto as Gary said. Just be sure if your thinking about the 3200 that, has it the foot lift you want for the product you may want to make? A 4500 is a bit more $ but has a lot more thickness height if you need it. Holsters and pouches can get awfully thick at times and sometimes that is the way you want it. Check out this post I did a while back. I doubt the 3200 could do this job. Brian
-
I agree that does look better. The stacked straps have an advantage in one way in that both pieces of leather give strength at where the buckle tongue goes through. The disadvantage is that the raw straps can chew up a fair amount of time in getting them edge painted satisfactorily.
-
I just checked your other posting and if this is as you said -- I'm using a size 18 triangle point needle and size 92 bonded nylon thread on a combined weight of 4-5 oz kidskin --- I think you should have a look at a thinner weight thread top and bottom. In Australia the 92 would be called a 30 metric. Mostly ladies shoe strap use a 40 metric with 60 bobbin (size 100/16 needle)or a 60 metric with 60 bobbin (size 90/14 needle). This may not be the look you want though in this case but I just though I should mention this. This attached pdf file may help Brian

-
That is looking like you are getting there alright. Do you not have an edge guide? It is a little hard to say but I think your bobbin thread could go a weight smaller. I would tighten your top tension 1/2 a turn for the folded strap if using the thread you have used here. What machine are you using?
-
Cowboy CB1618 vs CB227R vs ... ?
RockyAussie replied to Wonderboy's topic in Leather Sewing Machines
Missed that last time......your welcome I guess. Merry Christmas and a very Happy new year to all.
