RockyAussie
-
Posts
3,265 -
Joined
-
Last visited
Content Type
Profiles
Forums
Events
Blogs
Gallery
Store
Everything posted by RockyAussie
-
 At a quick check over....Very good video work and excellent narration. I would love to have that confidence with speaking on my humble video"s. I expect to see many more of your fine efforts coming up.
 -
Tips needed for machine sewing curves in 4-5 oz leather
RockyAussie replied to Cami's topic in How Do I Do That?
If you are getting feet marks you may have the foot tension too high and that can lead to your layers shifting and squirming around somewhat. Lifting the foot a little as you go can help but will slow it down as well. I understand that the 227R is a cylinder machine and am wondering what you mean by saying it having a post bed? A couple of pictures of the machine and the job would help I think. Brian -
How to lay down wallet pockets straight and even repeatedly
RockyAussie replied to RockyAussie's topic in How Do I Do That?
Just found this old post looking for a reply to a question on getting zippers to sit in straight. We find it very helpful for that purpose as well so I thought I'd give it a bump. -
I would suspect that the veg is firmer and the feed more positive than on the more softer harness. A little less foot tension may help or perhaps you will need to open the stitch length more on the harness.
-
That happens a lot if the bobbin gets caught up. Thread could be badly wound on. Sometimes the top thread could get snagged as well. If the tension still looks fine either side it is probably something else. Picture would help. Brian
-
The 205-64 is needle and bottom feed, and has the great advantage of being able to use a roller foot as well easily if required. For many bag makers this is often better than a walking foot machine as it will allow the feet into tighter spaces like the gussets and such.
-
Schmetz needle for thread '20' thick
RockyAussie replied to tafspeed's topic in Leather Sewing Machines
I think both charts are helpful but I would have thought that the (Tkt) sizes in the second column as shown in the chart that @Wizcrafts is referring to could be taken as being the metric sizes?? I only bother to point this out as the chart above does not have show all of the common needle sizes. For instance above it says for metric 40 to use a 110/18, but does not mention as in the other chart the 100/16 needles which I would more commonly use for that thread size. Same thing with the 19/120 needle size for the 30m thread etc. Often different leather/materials behave differently with one needle and being aware of close alternative sizes is important to know I think. -
All good points mentioned above. I use a point tool a bit like an awl to poke a good mark into where I want the stitch to turn at the tip and this makes you learn to get it right every time. With practice you should be able to start stretching or condensing your stitches as you get close to that point.
-
Consew skiving machine has 3 small chips missing from blade
RockyAussie replied to JeannieH's topic in How Do I Do That?
I don't know that machine so I would ask that question on the sewing machine section as a few there I'm sure will know better. The step i refer to is the edge where the leather joins. Little as it may seem, it can make miss stitching quite a common problem. -
Consew skiving machine has 3 small chips missing from blade
RockyAussie replied to JeannieH's topic in How Do I Do That?
I think the where your seam is finishing and where your presser feet come down are not working right. If this is your walking foot cylinder with the wobbly dog foot then that may not be helping. On a flat piece of leather probably no problem but with that step and perhaps how you hold it may have to change. That step is trying to push the leather away in toward the machine and and this allows the needle to flex in that direction and then the hook misses the loop. Thicker needle should help a bit as it would resist flexing more but I think a reduction in pressure of your outer presser foot would help as well. Try sticking a thin strip next to the join step and see if that stops the miss. -
Thanks Harry. I think that, that is what I am doing. I hope to make a start on some next week sometime and I will post some pics straight after. Brian
-
And a hefty sewing machine and ...and...6 hours drive mate and you can practice and ponder on all sorts of machinery.
-
They put a crease line on both edges of a belt strap at the same time. Look down in the valleys and you will see a raise on either side. The device is set for various widths of straps to run through.
-
Nice looking work there Wedgetail.
-
Thanks for that @JMixx. It is always interesting to see how different mediums can be employed into a variety of constructions. PLEASE don't hush, as great ideas often come from these sort of posts and the people willing to share. Brian
-
That looks to capture the idea well. Internally without a cover may look a bit rough for some jobs but as drawn here it would be easy to work out the collar length needed etc. I am totally self taught and I should get around to getting some books like that as the terminology at least could be of help at times. Thanks for the compliment. Brian
-
That plastic canvas sound interesting. Could you post a picture of it? What do they call it? Thanks for posting . Brian
-
Consew skiving machine has 3 small chips missing from blade
RockyAussie replied to JeannieH's topic in How Do I Do That?
So when you stop the bell knife stops as well? I had a very old Frobana that did that with a clutch motor and Note I said the word had. That is not to say that a servo motor can not do it though. The servo on my large sewing machine allows a great range of speed variation. I have heard of people splitting the drives onto 2 servo motors and in time that may be something to consider. I will say that a roller foot will give you better control as my video should show somewhat. The friction of the standard feet do hamper the smooth feed. -
Consew skiving machine has 3 small chips missing from blade
RockyAussie replied to JeannieH's topic in How Do I Do That?
This link should take you to one that is relevant. If all is working well the clutch should give you a good controllable feed through. Does your bell knife not run at a speed continuously? -
Consew skiving machine has 3 small chips missing from blade
RockyAussie replied to JeannieH's topic in How Do I Do That?
Under this answer there should be a blue link that says You Tube Channel. You should only need to click on that. -
I looked them up and from what I think is that yes the strap is 2 pieces joined and edged. The weight should be around 4oz which would be a bit over 1/8" when combined.
-
Consew skiving machine has 3 small chips missing from blade
RockyAussie replied to JeannieH's topic in How Do I Do That?
The steel feed wheel should only be necessary for firm to hard leathers and there are a few advantages to sticking with the stone as well unless you get a lot of feed slipping problems. A roller foot would be something to get if you have not already. If you check my you tube vids may help there. -
Sounds like a good idea.
-
If its for holding a phone ...have you thought about doing a simple piece across your gusset under the D ring? That buckets in and should make it good for quick access.
-
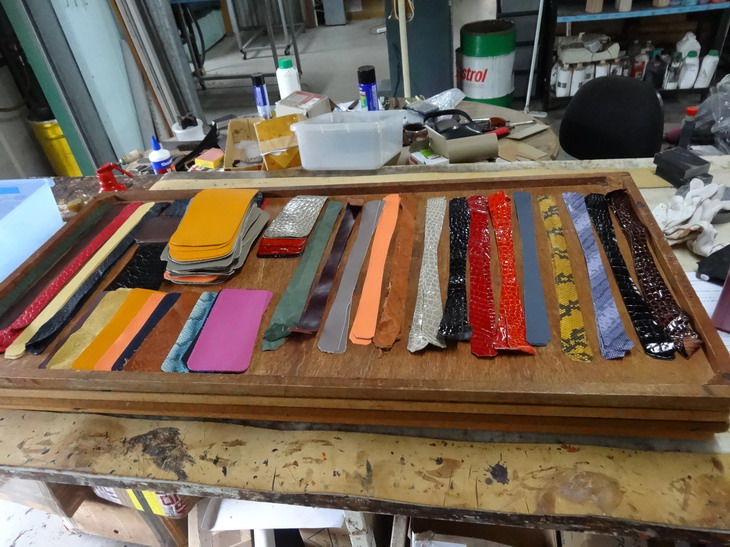
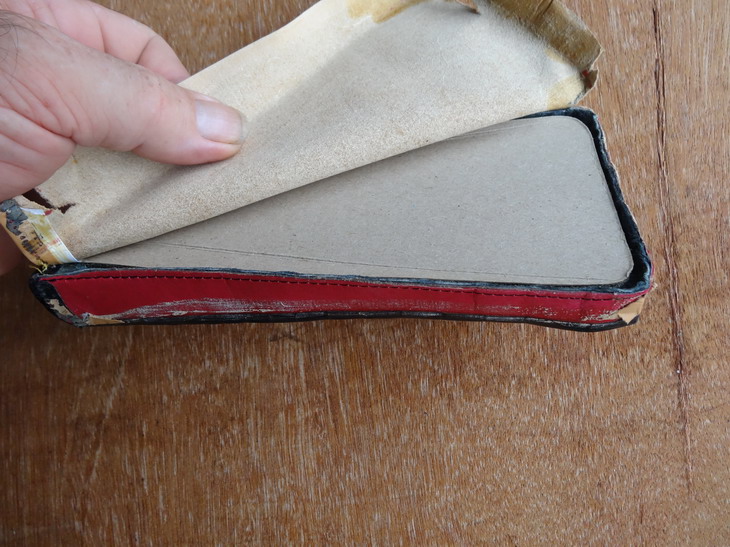
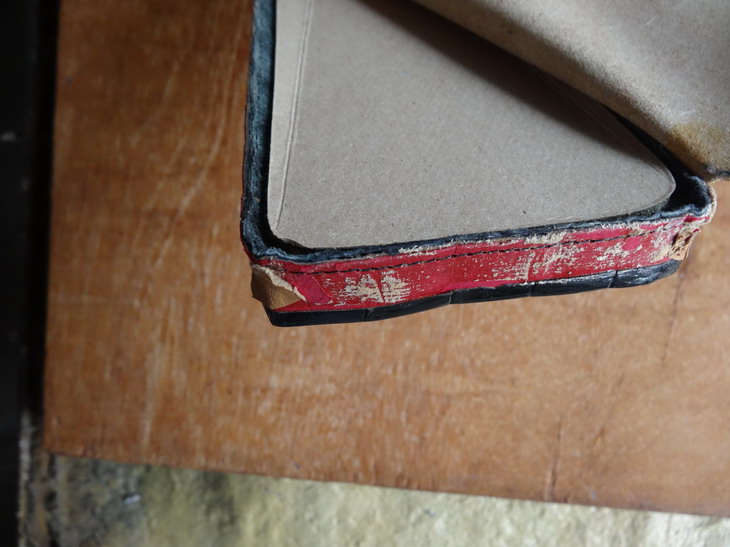
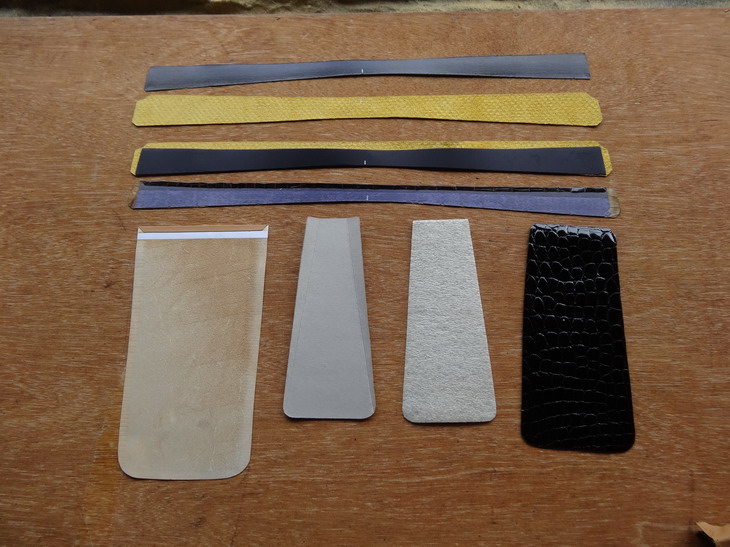
OK, this is the best I can do for you this weekend. I have a few more of these bags to cut out yet than I thought.I will try and post some pics of one or two and their various steps as I go on them. For any people interested to see them being made I will post them in a separate "How Do I Do That" post sometime soon. Follow me if you want to be notified. For now I have just grabbed a few pieces to show you the gusset building breakdown in some pictures. This first picture shows what the leather parts of the gussets look like cut out. This second picture here shows all of the components that go into making this gusset.At the top, there is a .3mm cardboard strip that is necessary to use with with many of the exotic leathers due to their stretchy nature. The third piece down shows what that cardboard looks like when positioned over the outer gusset strip. The next one down shows a piece with the croc's edge folded over. To the left is the lining leather that has the top folded over a piece of paper stiffener. Next is a .6mm strawboard stiffener with scribe lies to help with later shaping. Next to this is the same from the other side with some foam padding attached. The last one is croc for the middle part. Here for the moment I have pulled an old one apart to show what it looks stitched together and with the foam and stiffener attached in place. This following pic shows what the lining looks like when it is stuck into place before further assembly. That"s about it for now ....Hope that it makes some sense. Many firmer leathers would not need this level of construction but as I mostly do croc ....that's all I got. LET me know if anyone wants to see the whole bag being made in steps as it is quite time consuming.