


RockyAussie
-
Posts
3,265 -
Joined
-
Last visited
Content Type
Profiles
Forums
Events
Blogs
Gallery
Everything posted by RockyAussie
-
@Mark842 I would be surprised if the moulds you show were actually cast as they would seem unnecessarily expensive. These could easily be laser cut from a proper cad drawing and some would weld/braze or even just screw bolt together. Are your plastic moulds done from Cad drawings to start with? If so are they 2d for cutting or 3d for CNC or printing? You can get the 3d printed in metal from the 3d drawings if you want. If going from scratch testing the block in plastic first then getting it printed in metal is way way cheaper than years ago getting mould made. If you want to get a bit more understanding have a look into the Shapeways - 3d printing service.https://www.shapeways.com/ You can even see how much it would cost if you know how to get your weight sorted out, on more different metals and materials than I would care to mention here. If you haven't seen it before here is a link that within it shows a bit on some mould that i printed for handcuff pouches. http://leatherworker.net/forum/topic/77677-how-to-make-a-press-for-moulding-leather-pouches-and-such/?page=3 The cad drawing for this gets converted into an STL file and from that you can get your Mould made. Let me know if you need any more help. Brian
-

First watch band!
RockyAussie replied to motocouture's topic in Purses, Wallets, Belts and Miscellaneous Pocket Items
Wow ......Wow that was quick for a first time around and the results are better than I expected even from you. Don't think I've had to use this emoticon before. PS. PM me your dads address before you come next and I'll shoot down a few more bits for you to practice on. Not that it looks like you need much more practice to me. -
First watch band!
RockyAussie replied to motocouture's topic in Purses, Wallets, Belts and Miscellaneous Pocket Items
Looking good and on the right track so far for a deployment type. @YinTx thanks for the compliment and I do likewise admire both yours and motocouture's abilities and willingness to share as well. Like you I am excited to see the end results. I do think they are a lot more effort to get right than people think. Brian -
Hydraulic shop press as a clicker press for cutting dies
RockyAussie replied to Anubis78's topic in Leather Machinery
Nice looking idea. Knowing how heavy clicker presses work and how even massively webbed top plates warp I have to say that you will need a lot of webbing added front and back. I would be surprised that you do not have an upward tilt a little already at the edges from where you have welded already. Honestly I would be tempted to cut a v groove about 1/8" deep right up the middle from left to right on the bottom and then weld the full length back in. This should make the plate come down a bit front and back. This I would do before adding any webbing as I would be trying to keep a little of that bow for as long as possible. May sound crazy now but you will see why later. Note also that as your top deforms up so do your long cutting knives until they become banana shaped useless. Another idea if you prefer is to put 4 heavy wall box pieces on top of your channel and put some bolts into the ends in order to be able to screw them down tighter at the edge ends occasionally. This should allow an occasional re straightening. Regards Brian -
First watch band!
RockyAussie replied to motocouture's topic in Purses, Wallets, Belts and Miscellaneous Pocket Items
Apple watch and coffee stirrer all in one.......what will they come up with next??? -
First watch band!
RockyAussie replied to motocouture's topic in Purses, Wallets, Belts and Miscellaneous Pocket Items
If its not to late I have to say on croc or ostrich leg or similar I usually do one of 2 things where the strap folds over the pin that connects to the watch. I do not know the thickness of an apple Stouch lug so one method may not work. The cotton wool ear buds you get have a plastic tube that normally fits nicely over a normal spring pin (not all)and I have found them an easy one to fold the skin over and glue on to. Cut over long to start then trim down to size after. You can cut through the skin and it if you like as well. The other method is to put a very thin (.5mm) veg strip onto the croc at the pin fold area. This is normally about 3/4" long and thinned at the ends to hold the croc shape better and to support the weakest area that is normally the area that fails on a watch band. I generally give this a tight curl when I stick it down to avoid any wrinkling as much as possible. because of the depth of the grooves in the scale areas they tend to break away on a watch band quite easily if you go with croc alone. The veg or the plastic tube help to take the drag of of the croc skin. I prefer the tube method when I can use it. Brian -
Onto the third bag....
RockyAussie replied to motocouture's topic in Purses, Wallets, Belts and Miscellaneous Pocket Items
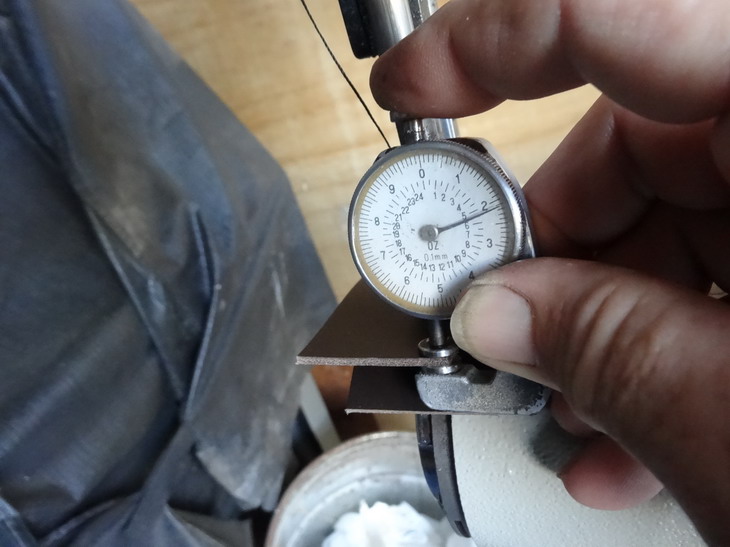
3oz=1.2mm and 4oz=1.6mm -
Ok I did a test for you of the above feet supplied by Ewe and the pictures show the results. The top strap would need to be more than 2mm thick or youd need to sand some off the bottom edge of the foot to go any thinner. The distance from the edge is 1/8" or 3mm if you like. The centre/front foot fitted straight on no problem but I did have to grind out the slot a whisker on the back foot but that is more than likely my machine a bit. Metal is hard and the quality is good. If this is what you are needing let me know if you have any trouble getting one there. Brian
-
What type of foot are you looking for or perhaps I should ask what do you want the foot to do specifically? Is this picture the type of thing you mean? Regards Brian

-
What Is Best Machine And Model For Sewing Wallets?
RockyAussie replied to Csr111's topic in Leather Sewing Machines
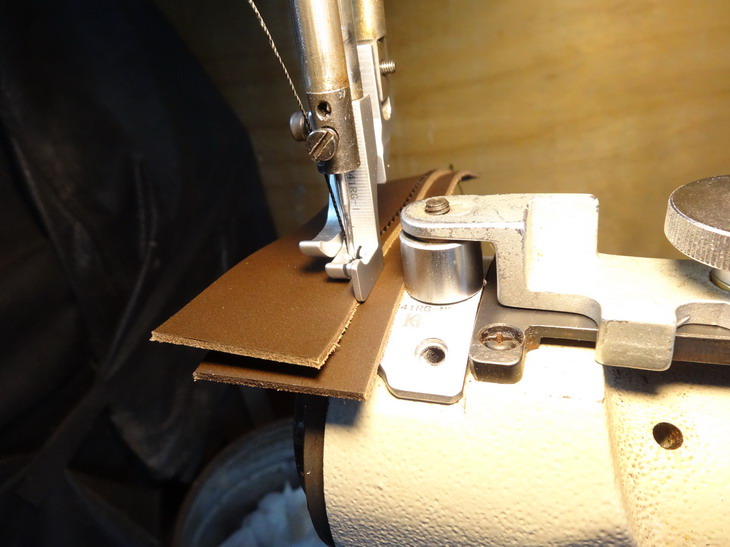
Hi Tia, Not knowing what type of range of products you are wanting to make I can only guess. Call me on 49342555 if you'd like to narrow it down a bit. A very common versatile machine that can do a very wide range of work.....is the Pfaff 335 or the Adler69 or many of their clones. I have both and and use both most days and I can get them to run a 20 size thread (138) if I want to but normally stick with around 40 and 60 for most work. Check my web site and I would say around 80% + of the product you see there would use these machines. I will attach a picture to show some of the sort of work where this type of machine is most useful as in stitching the small gussets in these bags. Here is a link of a Cowboy/HIGHTEX 335 clone video that may help a little. Note I have a 441 as well. Regards Brian
-
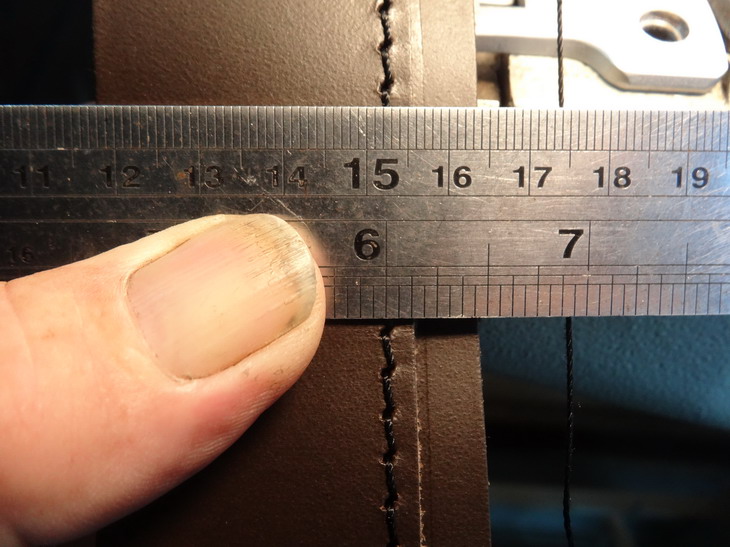
Strap could end up a bit less than 3/8" but that may be ok. I assume you would try and use the the full 2.5oz kid without splitting or skiving so watch the tape and your lining is not too thick.
-
Here is an earlier topic that shows a bit on the folder subject . http://leatherworker.net/forum/topic/73224-leather-strap-folding-machine/ Here is a very nice folder that is pretty much the bees knees if ya got the bickies.https://campbell-randall.com/product/model-star-3000 With regards to the elastic You should find examples in dance shoes and in particular ballroom dance shoes for women. Some have just fed the buckle tongue right through the elastic and attached to the shoe upper and some have a leather strip through the buckle and sandwich the elastic between that piece then stitch the elastic to the upper. From memory the elastic unstretched is about 1/2 to 3/4" long. The backseam tape is usually very thin if I remember but neither above is in the width you want. I checked the site and could not find any in the right width for making a 10 mm (3/8") strap. You would be needing a 9mm tape if you were doing a normal folded strap so I had a quick look on the net and found this http://www.textilesleon.com/en/catalogue/adhesive-and-reinforcement-tapes/ Half way down the first page you should see a range of colours at 9mm wide. Sorry I cant help much more at the moment as I am drowning in Christmas orders. Brian
-
By folded I mean that the strap folds in from the edges to the middle. Old trick is to make over long to start and put a tack in the end after it has been glued up fully. Carefully with index finger and thumb whilst holding the other end you can get slide them down the strap and close it up. It does take some practice and a folder is generally less of a frustration. For higher quality a tape around 8mm in this case is attached in before or during the folding.Not sure where you would get the tape where you are but over here shoe repair suppliers normally have them. ( square buckles are kinder to the leather wear than the rounded shape ones). Also elastic in the strap that holds the buckle can help with wear as it allows the strap to expand and contract with out over stretching the attachment. Brian
-
Inline Cowboy presser feet on Cowboy CB4500
RockyAussie replied to Wizcrafts's topic in Leather Sewing Machines
Did you get a Manuel???? The diagrams and descriptions would make it a lot easier to understand and I would think best to understand what to adjust and why before adjusting something wrong and end up not knowing how to get back. Here is a video that may help but I would be reading and understanding the Manuel as well. -
I am thinking that the thickness of your straps is a bit thin for that method but I don't know your lining thickness so cant be sure. I mostly only used folded straps when I made them and then lined them in with about 2oz. If you are not using a clicker press knife it will be easier to make the top strap up to width first then attach to a lining that is cut wider (about 1/8" all around then carefully trim up to that after attaching and stitching. A small pair of sharp scissors works well for this also. This is the same procedure whether the strap is folded or not. Trying to cut through both pieces together on a 1/4" to 3/8" strap will be very difficult to get it to stay where you want it while cutting. Most straps tend to break where they go through the buckle in time. Brian
-
Welcome fellow Aussie. Plenty of good help down that way and great suppliers right on your doorstep. Brian
-
441 bobbins 30mm long too long for Cobra Class 4 problem
RockyAussie replied to carolem's topic in Leather Sewing Machines
That will explain why I have been able to use either size in mine... it does not have an ejector spring in it. I had not seen an ejector spring in the Juki or Cowboy parts lists so I just didn't know they should have one. I guess I never get up any sort of serious speed with mine so as long as it keeps on stitching good for now I will keep it in mind if I ever need to get it up a bit faster. Thanks Wiz -
441 bobbins 30mm long too long for Cobra Class 4 problem
RockyAussie replied to carolem's topic in Leather Sewing Machines
There are a few very knowledgeable sewing machine people on this site and experience has shown that they tend to give their advise back more so, when the questions are asked in the Leather Sewing machines section. I would repost it there and see how you go. I have a 441 clone but it can take either long or short bobbins. Brian -
IF you happen to lift the foot and the tension discs release (early?) it can happen that the thread tension return spring can come into play and pull the thread up. Personally I have found no problems with keeping the tension tight while lifting the foot and turning. In the past I did. Brian
-
This sounds like a promising potential solution. If you are lifting the foot when turning the corner I would be tempted to also check that the rod that opens the tension discs is operating as you would like. I have often shortened mine (on other machines) to give me more room not to loose tension when I am lifting the foot. I reckon my foot just cant always lift the foot just that little safe bit to turn so I'm just going to cheat a little bit. Brian
-
The edge coat method would alleviate quite a few of the folding issues I'd say but to do well will take longer. As long as they are happy to pay ...$$. and the bigger the challenge, the better your skills will be the reward at the end. Hey...did I say that...? I do wonder just how many of us do charge enough for this type of work??? Sometimes I charge thousands and not really want the work and they just keep happily coming on back and sometimes to the bone $ and they still want to bargain for less... Still I keep learning.
-
That's not so bad.....a little bit of strategic padding and stiffener before lining and I'd say you'd have it about right. Brian
-
Yes nubuck is veg tanned and I don't remember seeing any chrome tanned nubuck. I prefer the nubuck in that application but it can be a bit harder to get a small logo impression with out a laser application in my own experience.The nubuck holds in place nicer and breathes better against the skin. Brian
-
What Is Best Machine And Model For Sewing Wallets?
RockyAussie replied to Csr111's topic in Leather Sewing Machines
Just my 2c ... If you have already a CB4500 I would think about a smaller size diameter cylinder arm than the CB227r. Getting around tight gussets and such can be a big advantage.Even stitching a wallet as above all the way around can be quite a challenge on a large dia machine. Brian -
Thanks for the links @Leatherbaron. I normally pay around $100au for one of the sets. Regards Brian