RockyAussie
-
Posts
3,265 -
Joined
-
Last visited
Content Type
Profiles
Forums
Events
Blogs
Gallery
Store
Everything posted by RockyAussie
-
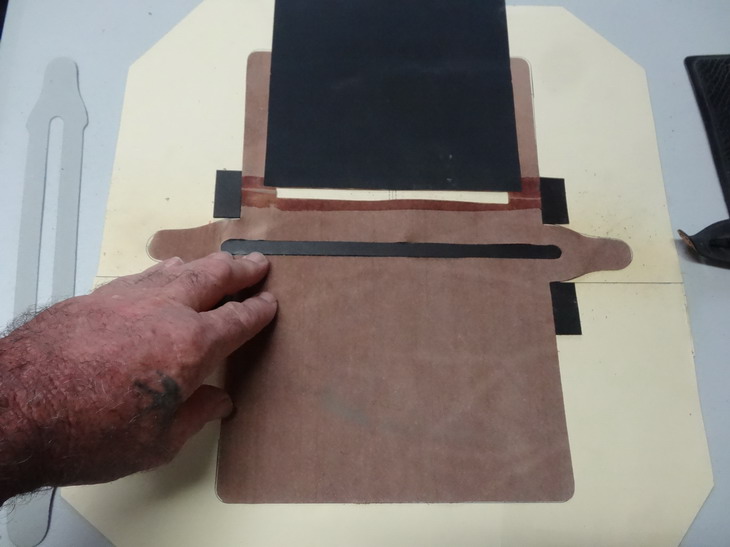
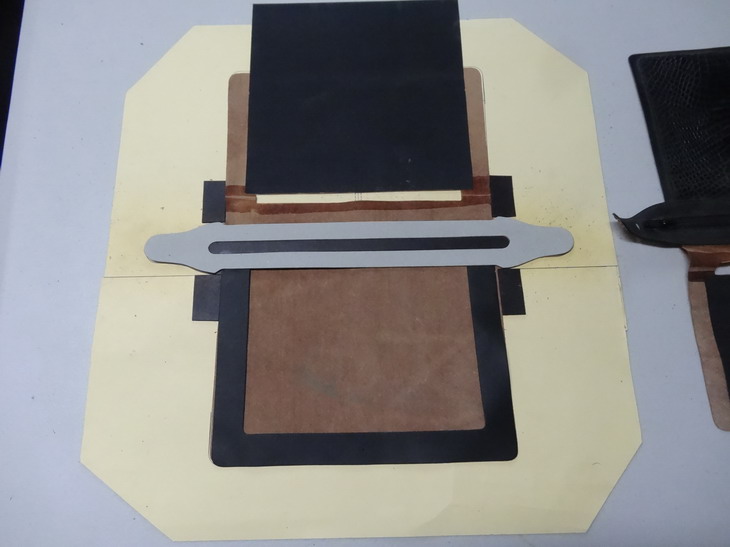
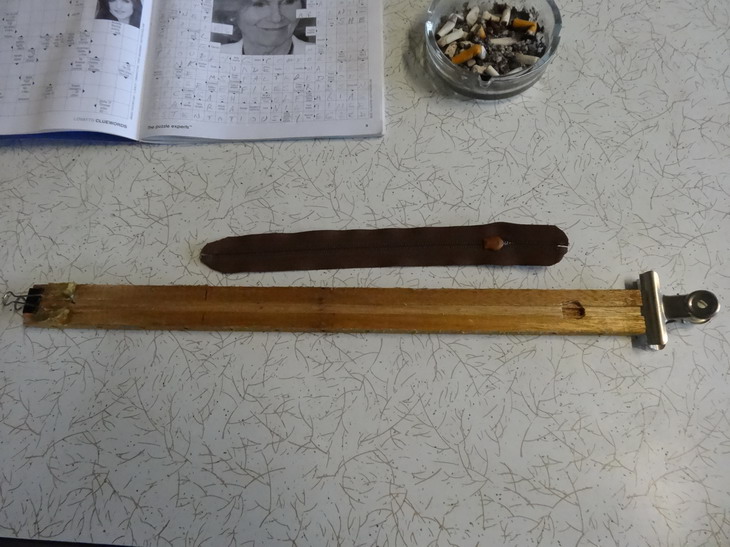
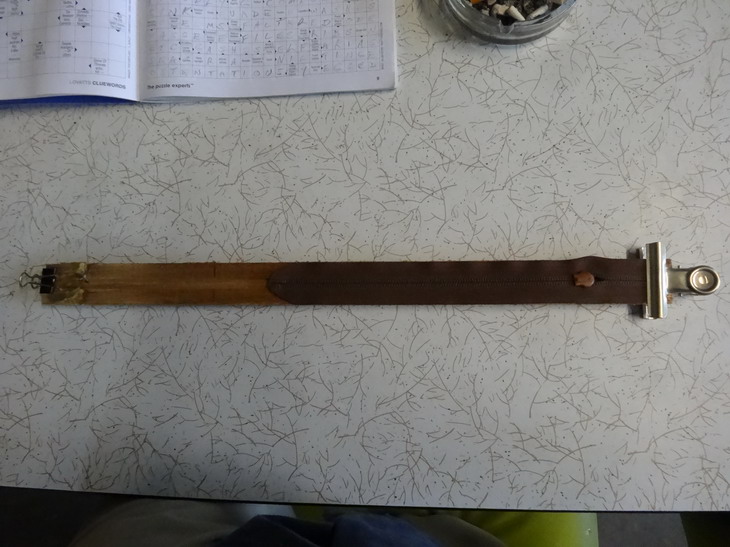
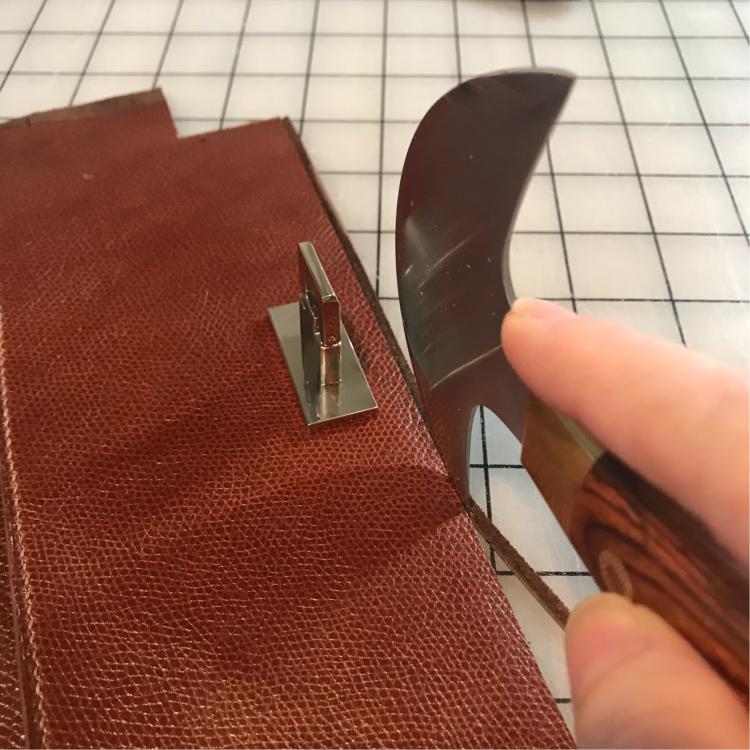
I hate zipper installation and I wish there was a magic tool to do what you say but as yet I haven't heard of it. AS a rule I make the under side a little closer to the middle of the zip as it is easy to end up too close to the edge when you are stitching and cant see it. Here in some pictures following I show some jigs that I use for making up the bag in the first picture. This next pic shows a drawing printed out with some bits of firm veg stuck to it. The aim is to get the lining and all of the following bit including the zip in exactly the right location. I didn't have handy a fully prepared lining but I think you will get the idea alright. After all of the padding and croc etc is glued down and in place the zipper is glued on the top side and attached to the centre stip shown below in cardboard. This then gets glued into place over the lining. In order to glue up the zip I make up a stick with a groove and hollow in it for the slide and with the clamps holding it in place I am able to neatly glue up the zip. The stick below is not the right length for the zip shown but again I think the idea is clear enough. This pic below is a prototype and not stitched correctly but may help to understand the process somewhat. A tool like i have made below or a variation of can sometimes be of use when locating a zip into place. I hope that is of some help and I wish for you patience and luck. Brian


-
Nice looking pick up there. Appears the dog is working on it and has already got the belt off for you. Nice and clean looking workshop there BTW.
-
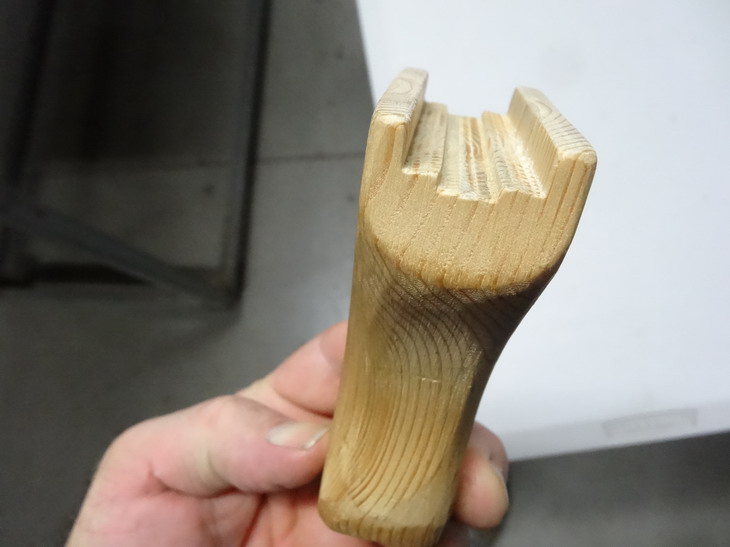
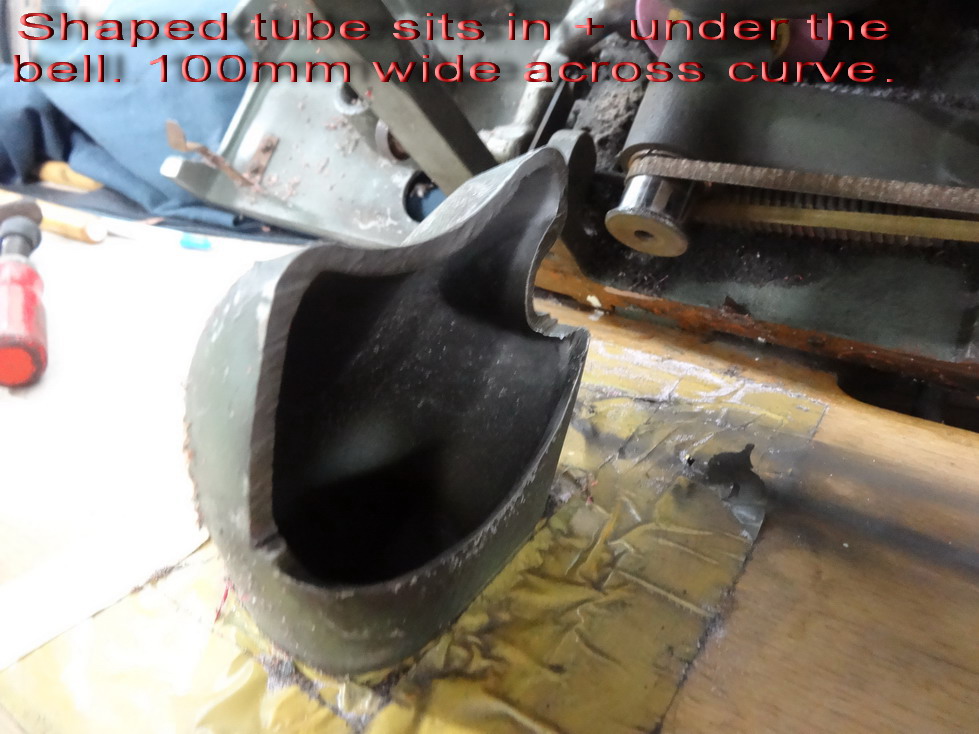
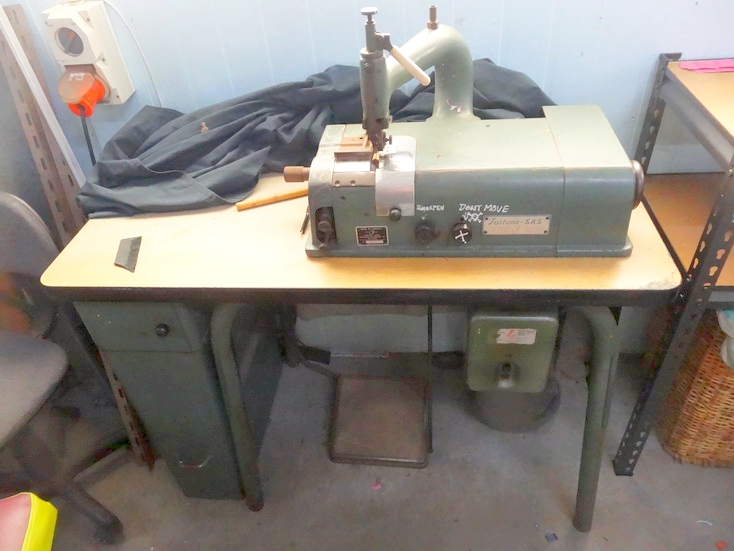
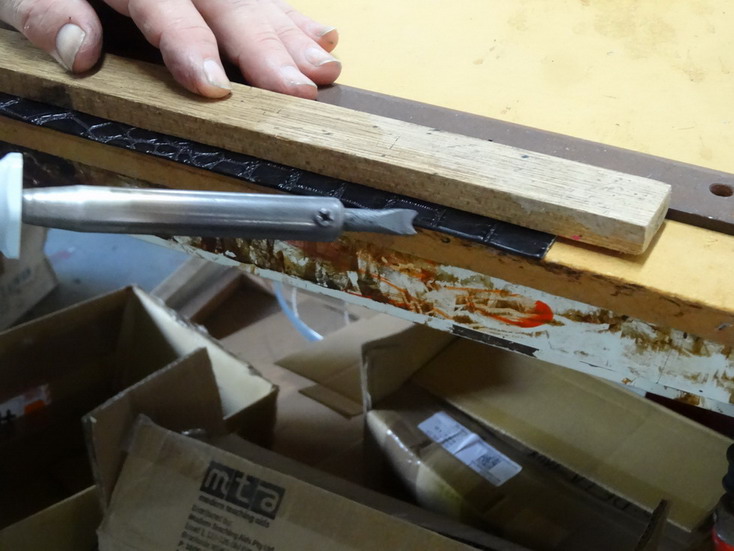
Here are a few pictures that might be of help. I suggested to someone awhile back about doing just this but I don't know if anyone has tried it yet. I suggested a bit of work with a poly elbow and a heat gun to reshape it. Note that you would want to have a space for the dressing stick to get in and I would suggest that the waste go into a sealed bin first then the vacuum attached near to the top and with a mesh to stop larger pieces from getting into the vacuum bag. The reasons for this are to stop any sparks from getting to the bag when sharpening and to have a more convenient method of empting the scrap. Although you are using a FAV and these pics are a Fortuna they will be the same measurements. I have a FAV AV2 as well with an extractor/aspirator.Brian


-
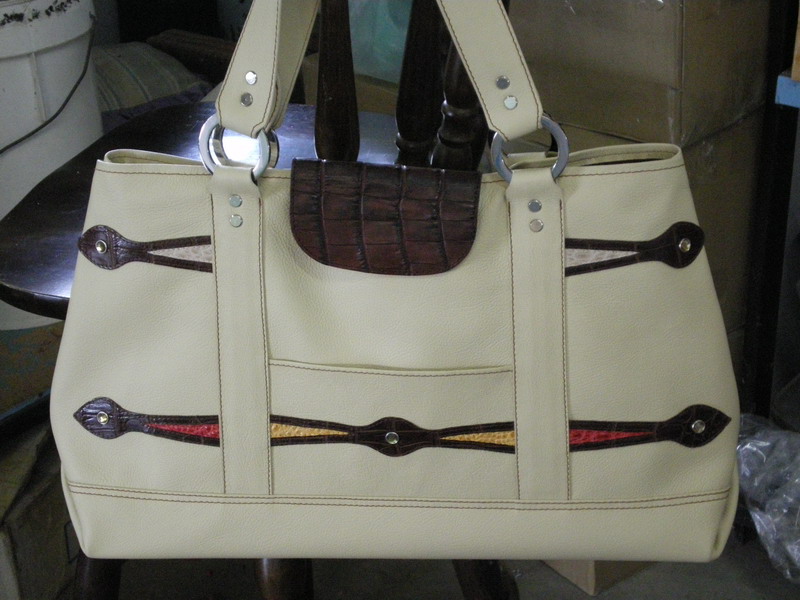
Thanks for the compliment. I would love to see one of these lace together styles made up even if only a single side. I reckon you would make a hell of a nice one and I would be happy to draft it up if you want to change the sizes a bit. .
-
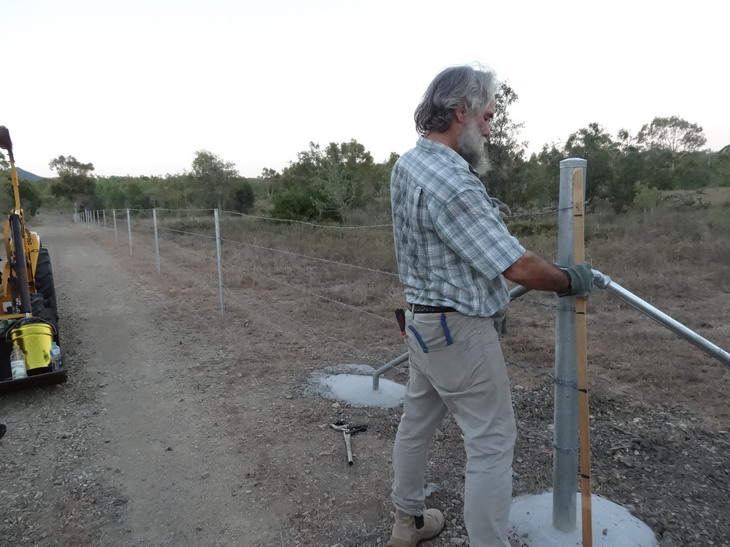
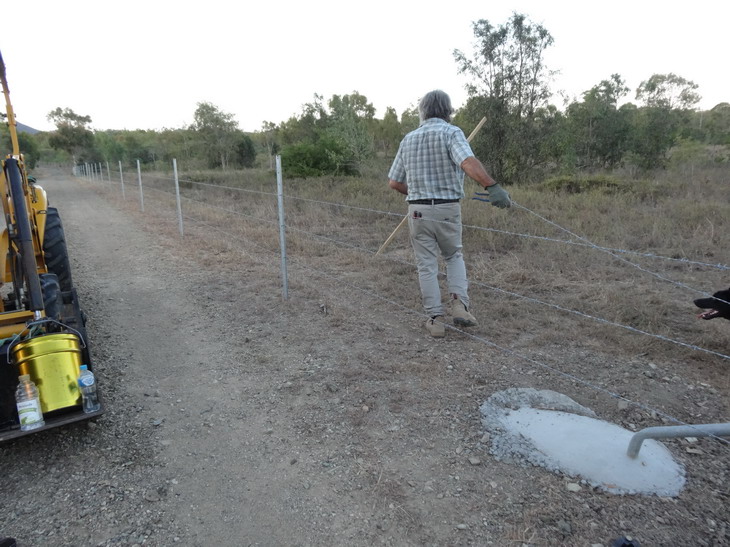
 Looks good and aren't those little crew punch holes fun to stitch.. It might be worth doing a pre coat with your edging up the sides before attaching the gussets. As for the fencing yeah it sucks....... but its raining again so here I am.
 -
Not quite the same corners but I use this method 3 in the video quite a lot and I reckon it works alright. Here some pics that show as I use it in leather. The base has a drop in stiffener and they can fold up to reduce space when travelling etc. Check my website to see more. Brian

-
Wow that is so amazing and similar and functional as well. I had not seen that post and am glad to see you are getting the stitching sorted out and some good lessons learnt as well. Thank you.... I've had a bit of practice. A divorce out of the question? . The attaching together of the 2 sides could be done with stitching instead of the rivets of course and could be done nicely with pockets sewn in as well if you can line them up on either side and get that awl to go straight. Getting gussets the right length as you now know is not all that easy with leather and with this design you don't have that worry. At any rate I will do up a zipper top version as well. Now your starting to worry me....yes, but 1 strap could be dived into 2 if you prefer. The intricacies such as adjustment buckles and lid shapes and so on are all things that I would expect you to adjust and do to your own liking. I don't like the lid shape myself and would prefer a squarer style flap. The strap width in the drawing is 1" (25mm) wide. This allows for common bag buckles for adjustment if desired. I will check back tomorrow. Brian
-
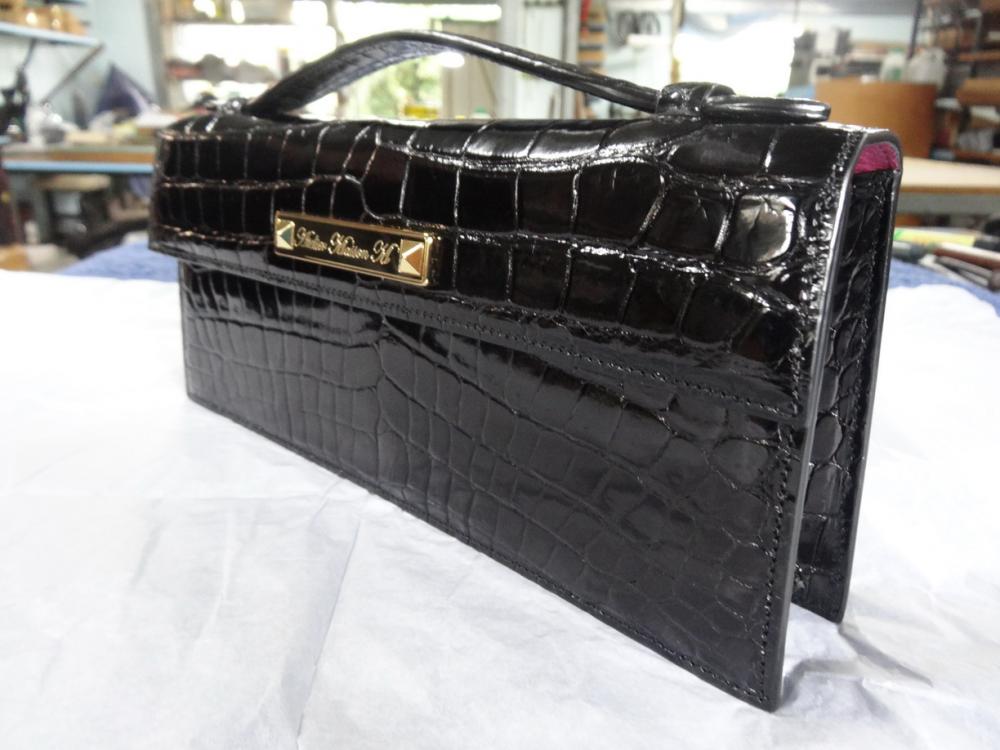
Fantastic workmanship as always. I'm not sure about the full gluing to the lining as that can show up a lot you don't want it to and sometimes make the product harder in the hand but if it works alright, that is all that matters. Your pictures as always are excellent and I must thank you for your efforts in posting them so well. I pinched a copy of your cutting here for another post you know of and I hope that is alright with you. Regards Brian
-
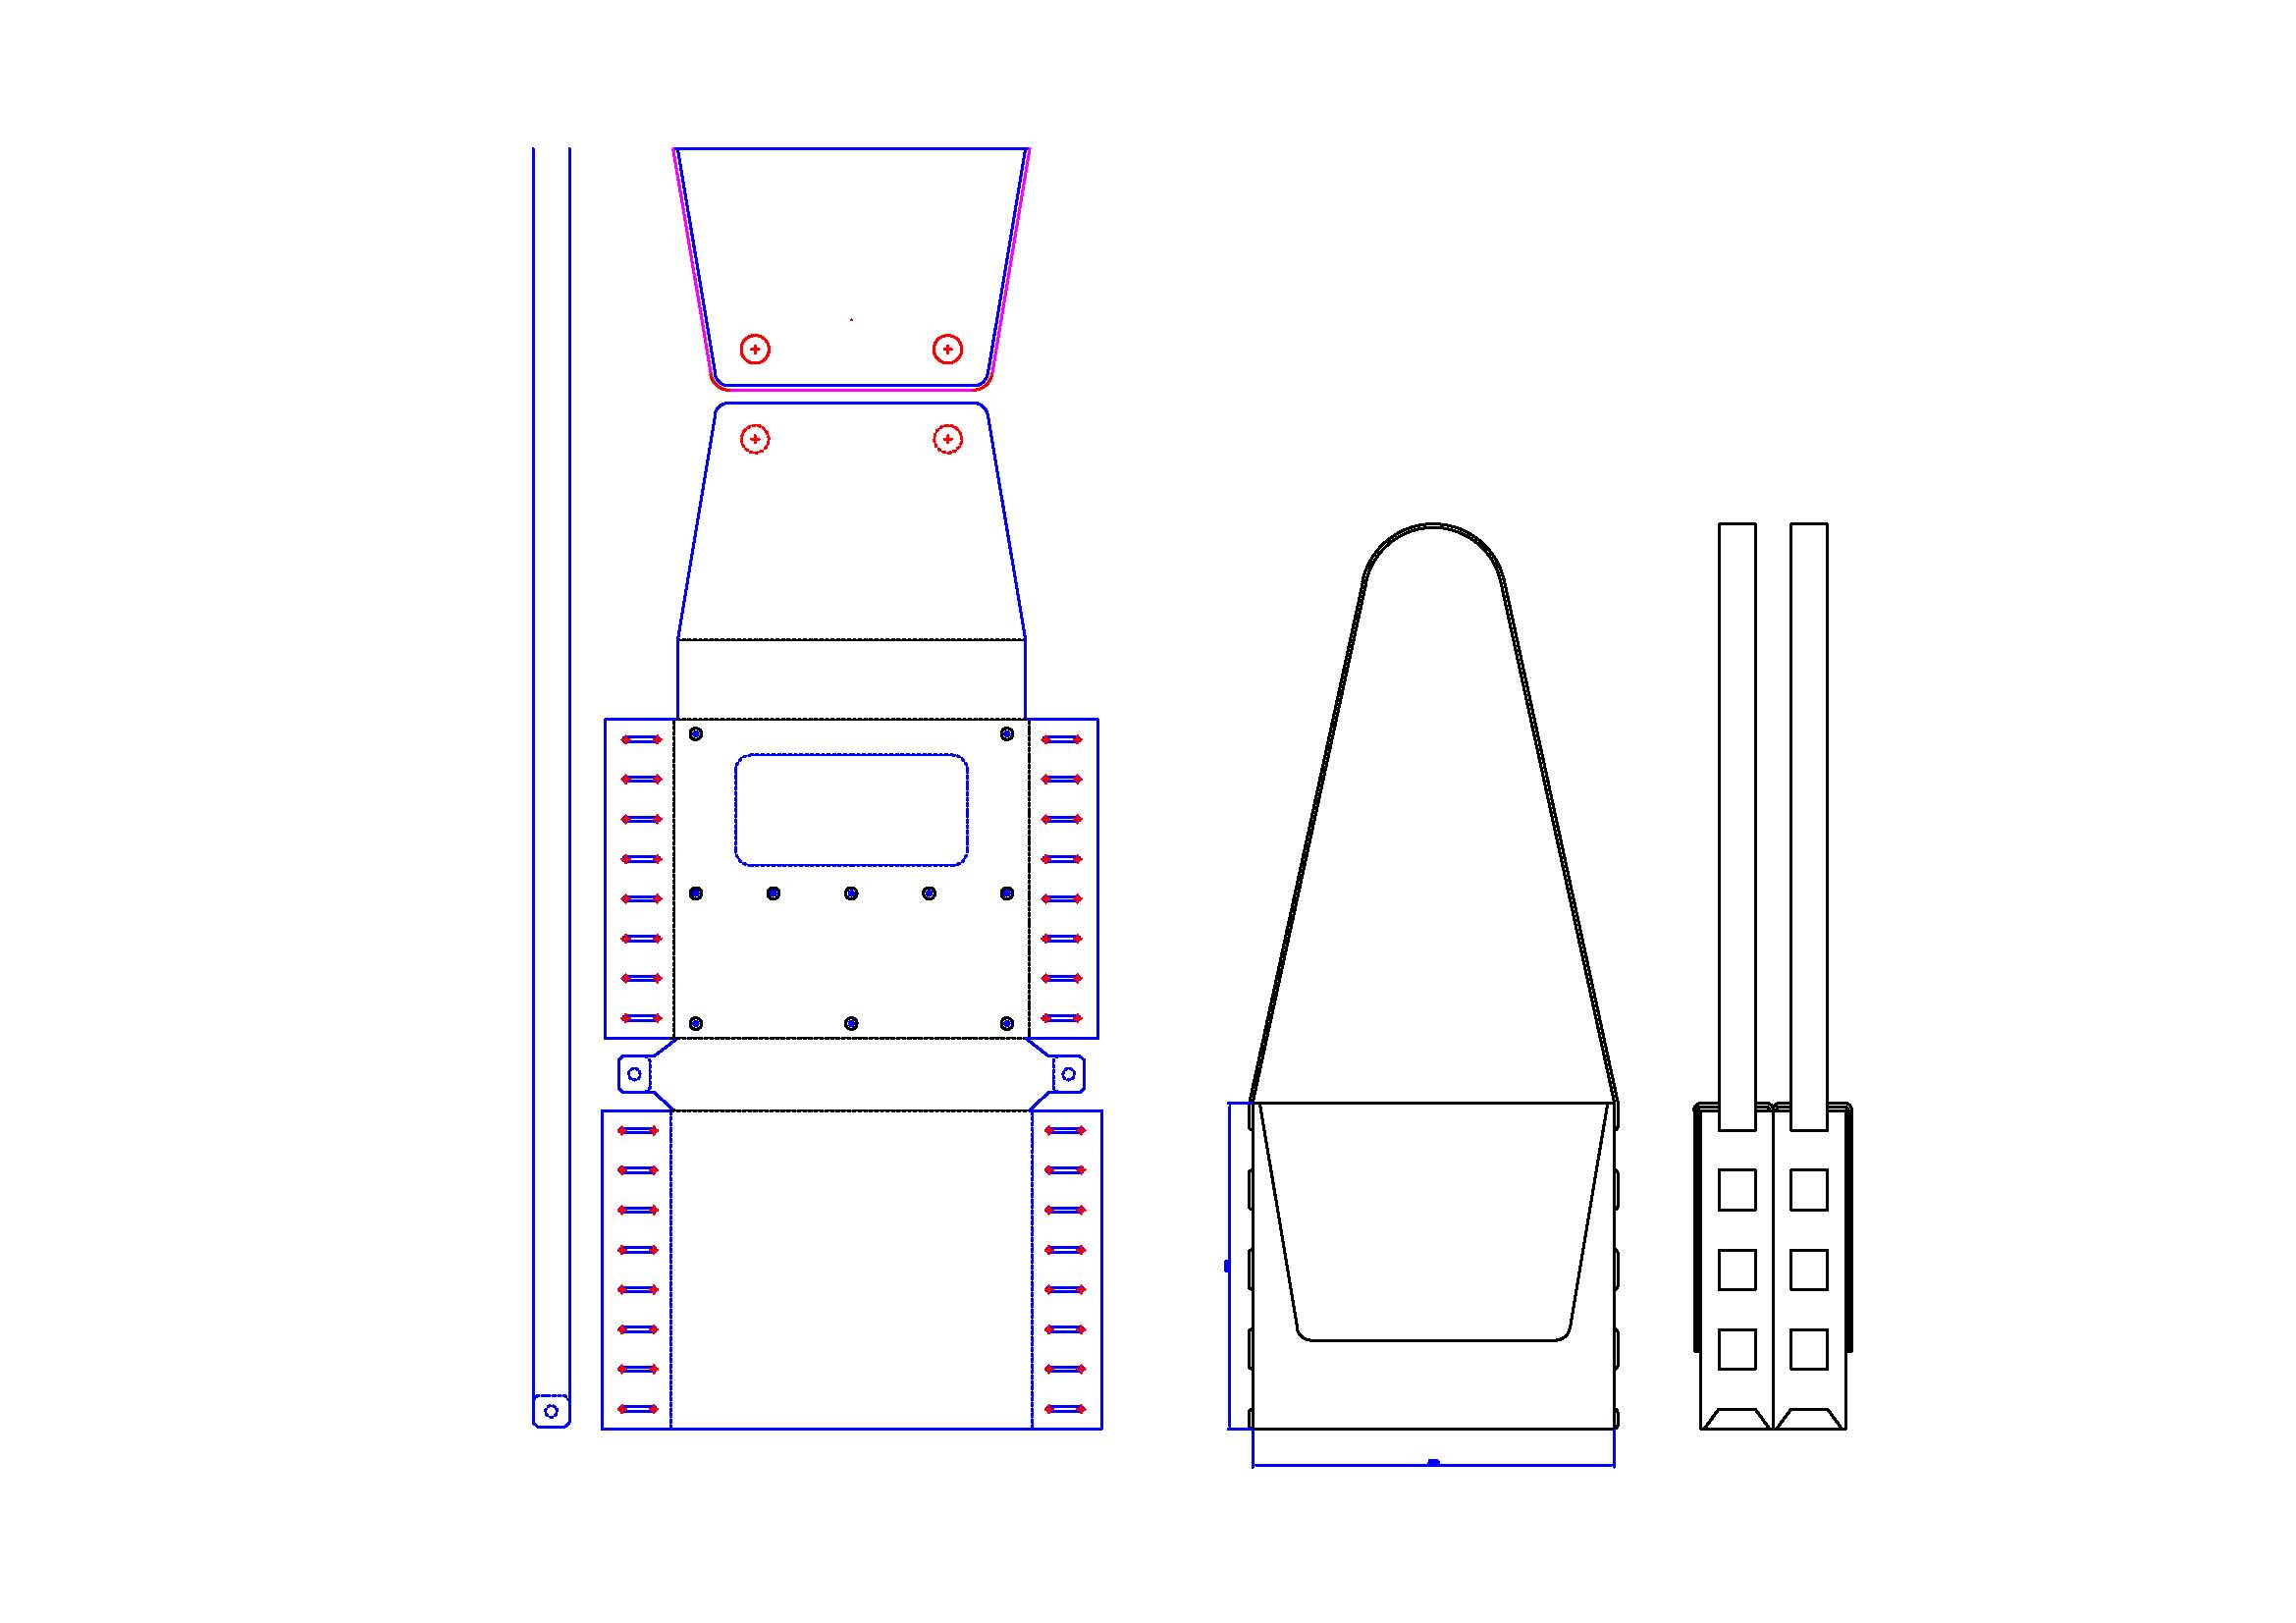
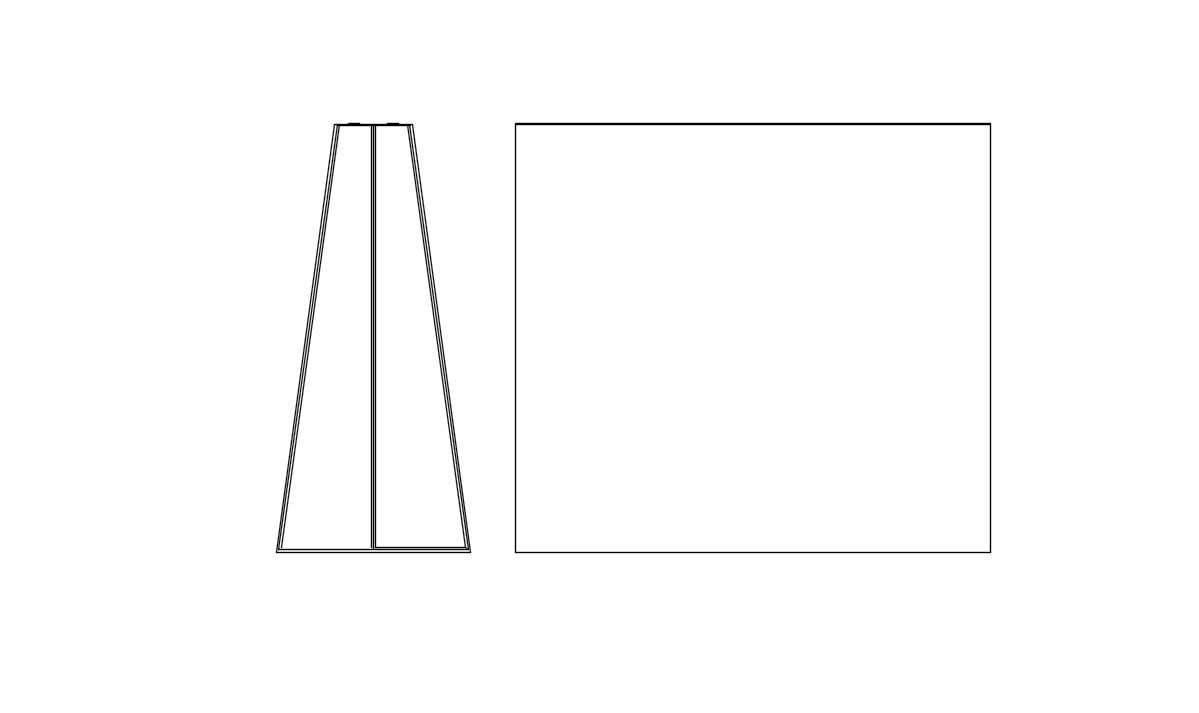
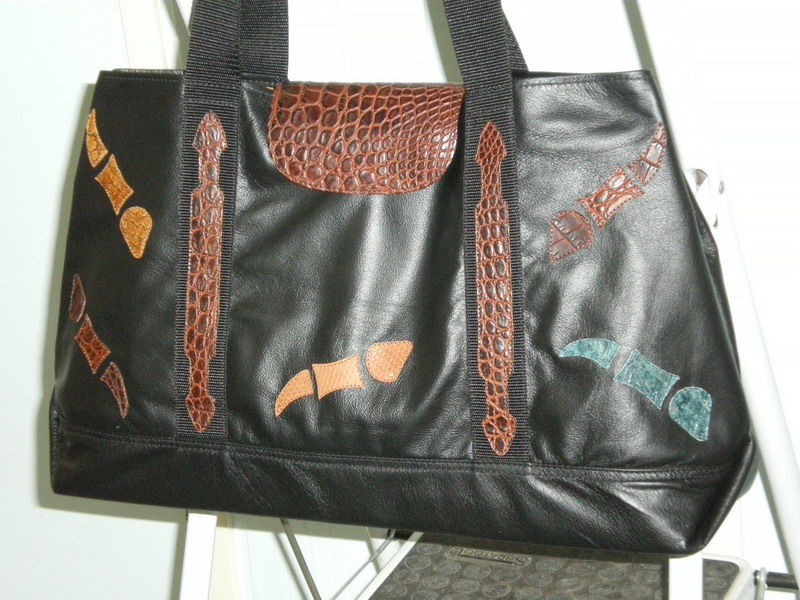
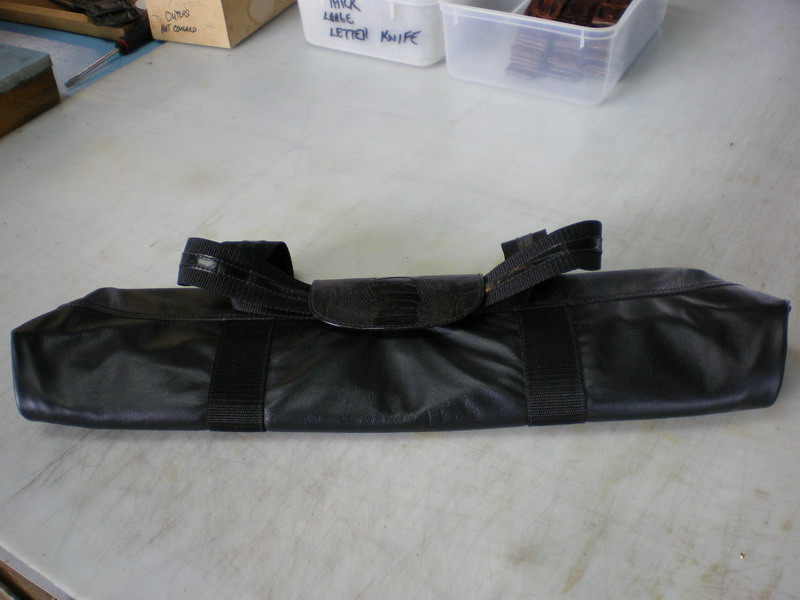
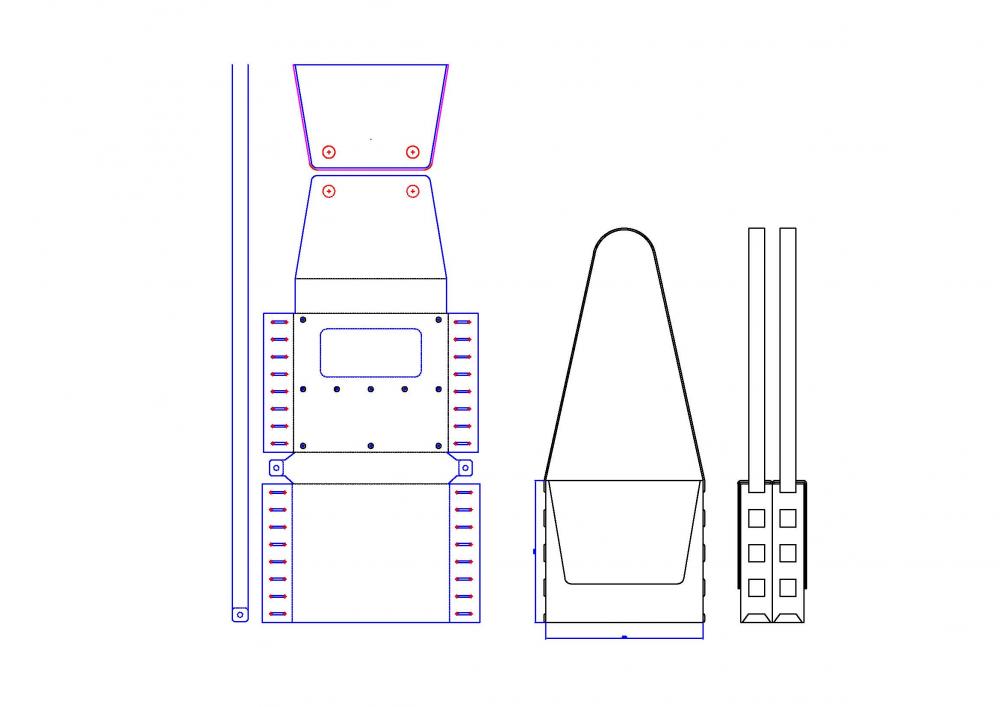
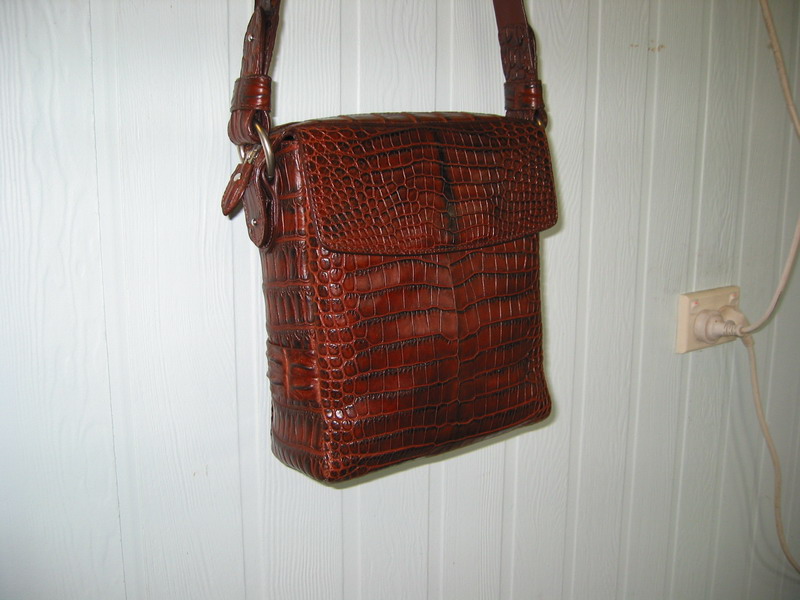
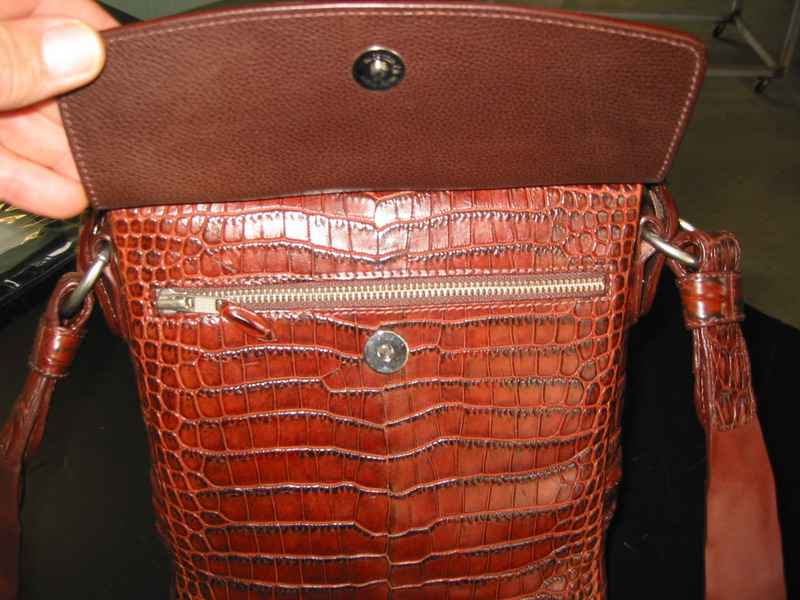
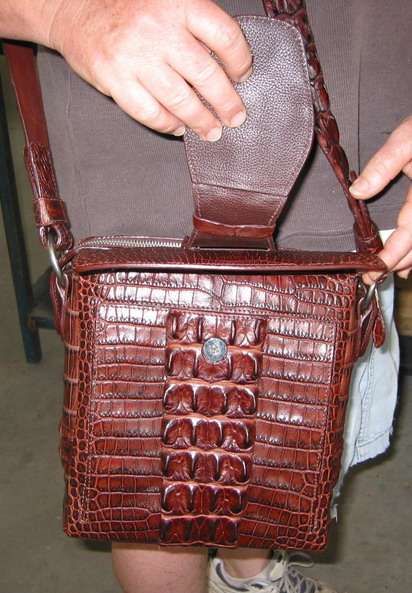
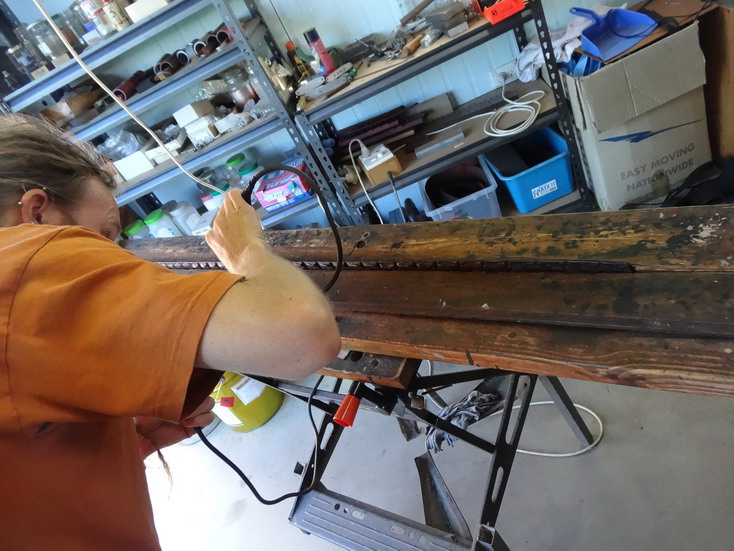
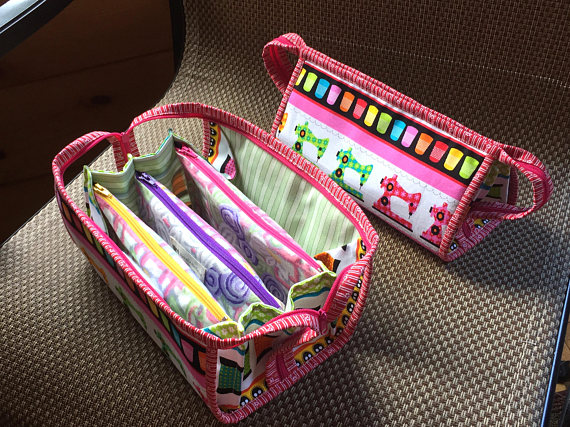
Well....here it is. A bag with no skiving and no stitching and about as simple to make for a beginner as I could design. I apologise for taking this long to get back to this but I have had trouble with a neighbours bull destroying fences to get at my cows. This has led to me having to do a lot of new fencing (about 2miles or more) to give more separation. After checking your profile I came to the conclusion that you would need a very easy project to start with and came up with the following design. It is a fair bit of a variation from your original but is the same size and can hold a phone in the middle etc. If you would like to to try it I will make a rough up version to iron out any faults that it may have. (There normally are some). You will note that I have not done this pattern with zips as they are a pain to stitch in by hand until you have a lot of practice doing them and zips generally restrict the opening room a lot as well. A picture below should show better what I mean. The pattern can be altered to put in zips as I have done in the double flap bag pictured below if you really want it that way. The pdf file may show the picture better than the jpeg. double clutch bag.pdf Note in this first picture at top left there is a piece that shows a red line around it.This piece is to glue on to the flap and give weight for the flap to hang well and also hide the magnets if you were to decide on using them. The magnets don't show on the outer front. The straps rivet on at the bottom tabs and feed up through the gussets thereby holding all of it together. Fortunately @motocouture has been working on a purse that I think she is doing very well on and it shows the second cutting around step that helps in getting a nice and true finish. The red line shows the first cut size. I pinched a pic of her work and is shown below for this purpose.. Picture showing access problem with zip. Same bag showing how I got the zip to be extended and come down the side. This pic shows the other side of the bag with a covering flap as well. Another bag design I do with same sort zip surround but with out the flaps. I noticed you asking if a simple soldering iron would help with the edge coat finishing process and for me the answer is yes. I have been using one with a light dimmer switch for about 20 + years now. (They fry themselves every 10 years or so) Way way before I ever heard of these fancy filotuse things though. Note in the background where Martin is ironing a belt you can see the dimmer switch set up. Here is a pic showing a lighter weight piece I am ironing in. It has now just stopped raining and guess what I gotta now do more of.......... Brian

-
Just before I go any further I've done a rough sketch of the sizes you've given and this is a fair bit different than your earlier sketches proportionally. If you are OK with this I will carry on. Brian
-
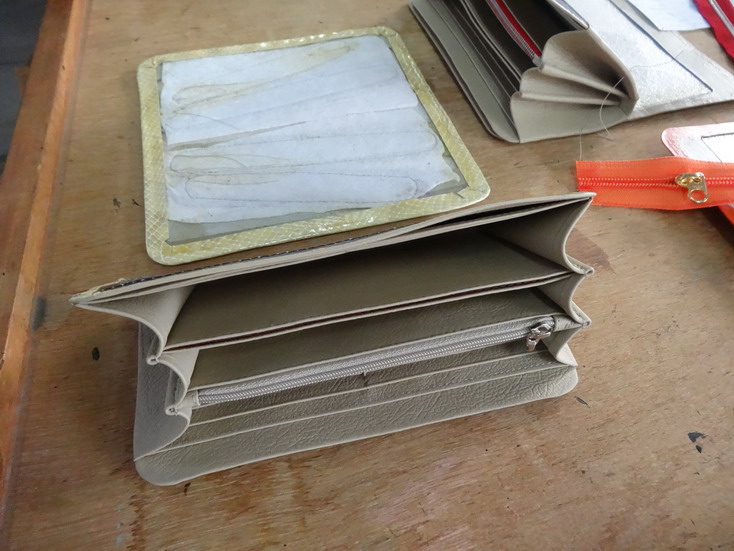
OK ...I'm awake and coffeed up now Dimensions...width height depth? I'm thinking maybe really simple construction by doing a little like your first drawing but with a total of 2 pieces of 3 oz for the linings. each side is a separate unit. 2 zips. One outer cover piece 3 to 4 oz. 2 little tab shapes that connect at the top over the gusset ends in the middle join to hold the Ds. The tabs/folds of the gussets face outward instead of inward but are part of each side pocket in the one cut. The stitching on the gusset ends get done along with the outer cover when it is attached. The little holders for the Ds attach with one rivet to the ends lastly. How are you at doing edge finishing? The first picture below shows a raw edge that is sanded in and the colour edged and the second picture shows a similar to what I mean by an outer cover going on last but note the outer edges are folded over a stiffener. This method does not need as much edging skills but would normally need some good skiving skills. The next picture shows gussets done similar to the one in your drawing style and they are fairly difficult to design and get right and would recommend against that method unless you have some skill with it already. If you'd like to give me some dims I will post a sketch asap.

-
WTH I'm trying to sleep here and there's a bat silhouette flashing and then it morphs into a kangaroo and now someone's yelling my name........... I googled double zippered clutch purse and found a few similar looking things. See pic below. In Pinterest there is a heap to check out in this link.. https://www.pinterest.com.au/pin/537969117979718870/ @Dun I am curious what material/leather you would like to make this out of. There are a ton of different ways to make something along this line but what tools/ machines do you have such as a small or large cylinder arm and skiver etc? Where I might go with a 1mm (2.5oz) chrome tan with stiffeners and padding you might like 2mm (5oz) firmish veg. The lesser the machines available the simpler the construction is normally best. An actual picture of something close to what you want to make would help a lot and some idea of the size dimensions as well. And this is always cheaper than starting from scratch. It gives you insights as you pull it apart as to what steps should be done and normally you will find ways of doing it better and sometimes even easier. I hope that helps for now ..... and can someone pleeeese get that kangaroo light off of my ceiling Brian
-
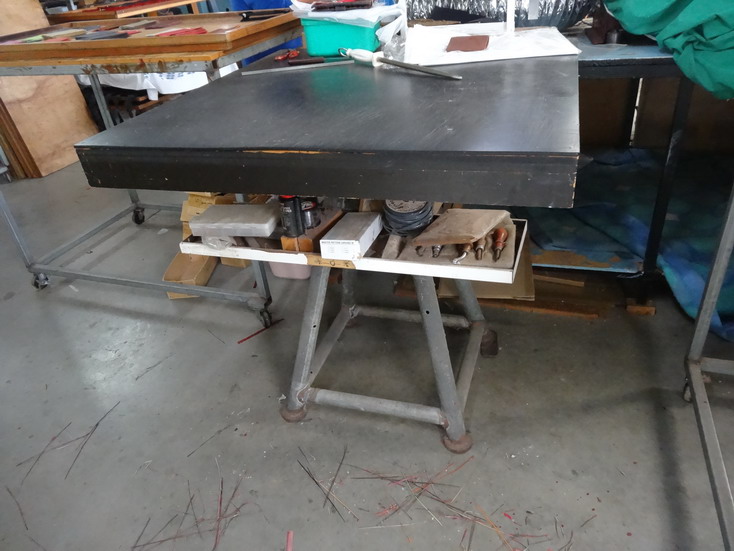
Here is my answer to that problem. The top sits on a wheel hub and can spin around and lock in various stop positions. It is real handy when cutting out complex shapes as well. Truth is I tend to just walk around it anyway most of the time..
-
Good news
-
Mostly here I believe that the skived section is for the glue to hold better in place. Often the top finishes on skins does not hold the glue as well.
-
I am glad if you found it as I would never have thought of that one.. Good thing is you never stop learning in this LW game.
-
Just check that while the bobbin is set up on the machine that you get an even pulling feel on the bobbin thread as you pull it out. If you get a feeling of snagging meaning loose and tight then you may have grit on the bobbin shaft or the bobbin case or the bobbin may have some damage. Also along with the points constabulary mentioned make sure the thread back at the cone is coming of without going loose and tight as that is also a common problem.
-
I think that looks alright but I would put the front support back half way between the two ends in order to have better leg room while sitting.Brian
-
2oz leather is only .8mm thick. The thread of 138 if measured is near .4mm. Double that for the knot = .8mm. The thicker leather will be a fair bit easier for you dial in to get close to middle. The thinner bobbin thread would also help a lot unless your foot/ timing is out in some way. As Wiz says above your leather should not be pulling together and should want to sit down flat.
-
TECHSEW 85017 Post Bed Sewing Machine
RockyAussie replied to howlback's topic in Leather Sewing Machines
Thanks for that input Darren. What are the limitations on running the DPx17 needle system? I am interested as other than a patcher I don't know any other machine that can get into as small as the toe of a shoe and keep going. If you do bring one in at reasonable landed cost I could do a full on video review on what it can do as far as bag making etc goes and maybe the manufactures and Steve could help a bit on that. I know a lot of repairers could be interested as well. Brian -
Looks real nice and well saved.
-
Sorry I disappeared last night on you. My wife got back with the groceries and managed to lock the keys in the car when she got out of it. Many hours later we saved the meat and ice cream etc. As Constabulary said this could be a timing issue and probably its best to let the experts look into it. Hope to hear it all sorts out alright.Brian
-
Hey Ryan, I am no sewing machine expert and I usually work in metric sizes and missed that a bit earlier in the post. The thickness you are trying to sew with that size thread is a bit extreme. I would be trying a thinner thread for the bobbin if that was alright. If you were up at 5oz (2mm) leather you might have more luck but the 138 (20m) thread knotting into the middle on 2-3oz may be a big ask. With your foot pressure ...Test that it lifts smoothly by lifting them by hand from the feet upward. If there is a jumpy feeling you may need to try more oiling or cleaning up the shaft. Also make sure both feet come down onto the plate with similar pressure when fully down meaning that they are both fully extending down. The bobbin will be very loose to take the thickness you are trying and can take a fair bit to get right. I keep a couple of cases to not have to adjust them when I do get them set for a thread thickness. Hope that is some help until some more expert chips in. Brian
-
When you pull the loop does it feed out of the bobbin and the bobbin spins or pull down from the top? I have never had a bobbin do this at slow speed myself.
-
I hate to sound silly but can you confirm that , that is the bobbin thread showing in the loop there? Brian