


RockyAussie
-
Posts
3,265 -
Joined
-
Last visited
Content Type
Profiles
Forums
Events
Blogs
Gallery
Store
Everything posted by RockyAussie
-
I know I will regret saying this but I have found that I get a fair bit longer stitch by removing the plate that is around the stitch length lever. I was warned by a mechanic that this may make something in the machine be able to go tooo far but 10 years later I haven't found it to be a problem.I can only say that if you do it check carefully by hand turning it over that there is nothing that touches and you do it at your own risk. Sincerely Brian
-

Bold Orange Clutch
RockyAussie replied to YinTx's topic in Purses, Wallets, Belts and Miscellaneous Pocket Items
Looks good. Only a suggestion is to bring your stitch at the back on the gusset up and over where it connects to the lid as it may what I call dog ear out. Oh and nice contrast with the edge coat. Brian -
I think Sonydaze is correct about the going through the 3 thread holes being too much.Being so close together they would create a lot of drag without the tension discs and I cant say I have ever needed to run the thread through so many holes before.Bigger needle should not help though as that should only make it easier to pull the knot through even further. In your second picture the thread appears to be behind the disc guide for the thread tension return spring which would play havoc but in the other pics it looks like you may have it back into correct position.Maybe it works now? For what it is worth when the bobbin has that little thread on it it can start to get a little looser as well. Is the bobbin a good fit on its shaft as picture 9 makes the bobbin look like it is loose enough to touch the case edge. Hope there is an answer in there somewhere for you. Regards Brian
-
I can only think to suggest loading a couple of pics of the thread path and close in on the tension discs and spring. Also which direction does the bobbin spin when you pull thread through it?
-
If the top thread does not seem overly impeded coming through anywhere I would take of the top tension discs and make sure there is no little sharp bits that could be making it drag. A fine sand and polish can help as these discs dont rotate around and the one spot is all it takes.
-
Your right, don't you just hate that????? Just think what the cost would be pre digital photos and internet.
-
Looking pretty good so far.
-
I agree with Richard that if used correctly the double capped rivets work fine but I do have a big preference also to the brass type as in years of doing repairs I know the rust problem does show up in time.
-
Work in Progress...
RockyAussie replied to YinTx's topic in Purses, Wallets, Belts and Miscellaneous Pocket Items
Sorry to hear about the fuzzies staying. My answer from there would be to use a layer of edge coat first and iron it in. That will work but I am not familiar with the method that Wedgetail mentions and that just may suit you better. With regards to stitching the zips in using an awl although I rarely do hand stitching I have found that using a crepe rubber block to press into can help. Over here you can get what is termed an abrasive restorer which is great for cleaning sandpaper belts etcand is about 1.5" square by probably 6" long. I often cut off slices to clean up excess glue and as I said poking the awl into instead of my hand. -
Personally I prefer a post bed machine for shoe uppers and with a fed roller foot ideally.Mind you a 345 at the right price is worth having anyway.As a shoe upper gets more into shape it is a lot easier on the post to manoeuvre around the top line as well as the heel counter area.
-
Welcome Ron.May your learning here be always fruitful and enjoyable.I will look forward to seeing your future projects.
-
What Kind Of Sewing Machine Is Best For Sewing Handbags
RockyAussie replied to BlakeSmith's topic in Sewing Leather
We have several machines for doing handbags. You have already the large end of the range as do I, so I can only think that you need a smaller cylinder arm and perhaps a flat bed. I have a very nice Adler feed wheel post bed, but for bags it is not hardly ever used. A Pfaff 335 sized machine gets the most work on bags here but that is possibly due to the bag styles we mostly make. Check my web page to see the range and I can say that most of the products you see there at some stage go through the smaller cylinder. Not knowing exactly what you want to do bag wise it is hard to say and if you have some pictures that may help. -
 Very nice and tidy work from you as always
 -
Me too
-
Work in Progress...
RockyAussie replied to YinTx's topic in Purses, Wallets, Belts and Miscellaneous Pocket Items
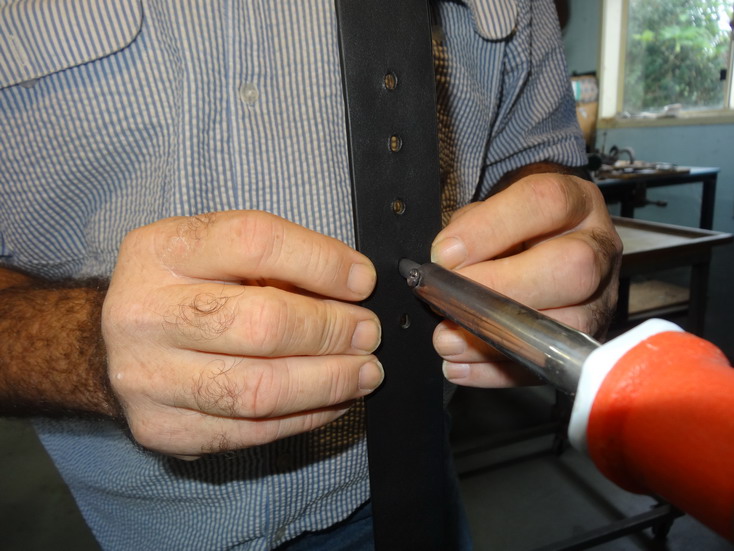
I think that a little light edging or dye even would work in combination with a bit of ironing in. See picture of ironing in some edging. The iron by itself without edging will also get rid of the fuzzies. I run mine through a light dimmer switch to control the temp but they have a lot of flasher type stuff these days. Practice on some similar weight first to get the hang of it. Regards Brian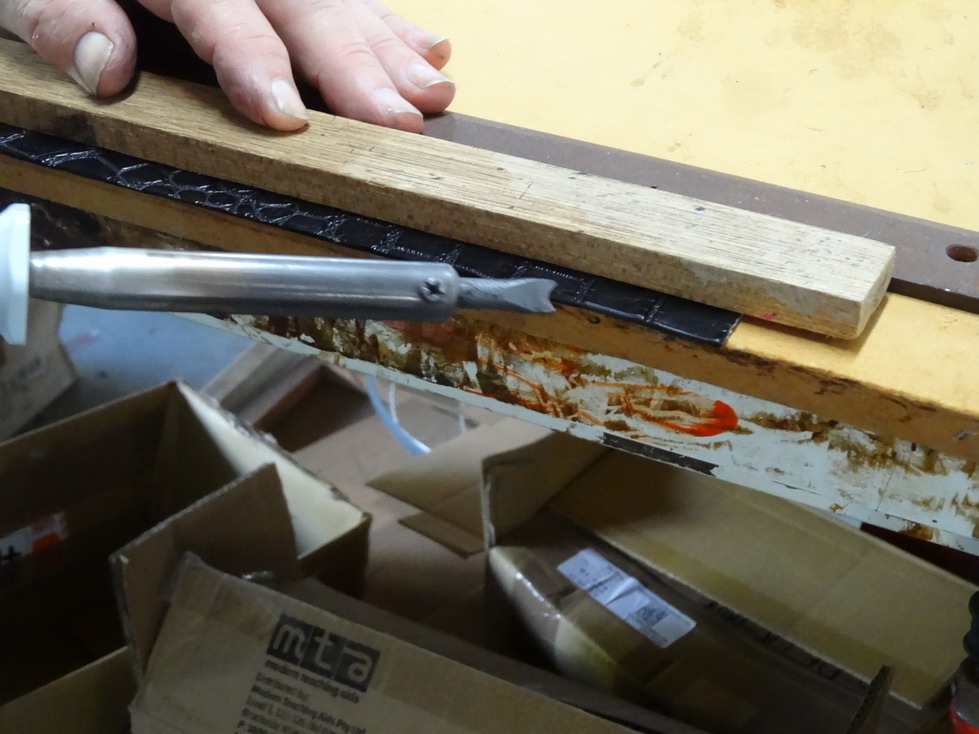
-
Odd Adler Cylinder Arm Machine?
RockyAussie replied to Chuckydownunder's topic in Leather Sewing Machines
Man you could have a lot of fun playing with that one I reckon. Have you seen it going? -
Work in Progress...
RockyAussie replied to YinTx's topic in Purses, Wallets, Belts and Miscellaneous Pocket Items
Hi Yin Tx. I am curious about what you are going to do about the fuzzy raw edges. You are doing a beautiful job of the stitching but I would have ironed / sealed the rough edges before putting together. A bit of wetting will reduce the look but pretty hard and tedious I would have thought once you get this far. Just wondering maybe that is the look your after?Regards Brian -
Excellent work and thanks for sharing.
-
Some I would liked to have but at the end of the day you have to have the money to legally do something about it if it is infringed. Or more than the other guy at least. I have done one I think it will have to get done in bulk in China and quickly mass marketed before others come up with their own versions of it.It is a manual lever device for pulling out Lantana and such weeds, can dig trenches pull out star pickets and many other change tip applications.It is mostly useful for rural and landscape applications.It has the power to allow an average person to lift a shipping container of the ground on one side.At this stage I just need to win the lotto though.
-
Work in Progress...
RockyAussie replied to YinTx's topic in Purses, Wallets, Belts and Miscellaneous Pocket Items
Well this is a bit suspensfull (my new word by the looks). I see a mistake here but don't worry I'll let you know when your finished. Just kiddin. I hate LOL so I'll just LOQ -
I think what your looking for you should find in this following link. They have embossing machines, letter sets and all sorts. They are a lot closer to you than me.http://www.howardimprinting.com/
-
Thanks again for the trouble Eric.I just happen to have one down at the moment.Regards Brian
-
A bit of stainless around 1mm thick should do it. If your not to worried about looks I have been guilty of cutting up a steel ruler before and bending to suit a particular application.They are normally quite springy. As you have probably noticed a lot of my tools are more about function than looks.
-
Fantastic as usual Alex. I wish there was more of a market over this way for holsters (Australian gun laws) as work like yours is always so inspiring.
-
 Wow
Wow