


RockyAussie
-
Posts
3,265 -
Joined
-
Last visited
Content Type
Profiles
Forums
Events
Blogs
Gallery
Store
Everything posted by RockyAussie
-
I think the .8 looks better but neither example looks to have been rubbed or tapped down and in some products the .6 mm could look better after tapping.
-
Have you tried a hot water and detergent soak? If you can get a good start at an edge try brushing along in between while gently pulling apart. If no go try methylated spirits and same process. Cut out small sections for trials first I think.
-

Skiving Machine and Stitching Seams
RockyAussie replied to SonderingSusan's topic in How Do I Do That?
The second lot look like you have got it a lot better. I could not be sure but it looks like your using LR point needles and in a seam that the stitching is not seen I would recommend either a TRI point or even round points.If the leather has a stiff surface as it appears too I would think it not a good leather for that application perhaps.Now that I see what your trying to do I I would not stitch into the skive at all or at least keep the leather over 1mm thick. When you tap the leather down try gently warming it with a heat gun first until quite warm to hot, then rub from the inside with a smooth ended hammer or slicker until nearly cool (about 1 to 2 minutes normally here). Then tap around gently onto a dolly until it looks right. Also make sure the thread tension top and bottom is tighter than normal.I hope you got to see my skiving videos as I have seen you having troubles with this in the past and was hoping they may help you some. I forgot to ask which model Highlead? Regards Brian -
Thanks Sam and billybopp. I have thanked the videographer. Probably have to cook diner tonight now. Have a think about subscribing onto my youtube channel as that way you get notified when I post something new and it don't cost anything at all.More and I hope better coming soon.
-
Need opinions on occasional printing/stamping
RockyAussie replied to SumpinSpecial's topic in How Do I Do That?
Just another thought... They may be willing to supply the leather piece separately unattached and that would save a lot of mucking around perhaps. -
Need opinions on occasional printing/stamping
RockyAussie replied to SumpinSpecial's topic in How Do I Do That?
There are tons of different ways to do this but I would say a picture of the product and where it needs to go would be the best place to start.Just had a look online and from what I see you could just replace that strap. I am surprised that they offered the dogs name at no extra charge as that would need be set up each time which would take some time doing. I make products for a lot of different brands and that costs no more as the stamps are made up once and reused sometimes hundreds to thousands of times.That time is then no more than any other. I would suspect that foil stamping would be the answer on firm chrome leather. This could be done locally no doubt by someone who has 1. a clicker to cut the shape out repetitively and store and 2. an embosser with a font style you think acceptable. This would take an experienced person around 10 to 15 minutes per time. As a one off I would not touch it myself as it would take too long. If you paid for the clicker knives and prepaid for 20 or 50 leather pieces to be made ready for stamping I think you may interest someone. If you check my website you will see where I offer free monogramming on my products. The foils can be gotten in all sorts of colours. Hope that helps some. Regards Brian -
Thanks gigi I hope to see a post of yours going soon.
-
Thanks Chuck. I hope to do a few more in the near future.
-
Here are some videos of skiving with a new roller foot and some of the advantages this roller foot is capable of. Having worked with many various leather types over the years including glazed finished crocodile I found it necessary to have a skiving foot that did not scrape the top surface and allowed leather to go through more smoothly with less friction than the normal supplied feet can give. I made up my first roller foot by cutting down a spare normal foot and making a brass roller to fit onto it. This roller has almost never come off the machine ever since except for the occasional polish and oiling. Steve or on this forum member Singermania kindly provided me a couple of manufactured roller feet to try out. The long one interested me the most as I could see a few applications it could be good for. Unfortunately this foot did not fit straight onto either my Fortuna or FAV skiving machines and some modifications were needed but in the end I think well worth the trouble. The first 2 videos are all about the foot modifications and the last is a bit long but shows me trialling out some skiving operations. I hope these are of some help to any of you that are trying to master their skiving machines. Regards Brian
-
No sorry. I have a set up up on a couple of Pfaff machines here with Variostop motors but the part you have outlined is only to regulate and lubricate the air cylinder that lifts the feet when pushing back on the foot pedal.
-
Trouble with PFAFF 1445 stitches in Veg tan
RockyAussie replied to chasman52's topic in Leather Sewing Machines
Could be just bad bobbin winding. If wound too tight onto bobbin the threads can get caught under itself on and off and thereby tension up and down. Make sure there are no ruff edges around the bobbin as well.Try a dry run of bobbin in case for any roughness.Clean and oil. -
Showing some stuff!
RockyAussie replied to ruffwerkz's topic in Purses, Wallets, Belts and Miscellaneous Pocket Items
Very nice looking work and detail on edging. Am curious what the leather showing is behind the buckle tongue in the crew punch area? May have to change your logo to Not So Ruff Werkz I think. -
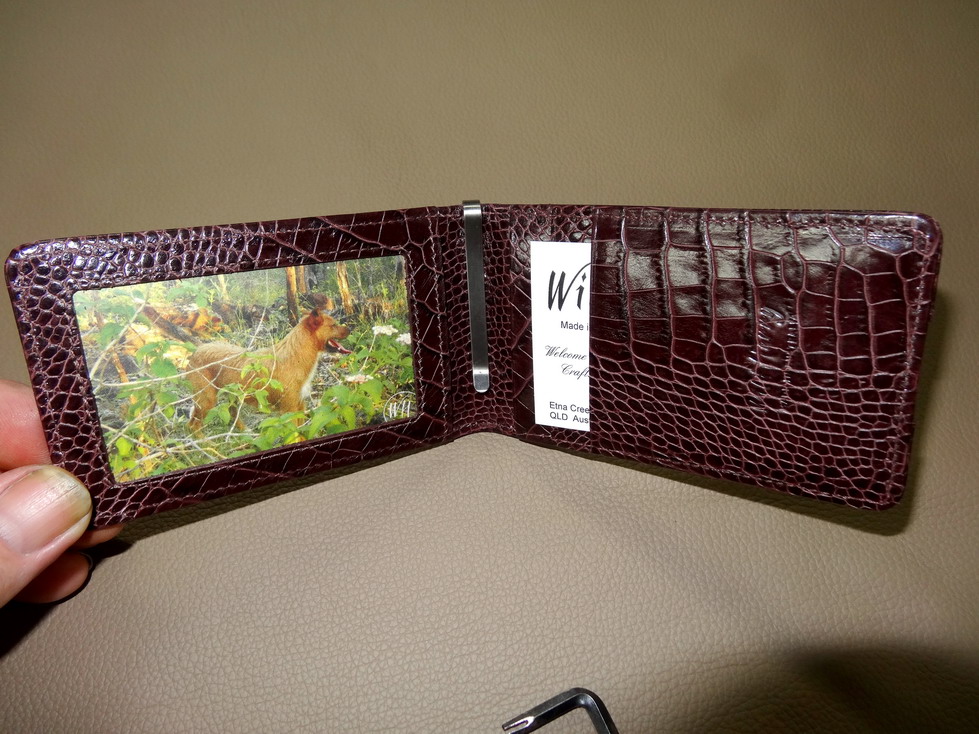
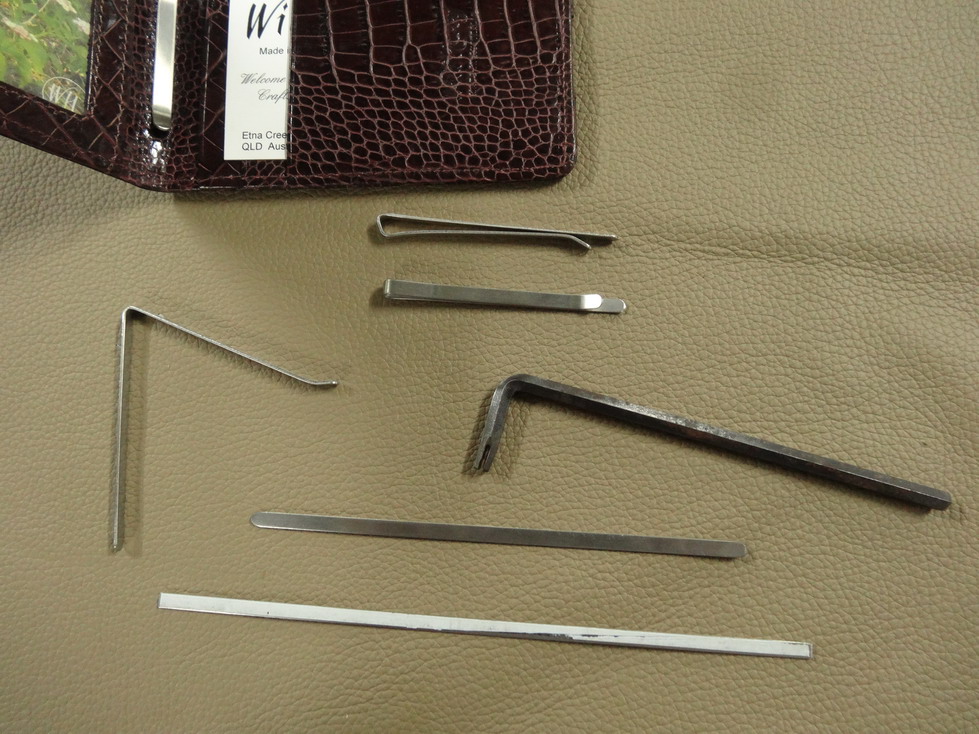
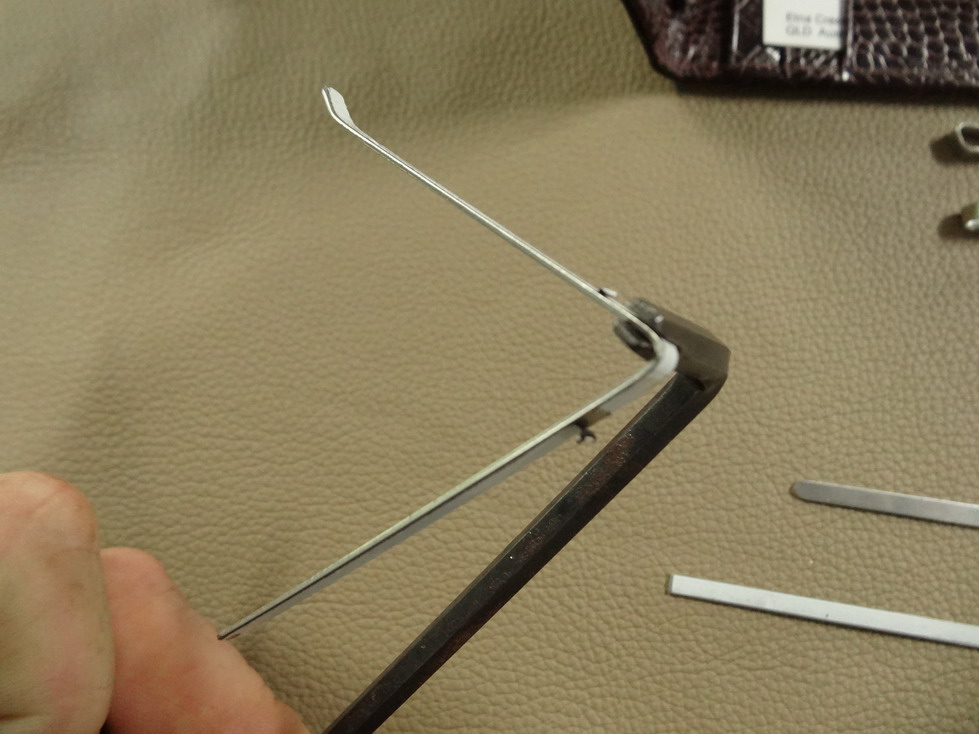
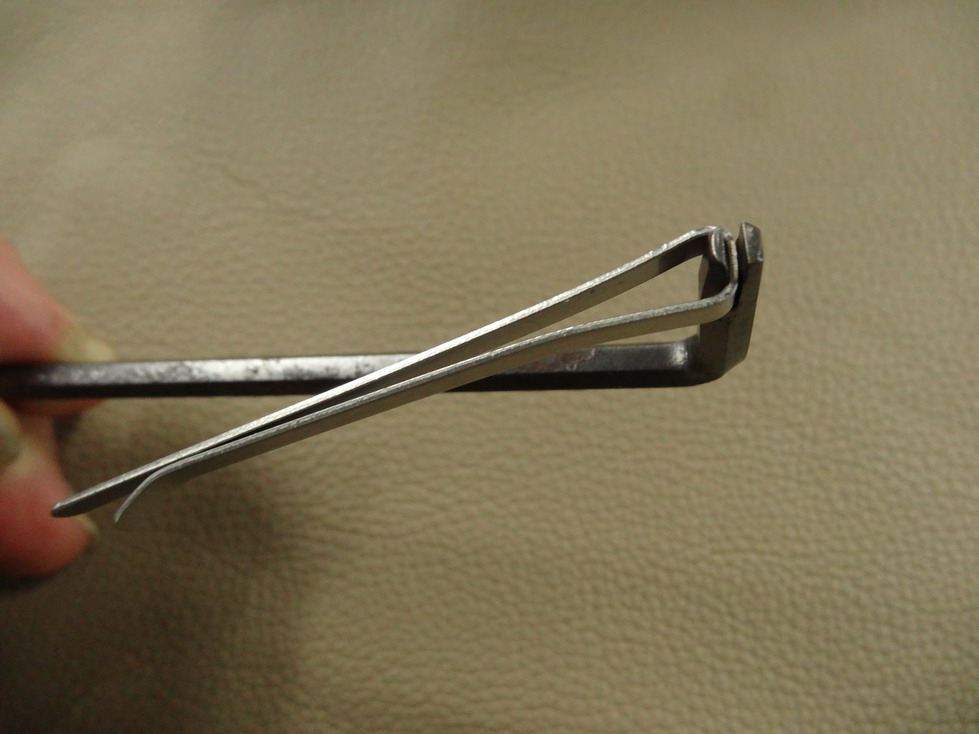
Not sure if this is the type of clip you want to make but thought it might help a bit with ideas at least.See pics This shows clip in finished billfold Piece at bottom shows as cut from stainless steel supplier cost about 70c per This pic shows bending angles with allen key that I have cut slot into.Plastic still attached. Final bend done and tapped with mallet at bend to make more springy. Hope that inspires some at least. Regards Brian
-
I'm using .9mm and I have been doing them on and off for 4 or 5 years and never yet heard any problems or complaints. I don't use bill folds myself so I can not be 100% sure.The strips cost me about 70c each and take generally with practice about 5min to sand and bend into shape.I cut a slot down an allen key to enable the close bending operation.The bending is done with the plastic protector sheeting still on. I will get you some pics if you want.Regards Brian
-
I am curious if the one on the left lifts up on a spring tension thing or not? I make one for a bill-fold style that we do occasionally and that is not all that hard to bend into shape. I start by getting a place that works with stainless to cut me some thin strips and then I just cut them to length and sand the end rounded then bend them into shape with a tool I made up for the job. Something to consider and it gives a point of original difference to your product..
-
Hi Dorothy Given the thickness you state around 3mm it would stitch that fine but I would think it is still likely not a good starting point machine. What I was trying to say is that in my factory I have quite a few various machines and I could give you a quick run through on them and what they do.Our web page shows a lot of bags and wallets and such and these are all done on lighter machines than the this Singer. The Cowboy will stitch up in the same thread sizes and thicknesses as the Singer your looking at and would give you a good idea as to whether it is too much or not, in regards to size.Re the servo motor the Cowboy has one on but many of the other run on clutch motors like the Singer and some have clutch Efca with needle positioners and so on.
-
Hi Dorothy, I think that is a pretty good price for this machine around this neck of the woods at least. I am out Etna Creek ways if you want to talk. Check my web page it has contact details or just PM me a message. I am not too sure if this size is what you would want for bag making normally but I do have a Cowboy 441 here if you want to check it out for use.
-
Nice looking gear and would love to have the type. PM me if you like with contact details. I am up in Rockhampton but may be able to get a brother down there to help collect.
-
Horween Tumbled Essex Bag
RockyAussie replied to 9tpi's topic in Purses, Wallets, Belts and Miscellaneous Pocket Items
Well done. I bet you had some fun doing the edging on it though. -
I do a similar process as well if I am concerned about the adhesion of the foil due to whatever finishing products may be on it. I do think though that 325 is a bit to high and if following with foil you would have to put the pressure down very light and the time very fast in order to not end up with a big blur. On stiff leathers maybe alright.See this link of the machine type mentioned-
-
That Juki looks good for the job but I cant say I have any experience with the thin shaped throat plate as yet. The small end is a great asset when doing tight curves as in wallets etc. The way I design a lot of my wallets I can stitch all the way and across the bridge area as well. A check on my web site should show some I think.I way prefer the table with the cut out in the middle as it gives somewhere to put extra bits to be stitched a lot of the time without needing to of feed of a trolley which does slow things down.
-
Skiving Machine and Stitching Seams
RockyAussie replied to SonderingSusan's topic in How Do I Do That?
Happy St Patricks day to you as well if it still is I guess. I cant say I know of any books or video's on stitching in an overall all encompassing way. I guess first thing is are you hand stitching or using a sewing machine and what type if you are? I have too many sewing machine types to mention and although they all mostly work to sew and join stuff together in a similar sort of way they all have their own, can I say personalities. This week I had an operator who could not understand why the edge of the tote she had sewed up when put into shape showed the stitching thread so much down the edge. The tension looked fine and the knotting looked to be in the middle? This machine previously was still set up for very light duty work and the tensions were set to not pull the fabric out of shape on credit card pockets.By tightening the bobbin 1/2 a turn and the top tension about a full 3 turns we still ended up with the knot in the middle but the tightness of how it held was a world of difference better. The point here is that it can take a lot of practice to get the end result desired and sometimes a little advice can help.I would love to see your picture of the seam whenever you are ready. Regards Brian -
Cowboy 4500 / Cobra Class 4 Questions
RockyAussie replied to JeffGC's topic in Leather Sewing Machines
Thanks Uwe and Jim Timber. I have recently bought a 441 with a guide rod that is mounted along with the bobbin tension discs. What threw me here is that my understanding of doing the tension on this machine is to tighten the second tension 1 turn to 1/2 half turn at the primary tension. As Uwe kindly has shown in the pic above I believe the surface contact area on the thread would be more than if going straight down to the secondary tension. Therefore has that procedure of tightening the 2 got to be done any differently? Regards Brian -
Hot foil or just blind stamping with the heat and a decent hot foil machine will work most of the time on chrome, but sometimes maybe consider a Veg badge stitched on as some leathers just won't behave almost whatever you do.
-
Cowboy 4500 / Cobra Class 4 Questions
RockyAussie replied to JeffGC's topic in Leather Sewing Machines
Would it be too much trouble for a pic of this Steve. It sounds like the tension discs would be nearly fully surrounded by my understanding.