


RockyAussie
-
Posts
3,265 -
Joined
-
Last visited
Content Type
Profiles
Forums
Events
Blogs
Gallery
Store
Everything posted by RockyAussie
-

How to make a linesmans pouch and use a Cowboy 441
RockyAussie replied to RockyAussie's topic in How Do I Do That?
Thanks, main thing is that the customer thinks so too. -
How to make a linesmans pouch and use a Cowboy 441
RockyAussie replied to RockyAussie's topic in How Do I Do That?
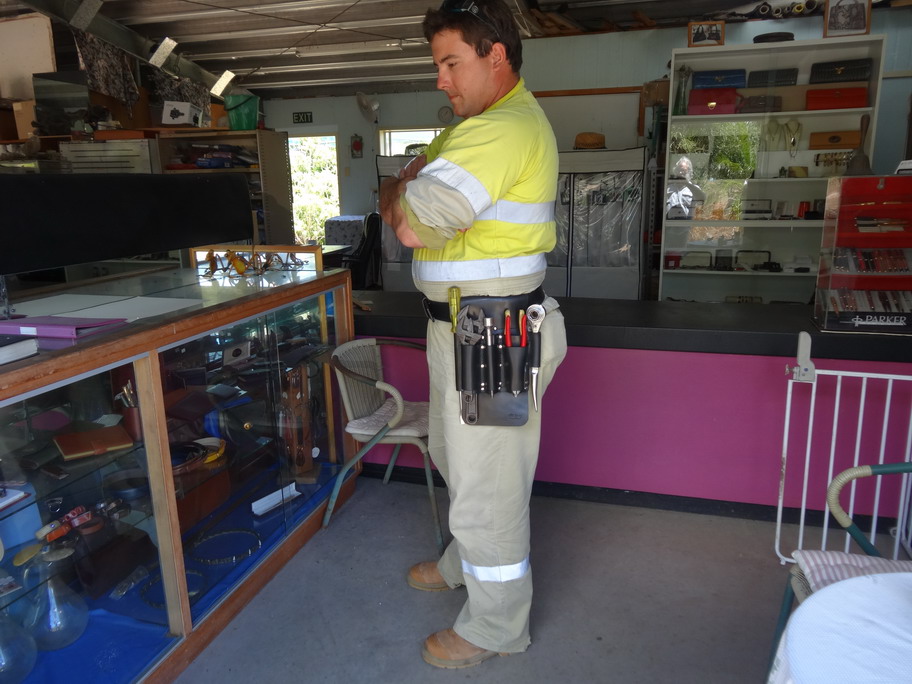
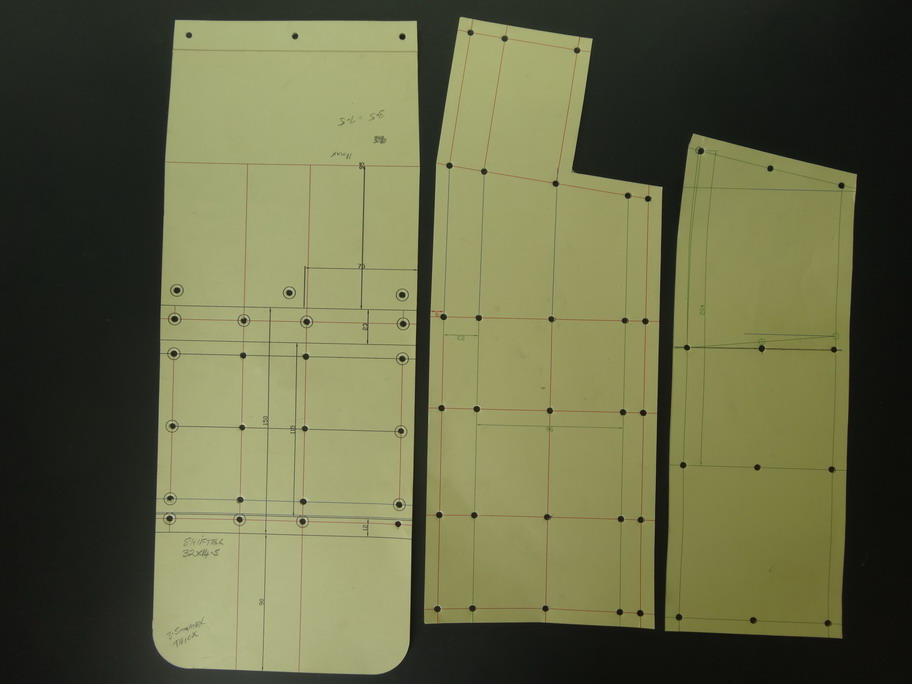
I have done up the patterns for the linesman's pouch to the best of my ability for A4 printing. Please let me know if there is any problems in printing and make sure that the printer is set to print 1 to 1 or full size. The new owner/ customer picked up the pouch yesterday and kindly posed for a couple of pics and he was very happy with the new pouch. Brian Linesmans pouch for A4 printing.pdf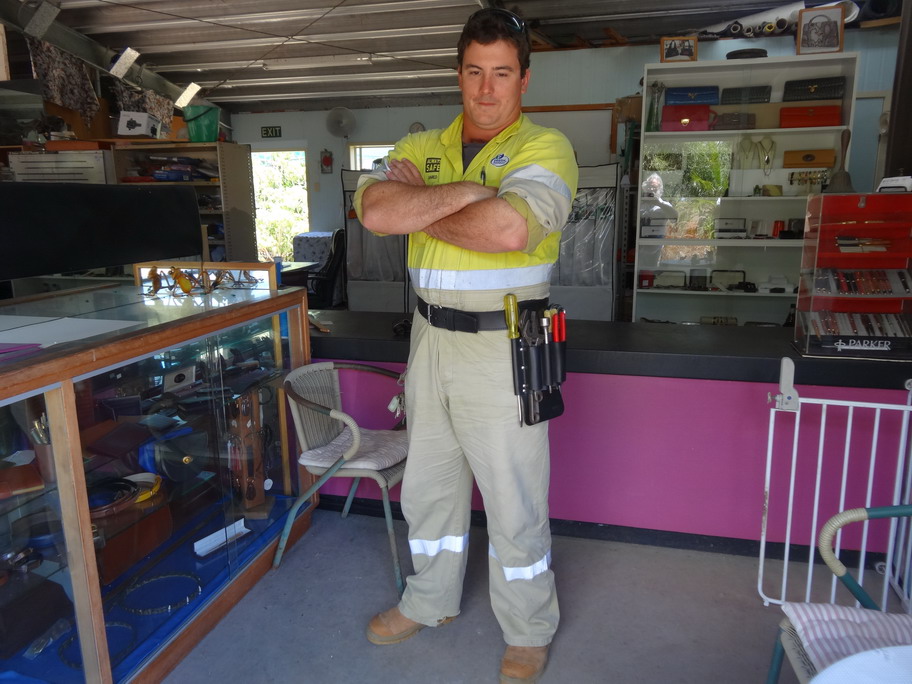
-
Nice looking machine. These have always been a favourite of mine and I still have 4 of them. They use very little floor space compared to most other sole stitches. Only problem has been getting hold of the presser foot wear block. When it wears off on too much on an angle on the right it makes missed stitches a problem. I found replacing them with a new one makes a world of difference. The one in your pictures looks still good. If you can help with finding this part at a reasonable price I would be very grateful. Regards Brian
-
How to make a linesmans pouch and use a Cowboy 441
RockyAussie replied to RockyAussie's topic in How Do I Do That?
I have for years had a preference to using the thread in this pdf attachment.shann_Strongbond_spec_sheet.pdf I have over the years tried a lot of threads and this has always given the least sewing problems. Unfortunately here in Australia they only stock black and white in the 277 range. -
How to make a linesmans pouch and use a Cowboy 441
RockyAussie replied to RockyAussie's topic in How Do I Do That?
OK. I will draw up a couple of ways and sizes with a lot of measurements. -
How to make a linesmans pouch and use a Cowboy 441
RockyAussie replied to RockyAussie's topic in How Do I Do That?
Will do tonight if I can. The only thing is the A3 printer I use is not long enough for the larger piece in length in one hit. I had to print out and cut the top and join. So I am wondering what is a paper size to put it on? A3+ should work but is that tits on a bull for most people? Regards Brian -
How to make a linesmans pouch and use a Cowboy 441
RockyAussie replied to RockyAussie's topic in How Do I Do That?
Cant say for sure as I've had it a while. It appears to be a chrome tanning, quite compressed with a possibly urethane top coat. I tried casting with it a while back in hot soapy water and whatever I tried it just dripped the water off and laughed at me. I did manage to cast a gun pouch with it but that took some extreme pressure. I have to say bending sheet metal is probably easier and I don't think I will be any hurry to use it again. The fact I got away with stitching it on this CB 441 at this hardness and thickness did surprise me. -
How to make a linesmans pouch and use a Cowboy 441
RockyAussie replied to RockyAussie's topic in How Do I Do That?
Thanks for that idea. It would save a lot of time if it works. I will try and find local and give it a try. I think they may need a washer on the back to hold but that should not be a problem. The length they can get through to hold in this case up to 11mm (7/16") may be an issue as well. I love the idea a lot. Regards Brian. -
How to make a linesmans pouch and use a Cowboy 441
RockyAussie replied to RockyAussie's topic in How Do I Do That?
I would be happy to give you the patterns for free but you have to consider that it is made size wise for the actual tools in it. Are you able to take DXF format? Or which file format can you use? Instructions on how - as this was my first I would wait for a few days and see if any other members can input any better ways of construction as this took more time than I thought with all of the bolting etc. -
Just playin' with my laser.
RockyAussie replied to Wedgetail's topic in Purses, Wallets, Belts and Miscellaneous Pocket Items
Lookin pretty good mate -
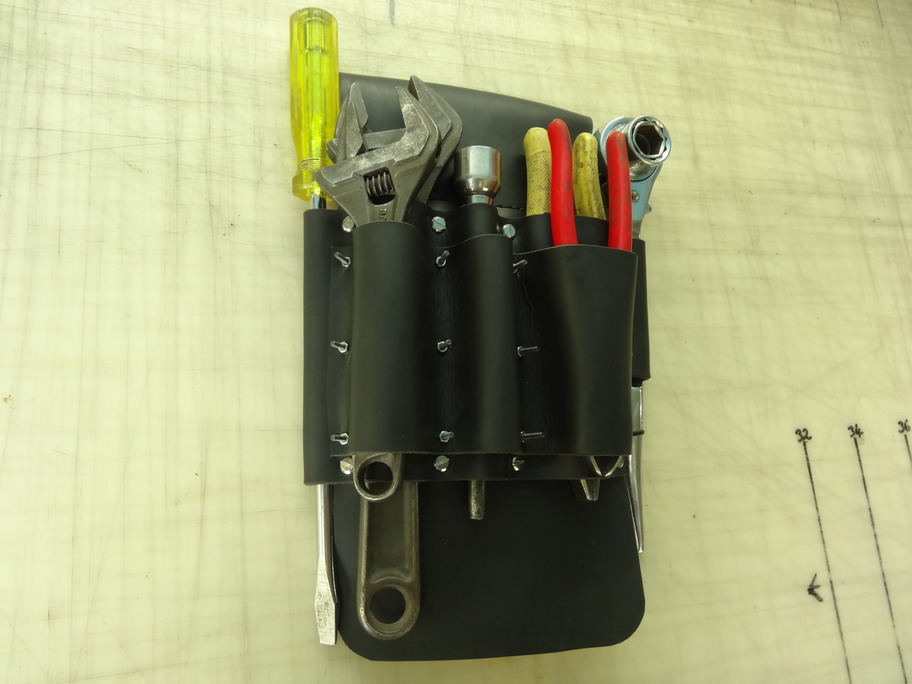
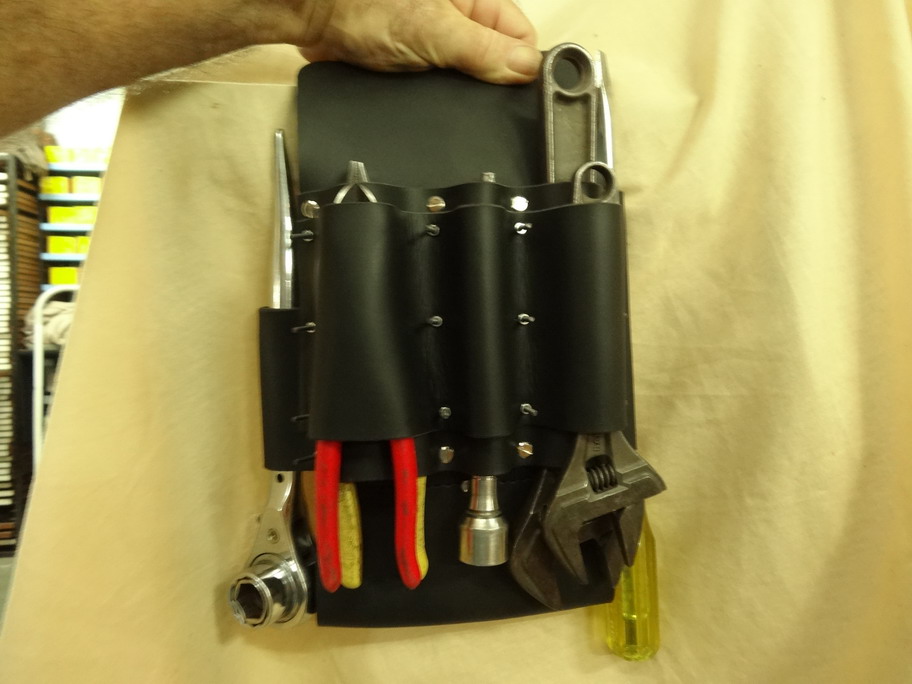
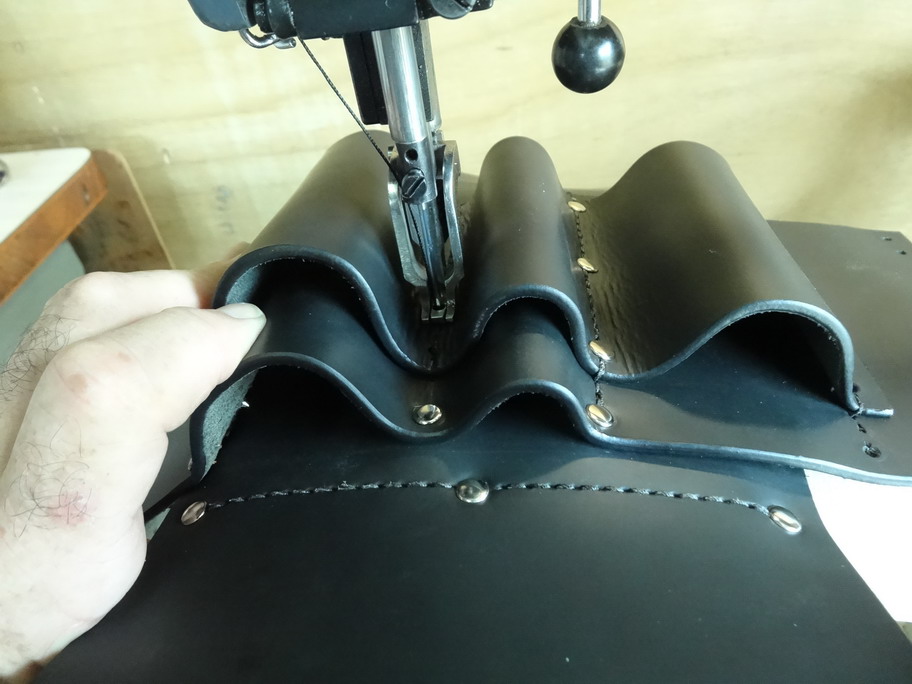
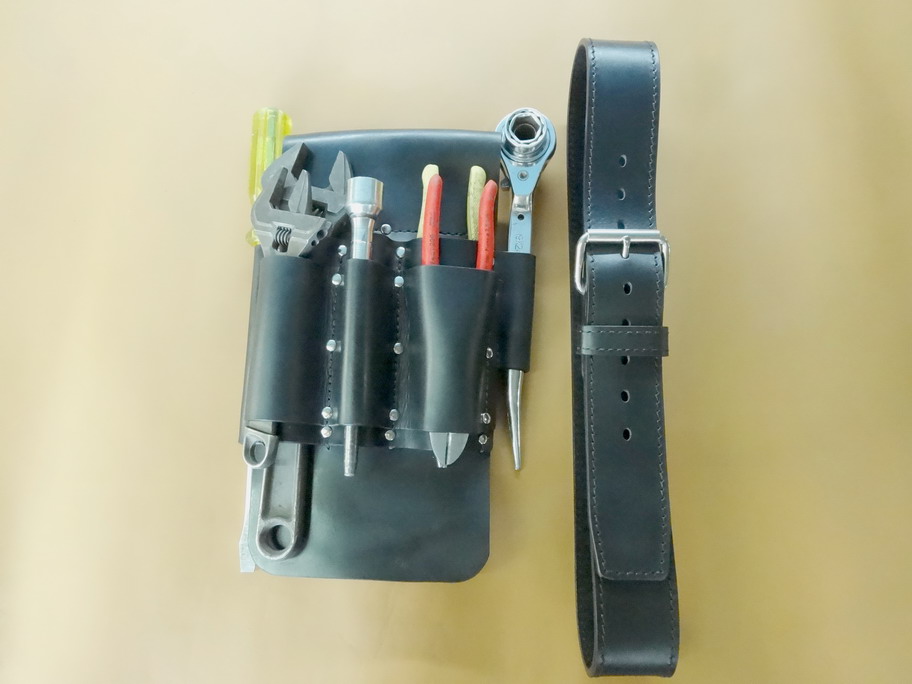
This is how I went about making my first heavy duty linesman's pouch.there have got to be easier ways but for now this is what I did. I got a call from a guy that wants his own pouch as he is left handed and also wants the tools to slide in easy and not fall out when upside down.Leather has to be waterproof and as thick as 3.6mm (9oz) to remain durable as possible.No problem!!??. First step buy a big Cowboy sewing machine and spend a day learning how to use it and find its capabilities. This resulted in knocking it out of timing as I found it could stitch OK going forward but would not pick up the bobbin thread going backward. A search on the net showed some videos on the subject but the best info I found was in a Juki engineers manual which gives clear measurements I found referenced in L.W. After getting in the right needle and thread (277-10metric used top and bottom) I proceeded to CAD out some patterns as shown below. Second pic shows leather cut out and bolted together to test pattern. Picture 3 shows back view. 4 shows the test hanging upside down works Pic 5 shows the outer third piece stitched to the second piece. Pic 6 shows stitching the outer stitched layers onto the back layer by sewing through and following the same holes and removing bolts on the run. Bit scary but all went well. Pic 7 shows the finished pouch with tools in and it tested good. Last pic shows the belt that is suede backed and measures 6mm (1/4") thick stitched here with a 230 size 26 LR needle except for the keeper. Any tips and criticisms are most welcome. Brian


-
Not so easy to answer as there are a lot of different sizes we make . The larger bags because they are so large have to allow for a shorter person to not be dragging along the ground if holding in the hand but not so short to be uncomfortable if put over the shoulder. A starting point would be from the top of the bag to top of strap at shoulder would be about 10 to 11 inches. Often we make some adjustable to allow for different customers requirements. Regards Brian
-
Tote Bag
RockyAussie replied to LeatherLegion's topic in Purses, Wallets, Belts and Miscellaneous Pocket Items
What size and breed may I ask? -
Tote Bag
RockyAussie replied to LeatherLegion's topic in Purses, Wallets, Belts and Miscellaneous Pocket Items
Looks like its shaping up not too bad. I think the needles might not be LR and may have looked a better stitch but if you are using round points that would be what you need for the webbing anyway. I think folded leather straps would look good though. -
For production work I have found the Variostop very useful and if you check out the video our local newspaper made showing me making a key tag it shows the advantage of being able to quickly and easily lift the foot which is where the air comes in to use a lot. It does not use much air but I have had to replace the little switch valve which opens the air path once. I think it cost about $35.00 from a common air switch supplier. Here's the link http://www.themorningbulletin.com.au/videos/wild-harry/43913/ Best of luck Brian.
-
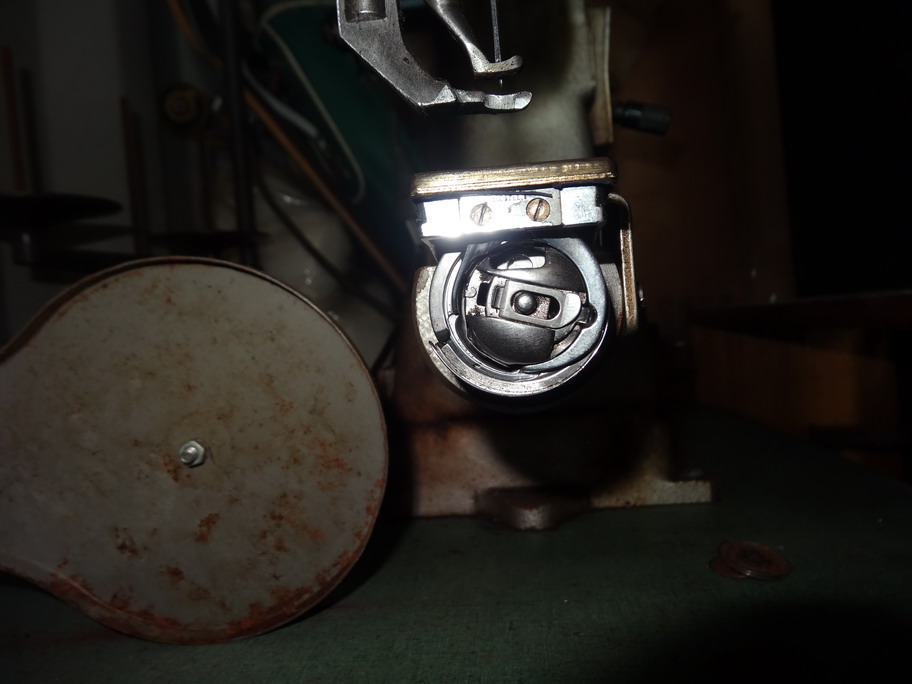
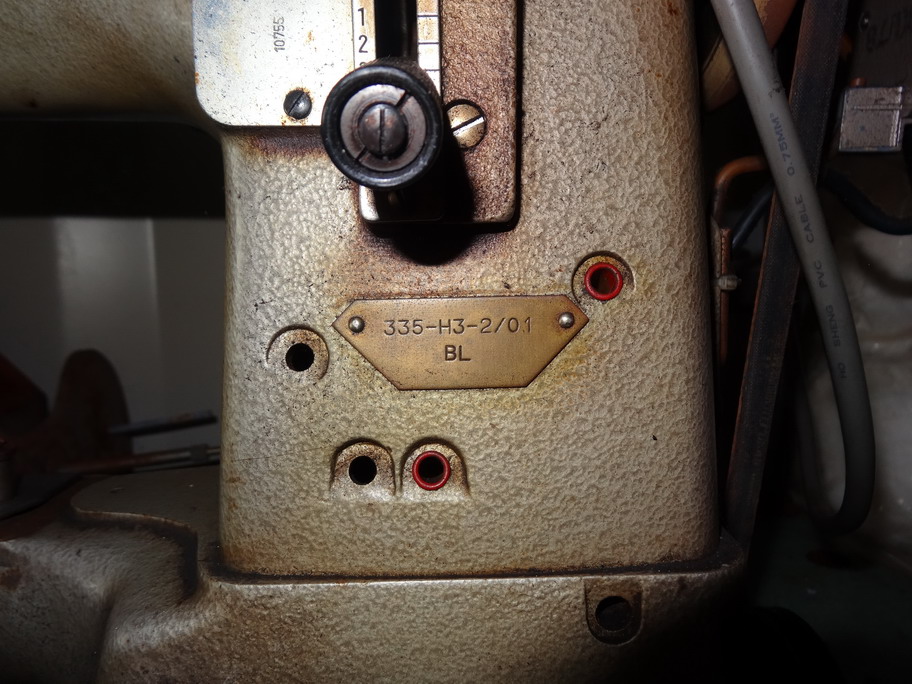
Are Pfaff 335 and Adler 69 cylinder arm caps interchangeable?
RockyAussie replied to Uwe's topic in Leather Sewing Machines
I just checked my 335 and it has a closed end cap part Pfaff no 14638. The 69 Addler here wears a pfaff cap as well but has been shortened back about 1mm. The shorter cap will go on the 335 a bit far in but still clears the hook etc. Note the end on your 335 looks different to mine as pics shows I hope. Hope that is of some help. Brain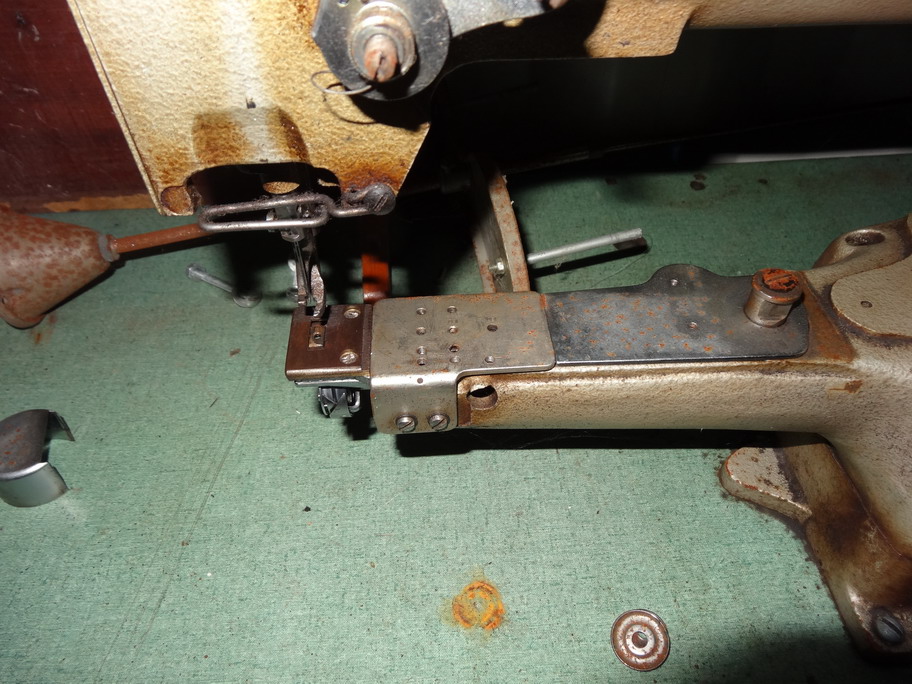
-
Be that I mostly use machines I would not see any problem using the right sewing machine for the job. The hardest thing I think is stitching small zipper pullers that are profiled and made from crocodile.
-
For most of the totes we make they have drop in liners and I doubt you would have any luck using a Cb4500 to sew the lining at those thicknesses. I would say you would be better to go with the liners attached to give more substance to sew with. If you don't want to do edge coating having structured bags will be quite difficult to accomplish.I would put a 335 on my shopping list. Check my website for totes as they are done with a small cylinder arm machine mostly. Having just bought a CB 441 I hope to do some new totes using it sometime soon with different construction methods. Regards Brian
-
First Project
RockyAussie replied to ZATARA's topic in Purses, Wallets, Belts and Miscellaneous Pocket Items
Stick with it. For a first that is very good and tidy looking work. Brian -
Congratulations. I am full of envy.It looks very clean and tidy and I hope we get to see some of your products soon. Brian
-
Just curious which machine you stitched up with? The bottom and top look similar size thread and quite equal in angle/tension. I would have guessed a bigger machine than a 335. Just got a Cowboy 441 to try out as I hate changing bobbins so much. I'll let you know how she goes when I get it sorted out a bit more. Small LR needles and threads over here are a big challenge.Regards Brian
-
That is what is so good about this forum you get to learn something new every day. In the 30 + years I have been manufacturing and using these machines I have never heard before that the correct tool was sandpaper glued to a stick. I have only ever bought the stone in the stick type before as shown above and in the link I referred to. Thanks electrathon.
-
That is unless the sandpaper gets caught in the bell.
-
Nice design Gigi and the folded edge came out well and saves a lot of edge coat time I think.
-
I saw in Campbell Randall Parts available for Fortuna/ FAV skiver. http://www.campbell-randall.com/shop/index.php?route=product/category&path=49_76_114 About $9.00 sounds pretty good. Also take a look at this roller foot as I would recommend it if you don't have already.. http://www.campbell-randall.com/shop/index.php?route=product/product&path=49_76_114&product_id=14495 Regards Brian