


RockyAussie
-
Posts
3,265 -
Joined
-
Last visited
Content Type
Profiles
Forums
Events
Blogs
Gallery
Store
Everything posted by RockyAussie
-

Cowboy CB4500 vs Cobra Class 4 Comparison
RockyAussie replied to Wonderboy's topic in Leather Sewing Machines
There are a few differences but I think you need to advise what type of work you want to do more fully as both machine types have sponsored this site I think and it may be a bit ticklish to get the best answer and few will have a good knowledge of both. An enps is great when you need to do a lot of repetitive stop and start work and I love them but I don't have one on my 441 and don't really miss it there. Dealer wise you might be better off with the CB 4500 as I am unaware of a local agent for the Cobra but I don't know of that for sure. There are a few rough bits on the Cowboys and I think some parts on the Cobra are better finished off but I haven't had too many problems or issues with mine I have to say.If you get up this way feel welcome to come and try out mine. I look forward to any other user comments as well. -
Hopefully I'm too far off to be sued but make sure if your stitching webbing that you don't use any leather point needle as it will cut and weaken. A point only style I'd recommend.
-
Glue alternative to lining wet formed items with suede
RockyAussie replied to BDAZ's topic in How Do I Do That?
Thanks Bob. I have never done or thought to wet form with the suede attached before. I can see a lot of potential with this product for attaching cut out pieces to other pieces and I will have to give it a try if I can find where to get it here.It could save a lot of time when making some products like these picture below I think.
-
I have some machines that when you push on the pedal with your heel the foot lifts so I would think that if you had an arm loop connected to the pressing pad you could lift and get the same effect.One I have is pneumatic on a Efca variostop system and the other is electric magnetic controlled in a similar way and a bit like the thing (can't think of its name) on your car starter motor. The reverse may be easier if a hook above the lever (perhaps a large magnet to attach)and a large rubber band to loop over and hold the lever up. Some time back I bought a heap of them super magnets about 1 1/2" long by 1" wide and 1/8 thick and I found that I can use them in many different ways such as 1" boxing about a foot long can attach to my shed frame and act as a hook to hold sandpaper belts tools and so on.I often use them for holding templates for embossing names as well. Only problems I have had with them is when 2 get close to each other and you have a finger in between (Ouch) and when you get them too close to sharp knife OH Golly Gee that's not good. Hope that gives some ideas to pay with Regards Brian
-
Are you kidding? when that stitch goes wrong and the teeth grind down ....what have you got then.Youd have to do a relaxation course and lock the doors to have any chance I reckon..And can I ask how many people go to the dentist and when your mouths opened they want to ask questions?
-
That looks like an excellent solution. Just curious if it is practical to use your chest for pushing with in order to have more hand freedom still or would that create balance problems? I know when I made a linesman pouch awhile back I would have liked three arms to hold/fight it while sewing at times.Thanks for sharing.Regards Brian
-
CB4500 reverse stitch bottom loops
RockyAussie replied to Zandeosaddles's topic in Leather Sewing Machines
NO. That is wrong as Uwe has pointed out. The (25.9mm) is when the needle is at the absolute bottom. After that when the needle is raised up 5mm the hook tip should be lining up with the middle of the needle then. 2 different steps here . If the needle is in the bar fully and the needle bar is in its correct position the top of the needle eye to the hook tip should be 2.5mm apart as well. Hope that makes it easier. Regards Brian -
Glue alternative to lining wet formed items with suede
RockyAussie replied to BDAZ's topic in How Do I Do That?
Thanks Bob. When you say it takes wet forming without issues can I ask what you mean by that? I think of wet forming as being leather being cast or formed into a shape and I can't understand how you could then use a flat press.Regards Brian -
Glue alternative to lining wet formed items with suede
RockyAussie replied to BDAZ's topic in How Do I Do That?
Interesting stuff. Here's a link I just looked at on the product.https://www.youtube.com/watch?v=dmDvjE14tek I would be curious to know how it would go on a curve with a heat gun.I will have to see if available here in Australia and give it a try. -
That is true, Hermes bought all the large ones awhile ago and the only 2 I know that haven't sold are hard and very expensive to buy from. I can arrange the sale of hornback backstraps if you like as I have thousands of them here. Pretty sure around $60.00 au plus gst + freight will cover it. I think I could sell the hatband/wristband strips that get cut off the side when I make their belts as well. Tons of that here unfortunately. Regards Brian
-
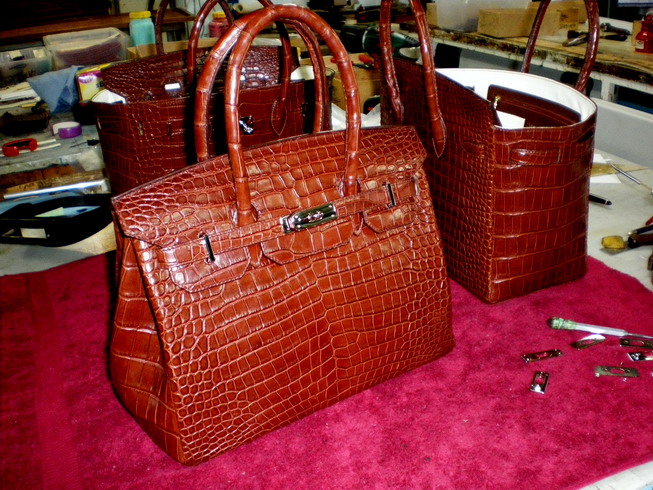
With some leathers that might work OK I'm not sure.I tend to put an isolator fabric on a lot of leather particularly croc to keep it from stretching around and losing shape as you work it. A lot of keeping the shape and movement of the product is better with an isolator fabric backing the leather where it rubs against another piece.
-
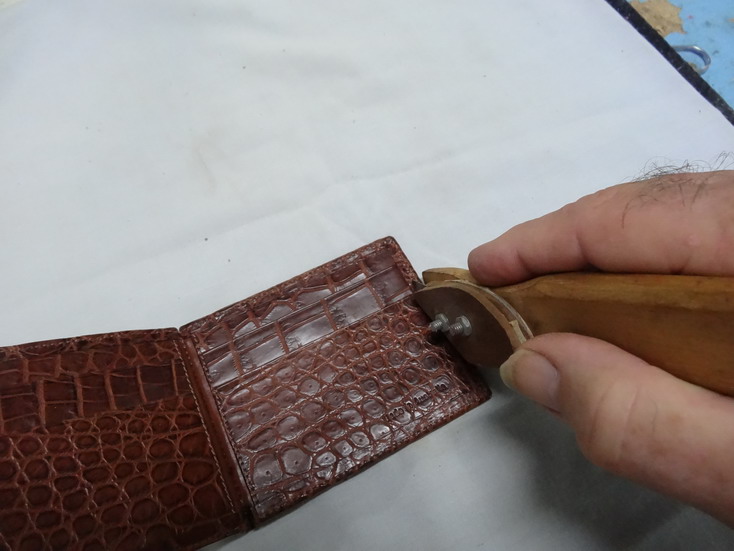
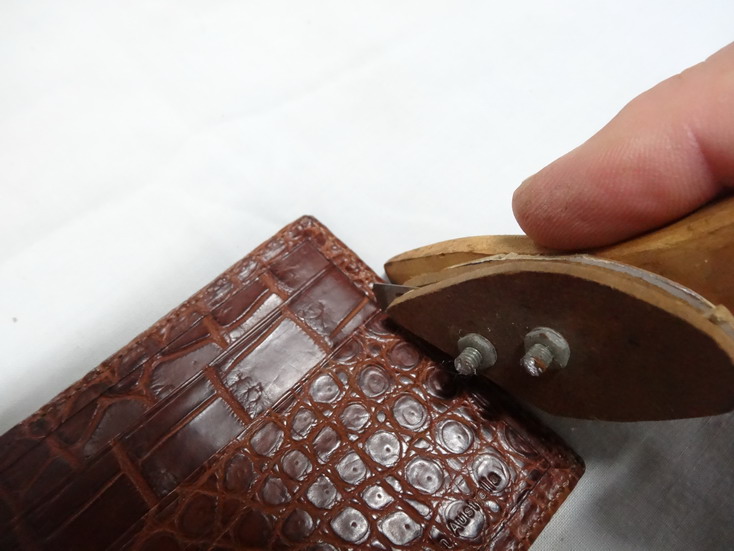
I should have thought to have added that when making wallets like in your video I now use a piece of 1/4" key steel to trim the edges first then fold over. The leather on the outer skin and the inner is in this case contact glued well before trimming.Trim and fold and a little bone folder edge slicking Done.Way quicker.
-
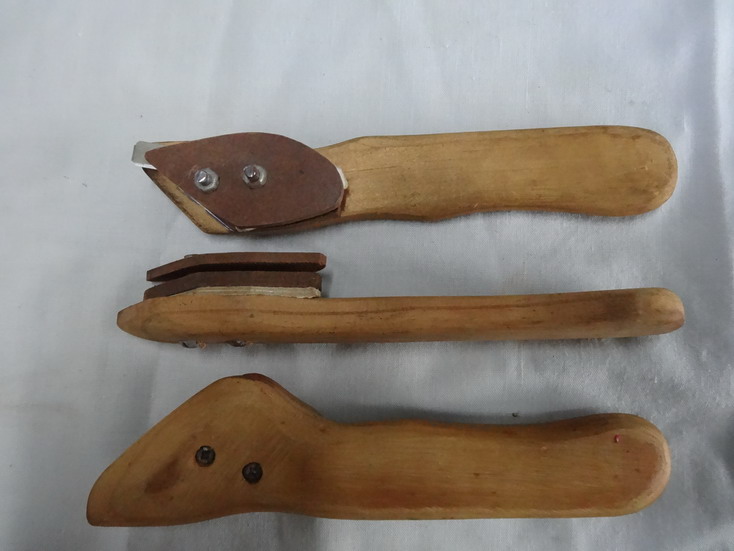
It looks like it could be a piece of venicion blind slat maybe. I don't use that method much any more unless I'm doing a french edge as in the Video Tom has suggested.Sometimes I use a bit of plastic but with practice and a sharp blade you can do without.I made up some tools when I had a large run on and they worked great and saved a lot of time. One edge rests on the wallet edge and the blade is spaced to give me the distance and angle to cut nicely.No ruler needed. First tool took maybe an hour but the others were a lot faster. Here's some pics of what I am talking about.
-
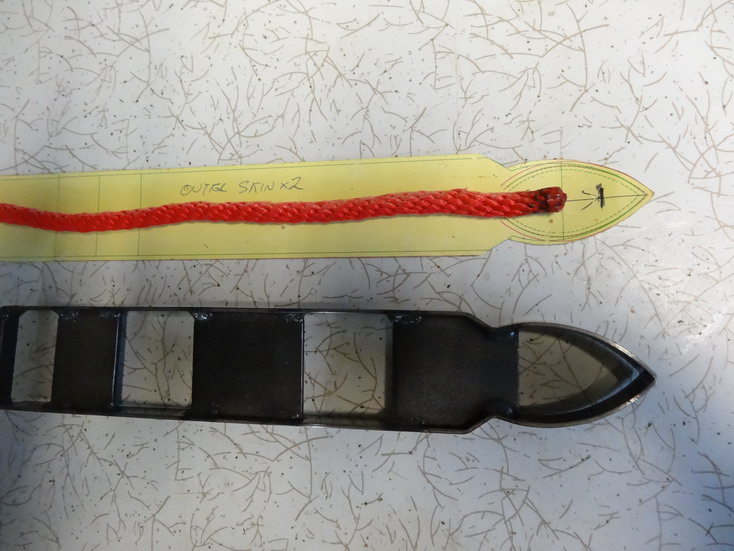
I should have thought to mention that you will get better results by putting an isolation fabric around the rope first with no glue touching the rope except at the ends. Then you can glue it in place in the leather without losing the free movement of the rope inside. It makes the handles more easily move and stay in place better. Regards Brian
-
The size would depend on the bag size and weight etc a bit but I mostly use some 10mm cord like in the picture here. I make the pattern where the stitch line up wider to start and trim down after I stitch. Self taught and there may be better ways. Here are some pics that may help some.Sorry I have not some more of the break down.
-
CB4500 reverse stitch bottom loops
RockyAussie replied to Zandeosaddles's topic in Leather Sewing Machines
Excellent video as always Ewe. I found a video that I initially used to time mine and still had problems with missed stitches in reverse etc and when I followed the Juki guide as best I could it then went perfect. There was a large difference in the 2 different procedures as to where the hook ended up in relation to the needle height. The 25.9 height from the bottom of needle bar clamp and the throat plate seems a bit difficult (ha ha) but I rested a short ruler on the throat plate and got as close as I could see and now no problems. I believe that your hook is not going back as far as mine is Uwe and that may make the hook not fall back with gravity to open as easily at slow speed as is desirable. Logically a machine moving at some speed will make the hook throw back away more definitely as it reaches the end of its travel in either direction and is probably one of the reasons that miss stitches happen more when you are going slow. You'd think they would be able to work out some sort of alternating repulsing magnet to better force the opening on the hook. I should perhaps mention that I do not have any problems getting the reverse stitch lining up into the previous holes as it seems many do and I have not got any washers and so on to do this. Don't know why and if it develops I will have to find out I guess. Brian -
CB4500 reverse stitch bottom loops
RockyAussie replied to Zandeosaddles's topic in Leather Sewing Machines
Just a couple of things I've noticed by going back over Uwe's video. My hook goes back at least another 3 to 4mm than does Uwe's. It appears that the thread in Uwe's snags in the race and logically that could impede the bobbin/hook from falling back away when it should. I would guess as Constabulary suggested that the shuttle race packer needs to be a bit thicker in that case. I believe a coke can thickness could work if that helps.Equally if the race is not freely moving without thread in it the packer may be damaged or too tight for that size thread. Best of luck Brian -
Is the cylinder too big or what is the problem with the Cobra 4 for doing it? Generally where there is a will there is a way. One front or back on should be easy.Keeping in mind not to put in stiffeners until after the outside is fully sewn.A few position markers for lining up as you go around would be necessary. You just cant fully glue it down into position first is what I am saying and it would possibly require 3 stop starts.Saying that though a 335 would be a fair bit easier and a sew around the sole edge machine would be a breeze.A good shoe patching machine would easily do the job but it takes a fair bit of practice to get a nice looking stitch from them.
-
CB4500 reverse stitch bottom loops
RockyAussie replied to Zandeosaddles's topic in Leather Sewing Machines
This is just a thought that comes to mind as I have known of some sewing machine mechanics to tighten the shuttle race screws fully in tight.The 2 I am referring to are the ones with springs behind them.I believe if they are tight they can impede the thread from going around without being caught up.This following link I think should be checked around the 9 minute in mark to perhaps better understand. https://www.youtube.com/watch?v=TvHgMDlfQo0 I initially received mine with them fully tightened and had some problems.I have not noticed any problems since I have loosened them and timed the machine following the Juki 441 engineers manual instructions with regards to height measurements. Thanks for the Video share Uwe and Wiz for your as usual superb break down of useful tips. -
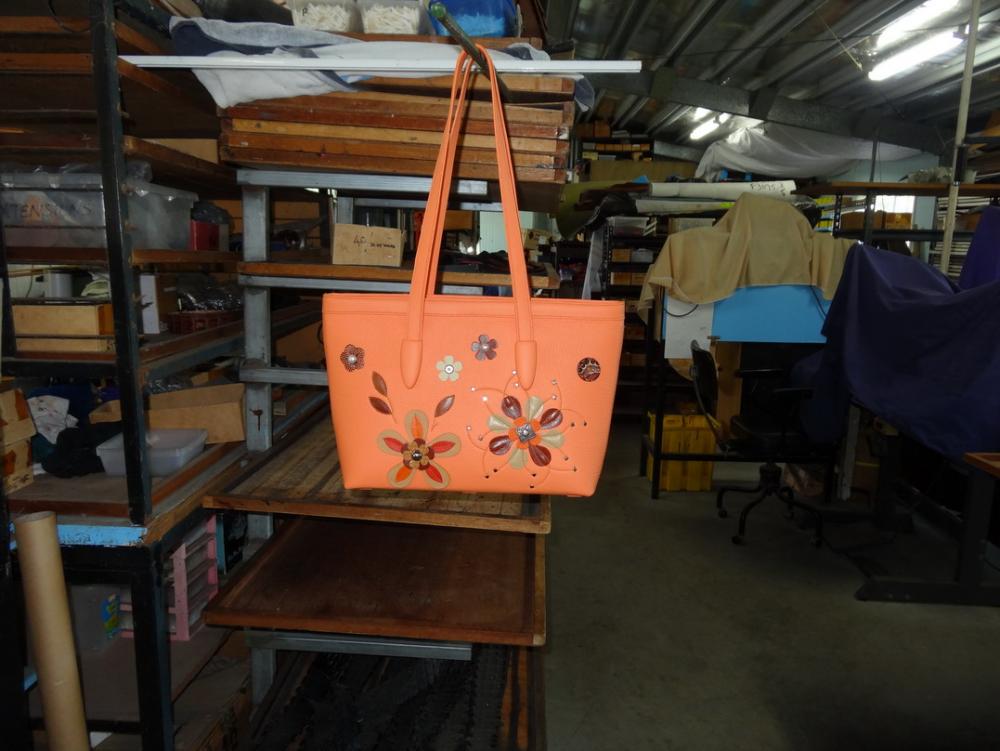
Work in Progress...
RockyAussie replied to YinTx's topic in Purses, Wallets, Belts and Miscellaneous Pocket Items
Nice looking set there and should last more than a lifetime I think. Well done Y -
That for sure is dam fine piece of leather work craftsmanship.Very inspiring.Thanks for sharing
-
Work in Progress...
RockyAussie replied to YinTx's topic in Purses, Wallets, Belts and Miscellaneous Pocket Items
Me too always. It is shaping up nicely Y. -
how to do a liner on this box purse?
RockyAussie replied to Windrider30's topic in How Do I Do That?
Easiest way I think is to have the roo oversize all around by 10mm to 1/2" or so and glue and attach to bottom rectangle only first. Then one piece at a time glue and attach the flaps using the edge of table,box or similar to get in the bends without wrinkles. The lid piece would be last and glued only to the back top edge first. To allow for the lid curving I would put a mark on outer lid edge while it is flat and mark inward about 8 to 10 mm. Mark right across as it will help to keep straight and square. Now I would glue and attach going for a curve that meets at that point marked. This should stop too many resistance wrinkles from developing.Then with sharp tip knife trim away all the excess on edges and then sand and edge before further assembly.Look forward to seeing the finished piece. Regards Brian -
If it is going alright I'd say grab it quickly. Second hand here they are often over a $1000au. They dont do the best stitching as some machines but for repair work on shoes and sometimes a bag they are often about the only affordable way. With practice you can make its stitches look very acceptable. The foot if you don't already know can go in a full 360 degree direction.
-
how to do a liner on this box purse?
RockyAussie replied to Windrider30's topic in How Do I Do That?
Are you wanting to do a drop in liner or attaching together first? If so what thickness leather outside and what sort of liner and thickness? Is the bag then fully self supporting or will it need any stiffeners anywhere? Just a note to make sure if your lid where it comes across is a little wider on the top.Strap and or handle attachments and lid closure need to be taken into account first.Regards Brian
