Handstitched
-
Posts
2,817 -
Joined
-
Last visited
Content Type
Profiles
Forums
Events
Blogs
Gallery
Store
Everything posted by Handstitched
-
When you amaze yourself
Handstitched replied to Madmax500000's topic in Purses, Wallets, Belts and Miscellaneous Pocket Items
G'Day, Very nicely done I hear you when you say " When you amaze yourself " . I made a lovely bag for a client a while ago , so nice I wish I kept it Ha ha HS -
Pictures Please? How do you store your hardware?
Handstitched replied to bikermutt07's topic in How Do I Do That?
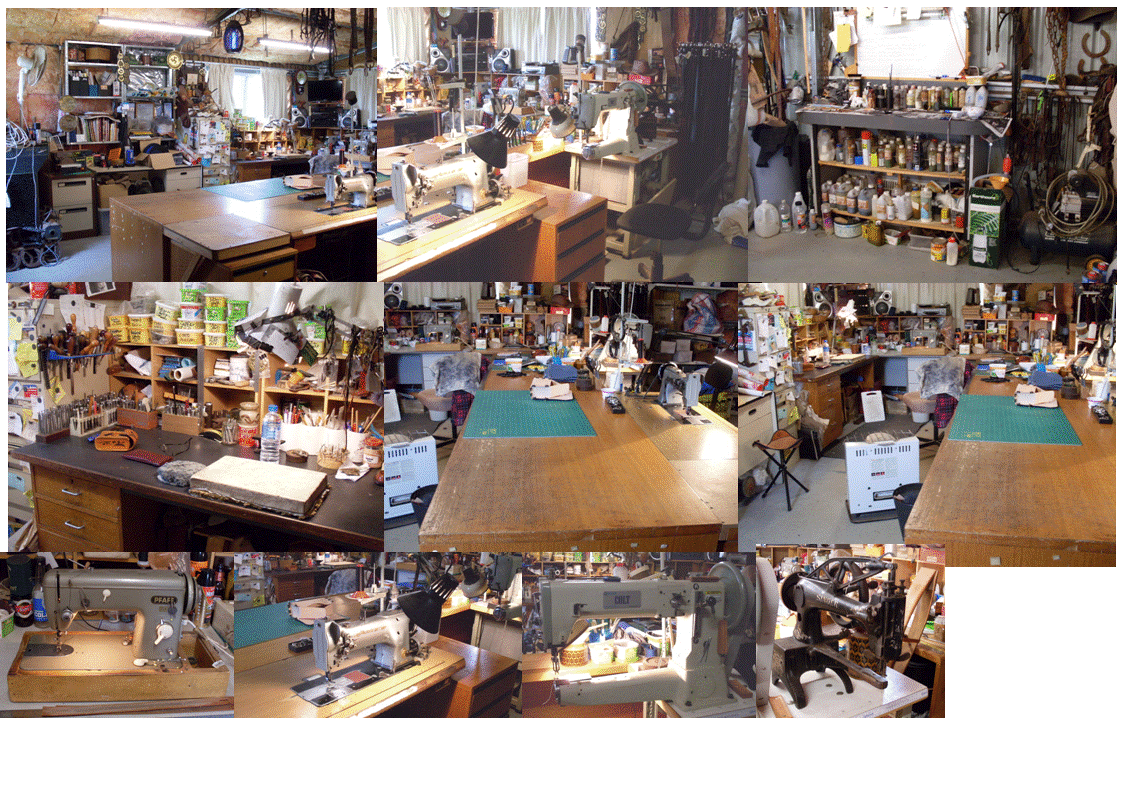
As space is at a prime, I used empty cleaned butter containers for all my hardware. See pic, centre left, on top of the shelves . thats only half of them. Not the ideal solution, I know , but it works. http://leatherworker.net/forum/uploads/monthly_2018_08/5b869fe92624f_WorkshopPics2018.gif.30864d7b0338c9d6d3e500212dc11254.gif HS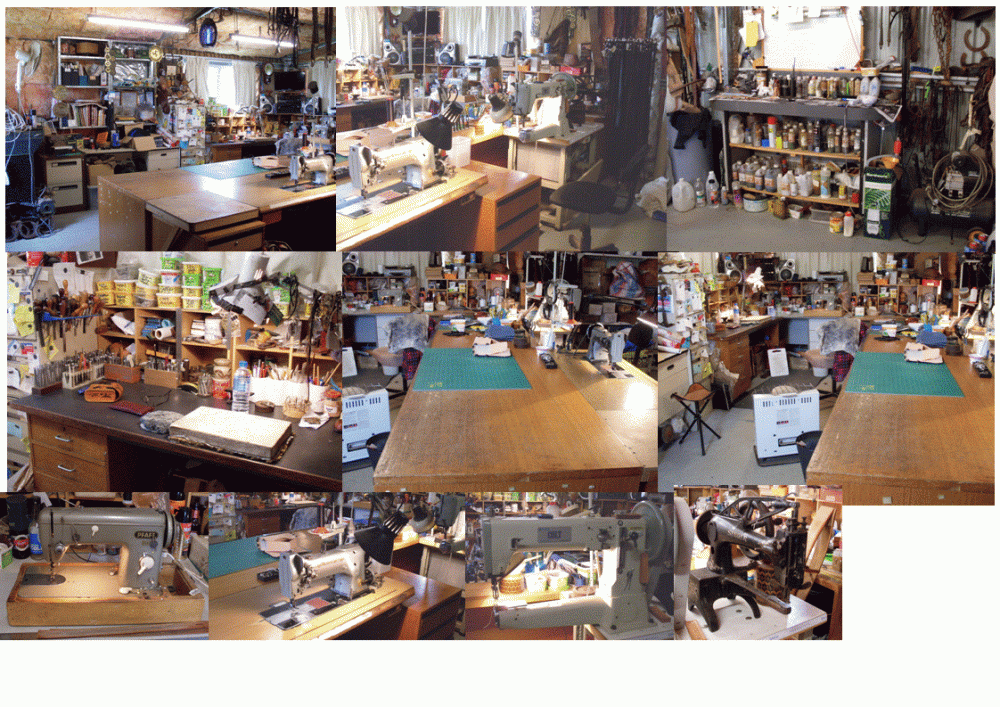
-
Nothing wrong with that , looks aged , nice I have known people to modify an old screw driver, sharpened , to use as swivel knife. No different to modifying the ends of nails , bolts etc. to use as stamps . If it works and does the job.....? Like stetson912 said, you don't have to use all the fancy tools to do the job. HS
-
G'Day, I had a quick look around, and, just looking at this pic , I thinks it does, see the lever on the right ? : https://auctions.afimg.jp/item_data/image/20171010/yahoo/r/r211605064.1.jpg However, I also found this: http://parts.singerco.com/IPinstManuals/16U288.pdf It makes no mention of reverse. And this: http://www.industrialsewmachine.com/webdoc1/singer/16u.htm once again, no mention of reverse ? Hope this sorta helps, HS
-
Any Sussex leatherworkers here?
Handstitched replied to CutThumb's topic in Leatherwork Conversation
We can have a virtual coffee instead Flat white no sugar, thanks But feel free to ask us anything about leather. Its pretty much guaranteed that someone on here can give you an answer/s to whatever you need to know. HS -
That has happened to me, mainly due to over saturation of oil. I have also found , from experience, that there may have been something on/in the leather that has caused it to soak in too much in one spot. It 'might' soak in a bit more if you left it a bit longer, try it . However, if all else fails, then yes, try dying it using a slightly dark antique, but it may also still show through a bit , depending on how many coats you apply. Nice tooling though HS
-
Basketweave belt
Handstitched replied to Jack1970's topic in Purses, Wallets, Belts and Miscellaneous Pocket Items
Makes me want to go to my workshop right now and practice my basket weave skills......which are not as a nice as that . Lovely colour HS -
G'Day, That looks stunning Just the sentimental value alone would be priceless. Well done
-
Any Sussex leatherworkers here?
Handstitched replied to CutThumb's topic in Leatherwork Conversation
Nup, I'm from Haverhill, Suffolk .....originally , much further north , not far from Newmarket,... horse racing country . Now I'm in 'upside down land', ....Australia, ( or ' Austraya ' as we call it . ) HS -
I mark the prices down , with ' Reduced' or ' 1/2 Price' signage etc . They see something in the bargain bin and say, " oooooh....aaaah ...look at the work in that !!" My silent thought bubble pops up with , " yeh ....look at the frustration, the blood sweat & tears, the little scratches from where it got thrown a few times ... if only that thing could talk " Yep,it sells, even if just covers the cost of materials or part thereof ...or at least a few ice cold beers HS
-
G'Day I agree with kgg & ComputerDoctor , it might seem like a good deal, but by the time you've paid for shipping, taxes etc. it might not be such a good deal after all . And what about the voltage ? Obtaining parts could be an issue as well. I would lean towards getting a known brand closer to home, even a good S/H machine where parts and service are easy to get. HS
-
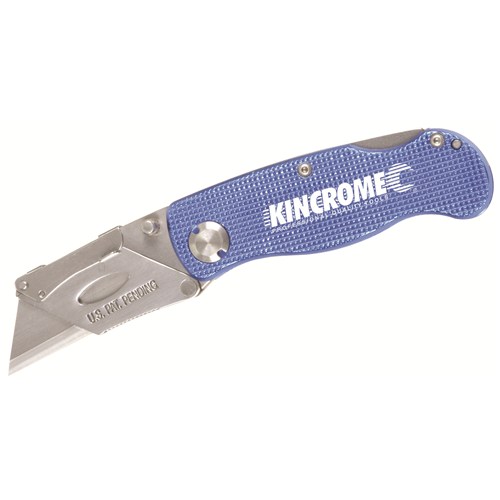
Well, I think you've nailed it . If cutting using a knife is causing discomfort , I can't see any other way. My strap cutter cuts most leathers easily , even when the blade is a bit dull, but, if want to cut leather 5mm + I put a new blade in , glides through nicely , and if I need to cut shapes etc. I sharpen my blade , or replace with a brand new blade. I don't use a round knife, I find them awkward . I use a knife same as the one pictured. When the blade is new its super dooper sharp and cuts through thick leather with ease, even with a bit of arthritis that I have in my hands....now And btw, theres no such thing as a silly question on here HS
-
Albob, I'm guessing that your aim is getting better with your coffee cups ? Besides, coffee cups are cheaper than cans / stubbies of iced cold beer Its no consolation , but " yep .....been there, done that " . I've made the devil blush a few times You have a ' bargain bin ' too eh ? Mine is actually an old basket full of ' mistooks' , shop soiled stuff , and and stuff that I've made that is .....well....... crap But, people seem to buy it . HS
-
G'Day chrisash, One suggestion, you could just simply try doing what I did, do some simple market research in your town / local community I looked around my town and thought, " what does this town need that it hasn't got ? " , with a horsey theme in mind. I also asked some horse owners in my local community . ( my town has approx. 1700 people) , 'who does this,who does that? where do you get that done? ' ...and so on. I soon got my answers. I also like to be a equine retailer in the future, but thats another story. It might give you some ideas ? HS
-
Thats interesting to know about pricing there. My customers drop off & pick up their rugs as I'm only about 10 mins from town . I can pick up & deliver locally if they need me to, but to another town is extra. The least I charge is $10 for a simple minor repair, and it goes up from there. The ones in the pics were around $60 - $80. Most of my customers give me 2,3, 4 rugs...or more to repair . During Summer & Winter, I can earn quite a few dollars as they come in thick & fast . HS
-
G'Day chrisash , Apart from various types of leatherwork , I also I do an assortment of leather repairs bridle repairs, stirrup strap repairs , alterations etc . , as well as an assortment of repairs & alterations to canvas , tie down straps, shade sails etc. In the early days, being the only leather worker in town, it didn't take long for the word to get around on the bush telegraph. In my small country town , there was no-one that did any of this locally. So I got all of the work. With a bit of basic market research I asked a lot of the horse owners " who does your horse rug repairs ?" Quite often the answer would be " I dunno" or " they get sent to Perth" , some hours away. So an opportunity came up. Long story short, an industrial machine came my way. I started doing rug repairs. Check the link. I do all my horse rug repairs on this machine, both clean ....and dirty. Yes, some rugs are filthy dirty when I get them , and I quite often smell like a horses butt when I've finished. Some would not receive them like this, but, ...as I am the only one that does this, and as I have a good rapport with locals and well known in town, its difficult to refuse both work ...and much needed income. There are no washing facilities anywhere, but some clients do try to clean them. This machine is serviced regularly, cleaned and liberally oiled frequently because of this. http://leatherworker.net/forum/topic/81806-sewing-machine-reliability/?tab=comments#comment-548958 This machine has earnt me quite a few extra dollar over the years, and sure helps when the leather works goes a bit quiet. Perhaps one day, I'll be able to provide washing facilities as well. The market demands & circumstances where you live may be a lot different. But good luck with whatever you decide to do Hope this helps HS
-
Thankfully, it never got that far " New swear words will also be invented and tools flung if one....." .....forgets to fit a vital piece of hardware before gluing and stitching and assembling ...but thats another story for another thread . HS
-
Yes, just slightly to the right of the 'thread slot' , almost obscured . You can just see the tensioner 'passing' over the slot . But be gentle with it, its just a tiny little screw. I adjusted it using one of those ' precision' screw drivers. I only needed the slightest turn clockwise , and thats all it took for my old Seiko to work just nicely. I did that many years ago when I first got the machine , and thats how its stayed ever since., .It took me an hour of swearing and throwing tools across my workshop to learn about that "tiny little screw" Feel free to ask any of us questions, as I know how ' hair pullingly * ' frustrating some machines can be. * ' hair pullingly ' << new expression I've just made up Hope this helps , HS
-
Sheath for a... uh.. uhm... Bread knife
Handstitched replied to Riem's topic in Gun Holsters, Rifle Slings and Knife Sheathes
I thinks its about time someone invented ' smell-net / taste-net ' , ' inter-smell' or an app where we can smell & taste produce That bread would have gone well with my lasagna and red wine tonight . as for the stamp bounce, we can't perfect all the time eh? It looks quite good otherwise. Ya man HS -
What Brmax said This is off topic I know, but I still have all the components to put it back to twin needle, but I've never had the need to. HS
-
Dont get carried away with collecting sewing machines
Handstitched replied to chrisash's topic in Leather Sewing Machines
I have 4 machines , all in use , 5 if i include the old domestic Necchi Supernova ( not used much) yeh, I heard that, those machines were mostly part machines as he mentioned . But what a collection eh ?? HS -
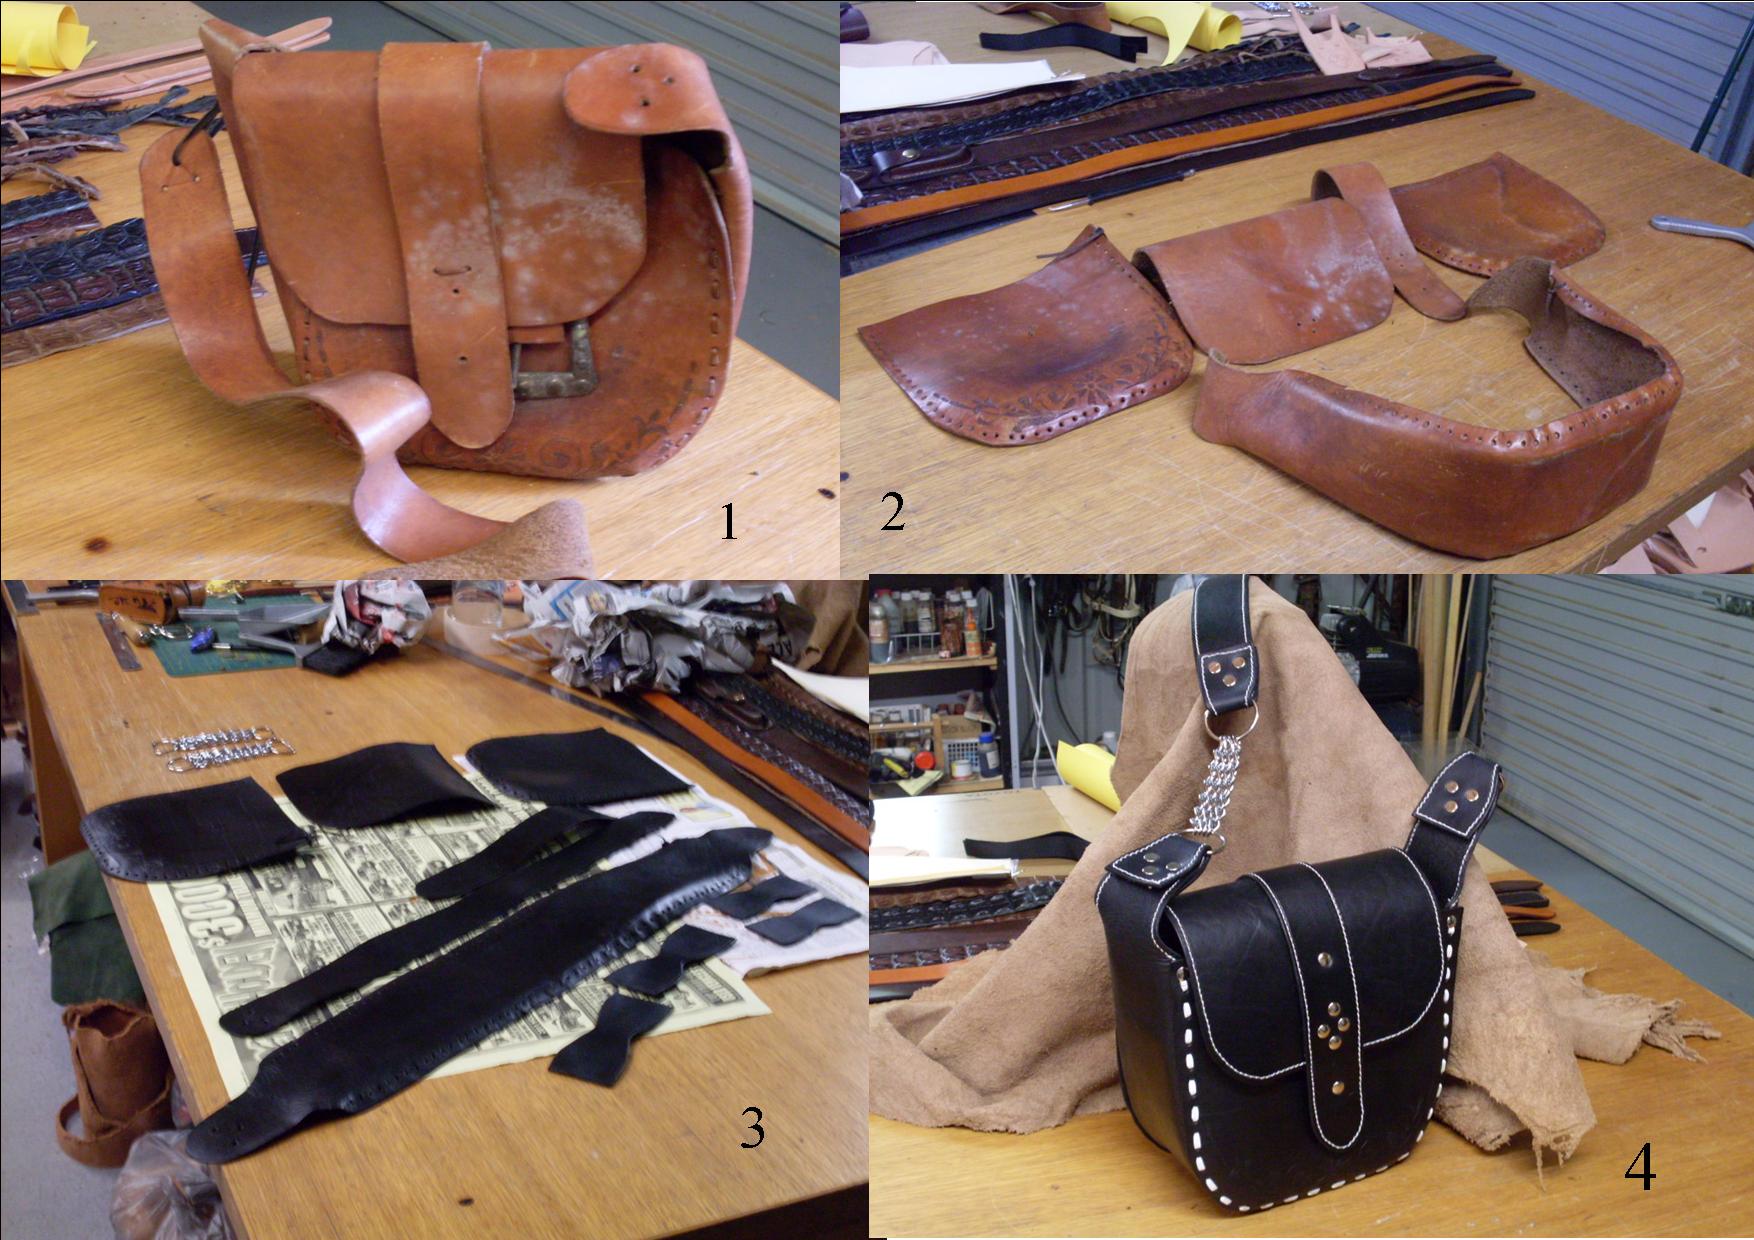
G'Day and thank you for your responses, ByNelson , I do appreciate the differences in market demand. These old bags get snapped up real quick here. But I hope you're able to restore maybe at least one of them and love to see what you'll do with the one you've cut up . The old leather has a lovely natural aged colour. There maybe enough leather for a nice purse , wallet or a clutch bag just looking at your pic. HS
-
That bag has ' restoration ' written all over it Ditto to the above. A good dose of oil, even re-colour it if need be to hide any scratches, discolouration etc. . But to cut it, and the others up for something else ? Nup Restore. heres a pic of a bag I restored and sold. HS

-
This project is getting closer. Had a good look on Mr Google, and Mrs Youtube . I may end up doing two . One to ' practice' and the other as a project. I would have made one made by now if it wasn't for the ' interruptions' I've had these past few months or more . Love the " Frankencow" hat What a great way to use up scraps HS
-
G'day, So many people come to my workshop or stall , walk in , and say " *sniiiffff* " mmmmmm I love the smell of leather" I can't smell it at all , with the exception of first thing in the morning when I open my workshop door. But after about 1/2 hour or less, it smells ' normal'. I get used to it. But my cuppa-soup & toast at lunch seems to cut through it quite well though I used to make fibreglass pools in another life, thats another story, but I soon became impervious to that smell HS