


Chakotay
-
Posts
90 -
Joined
-
Last visited
Content Type
Profiles
Forums
Events
Blogs
Gallery
Store
Everything posted by Chakotay
-
Wednesday Adams satchel template?
Chakotay replied to AtomicLeathers's topic in Patterns and Templates
Yep, you found them! Some of the items (like the shaped die cutters) are best used on an arbor press (or similar). You may see me on the videos pounding on them with a maul, but that's usually just because I only needed one or two cuts and didn't want to set up the camera for it. The leathercraft stuff on Amazon really runs the gamut of junk to very good. Just read the reviews carefully. But at the price it's a good place to try a particular tool before spending real $$$ on the expensive version. For instance, before dropping $180 on a single Sinabroks stitching punch, I decided to try the $40 "WUTA" brand stitching punches (a set of 3) first just to see if I like this style of stitching. They work great and l never bought the Sinabroks verison. -
Wednesday Adams satchel template?
Chakotay replied to AtomicLeathers's topic in Patterns and Templates
I believe Babylon sells both craftboard and clear acrylic templates for this satchel. I get them from Amazon. Just look up "leather corner cutters" or similar. There's several styles of them and they're pretty cheap. -
Wednesday Adams satchel template?
Chakotay replied to AtomicLeathers's topic in Patterns and Templates
I actually made a video of this for my Youtube channel. I didn't use a pattern at the time of filming. However, you can get one from Babylon Leather (link in the video description . . . note I don't receive any commission for this.) -
Back when I started using it you couldn't find it anywhere else. Found an international seller on eBay who sold gallons of it relatively cheap. But good to know I can score it more locally now! When I run out of my current supply I'll defiantly go there.
-
Just don't take a deep breath of Barge or Weldwood! lol
-
^ This 100%. Aquilim 315 is the only glue I use anymore. You can see me using it all the time on my YouTube channel. Previously bought Barge and Weldwood simply because those were easily available at Home Depot and Lowes. Aquilim is more expensive, and you have to order it online from Germany, but for me the fact that it's water-based, non-toxic, and low-oder more than offsets the health risks associated with the high-VOC stuff. I was getting headaches brushing on the other glues. I found it's plenty strong for everything I've thrown at it. But I use it almost exclusively for gluing liners . . . which all get stitched anyway . . . so how strong does it really need to be?
-
I have. . . . and decided I much prefer just printing PLA.
-
Antique will darken your work to some degree no matter what. Same with oils and other finishes. They all effect the final look. I compensate by beginning with lighter coloring. In other words, if I want the final piece to be "medium brown" I use light brown dye (or dilute whatever dye I'm using) . To lighten an already-dyed workpiece, you could scrub over the leather with a melamine foam pad (aka Mr. Clean magic eraser), or cloth dampened with alcohol to remove some of the antique. hope this helps.
-
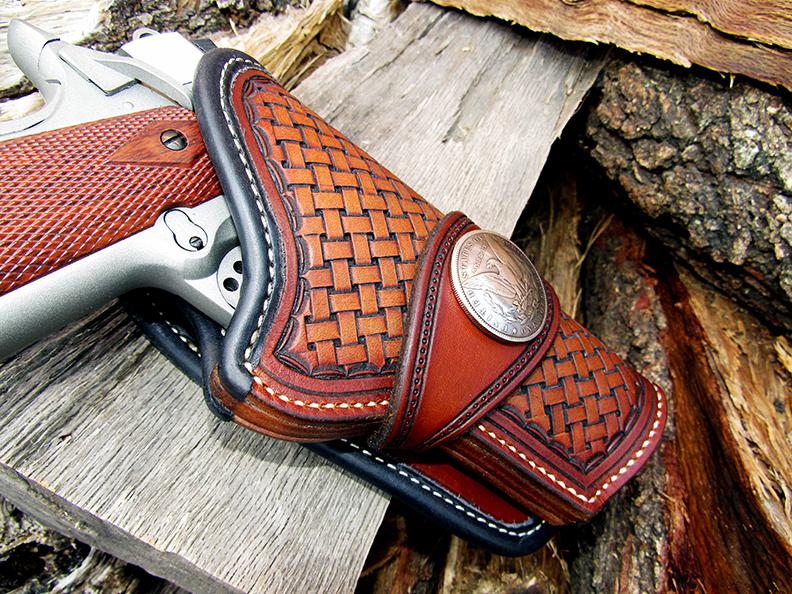
Basketweave Tooled 1911 Holster
Chakotay replied to Chakotay's topic in Gun Holsters, Rifle Slings and Knife Sheathes
#X517 Basket Weave Stamp purchased at ProLeatherCarvers -
Latest 1911 holster with my NEW favorite basketweave stamp. Fully lined with milled leather. I've got into a habit recently of doing edge binding on my holsters. I really need to stop; it's such a pain in the butt.
-
Where are you looking for them? A quick search in the usual places: Amazon, Springfield Leather, eBay, etc... I see lots of strap cutters and replacement blades for cheap.
-
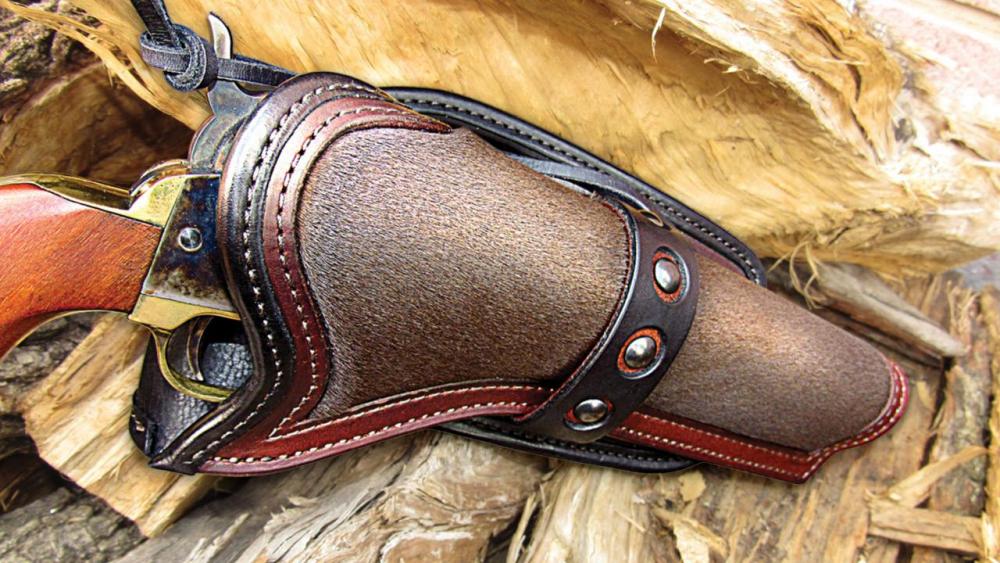
Guess I shoulda have included that: Thanks! It a nice calf hide I picked up at Tandy.
-
Just finished this holster for a '51 Navy using hair-on-hide. I have a build video on Youtube as well.
-
here's my vinegaroon recipe:
-
Glock 21 45 auto/ snapping turtle holster
Chakotay replied to Garyak's topic in Gun Holsters, Rifle Slings and Knife Sheathes
Very cool! -
Agreed it's a combination of techniques. Surface was tooled, dyed, antiqued, and scrubbed/sanded.
-
Trying to learn video making skills... warmup video, comments welcome please!
Chakotay replied to YinTx's topic in Show Off!!
Ha. Sorry. Road Agent Leather is my YouTube channel. I go by "Chakotay" here on the forum. -
Trying to learn video making skills... warmup video, comments welcome please!
Chakotay replied to YinTx's topic in Show Off!!
Yes, that's me! -
Trying to learn video making skills... warmup video, comments welcome please!
Chakotay replied to YinTx's topic in Show Off!!
Hello fellow Texan! You've been given some good advice. I have my own leatherworking YouTube channel I've been (slowly) building up in the last few years. Not saying I'm an expert; I'm trying to learn as I go. But my quick thoughts: --Agree that filming is the easy part. The real chore is editing that footage together into a "story" that will hold people's attention. --I wouldn't agree you need more than one camera. IMHO, that would just make editing more complicated. But be prepared to be frequently changing angles to get the best shot. The one camera you do have should be good quality (This is my next investment) --Lighting is just as important as the camera (maybe more?). Fortunately, it can be had much cheaper. I used an inexpensive light ring from Amazon. --I wouldn't necessarily agree in needing short videos: Depends on subject matter, but it's generally held longer formats equate to longer watch time . . . which helps your algorithm. --Relating to above, watch time is actually more important than subscribers if you're concerned about revenue. --Don't skimp on your thumbnails . . . they're the billboard for your video as people scroll through hundreds of other videos with similar content. Good Luck! -
Chuck for a leather awl haft - where can I find it?
Chakotay replied to noordwesth's topic in Leather Tools
Here's one from Tandy: https://tandyleather.com/collections/tools/products/flat-side-awl-haft -
That's how I would have interpreted it. Look good man!
-
Cowboy Outlaw, Tippmann Boss or niether?
Chakotay replied to Loki74's topic in Leather Sewing Machines
I had a Boss for almost 7 years. It did everything I asked of it. It can be finicky while you learn its quirks. The only time the "manual" aspect of it was tiring was when I was stitching liners to belts. Can't comment on the Outlaw, but It's made/marketed by Cowboy so I presume it's a well-made machine. The Boss has been around longer so there will be a deeper "well" of information and support surrounding it if you need help---something that shouldn't be discounted. It does have a deeper throat than the Boss. Not a huge deal, but depending on what you're making it could be a deciding factor. Whichever one you end up picking, make sure you get the edge guide for it. It's indispensable. -
Boil a cup of water in the microwave. Then throw a tiny scrap of the leather into it. If it just gets wet (but otherwise holds it's shape), it's chrome-tan. If it shrivels up like a piece of fried bacon, it's veg-tan
-
Not laced like you were looking for, but here's another method for covering an edge:
-
Agreed with it being milled, but it could also be veg-tan. Try the boil test.
