


JLSleather
-
Posts
7,378 -
Joined
Content Type
Profiles
Forums
Events
Blogs
Gallery
Everything posted by JLSleather
-
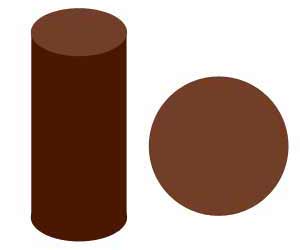
Skipping all other factors for the time, assume the gun is a cylinder (circle on the ends). So think of the holster around it as a split bushing. Which on a 50/50 split would look like this.


-
Yeah, that's those "50/50 pancake" holsters so many people make - other words "mirror one side to another". I like 2-piece holsters curved to suit the hip, myself. But there IS cause to lay it out that way, since from there you can make the curved "pancake" holster, or any number of other "models". Must be getting forgetful .. I keep talking about doing an article about how to go about altering these. I did get as far as how to turn that '50/50' into a basic "avenger" and a simple "IWB" model (I guess that 'counts'). The short version of turning those (50/50) into flat or curved back is pretty simple. First, a brief discussion of the problem. Those "mirror one side to another" love to BIND. Traditional ‘pancake’ holsters are tighter on the belt than they are when held in the hand. The ‘retention’ of the holster is not better when worn (it’s the same holster) – they’re simply relying on the flexion of the holster to bind on the gun for retention. This is an inherent flaw in the "mirror" design. MANY "holster makers" simply add room by moving the stitch lines OUT from the pistol, hoping to reduce the binding built into the "50/50" design (and usually offer an added 'story' about the user responsible to "break in" the holster). But moving the lines out, loosening the holster and eliminating the fit, doesn't eliminate the bind. This much has been covered already at http://www.jlsleather.com/holster-design-upgrade/ SO how to adjust so the FIT is the same but the SHAPE is not "mirror one side to another" )50/50)? For the moment, let's agree that: the gun doesn't change, regardless of the holster you're making; and the INSIDE of the holster should be the same size as the OUTSIDE of the weapon. Easiest way to illustrate is with a circle. That discussion coming in a minute ... gotta prepare some cheap down 'n'' dirty graphics.
-
Got a pic of the back side? Or maybe one looking at it from the front end?
-
That needle does look low. That was built for clearance. Make sure you are using a 794 needle and that it is fully inserted and it isn't bent. If the needle is correct and straight, make sure teh shuttle assembly doesn't have anything behind it and it's tightened into position. If those are correct, is the needle bar bent or misaligned? Is the lower feed deflecting the needle into the shuttle? Your red arrow is in a bad spot to see right there, and we don't know if this is showing the down stroke or up.
-

Computer Drawing Software For Making Leather Patterns
JLSleather replied to Blackey Cole's topic in Computer Help
CorelDraw is pretty slick, appears to be efficient to use. The guy who used to do our vinyl logo stuff uses it, sends it right to his cutter. If I didn't already have PS and some knowledge of how to use it, I would likely get CorelDraw. Shoot, I thought that 10 years ago -- could have had it mastered by now! -
There may have been a time long ago where fuzzy leather and something to "slick" it with was the norm.But that was then. Just buy leather that is well trimmed on the flesh side, and pocket the money spent on "products" to fix badly trimmed leather. BTW I also don't walk to the leather supply house, nor do I salt hides ... Lots of things are used to burnish edges, including wooden "burnishers", denim, canvas, and more. Try 'em out, use what you prefer. (Thought: If you use an edger to round teh cut edges, perhaps the other end of that same edger is a smoothly finished wooden "burnisher"?) WAIT: IF a fella had a wood-handled edger, couldn't he chuck that edger in a drill press or lathe and spin a groove or two into the handle?@!
-
Yup, 4 would be pretty light. DOUBLE layer of 4 would work, if the added cost isn't an issue.
-
Well, by the time you get it, it may already be the FOURTH time Nuthin' out the door that aint tested.
-
Sorry -- there's 4 of em. Pics in the other thread (double post).
-
Let's keep this one. The other thread is a misfire.
-
Computer Drawing Software For Making Leather Patterns
JLSleather replied to Blackey Cole's topic in Computer Help
I usually just measure 'em up and draw 'em in. Takes a bit, though, so I don't get too concerned about the back end TIP: If you know PS and / or IL, guy might could create a new drawing 11" x 8 1/2", transparent background, at 80 px/inch, and makes it fairly easy to draw. Digital graph paper with 1/8" squares. You talented folks likely work in something more like 300 resolution You might recognize this Ruger. Exact position of the safety and/or take down lever not critical, but I do like the port in the right place, and the mag release at least quite close to right.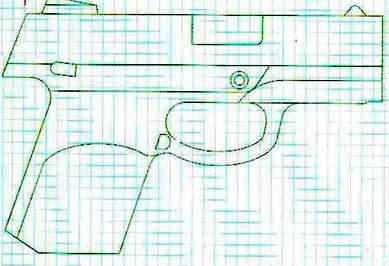
-
Shortest is 48 1/2" long, all are 1 1/2" wide. Cleanin' the closet, and suddenly there's these! $50 gits 'em ALL, shippin' is free if you in the U.S. 8 oz leather from W/C
-
Shortest is 48 1/2" long, all are 1 1/2" wide. Cleanin' the closet, and suddenly there's these! $50 gits 'em ALL, shippin' is free if you in the U.S. 8 oz leather from W/C
-
Decide what you want to sew. It matters. No ONE machine sews it all. If it was me, I'd determine what you will sew MOST of. Bags can take a LOT of stitches, holsters not so many. Best bet, ask Bob what's in stock (link below).
-
Computer Drawing Software For Making Leather Patterns
JLSleather replied to Blackey Cole's topic in Computer Help
Let's see what ya got! Issue I have is getting the gun IN the picture. HOW do you get the right size / shape / scale? Pic one I got a pattern for and I'll swap ya ... I don't so much need the PATTERN as maybe something showing us HOW YOU GOT IT IN THERE to begin! -
Computer Drawing Software For Making Leather Patterns
JLSleather replied to Blackey Cole's topic in Computer Help
SOlidworks is pretty cool, but she make it sound like I might hurt myself Just not cost effective for me, either. -
Computer Drawing Software For Making Leather Patterns
JLSleather replied to Blackey Cole's topic in Computer Help
I really MUST update some of my software. And I still need to learn how to scan a blue gun on a flatbed scanner -- can't convince 'em to lay parallel to the machine bed! Still, even if it's a bit slow, I was able to eeek out this 'passable mess' for a gal who makes great clicker dies The artwork is hers, I just made it a "button" that would show up on a web page.
-
Well, yes - I DO know Hit on just what I wanted the first time doesn't happen all the time, but it does happen. Instructions are written in a way that if you "figger" a standard "pancake" holster, you can then easily convert that to what some folks call an "avenger", or a simple IWB, or a clip-on, etc..
-
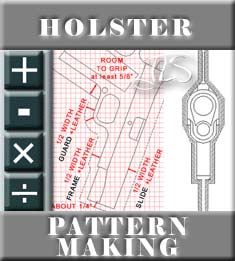
http://www.jlsleather.com/diy/pattern-making/gun-holster-patterns/
-
Looks purdy good -- that's a bold stitch! Might try needle one size smaller, just see if'n ya like the look. And call Bob, ask him to drop half a dozen spare bobbins in the mail.. cheap, and very handy.
-
31?@! And he carryin' TWO (and I assume 1 in the grip)?@! Who he goin' to war with? Bunny prollems down there? Maybe he just need a couple magnets sewed into a new belt? 8" long, maybe he need a THIGH STRAP? Oh BTW -- sent you a small box this mornin'... jus case its too hot ta fish...
-
I don't find Osborne tools anywhere near the quality they used to be. I know punches need to be sharpened, but I shouldn't have to sharpen it BEFORE I use it. I have some dies - including mallet punches - from TX and they have been good. Lately, I also recommend Sandy 'n' friends at http://intdieco.com/index.html Great service - the dies are always quick, reasonably priced, solid, sharp, and spot on size. ETA: Been braggin' on Sandy 'n' friends for long enough, thought I better send her a note, ask if it's okay if I put their link up on my site.
-
In the process of updating the software ... maybe get it to show in grams, or pesos, or whatever that is...
-
Are sewing machines worth the money
JLSleather replied to Horsewhishper's topic in Leather Sewing Machines
Some guys will buy machines because they want to earn money, others will have them because they like doing it. Either way, up to you if it's "worth it". Determine what you want to sew. Making yourself one holster? Probably not "worth it" getting a machine. Sewing one belt? I'd pass. Sewing TEN belts, total, I'd still pass. You want to sew 10 belts per week, I'd get a machine. "They say" that the 441 machines will sew leather an inch thick. Personally, I don't see myself ever needing to do that. Most of my belts and holsters range from 3/16" to 5/16" thick. The machine that sews those "can't" sew my wallets (it "can", but I don't care to change it, only to change it back). So, decide if it's "Worth it" to get a machine. And IF it is, decide what you want to sew (leather thickness AND thread size you want to use) and there's your starting point. For a good while, I made more wallets than holsters, so I had a machine that stitched the wallets very well, and hand stitched the holsters (which are short). -
As for me, my comments were intended to AID, not to denigrate. FWIW.
