


.jpg.e13e7809a690335a89b8a4ed2e876db1.jpg)
Northmount
-
Posts
6,542 -
Joined
-
Last visited
Content Type
Profiles
Forums
Events
Blogs
Gallery
Store
Everything posted by Northmount
-
.thumb.jpg.6e903dd66163ad5672f00f144058c571.jpg)
Idea on tree
Northmount replied to T Moore Medicine Hat Saddlery's topic in General Saddlery Discussion
Take a look at Rod Nikkel's site. They have retired from tree making, but have left the site up as a resource for all to use. You might find some of your answers there. http://www.rodnikkel.com/content/pictures-of-trees/ Tom -
Keeping A Sewing Shop Going During Grid Outages
Northmount replied to cdthayer's topic in Leatherwork Conversation
For USA and Canada, take a look at a Generac standby generator. Runs off natural gas or propane. My son lives out in the sticks and is subject to several outages a year. During June and July, he has to keep up to 3 sump pumps running due to heavy rains and high water table. Local power poles have fallen over due to the wet conditions, leaving them with no power for several hours. Also needs power for water and septic tank systems. He has a fire sprinkler system that is useless if there is no power as he would have no water. He put in a 22 kW unit with automatic transfer switch. http://www.homedepot.com/p/Generac-22-000-Watt-Air-Cooled-Automatic-Standby-Generator-with-200-Amp-SE-Rated-Transfer-Switch-6551/205398231 It is a very reliable unit, quiet, easy to install, just need to rewire the main feed to the main panel. It has been a real lifesaver. Tom -
Also be careful how you pull and twist them through the leather. The eye of course is the weakest point so fairly easy to snap while the eye is buried in the leather. If using pliers, be even more careful to keep the needle straight. Tom
-
Seller's location appears to be Fort Erie, Ontario based on his IP address. I think it is clear he is selling the press. @threepetsThe requirements of this forum are that you detail the condition of the item and that you provide your selling price. Tom
-
See https://www.google.ca/search?q=+ASF%26T&ie=utf-8&oe=utf-8&gws_rd=cr&ei=VhzWV8KFOo6cjwOOz4SgCQ#q=ASF%26T+hole+punch for several ASF&T punches. Looks like Osbourne related. Used for leather and gaskets. Tom
-
See this link for a new rein rounder at Weaver Leather http://www.weaverleathersupply.com/Mobile/Catalog/ItemContent.aspx?ItemNumber=9106&CatalogId=001&CatalogDetailId=43&NSM=Y Tom
-
Servo motors are variable speed control. No clutch. You can also slow your machine down by installing a pulley speed reducer set and by decreasing the size of your motor pulley, or increasing the size of your machine pulley. Sewing leather with a hard temper and / or a thick stack of leather requires a lot of torque, So even with a servo motor, you may still need to use a pulley speed reducer set. Torque in general varies inversely with motor speed. You can do a search here and find lots of threads and posts about servo motors. Tom
-
Also consider using buckle sets that are typically sold for leather hat bands. Will be smaller and more 'dainty' suitable for a baby. Tom
-
Should I save leather from old chair?
Northmount replied to metroplexchl's topic in Leatherwork Conversation
People are recovering leather from purses, jackets, and such to make wallets, coin purses, etc. Many people are using upholstery type leathers (new) for similar purposes. So why not re-purpose for items you wish to make. Tom -
First show booth featuring my leather work
Northmount replied to Dan Miller's topic in All About Us and Off Topic
We used just a couple tables many years ago. Tom -
I would add that the first hole in a belt for a baby should fit today's waist. Allowing the belt to be used longer before it gets too small. And like JLS says, name won't stay centred, so think about his suggestion of initials at the tip. The leather thickness can be reduced too, as well as the width. But too narrow means very hard to tool. Tom
-
First show booth featuring my leather work
Northmount replied to Dan Miller's topic in All About Us and Off Topic
Some malls will let you setup for a couple days for a much more reasonable fee. Contact the mall management company. Tom -
Wood and Leather Satchel
Northmount replied to SmokeCigars's topic in Satchels, Luggage and Briefcases
Drill out holes at the end of each slot with a brad-point bit, then use a coping saw to cut the slot. Same principles as cutting a slot in leather using a round punch for each end of the slot, and a knife to cut between. The brad-point bit is similar to a forstner bit. Drills a cleaner hole than a typical twist drill. Tom -
You have a couple queries about your clicker press. Please advise these fellows if it is still available, post a couple pictures too. Tom
-
Moved your request to leather sewing machines. You'll probably get more answers here. Tom
-
Video: Possible Schärf-Fix 2000 Alternative?
Northmount replied to Daniel G's topic in Leather Tools
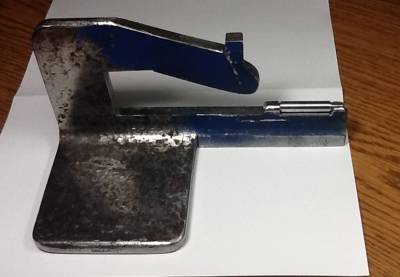
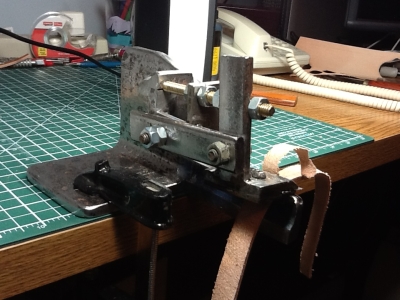
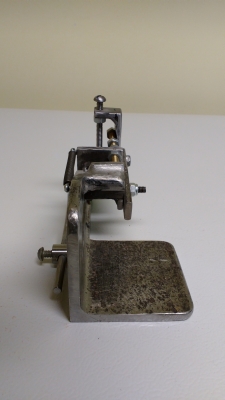
Edited: Looks pretty rough! Frame made from 4 X 4 X 1/2" rusty angle iron, with minimal tools (drill, hacksaw, file). Oh, and lots of wire brushing! Pic 3 and 4 show skiving, then modified to allow more adjustment of the knife, pics 5, 6, 7, 8. Knife holder needs to be re-done. Tried milling a nice recess for the blade using an end mill in the drill press, but too much slop, so it jumped and tore out a small piece. Now that I have a milling machine (which I haven't used yet since it is at my sons place) I should try prettying it up some. Tom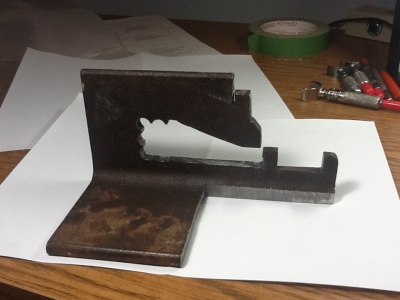


-
Video: Possible Schärf-Fix 2000 Alternative?
Northmount replied to Daniel G's topic in Leather Tools
The Chinese one or my copy of the Scharf? Tom -
What about just doing the head and flames? And repeating that. Tom
-
A pencil works well as an applicator too. Was mentioned in another thread here. I've used it a few times since. Works well for me. Don't have the slots in the Tandy applicator to clean out, just wipe with a rag or paper towel. Tom
-
The OP's IP address is in Hemet, California. Tom
-
Try aluminum foil tape, used for sealing joints in HVAC work. About 1.5" wide, self adhesive. Should be able to bury it between layers, easy to stitch through if needed. Tom
-
Locked! I think this has deteriorated far enough. Tom
-
Pictures? Descriptions? Thickness? Colours? Tom
-
If the edge you are cutting from is on a curve, the guide will follow the curve, and of course the knife is parallel to the guide, so it does cut curves. The radius will be limited at some point. The smaller the radius, the harder it will be to guide the cutter. Tom
-
You could use a brass hammer too. Won't deform the punch. May need to dress up the hammer face once in a while. Long time ago, we used lead hammers. When they got beaten up too badly, used to melt them down and recast them. Had 4 or 5 molds so could do a batch at a time. Now lead is no longer safe to use! The lead hammers didn't bounce either. Tom