bruce johnson
-
Posts
4,401 -
Joined
-
Last visited
Content Type
Profiles
Forums
Events
Blogs
Gallery
Store
Everything posted by bruce johnson
-
I have heard them called a "plonky" in some other countries. I like to say "plonky".
-
Looks great!
-
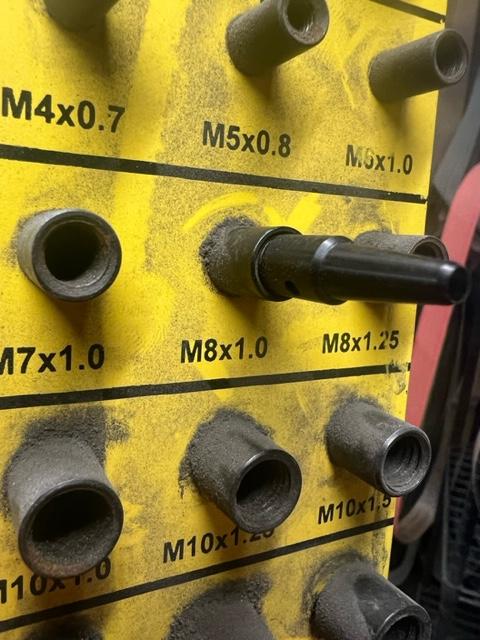
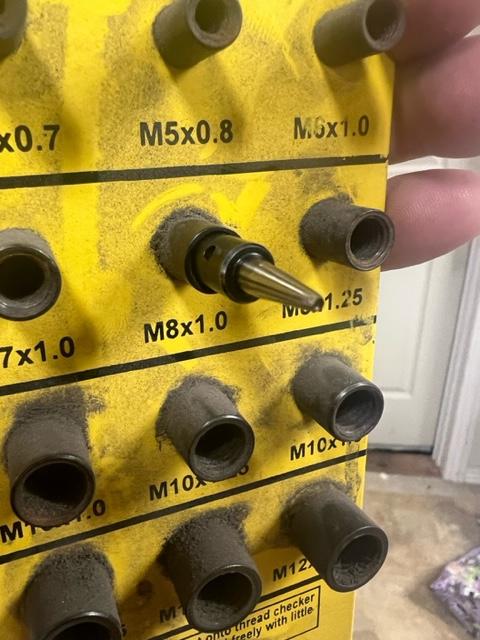
Threads on the tube that doesn't fit appear they aren't cut deep enough. When I talk about old CS Osborne frames and tubes, I'm going back to some of the Newark marked frames and maybe 30 years after. Anything in the last several decades all are taller threads. You got a dud tube. It will be interesting to see what they say. Probably grab a new tube and send it on. The threads that work on these 00-7 sizes is a M8-1.0 metric tap and die. I've had people tell me that is BS and have several reasons why these #00-#7 threads are not metric. They cite some SAE die on the tube or tap on the frame that somebody else told them. I stopped arguing it online years ago. Here are pictures of new CS Osborne #00 and #3 tubes screwed into the thread checker board in my shop. Chase the threads in a 120 year old frame these new tubes screw right in and bottom out where they are supposed to. You can screw 120 year old tubes into newer frames without anything but I don't trust old tubes off a Newark marked frame. Easier to just unscrew and toss them and put new ones on.
-
It is not the threads on the new tube that are the problem, it is the threads on the old frame. The old dies and tube threads had a lower thread height, same pitch. Run a modern tap through the old frame and the new tubes screw right in. Three different tap sizes. Zeros through #7 have the same size tap. #8 tube is unique to that size only, and #9 and #10 use the same pitch. As far as polishing your tubes….make a steel wool Q-tip. Start with coarse steel wool. With a variable speed drill and small bit. String out some steel wool and wind it on lol the slowly spinning bit. When you’ve got enough of a wad on the bit tear it loose from the string. Shoot a little WD40 on it. From the threaded end slowly spin it through the tube to the tip back and forth a few times. Go to a medium steel wool and repeat. That’ll do it. I will be interested to see what thread pitches they tell you. It isn’t what you think.
-
Looks great, he's a good guy to deal with for sure!
-
Stitching punches are relatively new and mostly imports to the US from countries based on the metric system. Overstitchers, pricking wheels, and pricking irons traditionally were/are made in countries based on inches. BTW, pricking irons and stitching punches are not the same thing.
-

Flintlock shooting/hunting bag pattern?
bruce johnson replied to bjornk's topic in Patterns and Templates
My friend Eric Van Alstine makes a bunch of the period bags. For some inspiration his Facebook is Eric VanAlstine and Instagram account is ironweed_leather. -
Thank you! That was really fun to do.
-
As much as I’m a fan of PB Blaster, I’ve found a 50:50 mix of acetone and Automatic transmission fluid works when PB Blaster doesn’t. Saw the comparison chart a few months ago and it was higher than my tried and true PBB.
-
I’ve had some through here a few months ago. Nice stamps for sure but as has been posted nearly the same price as Barry King unless you take your chances on AliExpress. It looks like ProLeather Carvers stocks some.
-
Vintage Fred Mueller High Back Saddle
bruce johnson replied to Cindee's topic in Saddle Identification, Restoration & Repair
Hard to date catalog saddles like that because they made them for a long time and generally didn't change much except hardware like Oltoot mentioned and maybe stirrup buckle styles. That style tree and horn covering says 1930s to maybe the 50s to me. -
I’ve got them from a few places. Tim at Steel Stamps is my first pick. They did some for me when I was doing wholesale work with clients marks. My wife had him make her a couple. None have shown any wear. For Delrin I have some from Jeff Mosby at GreyGhost. They’ve held up reasonably well. After maybe 500 impressions you can start to see some wear but very legible. I had a couple other delrin stamp makers send me ones to try. one was OK and two other makers were cut pretty shallow on the background. Still legible but not a crisp impression.
-
Good tips Will! If you don't have Cratex a good workaround is wet-dry sandpaper over a surface with a little give. Something like a scrap of mousepad material works well. It has enough give and conforms to prevent flat spots or divots from bouncing the drill. Chucking the handle in a drill press with the belts at the lowest speed works well too and some folks find more control with that set up. I deburr my tubes with a tapered diamond file with hand twisting and buff the outside, then by hand I spin the tube into the end grain of a fresh 2x4 to wipe the final foils off the edge.
-
Depends on how sharp your punches are, what you are hitting them with, and what kind of supporting surface. I sold two stitching punches to a guy who said he had trouble with his last punches getting through the leather. He was using an import poly mallet with soft plastic head, pounding on a self healing mat on a table. Not a real wonder why he was having trouble. He buys two punches from me. Buys a 2# maul from someplace because someone told him that's what he needed for 6 teeth. The LDPE I advised wasn't needed apparently, even though it cheap and available about everywhere. He moved his punching to the table end to get some support from the legs. He writes to me the punches did great but then hard to pull out. Long story short - he was used to dull punches and bounce. He now was using too much maul and force for sharp punches, and they were punching through the mat and sticking in the kitchen table. Yeah, they are a little hard to pull of that. Pictures of the kitchen table were nice. My song for everything goes like this - "Punch on low density poly, cut on high density poly..." Low density lets the punch edge penetrate slightly without damage.
-
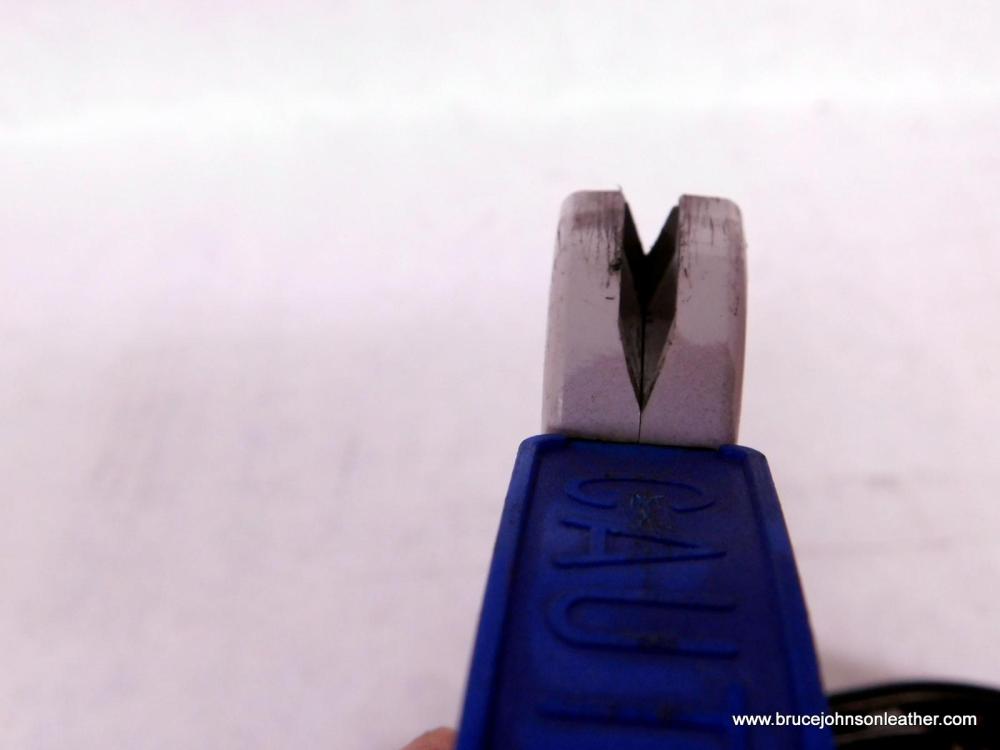
I have had that one or a version from another die maker and a few others. I also have the one from the local ACE hardware store I have attached pictures of. I like this one better. With this handle I can "feel" it better and keep it vertical easier than the round handle versions. The handle also helps me navigate tight turns on some figure punches. Realistically with dies, you just need a somewhat sharp straight edge without a roll here or there. This will straighten an edge and sharpen it. You probably don't want a really fine thin edge or you will fight rolled edges and this angle works well for me. I just bought my wife about 20 figure dies and I'll be dragging this down the edge of all of them tomorrow to start with. Might use a narrow wirewheel or cratex on the Foredom or Dremel to clean up some stuck on crap on the inside, run the outside around a soft buff to make them "pretty".
-
Great work yet again. Hope things are going well for and your family!
-
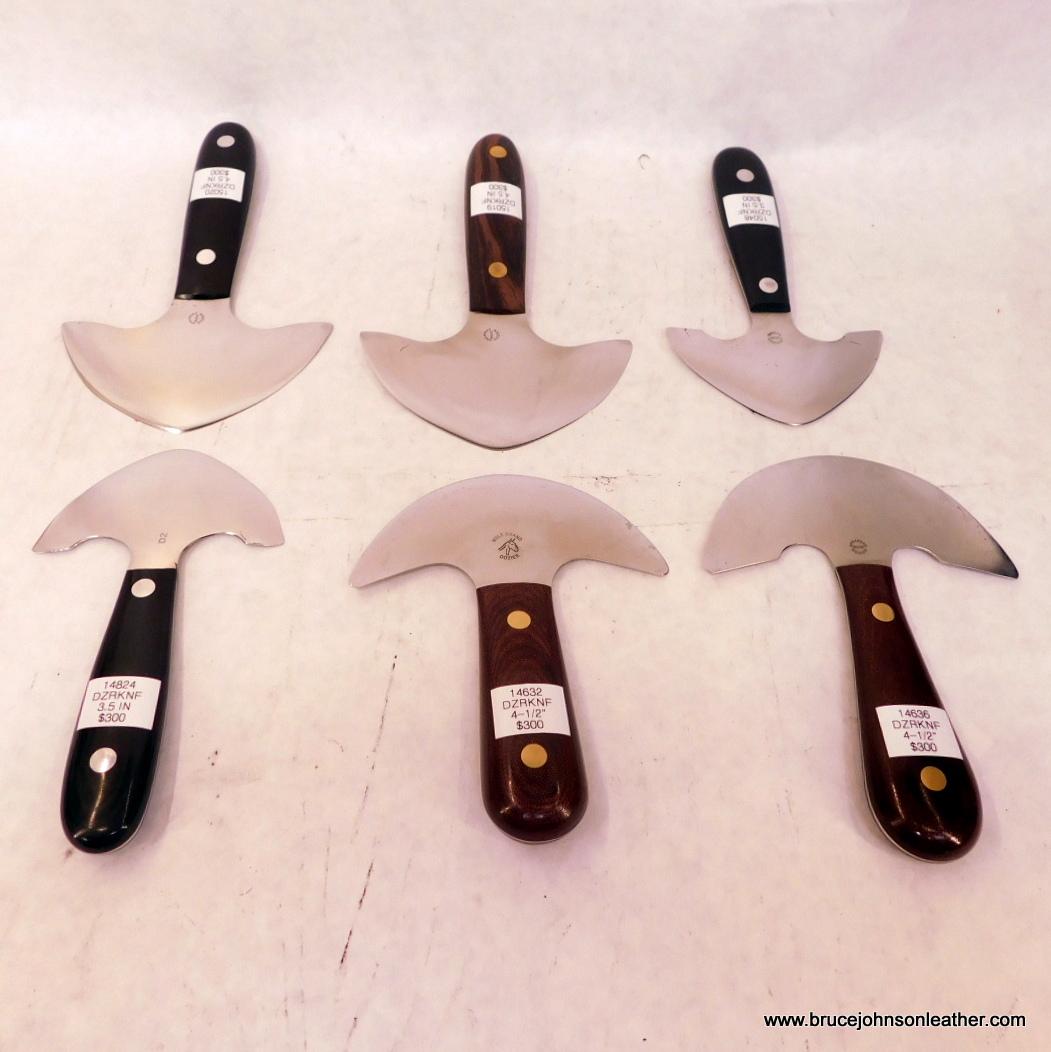
I don't generally make a lot of announcements here on this forum about daily updates on leather tools for sale on my website but today is kind of a high water mark. I have added 6 knives made by Bob Dozier. I doubt I'll ever come across this many again in my lifetime. These are in as-new condition and I have sharpened them all. Really nice knives. Here is a website link for more information on recently added tools - https://brucejohnsonleather.com/leather-tools-sale/recently-added-tools/

-
Cleaning up rough copper/ brass rivet heads?
bruce johnson replied to RickPleasant's topic in How Do I Do That?
I've used a vibratory tumbler with pretty good success for cleaning. Can do a bunch at a time if you are talking volume. Put them in and walk away for 4-12 hours depending. If you are looking for a high polish then the buffing wheel and compound. A benchtop drill press was the handiest thing in my shop and you can chuck a 4 or 6 inch buffing wheel in it. Move the belts around to the lowest RPM. I did all my saddle rivets on a set up like that. They can heat up pretty quick though or catch and fly. I used a vise grip to hold the shank with better results than burned fingers and flying copper shrapnel -
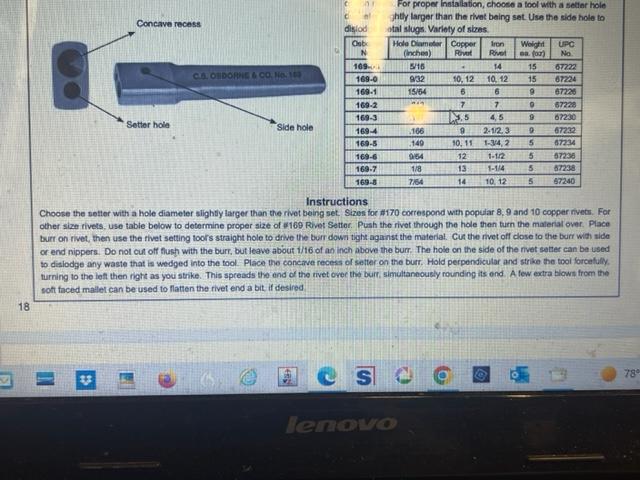
The chart I posted above shows the size for each number on the #169 setter. For copper rivets the #8 setter sets a #14 copper rivet. These are tinners rivet setters for iron or copper rivets and probably some reason they are size numbered like they are. It may have been some trade standard at the time. 150 years ago they probably found a #169-8 tinner rivet setter will do a #14 copper rivet for leather too. The #169-4 will do a #9 rivet and the #169-6 will do a #12 rivet. To further confuse things, the #170 setters looks similar to the #169 but not described as hardened at the working end or intended for iron rivets . They are listed in sizes for 8, 9 and 10 rivets and they do correspond to the size of the rivets.
-
I guess I should have gone to the source a few days ago. Here is the catalog page and explanation. Cleanout for anything that gets stuck in the setting hole.
-
The hole on the bottom is for setting the bur. Most of the answers I've been told the hole on the side is to hang it up. Don't know for sure. One ironworker told me if a piece off the shank breaks off in the setting hole with a hot rivet then you can drive the scrap up and out that larger hole. That sounds more real.
-
Might not be what you want to hear, but I'm going to be straight up. I'm not sure from what I see I'd trust it to rope a goat in a pen, let alone something big in a pasture. I'd pull everything off and start over. Breast collar dee is pretty low, The skive on the top edge of the rigging is coarse. Skive on the swell cover edges same. I covered dally horns before I put on the swell cover, wood post horns are a toss up as far as covering before or after the swell cover on a new build. That depends on who you learned from and a bit regional too. Doesn't appear the front edge of the swell cover was skived and there is a ridge there where it was folded under. The strainer liner looks thick under the back of the plate and that needs to be covered and blended. The ground seat end at least on this side is thick and not skived at the cantle corner. I doubt a seat leather is going to be enough without leaving a ridge over the ground seat or strainer and would likely take another piece of ground seat anyway. I cant see the screws holding the front rigging and with everything else, I'd be leery there. If it was me, Id take a day and a half to start it over and make it right.
-
I agree with using two if you use Chicago screws. My personal preference is to use the Chicago screws with the hole through the head. You can use a longer screw and have more threads to hold. Being around horses for 50 plus years, I've seen several tricks for securing them - drop of iodine to corrode the threads together, clear nail polish, acrylic paint, Loctite, Elmers glue, and more if I thought harder. If you choose Loctite go with the one that will release at low heat. Nothing worse than trying to get a screw loose without damaging the leather or concho head if it is a screw back concho. The low heat loctite will soften and loosen with a soldering iron held on the screw to heat it. Your customers are going to want to change these out to another rifle at some point or some other reason so make it somewhat easy. If you want semi-permanent to permanent then use rivets. I did some of those too. A tool that I personal REALLY like is the JP Tack Tool for Chicago screws. Tighten or loosen, they all get the JP tool used on them I got one of the early ones and still use it and have bought quite a few for gifts for gifts. This version is made from a polymer and has some flex. Some makers copied it with a visegrip or metal frame and that works. I havent seen those available recently but they can get enough force to punch the Chicago screw through the leather, the polymer frame ones won't. Here is a link to the JP - https://www.jptacktool.com/product-page/chicago-screw-tack-tool
-
kind of an idea though Fred. Actually I used to have a few clicker dies for scalloped belts and breast collars. Headstall dies were a one hit deal but the others were open ended. They did a section at time by just overlapping the ends. Pretty versatile - you could make the straps whatever length you needed but starting in the middle, doing as many scallops as you needed and then the billet lengths could vary by size length needed.
-
I skived mine back past the fold at least 1 to 1-1/2 inches past the fold so the trophy style buckles would have clearance for the tip to easily pass through the loop. My standard work kind of tooled belts were 8/9 with a 3/4 liner and even those could get tight on some buckles.