


Hags
-
Posts
1,070 -
Joined
-
Last visited
Content Type
Profiles
Forums
Events
Blogs
Gallery
Store
Everything posted by Hags
-

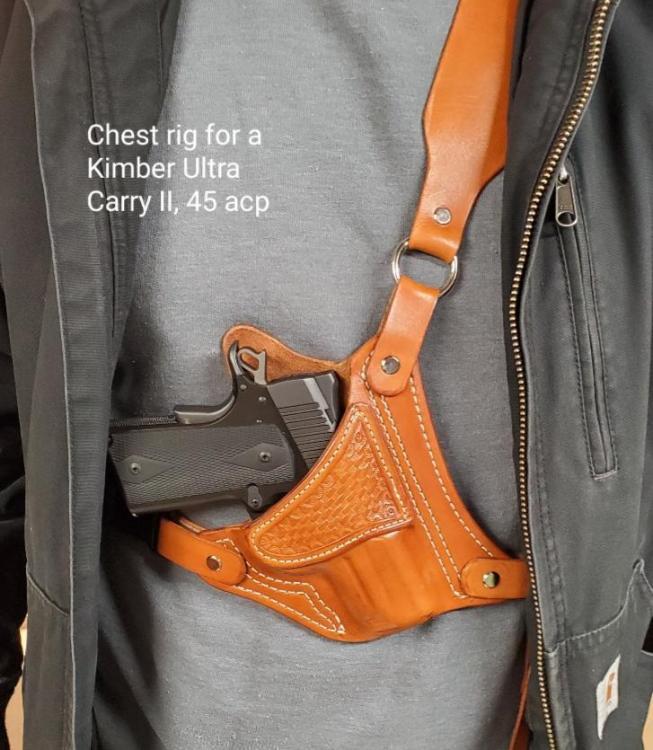
Chest rig for a 5" Kimber 45acp Ultra Carry II
Hags replied to Hags's topic in Gun Holsters, Rifle Slings and Knife Sheathes
Thank you! Used to deer hunt down in Nacogdoches county! -
Chest rig for a 5" Kimber 45acp Ultra Carry II
Hags replied to Hags's topic in Gun Holsters, Rifle Slings and Knife Sheathes
No, not thinned. Applied with a dauber, one coat circular, another one way, then the other, at one time. Let dry overnight. I do have to say not every bottle is ths same. The last "light brown" I bought was considerably darker. I also do a "streaked" look that folks like. I just start at one corner and drag the dauber across diagonally. It leaves heavier and lighter streaks across the leather. Questions are how we learn, I have many! Also, I dye before wet molding. -
Chest rig for a 5" Kimber 45acp Ultra Carry II
Hags replied to Hags's topic in Gun Holsters, Rifle Slings and Knife Sheathes
That is fiebings light brown pro dye -
Very nice Chuck. I do like tools...
-
Chest rig for a 5" Kimber 45acp Ultra Carry II
Hags replied to Hags's topic in Gun Holsters, Rifle Slings and Knife Sheathes
Yes, it would. But if you look close you can see a strap on the lower left that goes to the belt. That halts upward movement of the holster, but is still loose enough to not interfere with movement. Good call! That was the first mod I made for this type of rig. -
I too got mine as scrap. $5 for a piece about 24x18. Still using it. Want get a larger one for the desk I use now. Keeping my eyes open.
-
Finished this one this week. Just handed it off to the customer this afternoon. He rides bikes and has never been comfortable with any kind of a hip holster.
-
Pretty cool! I do a few pocket holsters and leave the flesh side out. I'll have to start tooling them now!
-
I just got started using the empty markers from the buckle guy. Much better than any results I had with a dauber. Pretty inexpensive too.
-
Second holster for this lady.
Hags replied to Hags's topic in Gun Holsters, Rifle Slings and Knife Sheathes
That looks great! I just finished another one, I'll post it separately. These are great holsters. And while this is your first, I doubt it will be your last! -
Second holster for this lady.
Hags replied to Hags's topic in Gun Holsters, Rifle Slings and Knife Sheathes
Yeah, all of that above. Thank you.. Lions, tigers, and bears, oh my.. Dorothy should have had a gun... -
Unfortunately, these are cows, not cats. They rub up against things before and after tanning. After these are tanned, they sit in big piles and the one on top gets pulled off, it can leave a line you wont see until after stain and finish. You are going to get the occasional wtf? I try to tell my customers this at the onset. Most of them welcome ths handmade, one of aspect of it. Go with it.
-
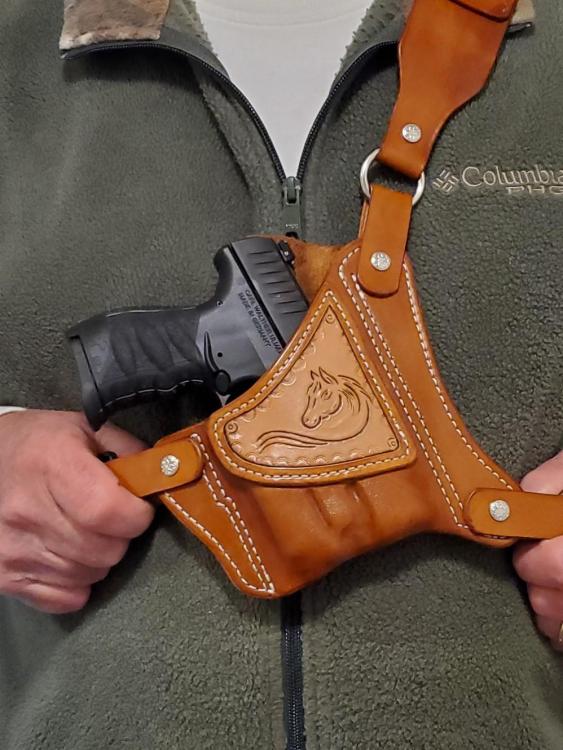
This lady was one of my first customers. I did a chest rig for a walther 380 for her. She rides horses up in the Olympic Peninsula national park area a lot. She recently bought this Walther 9mm with a tac light and wanted a holster for it as well. She is more concerned about the parking area them the forest. I'm still working on my artwork. She loved it though.i did this before my apron....
-
some more holsters
Hags replied to chuck123wapati's topic in Gun Holsters, Rifle Slings and Knife Sheathes
Good job! Nice and clean. -
What kind of Hammer for stichlines and gluing?
Hags replied to Silvyr's topic in Leatherwork Conversation
I use a Sears Roebuck cobblers hammer I found at a flea market for $10. I buffed the face and really like the nostalgia of the thing. -
I dont have any machinery that could possibly grab this. I guess I could climb up on the cobra class 3, but not likely. Not a machine shop..
-
That works! Pretty much what I did.
-
In Process Deer Knife Sheath.
Hags replied to WalterF's topic in Gun Holsters, Rifle Slings and Knife Sheathes
That looks great to me! I think the antiquing is spot on. -
Newly Finished Rifle Scabbard
Hags replied to JWheeler331's topic in Gun Holsters, Rifle Slings and Knife Sheathes
Very nice.. this is on my list. Now I have to buy a rifle, guess I could make one for my shotgun. -
Ditto JLS. To me, top grain is leather with a smooth, natural top/hair side and the split and sometimes sanded flesh side. I use HO exclusively for my work. I use one of 2 dealers because I know my b grade will be pretty much all usable. I like HO because I know how it is going to tool, mold, and finish. I use whichever one has the best deal at the time. One has a very good flat fate shipping and the other occasionally has free shipping. I do pay a bit more for HO, but I feel it's worth it. You will still have to work around zome problem spots, but I find them pretty minor. I also am trusting my supplier to send quality leather. If I had a tandy or Springfield within 50 miles, I may do things differently being able to see and feel the product. But as always, caveat emptor.
-
Dye from working on projects! Thanks guys. The cost is somewhat ameliorated by getting the lighter weight stuff when it's on sale. Usually black Friday stuff. I think I got that side for $65 and free shipping. I don't use much of it, but like to have some around for straps and the occasional bag.
-
Too bad Matt, could've treated you to a day on the golf course here. And all those sharp implements rest on a layer of 7/8oz Hermann Oak leather. Doubt they could make it through.
-
Ditto on the knife! Want to see the finished piece.
-
Mag holster for myself
Hags replied to lansacoder's topic in Gun Holsters, Rifle Slings and Knife Sheathes
I generally use 7/8 for the back and 4/5 for the front. I have taken the time to make a few molds out of plywood for 380, 9mm, and 45 acp, both single and double stacks. It really helps with the wet molding. -
Pretty cool.

