
Hags
-
Posts
1,070 -
Joined
-
Last visited
Content Type
Profiles
Forums
Events
Blogs
Gallery
Store
Everything posted by Hags
-
Did not visit Tally Ho. But if you're in the area about September the wooden boat show in Port Townsend is very interesting. And no, I'm not worried about the pointy ends. I did consider pockets, but ultimately settled on what I have. I dont sit except to do tooling and dont wear the apron for that. This is more for use around the cutting bench and sewing station. Thanks guys.
-
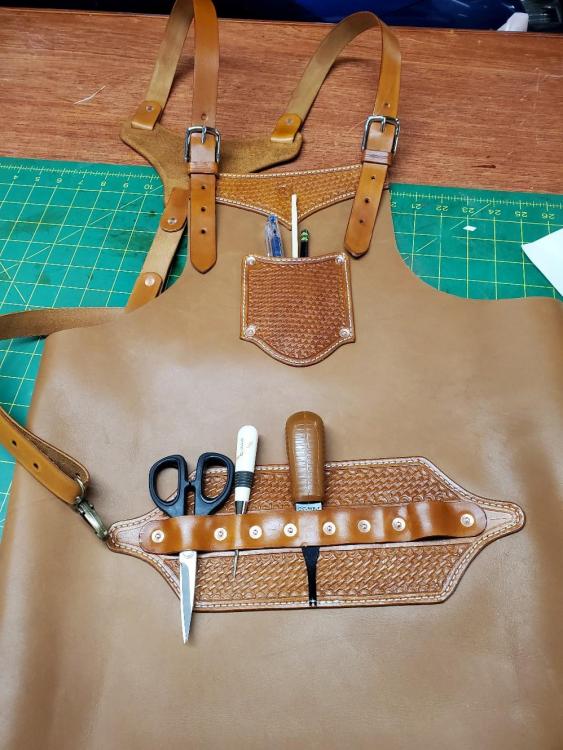
I had a piece of softer leather hanging around and nothing on the bench. Merry Christmas to me! I used 7/8 oz Hermann Oak for the tooled pieces, Hermann Oak 4/5 oz for the straps. Basket weave just because. I have never made an apron like this and can see room for improvement. The stitching on the top of the pocket is because I got so into the machine I just went right around the corner and sewed the dang thing shut! Pulled it out to the corners and hand stitched the top so the holes didn't look like I was ... I made a yoke for the back and it is tooled with my makers mark as well. It has a short drop to a loop for the waist strap. Anyway, i like it and can't wait to get dye all over it..
-

Mag holster for myself
Hags replied to lansacoder's topic in Gun Holsters, Rifle Slings and Knife Sheathes
Every new thing is a learning experience. I personally like a bit more coverage up the mags but otherwise a nice build. -
Cover for a hatchet
Hags replied to lansacoder's topic in Gun Holsters, Rifle Slings and Knife Sheathes
Nice and clean, less is best. Good work. -
I believe it was an Alden's school of leather video I watched regarding this. He used double sided tape and covered the entire back of the patch. It's a good video, look it up on Youtube. Sewing on a leather hat patch.
-
Ditto the plastic bag, re-wet as needed.
-
No roasts, maybe constructive criticism. Welcome! Hope you show you're successes as well as the "learning opportunities".
-
For my small patterns, I use card stock and print directly onto it. Works really well. For larger stuff, I often use the card stock you can get from Costco or similar stores that I find between the paper towel stacks.
-
Check out his videos. Just went through the cast iron skillet one for a friend with a few cast iron skillets that wanted one. Great videos!
-
That is very nice! I get some requests from time to time for these but have not done one yet.
-
Very nice!
-
Nice!
-
Holster and seeking advice
Hags replied to papaleaf's topic in Gun Holsters, Rifle Slings and Knife Sheathes
It is. Getting a little breeze off the Pacific today but the Olympic mountains block the prevalent southern wind we usually get. I grew up in Texas, moved to Seattle in 91 and got addicted to mountains, trees, rivers, salmon, etc, etc, etc. 52 here today. -
Thank you!
-
Holster and seeking advice
Hags replied to papaleaf's topic in Gun Holsters, Rifle Slings and Knife Sheathes
I use Hermann Oak 7/8 for the holster, 4/5 for the rest, 1" nylon for the chest strap, but you could do leather with a buckle as well. The glass slicker came from amazon. I see now there is a 2 pack of different sizes. I think I would like that better. Sometimes this one is just too big. I bought a 2 pack for <$20. I bought my welded rings there as well as the purple loctite (you don't need 40 to 50 ml!) that I use on my Chicago screws. I do almost all my buying online. I live on the Olympic peninsula of Washington state and dont have the luxury of a leather supply within 5p miles that includes a ferry ride across the Puget sound. -
Holster and seeking advice
Hags replied to papaleaf's topic in Gun Holsters, Rifle Slings and Knife Sheathes
Sorry, I just saw this.. here's a pic of my parts and pieces I use for my shoulder rigs. I use nylon for my chest straps, but leather is an option as well. I catch hell from a few members for this, but leather is not always the best material. I measure below the nipples, cut to size, and the holster width usually gives me enough room for clothing allowance. I do a 25 degree cant on the chest rigs, and just be sure to leave enough room for a grip and draw away. Dont hesitate to ask if you have other questions.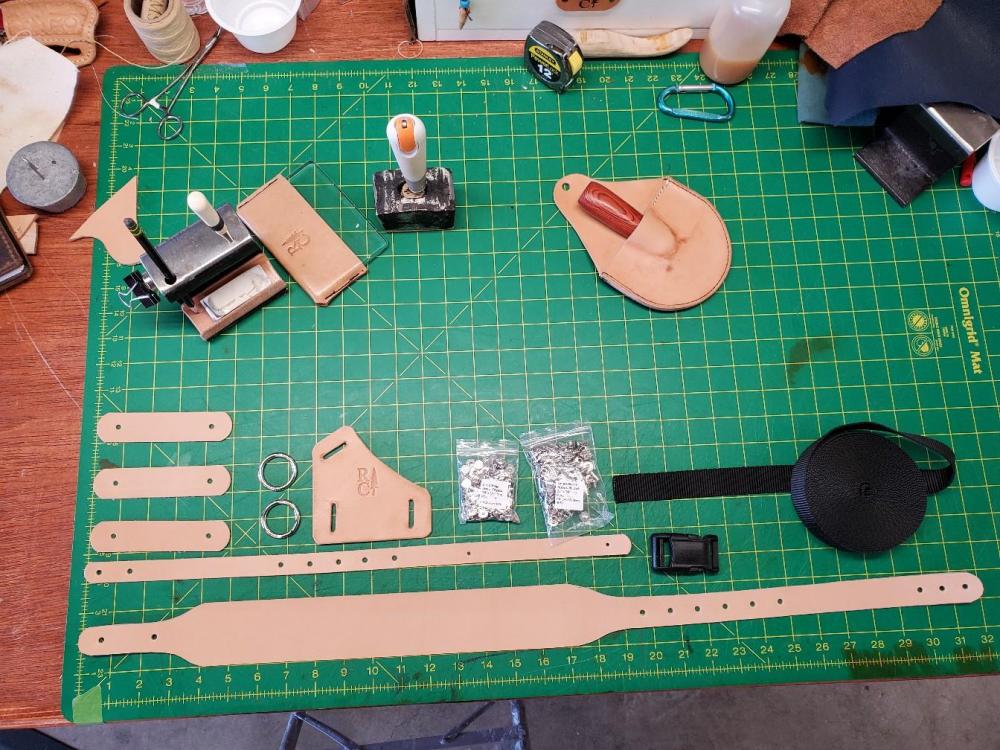
-
On my holsters, I stamp the reinforcing piece before I sew it on the front. Then I wet mold.
-
My First Attempt at Holsters
Hags replied to VikingKong's topic in Gun Holsters, Rifle Slings and Knife Sheathes
I think they look very nice, more so since they are you're first. Nice stitching and design. I prefer a forward canted holster. The FBI standard was set ar 15 degrees sometime in the distant past. I use this on my pancake holsters and find it does, to some degree, help with drawing the gun as I carry mine in the right rear. I also use a reinforcing panel on the front. I feel it adds some rigidity to the holster, but have made them without and feel it really made no discernable difference. It IS a very nice place to tool, which I enjoy. One thing that was brought up is the spacing between the grip and the top of the holster under it. I always leave at least 3/4" to get my fat fingers around the grip. I also get most of my retention from the back of the holster, trigger guard, takedown pins, etc. Good job! -
Handstitch vs Machine for artisan pieces
Hags replied to Warhauk's topic in Leatherwork Conversation
Arthritis, cobra class 3.... -
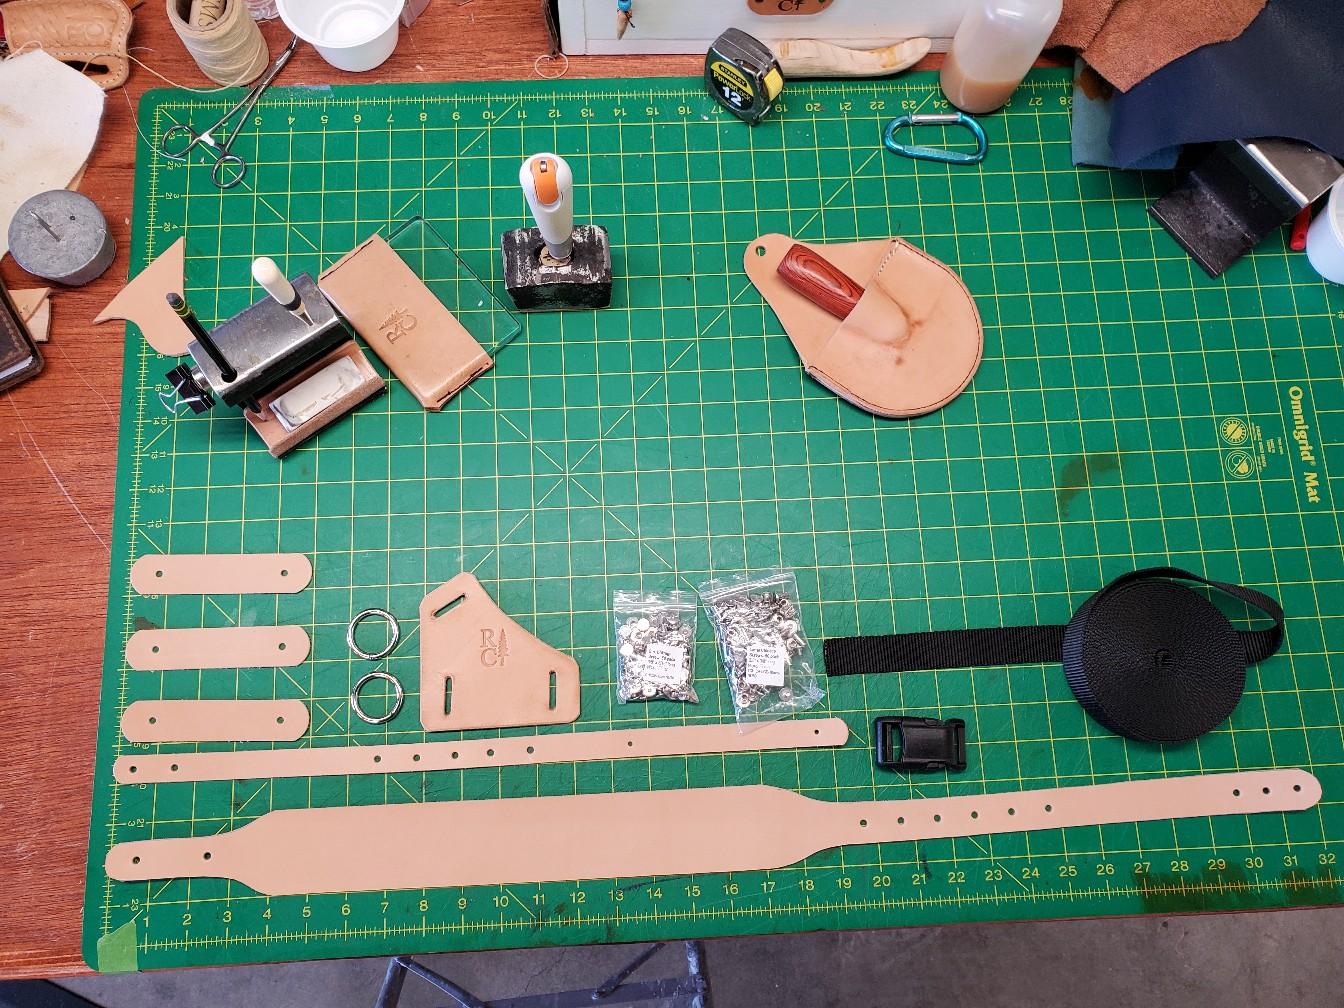
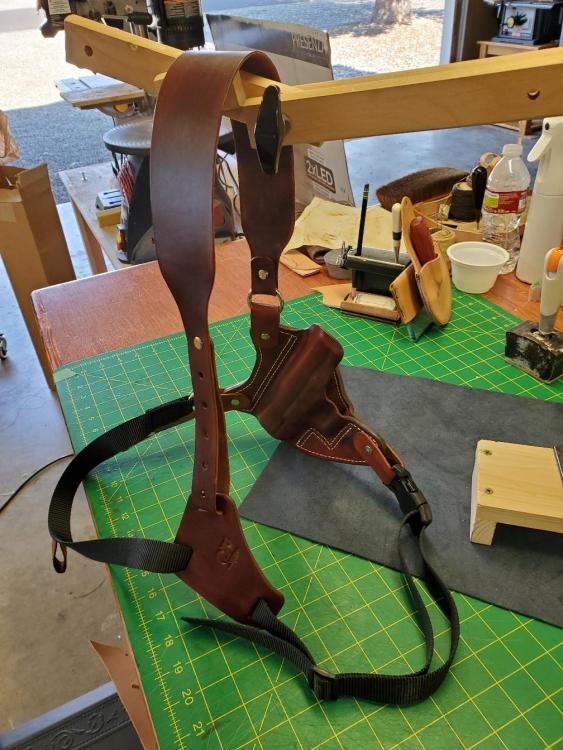
This is a pic of my connectors and straps. The 3 small straps in the upper left connect the holster to the shoulder and chest straps. I use 1" welded rings for the upper front of the shoulder strap and connect both sides to the ring with Chicago screws ( bigger for the holster, smaller for the strap ). I also use the rings for the non-buckle end of the nylon strap (cut to fit the person, + 12 inches or so for adjustment. The nylon strap goes though the bottom slots on the kinda triangular piece (RH shown) and around to the buckle end on the rh side for a rightie. The extra goes into a "keeper" for want of a better name. It has 2 slots and a center bar. I thread this on before I go to the buckle and put the end into to keep it out of the way (you can see it on the strap in the pic of the back of the holster). The shoulder strap goes through the top slot of that piece and gets closed with a Chicago screw. I use purple loctite on the screws on the holster at assembly and the others at final fitting. I used to not have the 1" bag punch and the triangle piece would float back to the left and loosen up. I remedied this with a 1/4 " punch for the leather and a soldering iron for the hole in the nylon pinned with another Chicago screw. With the bag punch the fit is pretty snug and I've had no issues with the attachment point moving. The skinny strap is the belt strap. I put a line 20 snap in the small holes in the right. These are spaced to fit a 2+in belt the other end attaches with Chicago a screw to the non buckle side of the chest/nylon strap`s welded ring. This greatly aids getting the gun out one handed. moving. I hope this helps. I'm still learning, and appreciate the feedback I get from this site.

-
Hmmmm, could work I suppose. My machine could sew close enough. Just not the way I learned. I'll have to think about this.
-
Scope stopped the gun from going quite as deep as I would have liked. Try as I might it's not a real perfect science.
-
Not my gun but yes, not my choice of grips. Thank you for compliments. This one was a challenge.
-
Yes, initially the retention was a bit too much. I wrapped the gun and scope in thick plastic wrap and let it sit for a while before it was completely dry. This loosened the fit enough to hold the weapon very well, but allows for the gun to be drawn. I also went into these areas while wet and released/eased them a bit from the inside. I saw this going in and advised the owner this is not going to be a "speed draw" holster (duhhh), and that unless he wanted a very loose fit and a strap, it was going to on the snug side. He loves it and can draw it one handed. Thank you for pointing this out. When I do pistols, I make sure to relieve the area around the ejector port to prevent locking the gun in. I just cant resist getting all the detail I can.
-
Total New Rig Design For Me
Hags replied to Dwight's topic in Gun Holsters, Rifle Slings and Knife Sheathes
I think I know that guy! Naw, not really. But, that is a very nice rig. Well done!