.jpg.e13e7809a690335a89b8a4ed2e876db1.jpg)
Northmount
-
Posts
6,539 -
Joined
-
Last visited
Content Type
Profiles
Forums
Events
Blogs
Gallery
Store
Everything posted by Northmount
-
.thumb.jpg.6e903dd66163ad5672f00f144058c571.jpg)
Messenger Bag
Northmount replied to rosiart's topic in Purses, Wallets, Belts and Miscellaneous Pocket Items
Fantastic job. Tom -
It's called a slit braid. Did a Google search and found several references. Try this link Also some examples and photos here. Tom
-
And Another One
Northmount replied to olivier79's topic in Purses, Wallets, Belts and Miscellaneous Pocket Items
Pretty good looking bag. Just burnish all the raw edges will make it an over-the-top bag. Tom -
Depending on the antique paste, some of it may be waterproof too. Tom
-
Pocket Notebook
Northmount replied to Bob Blea's topic in Purses, Wallets, Belts and Miscellaneous Pocket Items
Really nice job. Your backgrounding is really consistent and smooth. The mockups often take more time than the real thing, except for tooling time. Which tools did you use for the geometric pattern on the back? Tom -
Nice, and as others have commented, burnish the straps, get rid of the fuzzies. Tom
-
Ordinary disposable paper masks don't do any good for volatile chemicals. And the leakage around the "seal" at the nose severely reduces their effectiveness for dust. For dust, at least get the type with an exhale valve. Get a proper respirator type mask with cartridges labeled for organic vapors, or just dust if you are sanding or such. Note that the cartridges for organics must be kept in a sealed container when not in use, else the activated charcoal will be used up next time you want to use it. As soon as you start to smell the vapors through your mask, it is time to change cartridges. For exhaust fans, look at where the motor is in relation to the stream of flammable vapors your are disposing of. If the motor is in open "fresh" air, any type of motor is suitable. If the motor is in the exhaust stream, or in the spray booth, make sure it doesn't have any arcing contacts like most motors with a starting winding. Or use an explosion proof motor if it does. Shaded pole induction motors don't have a starting winding, and no internal arcing contacts. Most bathroom and kitchen exhaust fans are shaded pole motors. Tom
-
Harmonica Case
Northmount replied to Manypawz's topic in Purses, Wallets, Belts and Miscellaneous Pocket Items
I was thinking of a case for a single harmonica when I read the title! Looks great. Good layout. Tom -
Interesting box. Looks great. Tom
-
Link to Ray's photos http://leatherworker.net/forum/index.php?showtopic=826&p=295067 plus post 175 in the same thread. Tom
-
Take a slice on an angle through a log. Diameter only needs to be as wide as the width you want. your angle can be as acute as needed to get the length. Tom
-
It's looking pretty fair. Lines that are beveled can be softened some by running a spoon over the sharp edge to round it over some. You can do some small practice pieces where you just experiment with eyes, nose, etc. There is an Al Stohlman book called Figure Carving. It has lots of info for both human and animal figure carving. 132 pages. part of it is in colour and includes using dyes. Tom
-
3M and other companies now have water based versions of contact cement. Check your local hardware/builders supply. Not so strong solvent smell. Much easier on the sinuses and safer. There are also several thread about what type of glue to use and about contact cement here on LW net if you want to search for them. Tom
-
I have the Techsew 2700. Good machine, had it dropped at the curb, unpacked it and brought it, assembled and ready to go in a couple hours. Tom
-
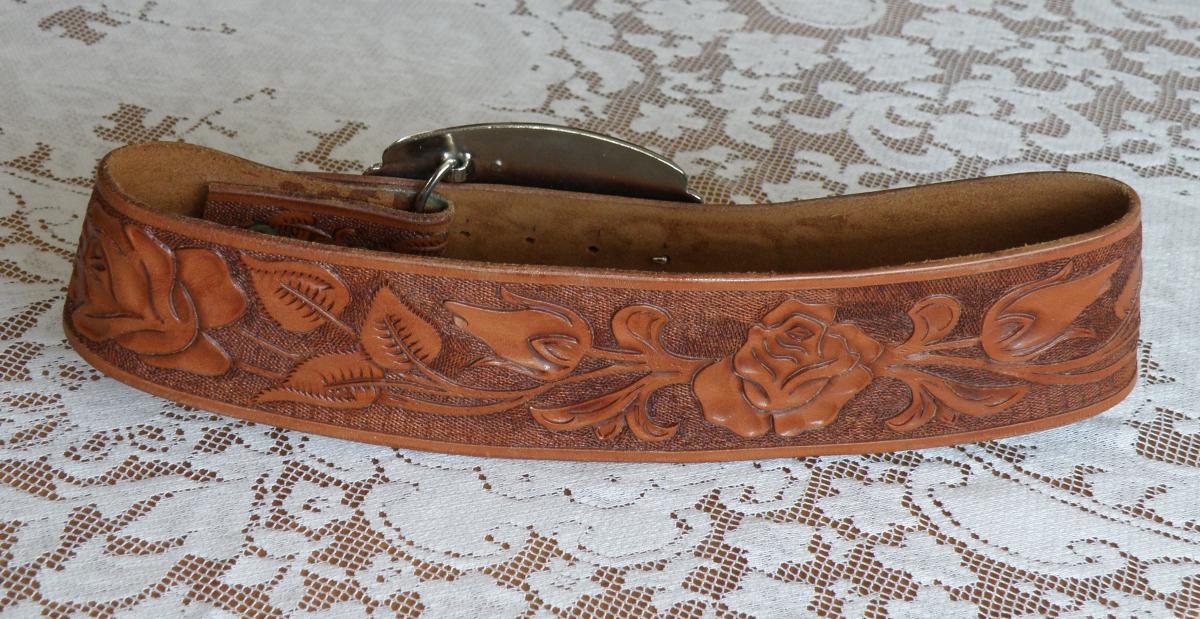
The NF oil should be pure, not a compound containing other stuff. NF oil does darken leather. The purse has a finish on it that may not take oil very easily. It is probably a lacquer which really seals the leather. If the oil doesn't reach the leather evenly across the surface, it can be blotchy looking. It may even out over an extended period. Some people are using extra virgin olive oil (EVOO). They say it doesn't darken the leather as much. I have a contour belt that I made in 1969. It was finished with NeatLac. It sat in the drawer for most of the time since. It was getting dried out, so applied a little NF oil to the front and to the back. The back was raw, no sealer or conditioner. It turned to a dark brown. I'll attach a couple photos so you can see the difference. Before After Tom
-
Don't put too much NF oil on at once. Light applications and leave soak in. If you get too much on, the leather will get soggy. You will find lots of threads here about how to apply NF oil, and also how to eliminate the excess oil when people put on too much. Tom
-
Skiving the end of the lace will help, but you may still need to use pliers occasionally. Before you do much work on the purse, recondition the leather so it is a little more pliable. Else you may start getting cracking and even tearing out some holes. Don't pull outward putting strain the lacing holes, pulling through the edge. And when you get all the way around to make the final slice, pull out a few of the starting stitches so you get the slope of the lace consistent across the splice. The first few stitches are usually too vertical, so need to come out. You should do some practise lacing around a piece of leather say about 4x4". It will help you a lot with the purse. Good luck. Tom
-
You can pull out as much lacing as you wish. If you get into an area where it is holding 2 or more layers together, you can use small zip-ties every 10 or so holes so everything stays aligned. Tom
-
And you may have trouble matching the lace colour and quality. So yes, replace it all. Tom
-
When I was a kid, a long time ago, my dad ran a hog farm. We got a whole lot of flax straw for just picking it up and thought it would make good bedding in the hog pens. By the time spring came, and the hogs had been trampling the flax straw for some months, the pens were extremely hard to clean. If you tried picking up the mess with a manure fork, you were literally trying to pick up the whole pen. It was all matted together. Had to use an old silage cutting knife to break it up into pieces that could be thrown into the wheelbarrow. So all the trampling and bacterial action did little to weaken the flax straw, just helped to bind it together. And of course you know that linen comes from flax. So I have little concern that linen thread will deteriorate faster than synthetics. Anyhow, the story would make a good cartoon! Tom
-
A side cutters / diagonal cutters / wire cutters and a small ball-peen hammer are all that you really need for setting copper rivets. And of course an anvil of some sort under it. Anything beyond that is a nice to have. Just make sure you press the washer down tight and trim the post to fit. A tool for doming the peened end could be nice sometimes. Tom
-
Really nice job! Tom
-
Moved to leather sewing machines forum Tom
-
Calgary Tom
-
I can put you in contact with my son that does website design and maintenance. He says "I could set up a private phpBB installation if they want to set up a shared hosting account on BlueHost, GoDaddy, or somewhere similar." Send me a PM if you want more info and to make contact. Tom