RockyAussie
-
Posts
3,265 -
Joined
-
Last visited
Content Type
Profiles
Forums
Events
Blogs
Gallery
Store
Everything posted by RockyAussie
-
Oh yea of little faith, You in the wrong forum section if a you going to use language like that. Sometimes the answer is in the formula. If the swell is made of the right sort of rubber/foam it will sit down under the pressure of the foot and bounce back up as you sew along. There is also another special foot set that may be hard to obtain but it allows you stitch around the welts on shoes. Lots of adjustments with those so I would try the paddle feet first. Could you load any pictures of the bridle pieces?
-

Glasses Cases
RockyAussie replied to ArkieNewbie's topic in Purses, Wallets, Belts and Miscellaneous Pocket Items
Not all that bad. I am wondering why the side stitching was not brought further down to the bottom? -
This part of it just does my head in. I do respect very much Singer quality and design but ...why have a freewheeling catch on the hand wheel and not a knob to turn it with???? If you disengage the hand wheel you could not load your bobbin. I suspect that the disengage function would not have ever been used on this machine. I agree with @shoepatcher about removing the front hub unless you have a hand wheel with a knob. Logically it would run more smoother and freely without having to run a set of gears for no purpose.
-
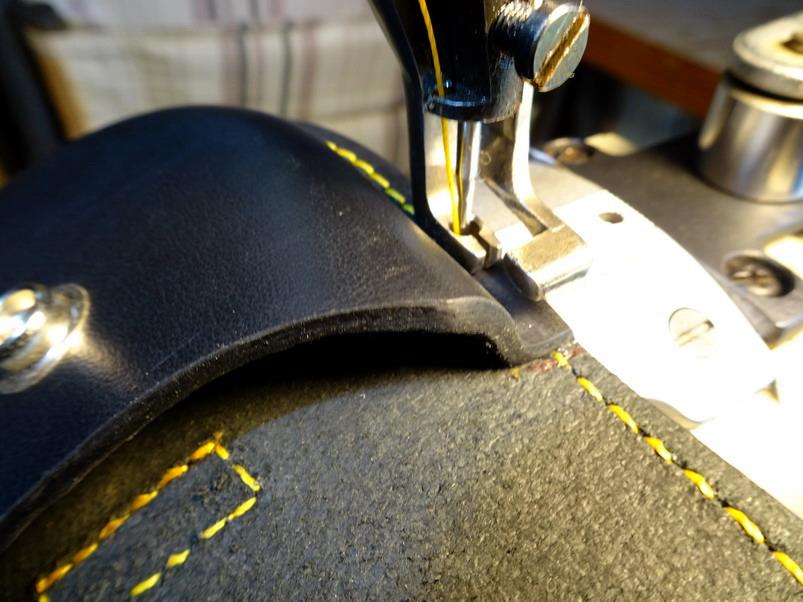
Hey @TomE, I am wondering if the right side paddle foot would work for you. With the narrow needle plate set and it you can get pretty darn close to the edge as you can see in this picture where I am stitching a oil stone pouch. Other than that an inline foot set should work as well or better I think. I do not do horse tack myself but with the 207 thread and the needle that that needs I would have thought 9/10 SPI would be getting a bit too close I hope to get to see how it goes. Regards Brian
-
Would this link be of any help - https://www.manualslib.com/products/Singer-29k70-701703.html
-
Handbag Hardware supplier needed.
RockyAussie replied to RockyAussie's topic in Leatherwork Conversation
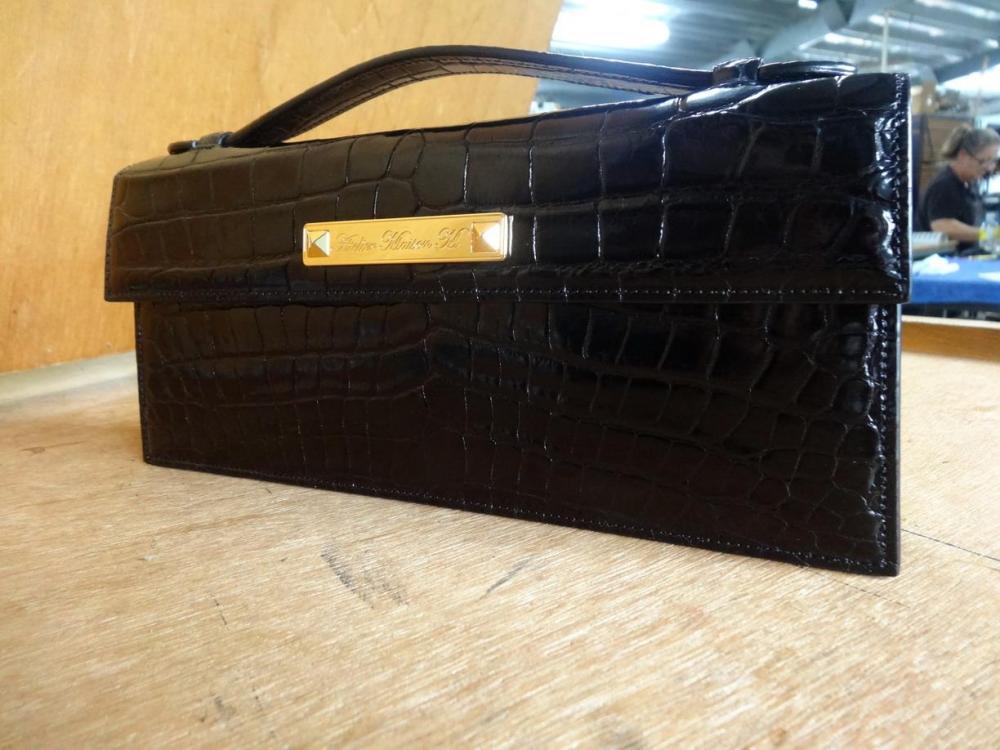
No harm asking I guess. I am tempted to just make them up from some of their hardware I still have seeing as how they claim that they don't make them anymore. Unfortunately I think the older seniors of the place may have got to retirement age and I have a deep respect for their past work and abilities. Communication with them has been very difficult and their web page is incredibly not English friendly nor up to date in any good way. They advertise mostly to make your designs but cant come to making their old ones due to them being too difficult to make now. When it comes to them making something from your design the cost gets way high. They use a badge I designed for a customer on their blog page showing the steps involved in the making of it. We had to get a lot in one order and they cost about $30.00 each. Neither the customer or myself were asked about them showcasing it that way. I did not mind so never brought it up with them but... This is the badge on the handbag I produced for my customer -
-
It looks like getting the taps for that thread size is pretty easy with a google search. https://www.google.com/url?sa=t&rct=j&q=&esrc=s&source=web&cd=&cad=rja&uact=8&ved=2ahUKEwj2svCzieb6AhXYGLcAHUWhBsAQFnoECA4QAQ&url=https%3A%2F%2Fwww.amazon.com.au%2F16-20-Right-Left-Hand-Thread%2Fdp%2FB075N48H1S&usg=AOvVaw0rXSk3GoaxJJH7xgbFknkA Being for push bike peddles it may be possible to get a bolt from that area and cut it to suit?
-
Handbag Hardware supplier needed.
RockyAussie replied to RockyAussie's topic in Leatherwork Conversation
Thanks for the compliments on the bags everyone. I have been doing a lot of searching and have not as yet had any luck finding any reliable supplier of high quality hardware. Every thing seems to be disappearing. I am fast approaching the stage of getting some casting gear and making my own. I hate that idea as I have often had to resort to doing a broader and forever wider range of stuff to make my leather goods. I could not get any locals to cut and sand the mirrors that go into my lipstick cases and now we have to have had to do that as well. Glass sanding machinery is not that cheap. Brass casting gear looks to be another $$$$ rabbit hole. I hope the gold and nickel plating part is not another big problem coming up. Thanks for that effort @PastorBob . There were a couple of interesting finds in there. Most of them are resellers and I have found in the past that the pieces there today are not there again when you need them. Mostly the actual makers are not making a lot of pieces they were before and only want to make new products for your needs. I don't make very large numbers myself so the cost of getting the moulds made etc is not affordable. It would be good to find a collective of like minded buyers to get made a small range of fittings that suited their needs but I am not sure if that could ever happen. I may try another post to see if I can find any interest in that idea. -
No...the spring I am talking about is a paddle shape that attaches with 2 little screws onto the needle bar itself. I will try and load this pdf manual where you can see it on page 27 part 18. Singer-29K71+72+73_Service-Manual+Parts_EN_text.pdf
-
Looks like a great find. How is the little spring that holds the thread onto the needle bar? I have found they are often broken when it comes to doing them up. I did a new one last week on a long arm 29K72 along with the bobbin rubber and a new needle bar screw.
-
Cobra class 4 reverse issues
RockyAussie replied to StoneBuiltKnives's topic in Leather Sewing Machines
Looks good to me. -
This is only a problem if one were feeling any need to answer those questions.................. You misunderstand kind sir......If these manuals appeared insufficiently stupid, for one the phrase WTF may never have come into place. Secondly the people might make the mistake and think that what is written there might sometimes be correct and then rely on that information.
-
I believe at the time the Ferdco pro was highly regarded and did some improvements with the feed dog to help with miss stitching but to the best of my knowledge the feed dog was not an actively working feed dog that assisted with clamping the product between the feed dog and centre foot. The needle plate used has only a slot like the standard narrow needle plate set on the Cowboy machines. Although that needle plate can be used fairly successfully on some jobs it still has the disadvantage that all of the feed is only obtained by the action of the needle feed and walking feet which can result in less than ideal stitch lengths on some jobs. The narrow needle plate feed dog set I designed for the Cowboy machines overcomes this problem very well but I do not know if it will work on the Ferdco pro as yet. It works with the Cowboy and Cobras and Techsews alright. We have sold a lot of these narrow needle plate sets around the world now but as I said I can not say if it works on the Ferdco. Perhaps some other user may know? This link will show the set we make and other peoples opinions -
-
Newbie Progress Report - Servo & Speed Reducer
RockyAussie replied to gr8legs's topic in Leather Sewing Machines
Same here -
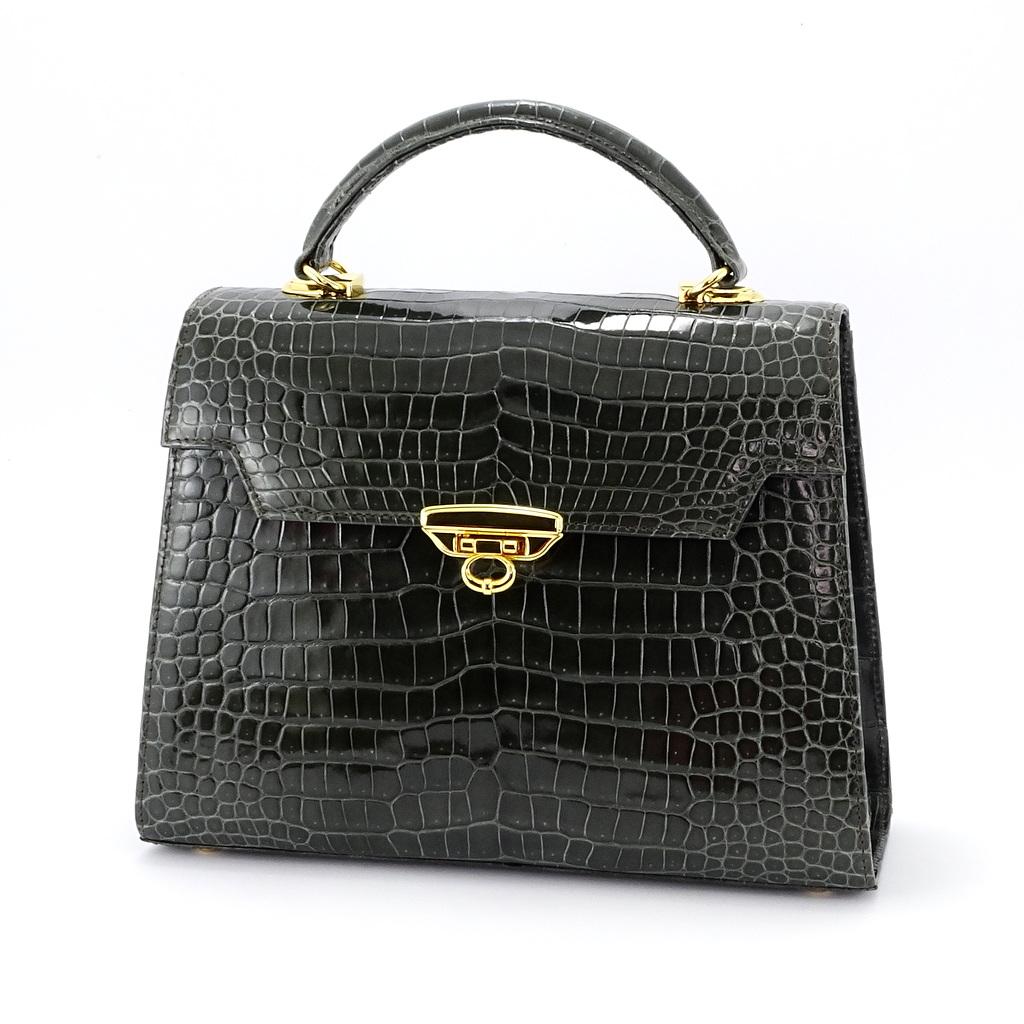
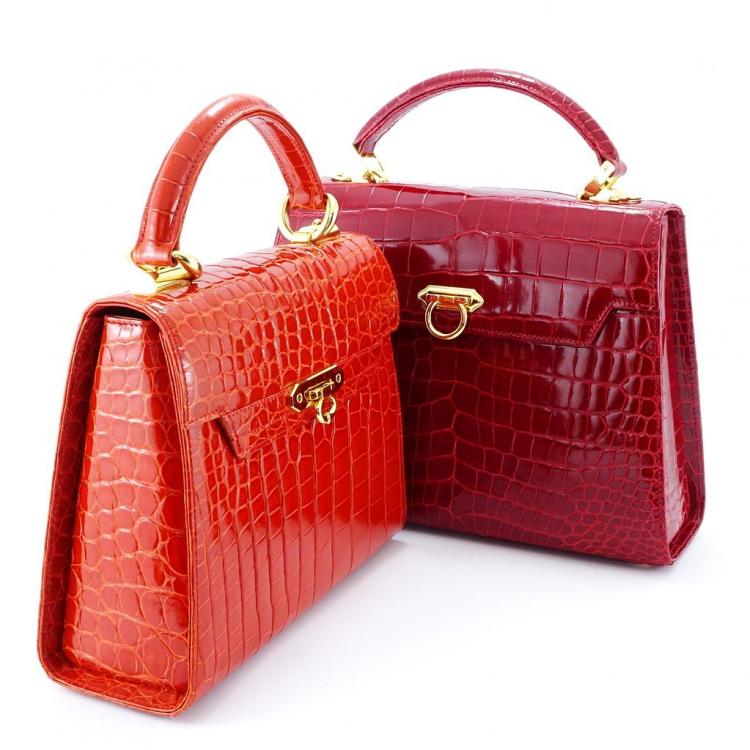
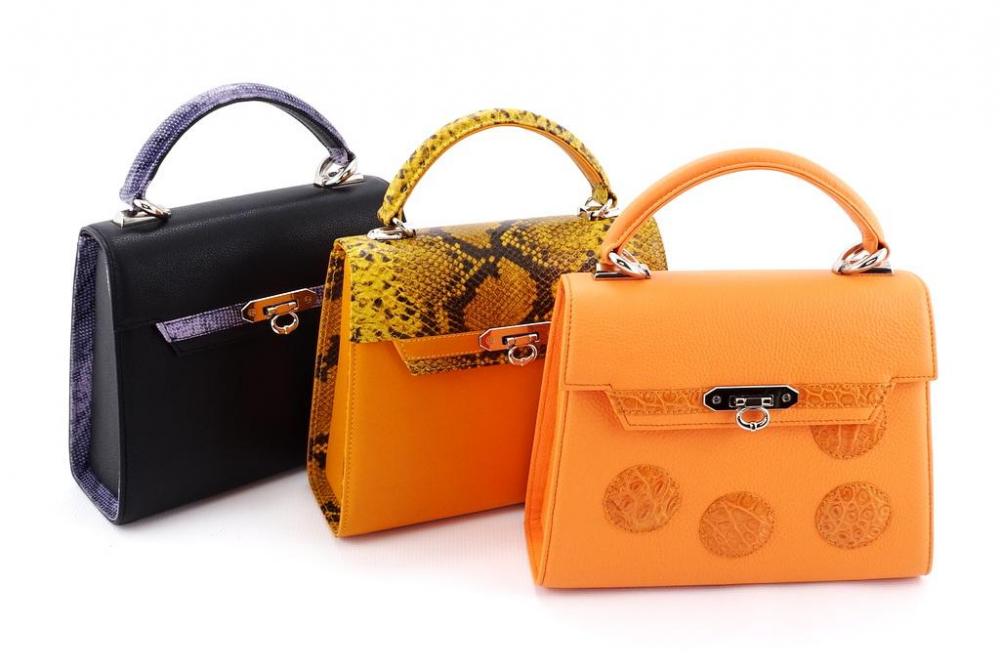
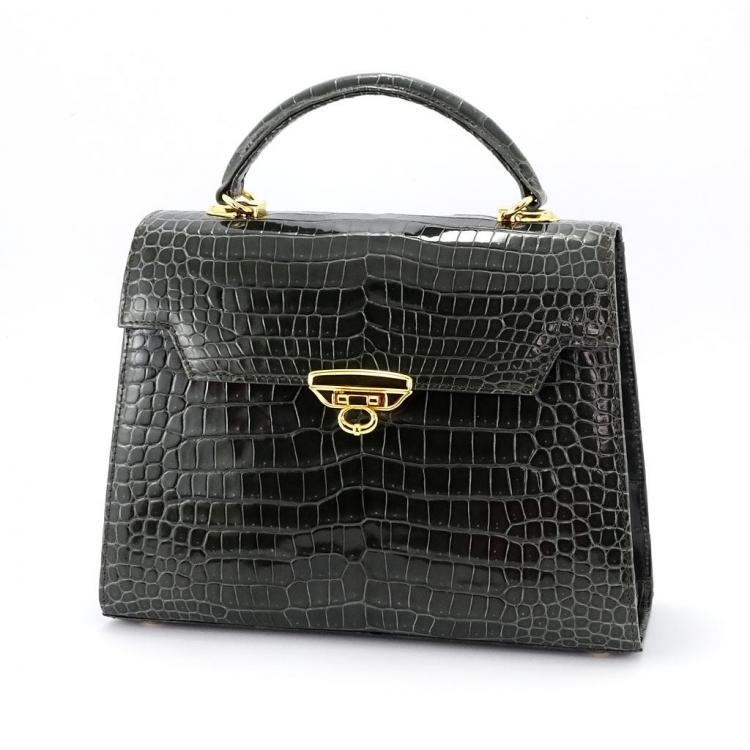
Help, I need a new supplier for my handbag fittings and in particular the front flip lock types. My supplier in Japan has stopped making these now and I need to find some high quality replacement hardware quickly. Most of the stuff I make is high end crocodile products some of which can be seen on my Wild Harry website and in these following pictures. If you have any good contacts to share please post here or send me a message if you prefer. This is a link to my web page - Wild Harry
-
Advice on building a new shop/building as part of business
RockyAussie replied to desullivan's topic in Getting Started
Allow a room for keeping all hose deigns and loose bits to be stored tidy and easily seen and accessible. Room for your flammables. Allow for the whole lot to be moved around to suit the present required production. As time goes on what is important to have laid out well today may not suit what you produce tomorrow. Plenty of power points everywhere. Room to have gluing up safely and close to the operations, mine is mid building and off to the side where it can be isolated by a roller door if required. Heavy belt production as against heavy handbag production both take up a lot of room and do not intermix well for efficiency. Plan well as you can but expect the lay out to change around sometimes. -
TechSew 5100 -- metal piece sheared right off!
RockyAussie replied to SewMuchToLearn's topic in Leather Sewing Machines
I have never seen that before. I wonder if something was too tight or jamming the hook from turning like something in the hook race? One of the reasons I like to have those spring screws out 1.5 turns I guess. OIL should happen on the hook race ever hour of use by my reckoning as well. I am sure that Ron will help you out. -
Where do I go from here?
RockyAussie replied to Rossr's topic in Gun Holsters, Rifle Slings and Knife Sheathes
@Rossr Some of your work looks excellent above, in particular the feather one with immaculate crew punch holes. The only main points of criticism that I can see is the different use of colour threads and sometimes uneven spacing from the edge like you have not used a guide or when sanding the edges not staying true to the stitch line. I noticed in the example member @Tugadude shows in his google search above down the bottom a couple of pouches that I made using crocodile. This made me use the same search terms to see where I had posted it before and here is the link I found that you may like to check - https://leatherworker.net/forum/topic/85774-knife-sheath-template/ You will see in that post where I have done some work with a jeweller friend that made silver fittings to go onto the pouches and that may give you some inspiration to explore further. Note that he did win many knife shows for years with the work we did together. -
What's the largest die you've used on your clicker?
RockyAussie replied to Cumberland Highpower's topic in Leather Machinery
I am sure it will work alright but I think as a general rule about 500 pounds per inch would be about right so on your measurements 16 ton would do it. Have a look here first https://www.keydies.com/faq.htm This post on page 2 has some calculations that may help -
Hey Don, Do you have these patterns drawn up in a CAD file? I normally draw up in AutoCad and print to check all is correct then send to the laser to cut. Taking a hand drawn pattern and redrawing into a cad file can be quite time consuming. It is a fair bit quicker to design in a CAD format right from the start. The product above would take me 1.5 to 2 hours to draw up and get exactly right. Once you have a CAD file you can get it cut anywhere you want. Great thing about going this way is that if you want a little wider or longer etc it can be done in just a few seconds
-
What's the largest die you've used on your clicker?
RockyAussie replied to Cumberland Highpower's topic in Leather Machinery
Pretty sure a 25 tonne press will handle that alright but the 18" may be getting a bit long hanging out. I try to avoid more than a couple of inches hanging out on the sides of the top plate as it can bow your knives if you are not careful. If needed I cut left and right and only half depth then take it down and repeat the same. Not for the press so much just for the knives. The knives I mostly use are 2mm thick steel. One thing that makes a big difference is giving the outer edge of the blades a polish with a rag wheel and tripoly wax. That can give a cleaner and a way less pressure cut. -
Just a thought that may be worth a try......With out the leather get a large plastic garbage bag and put it over the whole door skin then with a vacuum cleaner suck out all the air you can looking to see if it is possible to get minimal creases. If it looks possible spray the black leather on the back and lay it over the door skin and push into shape as best you can by hand then repeat the vacuum process. Then place your sandbags or just plenty of sand all over for a couple of days to dry out. This should give you a formed shape to then glue down starting off at the armrest.
-
I use a 2.5 watt Elksmaker to do engraving on leather and it works fine. I believe the 2.5 watt can attain the narrowest point and is therefore better for fine line work. I also use it a lot for cutting or marking my cardboard patterns and templates. Cuts in to black acrylic for making the odd stamp pretty well and I use it a lot for cutting out my cardboard product boxes. I did though rebuild it so I could do poster size work and enclosed it for better safety and fume extraction. This post I did a fair while ago shows a little bit about what I did to improve it - I do also use it a fair bit for cutting out fabrics as well for the one off prototypes and such. It is one of the things that I found very useful in quite a bit of my manufacturing.
-
Thoughts on the Cowboy 4500
RockyAussie replied to Silerleatherworks's topic in Leather Sewing Machines
Should be one of the best machines for the price if you want to do holsters. For wallets and purses keep in mind that the smallest leather point needles for them is a size 160/23 which means the thread size is best at 138 (20 Metric). The large cylinder end can sometimes be a pain when trying to do small gussets and such. The narrow needle feed dog set will give you a way better range of product possibilities as shown in this post - I would also suggest that you have a look on my Youtube channel where you can see a few other machines to consider for the future. Wild Harry YT Contact Bob Kovar , owner of Toledo Industrial Sewing Machines. He is a member here and has very helpful input @CowboyBob -
Hot Foil VS Hydraulic Press for volume stamping
RockyAussie replied to Workinman's topic in Leather Machinery
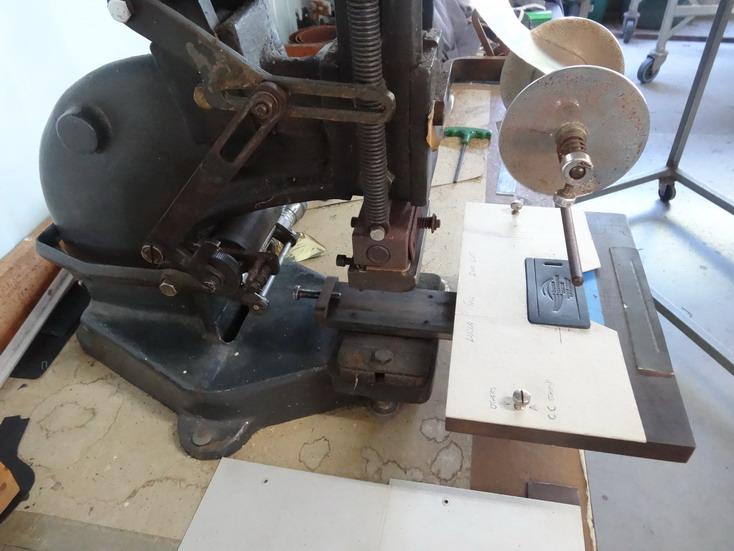
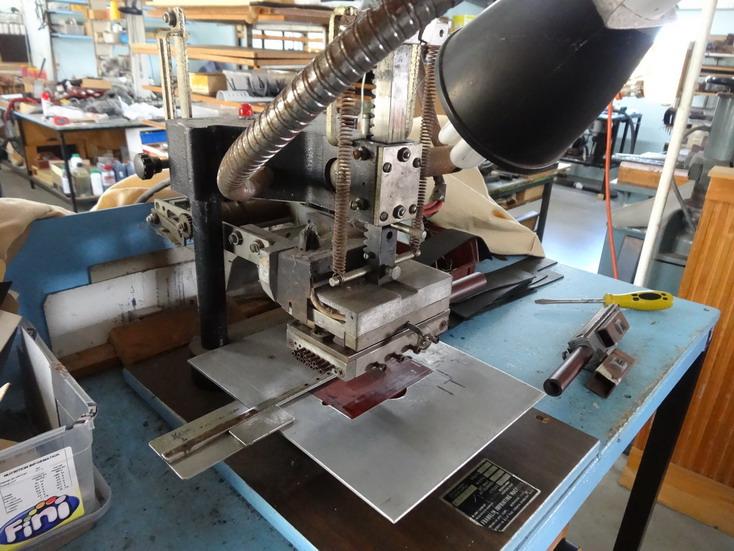
Just to add a little to Mike's advice above. A good embossing machine will allow you to adjust up and down for the various thicknesses to get just the depth of impression you want. Some of the manual clicker presses will also do this as well as come in handy if you want to do some clicking or wet moulding as well. This picture below shows one of my embossing machines which has the advantage of a sliding table and with this I am able to position many different cardboard cut out shapes to simply screw down and position between different jobs. It generally takes about 1 minute to change the cardboard to a different shape piece and the stamping takes just a few seconds for each piece. This is another one I use that has a guide that can be adjusted to act as a stopper and that is able to be set back or forward on the table. With it I often just use a square shaped magnet on one side of the guide to set the stamp position left +right.