RockyAussie
-
Posts
3,265 -
Joined
-
Last visited
Content Type
Profiles
Forums
Events
Blogs
Gallery
Store
Everything posted by RockyAussie
-
Never been much for facebook stuff myself but in this digital marketplace world I been giving it a go. Tried linking the web page to the facebook market place and got some rejected. Several try's later still have rejections. Got I response from them said : Our internal team has reviewed the products and it will remain rejected >> because Posts that involve sale/lease/trade/adoption/auction of >> animals/products derived from animals are prohibited on Facebook. Sale of >> animals draws a lot of negative user sentiment also there are legal >> regulations around the sale of animals/endangered species around the world Following he provided a link which shows the prohibited content - https://www.facebook.com/policies/commerce/prohibited_content/animals# As you can see at the bottom it states Any part, pelt or skin from an animal, including fur Therefore I can only reason that any thing made from leather is now prohibited !!! No leather shoes, belts, wallets or handbags? No bone or horn products? It seems that perhaps a .1% of the population is going to tell the other 99.9% how we are now to behave and sell our products. That may sound emotive BUT .... I have seen some terrible activities carried on by some vegan extremists here in Australia lately and the doors this opens for them is DEVASTATING. Why???? I did a bit of searching on line to see how some of the notable companies are handling this and found that they are mostly not mentioning words like skin, hide, leather and fur in what shows up on their Facebook Shop section at first glance. This means a new norm then is to use deceptive practices to fool Facebook and market their products. Deceptive practices in how a product is advertised within Australia is against Australian law. If a person (perhaps a vegan) complains to Facebook that the company is selling leather goods by doing that, then that company would be expected to be banned from Facebook. This.. if accomplished would give plenty of interest to every day media in a negative way to the deceptive marketing practices of the companies involved. It would be surprising if some extremist parties were not to collectively spend days trolling looking for any company they can damage and get removed. Although I do not use Etsy I did check out their guidelines on this area and thankfully it is a whole lot clearer. https://www.etsy.com/legal/prohibited/ Facebook has the right to ban what they like on their platform and that is fine but I hope that they reconsider their position as I have to ask, what comes next????? No Meat? No eggs? No .........?????????????????
-

First time edging with a Fileteuse: What am I doing wrong?
RockyAussie replied to Largo's topic in How Do I Do That?
My best guess is that you have too much paint on in your first coatings. Sand it all back and give it a quick (quick iron). When you have the speed and heat right it will glide along and give a smooth finish. If it looks too rough after that give it another coat without much build up and again a quick iron followed by a light sanding then another finish coat. The ironing mostly helps to sit down the nap and make it smooth as well as adhere better. If the paint sticks to the iron regardless of temperature and speed then possibly the paint is too old or faulty. A polished iron does help. Test if you go up the back of the shaft nearer to the handle if it then seems to go well. It can happen though rarely that the chemicals in some leathers can migrate into the paint and affect how it behaves when ironed. Common shoe colouring paints will generally not iron in as in your pictures. They stick to the iron and pull up too much. Check my you tube channel may help some -
The scales gives the option to show Kilo's (0.000)and that is in 5gram jumps or pounds lbs (0.00) or oz (0.0) Jin (0.00) and all of these go up in individual units. Possibly on a domestic machine this may not give a fine enough reading but I would be surprised.
-
Checked out your video and well done. I did something a little similar with some fish scales and for the price they work great. I wanted to post some results with these as for people that are new to using sewing machines it could be used as way of setting some idea of the parameters a machine should have in regards to the tension adjustments. Here is a link to the scales I bought and am very happy with. https://www.ebay.com.au/p/Wh-a05l-LCD-Portable-Digital-Electronic-Scale-10-45kg-10g-for-Fishing-Luggage/15020246737?iid=323005161210 I did a little on this subject in this following post that you may want to check - only good for giggle I guess.....
-
Anyone ever do an apprenticeship? Was it worth it?
RockyAussie replied to JC2019's topic in Leatherwork Conversation
It is not something I have done in many years. When some of the tanning was done in Australia I had to do a lot of reworking and improving the colours and fixing the colours so they did not bleed and so on. Still have a couple of the tanning drums etc. It is worth knowing a little about mostly only so you can discuss with a tanner how some part may be improved in the process. For instance if you know the % of fatliquor used in the tanning you can advise if it is too oily or too dry if want it decreased or increased. Backstraps I prefer about 11% as it gives a good feel and still allows the glue adhesion and makes the bone tops highlight nicely when polished. Due to the cost of these skins and the reputation of the skins - and your own, it is not something I think you should waste much time on other than visiting some tanneries and asking them what things you need to know on how to advise them back if any improvements are needed. Buying well done skins from reputable suppliers is in the end the better option in my opinion. Getting friendly with a tannery can lead on to good leads as well. If you can do good work efficiently and they know you can, there is no need to advertise as they will be doing it for you sometimes whether you want it or not. -
I have seen several hat makers here in Aus use what looks like that leather and it is normally a very waterproof type of leather. I would like to know the manufacturer if you would care to share as it does sound very cheap if that is Australian dollars and I would like to be sure that it IS made here for sure. It looks a little like a BC Hat or maybe this Cessnock from USA??? https://www.bullhidehats.com/leather/cessnock
-
Anyone ever do an apprenticeship? Was it worth it?
RockyAussie replied to JC2019's topic in Leatherwork Conversation
For reinforcing fabric an open weave cotton drill or any thing that holds contact glue well and resists pulling out of shape. I have used interfacing on some things as well ...depends on the product and the expected pressures on how you would expect it to be used. Some products like some purses and bags are further backed up with foams. For fabric linings and such check out the TABRU range in Italy as that is where we get a lot of the fabrics we use. http://www.tabru.com/ -
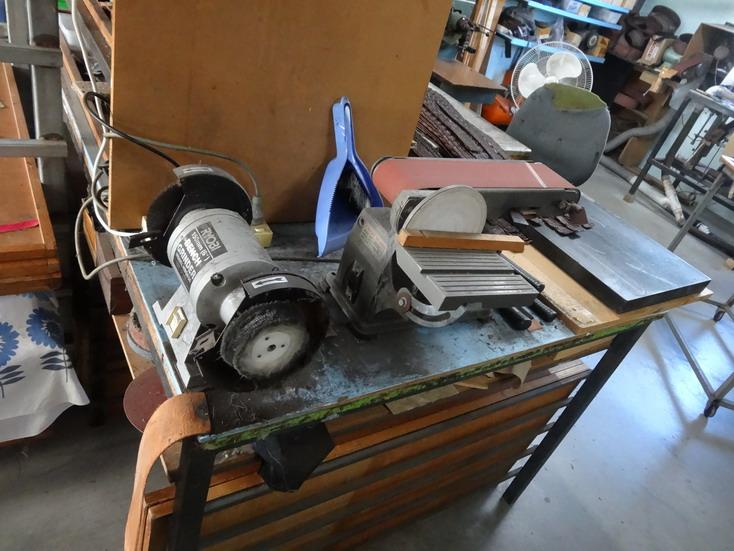
This is what I believe would have happened. Normally they would get polished until any marks are removed. Being that the discs have been so heavily sanded I would suspect that the machine has a lot of wear and I would check the post as well for a heavy groove in where the thread rubs it. Sometimes the post can be revolved a bit. As the thread goes through these discs on most machines it rubs in the same part until a groove is formed and eventually you can not get any top tension on the finer weight threads any longer. Sanding them back and polishing is a normal practice here. Similarly the bobbin case suffers the same problem under the tension spring and the easier thing is to have a backup one ready to go.I prefer to have a different bobbin case for each different weight thread. These 2 machines below are what I use and it only takes a couple of minutes. Brown tripoli polishing wax I use mostly. Do not mix different polishing waxes on the same rag wheel as that does not work very well.
-
Anyone ever do an apprenticeship? Was it worth it?
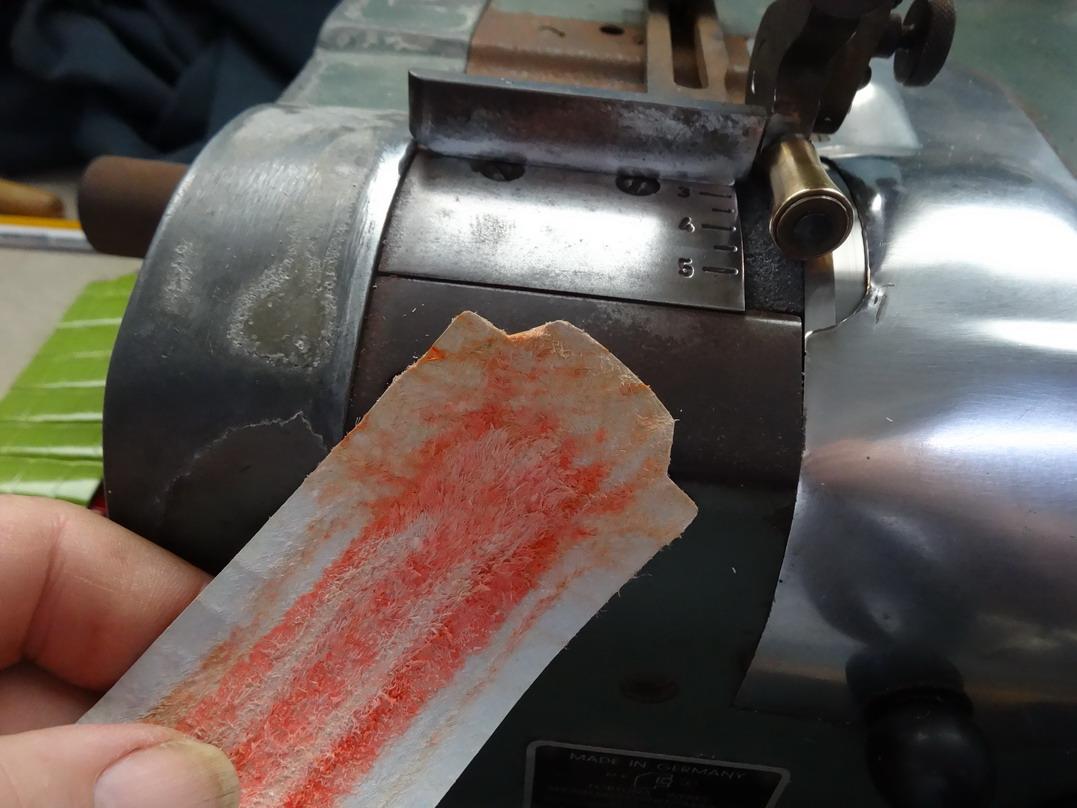
RockyAussie replied to JC2019's topic in Leatherwork Conversation
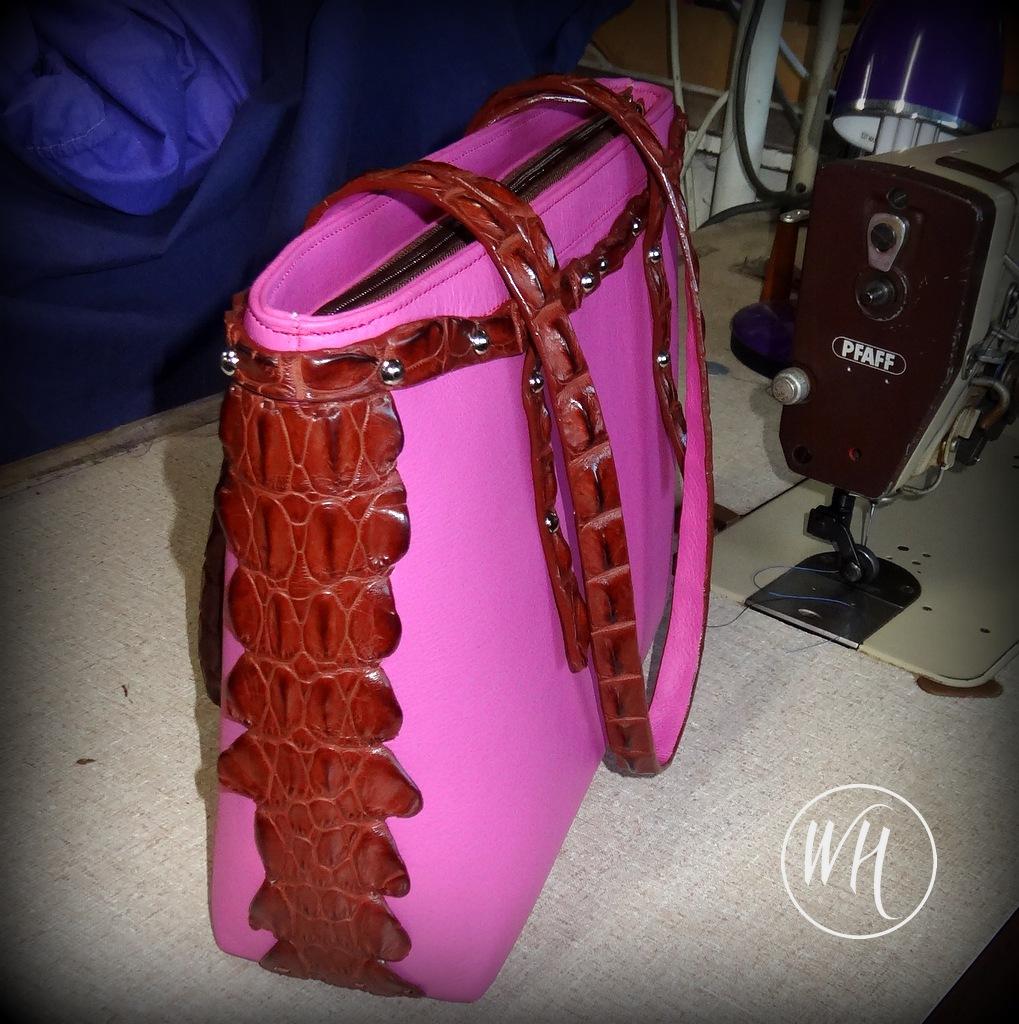
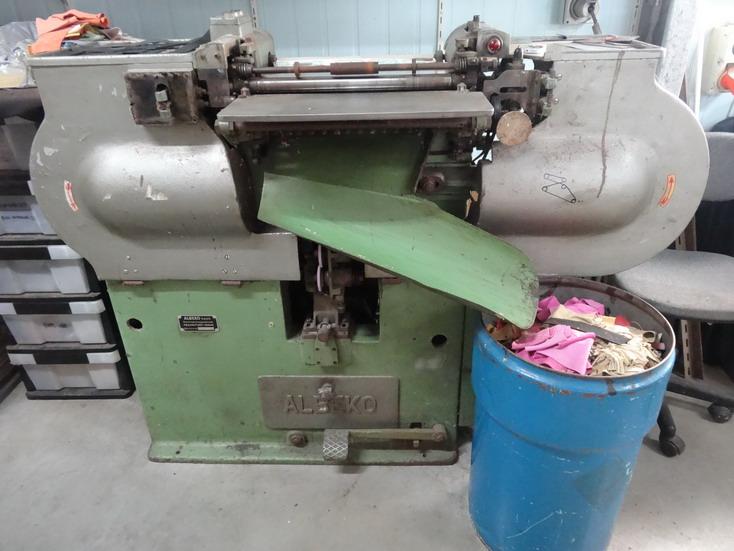
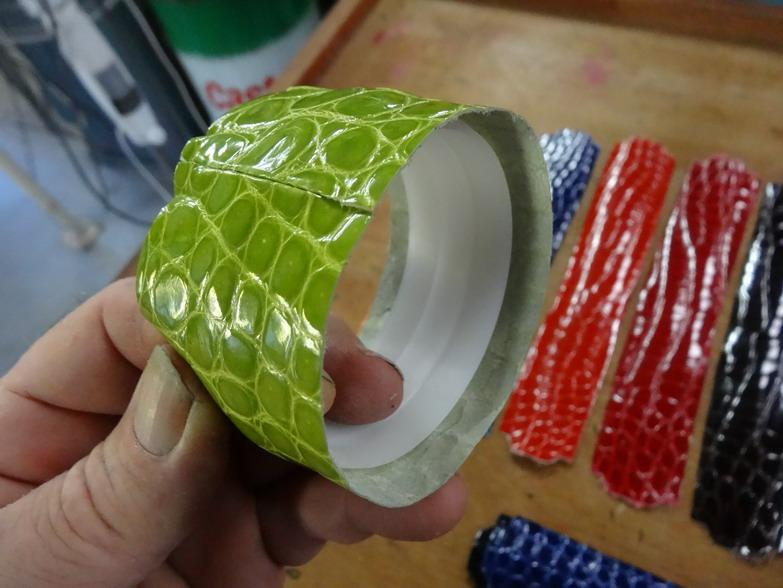
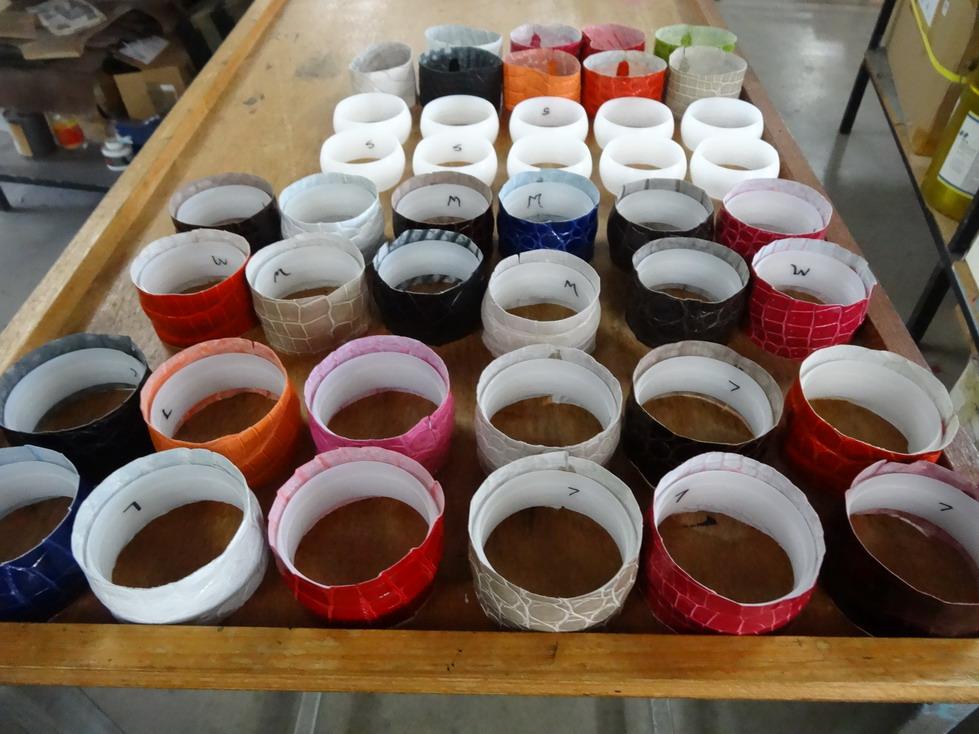
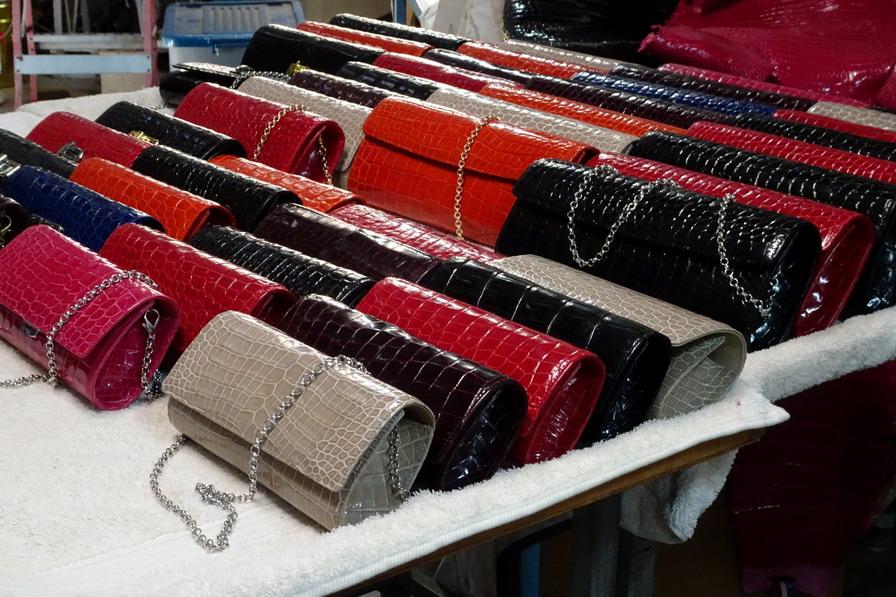
For splitting it depends on what skin type and even the tanner whether it is glazed or not what product is required and many other factors. Skiving is also normal and the method depends on what is being done. Sometimes by hand sometimes sanding and often a bell knife skiver is used. This below spliiter I have modified mostly for backstrap work on belts and has adjustable spacing rollers to do that work. This pic shows how it works The now split backstrap. This can also be done with a sanding machine. This sanding machine below can be used for the backstrap work but is also can be used for thinning belly skin and leather etc. Here I am using to break the tightness on glazed skin before skiving the edges on some bangles I make. Here the bell knife skiving is done What it looks like after the centre seam is stitched What a few look like prior to having the edges folded. Lousy pic but that's all I could find of what they look finished. Note: I make the plastic insert by injection moulding it here. Didn't have a 3D printer when I started making these. For wallets you asked - What oz / mm thickness do you like to use for your wallets (and interiors?). Depends on the skin etc but mostly with glaze croc .8 to 1mm and the lining pieces get split to .5 to .6 as any less can often lead to holes in the valleys. Likewise the skived edges are normally not under .3mm at the very outside edge. You asked - Do you often use something like veg tan to reinforce certain materials? No as veg is susceptible to shrinking and and heat and moisture affects it too easily for that. With croc it is good practice to apply/glue a fabric to the back and leave compressed/flattened a little overnight or longer before applying it to the product being made.The croc skin has a tendency to go back into its original shape and without the fabric it can end up quite wobbly looking. The fabric also helps the croc be controlled when it curves over in products such as these clutch bags in progress.


-
Anyone ever do an apprenticeship? Was it worth it?
RockyAussie replied to JC2019's topic in Leatherwork Conversation
They are onto an Ivan I think metal buckle blank. They have a leather backing on the other side which is about 1/8" oversize then a thin split leather is attached to the top then the croc crown piece is contact glued and attached and cut to shape then edged ironed edged etc. The edging colours are made up here to match. Sometimes I stitch them around but often the scoots get in the way and getting crowns to fit well makes the suitable for stitching ones nearly impossible. getting them apart is nearly impossible so the stitching is only decorative anyway. -
Anyone ever do an apprenticeship? Was it worth it?
RockyAussie replied to JC2019's topic in Leatherwork Conversation
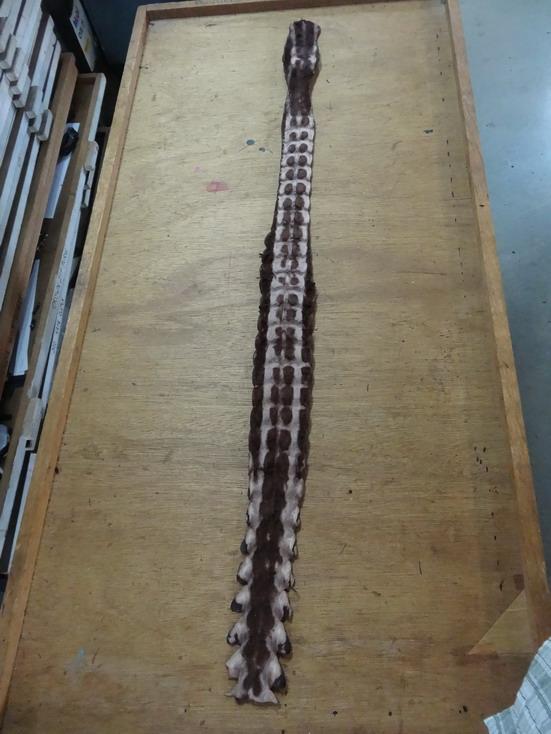
I have worked with some fish skins but I would not ever work with something that is not from a farmed situation of any thing rare as I would not ever want to form any temptation for anyone to have any reason to further endanger that species. If it were not for the farming of crocodiles here there would be little education to the public as to why we need to have crocodiles in our river systems. They have to as part of their licences provide education to the public in this regard. This I promote and will stand behind. I have never been convinced for me to want to work with Elephant skin to date. Ostrich skin has some excellent look and wear resistant properties and can easily be bought from farming operations. I prefer porosus for appearance but cane toad and bull frog is stunning as well. Some almost drop it when they find out what it is but it still sells incredibly well. On pen covering the toad easily rivals the croc ones in sales. Horback or the backstrap part of croc can be difficult to work with but often produces products I like a lot. Here's a few examples might tickle the imagination The belt and bangles are from croc skin I made in this pic below.


-
Anyone ever do an apprenticeship? Was it worth it?
RockyAussie replied to JC2019's topic in Leatherwork Conversation
Traditionally crocodile was mostly veg tanned but many tanneries went on to doing a mix of chrome first followed by veg to make it faster but also enhance some of the properties in use. Most of the skins I have been given to use from France are Veg tanned and I find them harder and harder to work with when they are glazed. The glazing process puts a lot of pressure and heat down into the leather as the glass or stone rubs over the skin. The Singapore tanneries mostly do the best tanning I have seen and worked with. They still get a fairly good highlight on the scale compared to ones that I used from Japan. There are various other finishes aside from Glaze and Matt and cost more generally. One I like is a semi glaze from the Chek Hong Tannery which has a beautiful feel and is very nice to skive and work with in general. They do many if not the most of the alligator skins in the world. Alligator is normally about half of the cost of Porosus and is normally a lot less desirable except that may be not so in the USA. I am not an expert in the marketing of these things as I get the skins sent to me from a lot off places and I just make up the product and they get it back. The skins all come with tags on saying what type of skin from where and generally what country it was tanned in. All these skins have to have permits to export, permits to reimport after tanning and re export blah blah blah. They sell me a bit when I want it but mostly I prefer to let them take all of those headaches. We do make wallets and purses and aplenty from glazed skin but I do have a preference myself to the matt as the skin is easier to look after and stays looking good longer. -
Is it segma type snaps you are wanting? After all the trouble I had with the tandy ones (which were good about 5 years ago) I had to change to another type which meant to an unusual set of dies as well. That supplier is getting erratic and is here in Aus so I cant say try there. My research at the time was to go with names of the others you mentioned but at the time the cost was high and I would need to commit to very large quantities to make it worth the freight. I was going to have a try with OTB and the buckle guy to test out as well. As I mentioned if the female part does not have the holes at even distances down when they are pressed into shape they will not work with any equipment. The male section on the tandy ones also does not have the bulge the locks it in as well they used to. The main reason I used to get them was because of the capped male side in black and brown colours but now I have to paint my own and use the stud part off of a speedy rivet. (major PAIN in the A) If I remember rightly the pull the dot ones were available with a capped male head and if you need to get some and they work good you can count me in for a few thousand most likely. The ones I am thinking of were supposed to made in the USA????
-
Anyone ever do an apprenticeship? Was it worth it?
RockyAussie replied to JC2019's topic in Leatherwork Conversation
Most of my work is with Crocodylus porosus (Saltwater crocodile) which is the best and most expensive in the world to use. It has the advantage that it has mostly the least amount of bone in it after the tanning process. It has a lot more rectangular shape scale than the alligator which is normally quite square. Alligator skin is generally tanned on the smaller skins due to the underlying bone that makes the bigger skins difficult to work with. Some tanneries can do a reasonable job with it though. Caiman is a terrible skin to work with and has a lot of disadvantages due to it having a lot of bone just barely under the top layer of skin and this leads to quick wearing out on many products. The tanning of these also shows the difficulty of getting the dyes to absorb evenly due to the bones as well and that is one of the ways that it can be identified at a glance. They also very commonly have a dishy shape scale in comparison to the others. It would be best to visit a seller of these skins to get used to the touch feel and look of these different skins and if possible try them out which will teach you faster than anything else could. Some crosses with Siamensis and porosus are getting hard to tell the difference between now and the differences between where they are tanned are the main difference. That knowledge unfortunately comes from seeing and feeling. -
The heels blocks are attached by nails from the inside but these are not long enough to be seen from the outside. Mostly they have a rubber heel attached on the bottom if they are stacked leather and such but yes as they wear they could possibly mark a hardwood floor if they were to wear them inside. The damage though would be significantly worse if wearing a stiletto heel in most cases.
-
Anyone ever do an apprenticeship? Was it worth it?
RockyAussie replied to JC2019's topic in Leatherwork Conversation
For me toooo easy but on a made up article and to the general public it can be quite deceptive. NOTE : I would never try and make anyone believe that a print was the real thing and I would detest any one if they were to do so. -
Just a quick point- Sometimes having room under the anvil part to slide a product like a pouch or handbag it helps if there is room to do so. Some presses don't allow much for this. I even grind some away at times. This tandy one does not look to bad but there are a lot of cheap ebay ones that can be got cheaper ass well. https://www.tandyleather.com/en/product/craftool-hand-press Using a press will give good results normally but only if the snaps are good as well.In my experience with the tandy segma style snaps over several years now they are NO good. The 4 holes in the receiving (female) side do not line up with each other and machine or not, they will not go down into their caps straight.
-
Anyone ever do an apprenticeship? Was it worth it?
RockyAussie replied to JC2019's topic in Leatherwork Conversation
Contact in regards to how to methods and the like I do prefer in the open forum here as the answers from my point of view I would like all to see and comment if they wish on. Sometimes some method or other may be new to me and worth while learning as well. If it is of a more personal nature you can contact me via a pm here or if you follow the link to my web page you can find my email contact there. As to skins that make good crocodile prints, the best I have seen are done on cowhide veg tan and as far as lambskin that I personally would not touch. As yet I have never seen any tanning with a print or not that on sheep skin/lamb skin that has the durability for me to want to use it. I will not even use it in a bag liner. I love the feel of it sometimes but if I can tear it open I will not use it. Never found any that I have had in trouble ripping. Mostly I only ever use a croc print to test out a new product to design and to train a new staff on perhaps. Regarding the loss of glaze on alligator or crocodile ...getting it back is hard. There are very long labor intensive ways to get a high glaze but in every day working things like always working on towels and pre polishing and a few other steps help to stop the shine loss in the first place. Generally if I am refurbishing a product I will carefully use a fine brush to touch up any wear patches and then a coating of Nivea cream if the skin is dry. After this has been absorbed for a day or 2 this is followed by a good polishing with a beeswax stick (HooCo wax) with a soft mop on a finishing machine. This will be a slightly less glassy look but to most people looks better and no longer susceptible to water drop marks etc. You may find this post I did awhile ago of interest. It gives you some idea of the typical construction techniques in making a prototype here.- -
Anyone ever do an apprenticeship? Was it worth it?
RockyAussie replied to JC2019's topic in Leatherwork Conversation
I cant help you there as I have not seen anything of use to date. That is one of the reasons that I joined this forum in my never ending search to improve where I can. I am happy to answer any questions that may help where ever I can. The 3D printing and the laser are both turned out to be very worthwhile and are something I wish were around 30 years back. They make a lot of the prototyping and moulds etc way less time and costly to make. If there is a little part in a design that could be better it only takes a few minutes to correct. If you want to work with exotics as I have done over the last 30 years I would say a visit here would teach you more about working with these skins than any other I know or have heard of. I can only add that we have done more high end Crocodile and perhaps Ostrich than any other manufacturer in Australia for many years. As I said before you are welcome to visit and I would be happy to show you a lot (enough to get you started) for $0. AS far as your interest in shoes I can show you a little but I stopped bespoke making them nearly 20 years back but still have most of the machinery, lasts etc. I found the demand was way to much for me to keep up and the training of people too expensive and time consuming to keep up with it. Wallets purses bags and belts do not require the same level of attention to fit exactly and are therefore way easier train people to make. Competition in the exotic area is very thin and is a reason that I like to help people to progress in this area. I love competition and when so many are doing such poor work it gets to be unexciting when there is such a low level to try and aspire to. I am sorry if this sounds like I am talking myself up as that is not my intention. -
As you know I am guilty of using hammers and scales and fish scales etc but its funny how little things like this can make such differences in the operation of a sewing machine I reckon. The slot looks to allow the thread to be pulled through the needle on a more straight angle and that would therefore make the thread slide through the needle with less friction. The roller giving a longer stitch I think would be because there would be less resistance on the fabric when going through. The other 2 feet keep pressure down all through the job and create friction over their wider non rolling base than the other large roller foot. Now I sound like a geeeek again . I'll get kicked outer this here section yet.
-
Interesting . They are 2 different feet in that the one on the left is a hinged foot and has a fair bit longer body length than the one on the left. Like a stiletto shoe heel a lot more pressure is going down for the same weight applied which explains the reduced foot pressure needed. I can only assume that the slot cut may allow the thread tension to come in earlier to effect how the thread tension behaves. It may also be needed for the needle travel if the foot is for a different length than this machine. AS long as it is smoothed off well no and if it requires less foot pressure to do the job it should extend the machine life as well. Thanks for sharing.
-
Anyone ever do an apprenticeship? Was it worth it?
RockyAussie replied to JC2019's topic in Leatherwork Conversation
@YinTx I know you are already very skilled so I would have no hesitation in working out some arrangement for where you would get paid. I did a bit of looking into this awhile back and I would have to look into this again to get some further clarification. I can teach you how to make products and techniques etc but if the products go on to be sold you then have to be paid (Australian Law). Training for the first couple of weeks would not be on goods to be sold anyway so no problem there (you pay me some ) after that I pay firstly the minimum wage (around $20.00 au). Food and accommodation we could work something out. You would always be welcome to visit and I look forward to that at any time you can make it. I can only handle 1 or 2 people on this type of arrangement as I am VERY much a 1 on 1 type of a communicator. I like to give value but also I like to receive value in return. Brian -
Anyone ever do an apprenticeship? Was it worth it?
RockyAussie replied to JC2019's topic in Leatherwork Conversation
What do they offer for $3k I have to ask. Got me curious as you mentioned an interest in exotics which is 95 % of my business making for other brand names. Most of the product on our web site is the same designs we do for others in crocodile products mostly. A look into my profile here should show you more. What type of products and level of training are you wanting? For a day or 2 of showing how its done and what with it would cost you 0000 + a flight to here and back. For 2 weeks solid full time maybe 2k. For a long as allowed time ......perhaps depends on your ability to work and again the cost of a flight to here and back. -
Need part for Chinese patcher
RockyAussie replied to drumminor2nd's topic in Leather Sewing Machines
The cast iron piece may have an advantage in that it can be made to hold oil within it and given that it has to turn some with every stitch at both ends I suspect that the cast iron would reduce wear and tear and wear in better to fit as well. I would be chasing up the part replacement and letting us know how that goes for any other members that may want one from this seller. -
I think trying to run a 11 1/2" through a 12" would be near on impossible but taking it down 1mm or 1/16" at a pass might do it. Also the leather may have to be softened some probably by soaking the day before and leaving in a towel or burlap bag overnight. Getting the right weight to start is likely the best answer.