


Hildebrand
-
Posts
421 -
Joined
-
Last visited
Content Type
Profiles
Forums
Events
Blogs
Gallery
Store
Everything posted by Hildebrand
-

Cuz taxes didn't suck enough ...
Hildebrand replied to JLSleather's topic in Marketing and Advertising
Just curious Pigasus do you plan someday to collect Social Security or Medicare? If the answer is yes why the complaint about self implement tax? You are your own employer and somebody has to make deposits into the system if you are to draw back out. Don't get me wrong I am not pro tax anything nor do I want to start a tax battle, but I think sometimes we start complaining about a tax just because its a tax before realizing there is a benefit. On the income tax I am right there with you, if they gave me power to change one thing I would institute a federal sales tax. No income tax only pay tax on what you spend. I know there are varying beliefs as to how long SS and Medicare will be available but I also remember getting the letters saying SS would be broke by 2018 and its still going. Just my $.02 Todd -
Best Glue For Leather To Leather, And Leather To Fabric
Hildebrand replied to CCPhotog's topic in How Do I Do That?
Montana Leather carriers a water base rubber cement and a water base contact cement. Bonus is the contact cement is odorless as well. I have tried both and they work as advertised. My holsters are made in the style of Catsass a member here. Short version is they are 2 layers of thinner leather contact cemented flesh to flesh leaving the smooth grain side out. The odorless version created a bond just as permanent as the barges. Todd -
Please give your opinion on my sewing machine purchase
Hildebrand replied to Louiesdad's topic in Leather Sewing Machines
I guess my suggestion would be to look at what is available for service after the sale. I would want to make sure I was saving a considerable amount if I was giving up service at the time of and after the sale. Not sure about the Adler and Juki but both the Cowboy and Cobra have dealers who are sponsors on here and have great reputations for helping with and after the sale. Todd -
When can you call yourself a craftsman?
Hildebrand replied to Handstitched's topic in Leatherwork Conversation
If this individual is putting out sub par work and using the title "craftsman" generally the problem will take care of itself as he will run out of customers for sub par work. If you are concerned he may be taking your customers just based on title I suspect if he is that will be short lived if his product is subpar, word will spread quickly. The longer I am on this earth the more I choose to concern myself with the things I can change and let the other stuff work itself out. Just my $.02. Todd -
I also just tried the Renia. I got an email from Montana Leather, they were running a special on both the contact cement and rubber cement. I ordered both and they seem great. The rubber cement is much stronger than the regular stuff I have been using and the contact cement was easy to use, odorless and grabs quickly and securely. Todd
-
Looks great from here. Todd
-
No offense but if 2 different dealers don’t want to do business with you maybe a look in the mirror is in order. Sometimes we as customers have unrealistic expectations of how we will be treated just because we are going to buy something from a dealer. I purchased from Bob and after several phone conversations with Bob and how he handled my multiple basic questions and requests I can’t imagine what was said that he asked you to take your business elsewhere. Todd
-
Did Tandy drop their WC & Elite gimmicks?
Hildebrand replied to Studio-N's topic in Leatherwork Conversation
Hwinbermuda, I know what you are saying but at least the gift card is better than thanks for the donation the program no longer exists. I have had that happen to me also, not in leather but other facets of life. Also its not like I am never spending any more money with Tandy. Todd -
Did Tandy drop their WC & Elite gimmicks?
Hildebrand replied to Studio-N's topic in Leatherwork Conversation
Fredk they should I got a letter since I had purchased an elite membership I got a gift card for the full amount I paid. Todd -
Pancake buck110 sheath
Hildebrand replied to Simplejack1985's topic in Gun Holsters, Rifle Slings and Knife Sheathes
I too like the contrasting blue stitching. Looks great. Todd -
Naval jelly should also cut the light rust and prevent further rust.
-
Suggested tools for holster and belt making?
Hildebrand replied to Maverick44's topic in Getting Started
Get a good overstitch wheel for spacing, no need for a round knife your utility knife with a sharp blade will do fine. Get a good strop to keep everything sharp. Jeff pretty much covered everything else. -
I recently received a slot punch but it is not anywhere near sharp. What do you guys use to sharpen punches like this? It seems to have a good bevel in place. ‘Thank you. Todd
-
I dont know if you got this working or not but if the top is super tight, check the linkage for the presser foot. I noticed I had trouble a couple times and the thread coming along the top of the machine somehow go caught in the mechanism on the back just before the secondary tension. It makes the stitches get really short then the thread breaks. Todd
-
My wife has embraced by hobby by encouraging wall cabinets initially to keep things in(read not clutter up her house) but we quickly realized laying the rolled up double shoulders on top was not working. We bought what is supposed to be a pantry cabinet. It has an upper and a lower section with a shelf in between. I stand the rolled up double shoulders( I haven't bought any sides and right now don't have plans to) on the shelf behind the top door and the lower door has 4 large drawers behind it which also work very well for more storage. Mine came from Menards but I would think most of the home improvement stores would have similar. Todd
-
You won't necessarily produce a better product with a machine. You will get a more consistent product with much less effort and time involved. Todd
-
Very Nice. I always like something new and different. Todd
-
Another thought. Check the tension disc on the bobbin. I was battling my CB 4500 tension issues, it seemed like no matter what I did the knot would not change position. Then one day a felt a little click when I was checking the bobbin thread and from what I can tell the the little pressure disc was in a bind and no matter what I was doing with the screws the actual tension was not changing. Since then I can make small adjustments and the knot moves as it should into the leather. Todd
-
Did you recently re thread it? I had that exact balling up of the top thread once when I missed the take up lever in the re threading process. Todd
-
Be aware that the piece of leather you are looking at on eBay may or may not die the same as your existing shoulder. It's tough to match die on different pieces of leather. Todd
-
I got mine from Phillipsengraving.com very fast turnaround and very happy with the stamp. Todd
-
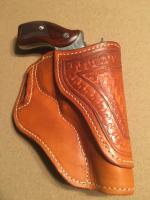
holster Walther PPS M2 Pancake Holster
Hildebrand replied to Sperrier's topic in Gun Holsters, Rifle Slings and Knife Sheathes
For the belt slots I have the wooden burnisher the fits a dremel tool, I got it on amazon for just a few bucks. It is pointed and you can work it down into the slots after you edge them. I am like Plinkercases I don't set the outside stitch lines until everything is sanded and lined up. I have a few where I thought it was "close enough" to sew and ended up with stitch lines on the back that were way closer to the edge than intended. Todd -
holster Walther PPS M2 Pancake Holster
Hildebrand replied to Sperrier's topic in Gun Holsters, Rifle Slings and Knife Sheathes
I think it looks really good for a first. My first I couldn't get the gun in to mold. Only changes I would consider are moving the stitch line in a little from the edges, you don't give yourself much room for error there and edge and burnish the belt slots. Todd -
machine - belt or bench sander edges?
Hildebrand replied to christine1ca's topic in How Do I Do That?
I use a belt sander like the one pictured, mines not Harbor Freight but the same machine. It works great for getting all of the edges even on holsters but it does leave the edges slightly rough. Still much easier to finish by hand than to even them up by hand. I tried that this winter when it was below zero and I didn't want to walk out to the shop to use the sander. Word to the wise the belt sanders are very messy to use, I don't recommend using them in the house. I tried it and immediately realized the mess created was not worth the short walk to the shop. Todd -
Make sure the wider tip will slide through the main portion of the sheath. Definitely use a welt, other than that it looks good. Todd