
.jpg.d60258221c476480a6e073a8805645bb.jpg)

Hildebrand
-
Posts
421 -
Joined
-
Last visited
Content Type
Profiles
Forums
Events
Blogs
Gallery
Store
Everything posted by Hildebrand
-

CB 4500 Reverse lever slips down shortening the stitch
Hildebrand replied to Hildebrand's topic in Leather Sewing Machines
Thank you everyone for the fixes. Bob is there a certain point the rod needs to be at before I tighten it? Thanks, Todd -
What are the options for a drop down edge guide on the CB 4500? Are there any pre drilled holes for mounting or do I have to drill my own? Thank you, Todd
-
Have any of you CB4500 users had an issue with the reverse lever wanting to slip down thus shortening the stitches. I haven't used the machine in a couple months and last night when I went to use it I couldn't figure out why it was off while stitching in reverse then I noticed the lever was not staying where I put it. Also if anyone has a fix for this I would appreciate it. I can just hold it up but sometimes I start with 3 stitches in reverse then come forward to sew and I need to hold the threads. Thanks, Todd
-
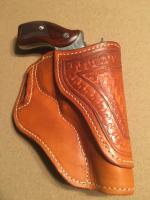
It is an avenger style around a Ruger Redhawk 45 colt. It is the first avenger pattern made from scratch. It works well but if I make another one I have several revisions noted on the pattern. This is a better picture. Todd

-
One trick for basket weave I read on here is if you are having trouble keeping things straight mark your tool so you are always using it the same and not rotating it. I can attest to Barry King being better than current Tandy. I started with Tandy Pro basket weave stamps and did ok, I recently bought a Barry King. The first thing I noticed is it does not take as much concentration and effort on my part to keep everything lined up. Todd
-
Creasing vs stitch grooving
Hildebrand replied to Scootch's topic in Gun Holsters, Rifle Slings and Knife Sheathes
I have done it both ways and I Ike Dwight’s way. It’s a nice channel to lay the thread in. Tidd -
Glue leather belt
Hildebrand replied to Davm's topic in Purses, Wallets, Belts and Miscellaneous Pocket Items
Try this Renia Aquilim 315 Cement. It is a contact cement that is water based and does allow just a little movement as you place the pieces. I have not had any problems with items coming apart. Todd -
Let me throw a different idea your way for multiple sizes of loops on the same belt. I am about to start my prototype gun belt for guys with more than one gun they like to carry. On the left side for the loops I am going to put a set of Pull the Dot snaps on. Then I am going to make individual sets of either 6 or 12 loops in the different calibers I carry that can be snapped on depending on which gun I am carrying. Little different idea for the same purpose. Todd
-
Hightex / Cowboy CB3200 Problem with Presser lift
Hildebrand replied to Miquel's topic in Leather Sewing Machines
Advice above is spot on, contact the dealer. If you want to look into it. Stand behind the machine and lift the pressor foot with the handle while watching the linkage that goes across to where foot lift chain attaches. With the foot locked up see if you can move the piece the chain pulls on, it should move easy if the foot is already locked up. Try these and let us know what you find. Todd -
Thank you both for your answers. Dwight how far do you usually put the loop from the end of the left side? Todd
-
I am starting my first Ranger style belt and was wondering what the general consensus is for overlap of the wide piece of the belt. I know I will need to size the billets so I have some wiggle room but am wondering what everyone shoots for for the wide belt. I was thinking around and inch maybe 2 but don't want to get to carried away since it will be double layered so doubling that will be pretty thick. Thanks Todd
-
Why the Rabbit Ears
Hildebrand replied to LiftPig's topic in Gun Holsters, Rifle Slings and Knife Sheathes
The loops allow the leather to flex out so that the loops can go around the belt. On the one pictured the ears have to pull out the width of the gun before the loops can go over the pants and around the belt. Todd -
Chuck I have an extra coal forge if you are interested I can send some pictures tomorrow. Once the hysteria dies down we could figure out how to get together. Todd
-
@wayner Tony is with Springfield leather which I have had good luck with. Weaver is the one with poor customer service. Todd
-
I think it is just under 1/2". I used a drill bit and enlarged it so that I could put it on a Harbor Freight Buffer motor. Todd
-
@gunny5821 I called to get Weaver’s catalog but by the time the girl on the phone got done telling me what I could Not get as a hobbiest and showing absolutely no interest in gaining me as a customer I told her to keep her catalog. I have had good luck with Montana Leather and Springfield Leather. I have used Tandy for in person buys but my last several Tandy visits the leather quality was way down. Todd
-
Round point needles are for webbing and such. Chisel point are for leather. I use the chisel point needles. Todd
-
@Bert51 what are you sewing with? I have never seen this mentioned in any sewing machine threads before. Todd
-
I have never had it cut the thread. I currently have a CB 4500 and previously used a Tippmann Boss. Todd
-
I apply with a 1” sponge paint brush no issues with dye removal. Todd
-
What measurements would you like? I put it on top of a Ruger SR 1911 and other than the rail it is identical. I will get some pictures in just a bit. Todd
-
Let me look when I get home I have a 1911 with a front rail, I just an not sure which manufacture. I would be glad to part with it at a decent price or trade for a straight full size 1911 mold. Todd
-
Cutting Resolene 50:50 was widely reported on this forum as the best way to apply it so I tried it and it worked well so I have never tried full strength. Todd
-
The basics for me would be whatever color die you are using, saddle soap, contact cement and resolene. I prefer the Fieblings Pro dies, I tired and Eco Flo all in one die and finish that was given to me and was not impressed. My preference for contact cement is, Renia Aquilim 315 Cement, it is odorless and works just as well as the wildwood or barges in my opinion. Finish wise I have had good luck with both Resolene and Mop and Glo both cut 50:50 with water I use a sponge paint brush and put on light coats. I use the Fieblings saddle soap that comes in the tin that looks like oversized shoe polish, I rub it on the edges after sanding with 100, 220 and 400 grit sandpaper. Todd
-
Butch's product is first rate as is his customer service. I bought a set of both 1" and 3/4" and it really is the cat meow for centering the belt holes. Todd